-
Posts
808 -
Joined
-
Last visited
-
Days Won
5
Posts posted by Christina Keddie
-
-
Can you clarify — did you simply delete the files from your hard drive (and then restore them back to their original location)? Or did you also delete the LR catalog containing your edits of these files?
Whatever you deleted (files, catalog, or both), you have to restore. And then you have to open that LR catalog and if necessary relocate the files to connect the catalog with the files.
-
 1
1
-
-
I'd recommend making a virtual copy of any file prior to doing any B&W work in LR. I don't believe making changes to your catalog will impact an ongoing export (should be easy enough for you to test it out and see, on a smaller batch than 700), but I prefer keeping separate versions of files separate, so I can always go back to the master color file to export disposable JPGs of it, and ditto the master B&W file.
-
 1
1
-
-
My foolproof LR method for this kind of editing is usually to send it over to PS.
 And honestly, with targeted edits like this, batch editing in a raw processor isn't going to save you any time, since you'd have to move and refine the adjustment brush strokes for each file anyways.
But if you're set on trying to do this in LR, I would probably try an adjustment brush (making sure, of course, that the auto-mask box is unchecked), and play with the exposure, shadows, blacks, clarity, and even temp/tint/color sliders until you get something that works. Then you could sync the brush adjustments across the files, and then go in and refine the placement and shape of the brush strokes on each file.
Which, again, really wouldn't save much time. PS would be much better at fixing this, and you could duplicate those fix layers across the files to make it faster to fix each one.
-
 1
1
-
-
1 hour ago, Kendra said:
I had put the new document as 8.5 in x 11 inch in the size boxes....
And what are the pixel dimensions of your new document?
-
Just now, Boca Life Photography said:
You are right. I need to re-do it.
Thank you!
By "redo it," you mean go to that layer and transform it, right? Because you still have everything as smart objects and separate layers?

-
 1
1
-
-
You've also made that top left head markedly smaller in relation to her body, right? I don't know the child in question, but it looks off just on its own, and that head is much larger in the other photos in this thread.
-
 1
1
-
-
@Teresa, I've moved this to the appropriate section. So yes, we cover questions like this.

-
 2
2
-
-
2 hours ago, NickP said:
Let me do this real simple like - I previously mentioned I had no idea of what you wanted me to do yet you came back with another question. All I use is Light Room to do very minor adjustments. My knowledge of it is minimal. I can google with the very best of them but have little patience to do so when I don't really know what I'm looking for. So, with that said and if I haven't run ya off, in English and terminology I can understand one last time.
Do follow the two steps Damien just gave you. But just so you know -- he gave you a link above ("To start, do this"), and that hyperlinked "this" gives you an incredibly detailed step-by-step tutorial on how to fix your color space.
-
Have you already read this article on Damien's site?
-
Which Yongnuo models have you had, and what frustrated you about them?
I've switched to all YN600 units and absolutely love them. But if you can tell us why you're looking to switch, we can provide better input!
-
-
Do you not have any lenses at all that you'd want to keep? If that's the case, then I would strongly urge you to consider buying good glass first...
-
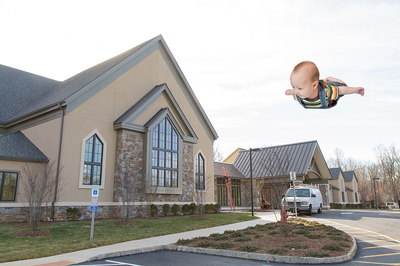
If you want a flying Superman pose, you'd need him on his belly with his head held up, yes? Otherwise, you'd have a lying down baby with his head down, which might not be the look you're going for in a Superman composite.
However you want the composite to look, you'd need to plan that out in advance well before ever picking up your camera. Think about how you want the baby to look when he's "flying midair" in the final composite, and figure out how to get him to be in that pose. (Again, you may want to wait until tummy time and strong neck control are established.)
Then you'd need to plan out what you want to composite him *into* -- you'll need your photo of a cityscape or sky at sunset or whatever for the new background. Take special note of the lighting in your new background photo and plan the lighting in your baby shots to match.
Then you'd layer your baby photo (or photos, if you take a whole bunch in order to have all the pieces of the baby you need without mom's hands blocking any part of him) onto your new background photo and mask away.
-
This is a really crappy example (I threw this together in PS in about 3 minutes when a friend shared that Rachel Hulin series with me), but it was easily done because my son was 6 months in the original photo and was into throwing his arms out like that when we did tummy time.
 No need to remove anything or recreate his clothes or anything.
-
How old is the baby? If he's old enough to do tummy time or to crawl, or otherwise hold his own body straight, it will be a lot easier. If we're talking about a newborn, though, it'll be harder to get him in the right position, and you'll need to take lots of photos with him being held at different places on his body so you have all the pieces to composite together.
-
Damien may have some good tricks for you (in like 8 hours or so, when it's not the middle of the night for him), but while you're waiting for him -- can you post a few of the photos from this session that didn't have these wrinkles? Because I suspect your best bet may be taking a chunk of unwrinkled mesh from another photo and replacing the wrinkled sections here.
-
 1
1
-
-
Damo -- would it be at all feasible/plausible to take the dad's leg and hip from the 2nd photo and kind of tuck it under the girl's leg, covering the panties and making it look like he was sitting with both knees bent?
-
Don't confuse megabytes and megapixels.
 The PSD files are going to be much larger in terms of the amount of data they hold (megaBYTES), because they contain all your layers and edit data. The JPG will compress that data as it flattens the PSD layers.
How large are the JPG files in megaPIXELS? As long as they're still 3275x2483, as they started out, then you haven't messed up the Image Processor settings and it's doing exactly what it should be doing.
-
 1
1
-
-
Why not just open the files from your hard drive directly into PSE's editor window? Never ever ever use the PSE Organizer, for precisely this reason.
-
This isn't that kind of website.

If you want Damien to teach you how to do it yourself, he'll need to see the images. Thanks!
-
 1
1
-
-
Have you seen this tutorial yet? http://www.damiensymonds.net/2010/03/softening-hard-shadows-method-1.html
And if you're going to try the soft light D&B method, you'll really need the color fix step of the "handyman" method (though I don't know if Damien would recommend this approach at all with such harsh shadows): http://www.damiensymonds.net/2015/04/the-handyman-method.html
-
A couple questions:
1. How are you saving your file after doing your PS edits? Just a simple Save, or are you doing a Save as?
2. What sort mode do you have your LR files set to in this folder? (Go to the Library module, and see if it's set to sort by Capture Time, or Date Modified, or what.)
3. What exactly is happening when your file is saved -- is the edited PSD/TIFF file going by itself to the very end of the filmstrip? Are the edited file and the original going together to the end of the filmstrip? Is the edited file going to a random spot?
4. And finally, how's your general system health? http://www.damiensymonds.net/thread1.html
-
6 hours ago, mrswright5 said:
I haven't. I'm having a hard time wanting to edit and need them by Monday morning.

Yikes, as in 24 hours from now? Any editor or editing service will charge you an arm and a leg rush fee for that...
-
Have you seen my posts in this thread?
I wrote out my basic LR to PS to LR file management workflow there. Let me know what, if anything, you'd want me to expand upon from that!


Missing Catalog
in Lightroom questions or problems
Posted
If you just deleted the folder from your desktop, and you don’t have some seriously wonky settings that create a new catalog internally in each new folder (that would take serious intentional effort to set your LR up like that!), then all you deleted was the files themselves. I’m assuming you aren’t creating a new LR catalog with each set of edits? Because again, that would take intentionality and effort to do so.
Assuming you’re still in the same LR catalog you’ve been in since the last time you created a new one, your LR edits are still intact in LR, in this catalog.
So go back inside LR, and navigate back to the LR folder that you used to edit these files. It should still be there, just with a question mark on it, assuming your file restore didn’t bring the files back to the exact same location on your hard drive.
Can you post some screenshots of what you’re seeing, and why you think your catalog disappeared?