

cdambrosio
-
Posts
301 -
Joined
-
Last visited
Posts posted by cdambrosio
-
-
On 3/24/2020 at 2:41 AM, Damien Symonds said:
< Go back to the previous step << Go back to the beginning
Display Technology
This step is really important, so read the info and make your decision wisely. I would say that the majority of screens out there in the world are “Standard LED”, but yours might be different.
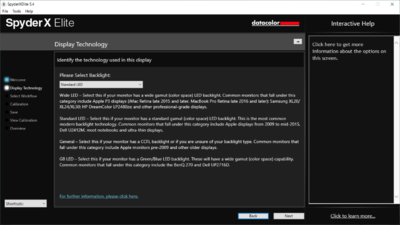
If you need help in deciding what technology your screen has, please comment below and I'll try to help out.
Workflow >>
I have a Benqu PD2720U. I went on their website, it was confusing.
-
What about High Dynamic Range?

SXE-04
in Calibration instructions
Posted · Edited by cdambrosio
I found my problem, You do say to turn off the lights!!! I missed that, I will recalibrate tomorrow with the new lights!
I am having difficulty calibrating my monitor, when comparing my test prints, they are warm and dark compared to my screen. The lighting in my office, it's very yellow and dim, I purchased new lighting that I can control the temperature using my phone, I should have them changed out tomorrow. I called Spyder to ask them about Calibration, they are recommending calibrating in complete darkness. What is your feeling about that? I am hoping to recalibrate tomorrow after I change out my bulbs.