

Stu
-
Posts
392 -
Joined
-
Last visited
-
Days Won
1
Posts posted by Stu
-
-
Update – he now also wants me to create these for his staff. So, updated email addresses and phone numbers. There are no previous versions of these, so I’ll need to create them. I do have the font files.
-
That’s a good question. I don’t think he really knows. He just wants to look good and not degrade if added to documents/letterhead or printed. I thought PNG would be best for this but not my area of expertise by any stretch.
-
Damien, I have a client that wants me to update their email signature as an image file from a combination of two previous versions. They have provided me the previous versions both in PNG and one in EPS format. I don’t have illustrator. I can open the EPS file in PS but it needs to be rasterized. It’s a fairly simple cut/copy/paste job to get the image looking how he wants it but just want to check with you what other considerations there are with this and if I can in fact do this acceptably in PS. Both PNG files attached. He simply wants the ‘john@winder.co.nz | 0211 788 589’ from one file below the WINDER’S TINYHOUSE FACTORY on the other.


-
Only way I can find is to create shape layers below the image layers which is a bit painful!
-
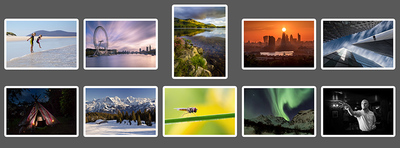
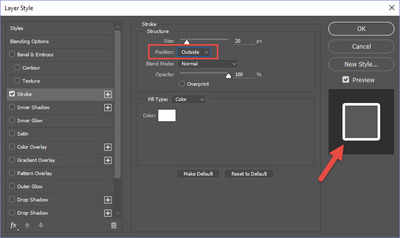
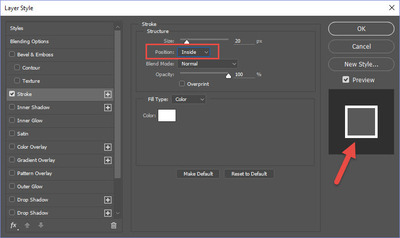
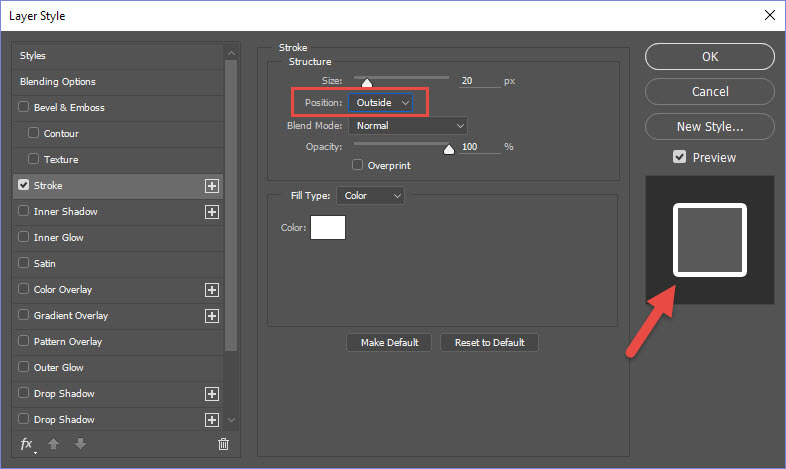
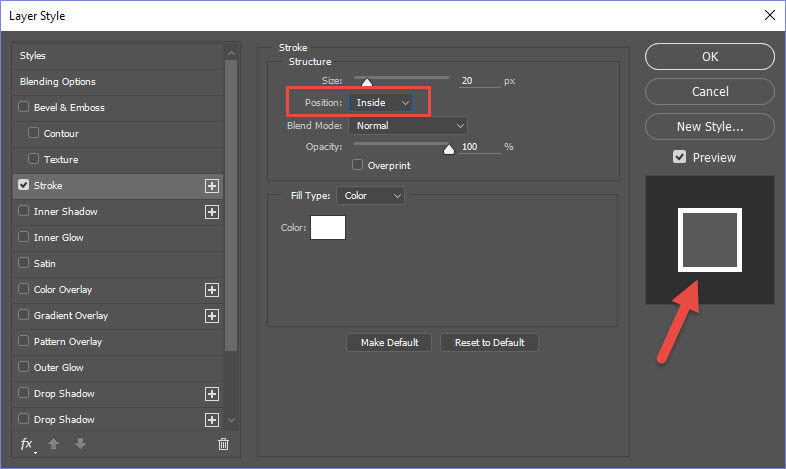
Hi, I'm trying to create a cover photo for my photography page made up of individual images. I realised after I had them arranged that I should have put a border on them beforehand and have been trying to do this afterwords using the Stroke Layer Style. This seems to work fine except when I choose 'Outside' (which I want) the frame has rounded corners. If I choose 'Inside' the corners are square. Any way to make the corners square with outside or do I need to start again? I'd usually add a frame by extending the canvas on the original image.
-
Thanks Christina - back they go then. I don’t want to be editing with a dull green cast on everything!
-
Hi, do you or any of the admins wear glasses? If so, do any of you have (or have tried) blue light filtered lenses? I’ve just picked up a new pair with this filtering and, despite being told I wouldn’t notice a difference, I can immediately see a change that is going to affect my editing. Whites are slightly duller and greener than with standard or no lenses. This seems like a complete disaster for editing, but before I take them back I’m interested in any thoughts or advise. I was recommended these due the amount of time I spend starting a screen and the artificial blue light it emits.
-
 1
1
-
-
I’ve encountered this problem myself when I start to stack more than 5-6 images. I’ve talked to a few macro photographers they’ve all said that Helicon Focus does a much better job than PS for focus stacking (apparently 40-50 images is no trouble). I’ve not tried the software myself however.
-
1
-
-
No, it’s not been an issue previously, and no, small differences wouldn’t really matter too much but that’s not the issue I’m trying to avoid. I’m trying to avoid a repetitive manual process in my workflow.
-
Ok, let’s give an example. I produce 50 low res images in 6x4 format for an event and share on social media. I crop a significant number of them. I then want to produce high res images in the same format to send to the event orgainser. I don’t want to have to go back and replicate the same exact crop manually across each image. That’s tedious. I want to save the original crop to use again.
-
Sorry, when I say adjustments I mean crop adjustments (for instance, to extend for canvas). In the vast majority of instances my initial crop on first output needs to remain that way for subsequent outputs. I’m just trying to find a way to cut down on the step of having to make the same precise crop every time I output the same file. I want to save it somehow.
-
In relation to this article. Is there any danger in cropping right at the end of the workflow that involves creating the master PSD, but unchecking Delete Cropped Pixels? I find cropping requires a bit of care and precision and I want to save this in my master PSD. I’d rather not have to replicate the crop every time I want to create an output file unless of course I want to change the dimensions and even then I’d want the original crop as a starting point for any adjustments for the new output. If I uncheck Delete Cropped Pixels then I can go back to the original capture anytime right?
-
Oh, I agree. A sample size would be so much better!
-
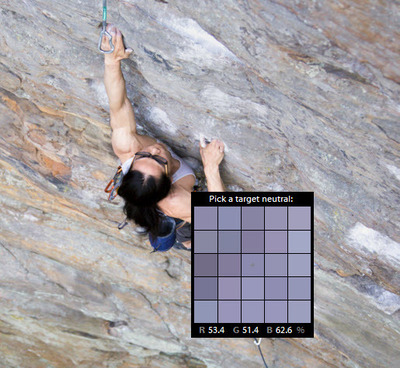
I’m one of the converts to Bridge/ACR from Lightroom. It took some doing and a lot of kicking and screaming but I’m glad I made the switch as my workflow is much faster and cleaner now. One thing I really miss though is the auto zoomed in selection to the individual pixel level when using the dropper tool for adjusting white balance in LR (see picture) as there can be somtimes be a surprising and unexpected variation between adjacent pixels. ACR doesn’t seem to have this. Just wondering if there is anything I’m missing or could be doing differently to obtain the most accurate selection in ACR first time. I know I can zoom in but then I have to zoom out again each time to access the difference. I find this particular process slower in ACR as a result.
-
and yes, I realise I don't have dither checked in this example.
**Update: I've worked it out. At the top Sample is set to Current Layer. I changed this to All layers and it works as expected now.**
-
2
-
-
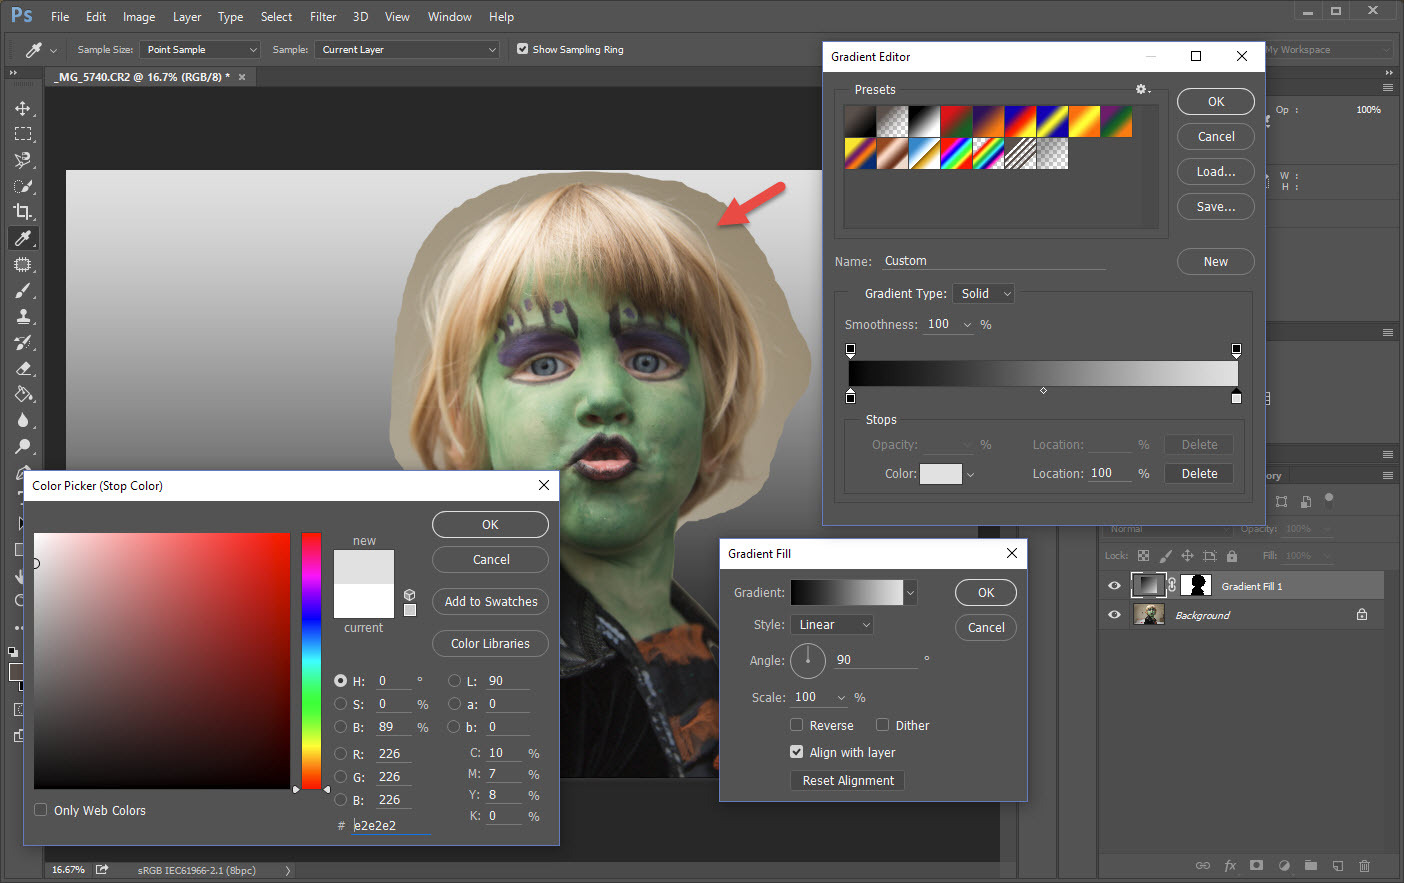
Ok, first screenshot is how I'm adding the Gradient Layer after making the selection (is this wrong?). In the second screenshot the I've marked with a red arrow where I'm trying to click with the colour picker. It however chooses the colour of the gradient.

and yes, I realise I don't have dither checked in this example.
-
Oh, I think I understand what you are saying, Yes, I’m clicking outside the original selection, however this selection is now a mask on the gradient layer. Is this where I’m going wrong? The mask is created when I add the gradient layer after making the selection. And sorry, I’m sure this would be much easier with a screenshot
-
From memory when I do the selection and then add the gradient layer it pops up the gradient fill dialog box and the gradient layer is automatically already selected. How else can I get to the gradient dialog boxes without being on the gradient layer.
-
Sure, but I’m not at my PC at the moment so will get this later this when I’m back. Wasn't expecting such a quick response!
")
-
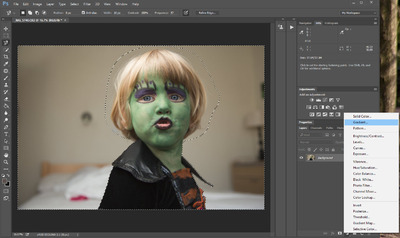
With all the background replacement questions lately I’ve been questioning my own method for this. I’ve tried to follow this method
but am coming unstuck at this point:QuoteWhen the Color Picker window opened, all I had to do was click on the brown above the hat, to choose it. Then pressed OK:
I’m unable to choose a colour from my original image layer as I’m now on the gradient fill layer and I can’t get to the original layer without closing the Colour Picker window. What am I missing?
-
1
-


Wet Lab vs Dry Lab
in Output - print, websites, Facebook, email, client disk, etc
Posted
I’m a little ashamed to admit that I had no concept of the different between dry and web lab printers until recently. I’m still trying to find a lab I’m happy with in NZ and was told by one of the labs I was looking at that they had a wet lab, of which they were boasting as being of superior quality. Having done my own research into this I’ve found a lot of conflicting advice and views (as always) out there. Just wondering if you’ve got any personal opinions and views from your experience on this subject?