
Christina Keddie
-
Posts
808 -
Joined
-
Last visited
-
Days Won
5
Everything posted by Christina Keddie
-

First day with shooting RAW....PROBLEM!
Christina Keddie replied to Mariann Wilson's topic in Photo Gear & Equipment
Are you asking an editing question? (If so, what is it?) Or are you asking for help with photography settings? -
If you want three separate prints, then you'd just do three separate files... Can you explain what you're trying to do? Three equally-sized wrapped canvases (or prints, or what), using three separate images?
-
Clone tool help
Christina Keddie replied to lsin's topic in Photoshop / Elements / Bridge / ACR questions or problems
You also have your clone tool set to sample all layers, and who knows what all going on in that actions group of layers and whatever other stack of layers you've got stretching out above that Cloning work is pixel layer work. You've apparently also done pixel later work to fix the eyes, and again, who knows what all in that layers group and other layers not shown here (but your layers palette scrollbar is tiny so you must have tons up there...). If you want to clone properly, and if you also *need* to do other pixel layer work (if you can't tell, I'm giving a serious side-eye to your layers!), do it this way: http://www.damiensymonds.net/2015/07/order-of-layers-for-complex-pixel-edits.html -
Clone tool help
Christina Keddie replied to lsin's topic in Photoshop / Elements / Bridge / ACR questions or problems
Are you trying to clone on the "background copy" layer? If so, your work is being completely covered over by the pixel later immediately above it, so that's why you aren't seeing any of your clone work. -
Prints dont match
Christina Keddie replied to Diana_Andersen's topic in Monitor calibration questions or problems
You do understand, though, that now that your monitor matches your prints, you can edit your files being fully confident that what you see on your screen will be a faithful representation of what will be printed, right? So you can take that file and edit it cooler and KNOW that it won't be warmer in print. No needing to "get used" to anything -- edit as you think appropriate and now you're finally seeing faithful colors on your screen. -
That would require you to put it into a profile. When you posted it, it was either in the FB group or in a random thread here. And again -- these numbers change. And it's only polite not to force someone who wants to help you to have to go digging for your old responses.
-
Jake,Ryan different photo/background
Christina Keddie replied to Cindy Young's topic in Help with editing
(I'm so sorry, Cindy, I've got to run to an event, but hopefully someone else will be around to help you through this! In the meantime, though, I strongly recommend that you download the PSD Damien created for you and take a really close look at his levels layer and the mask he used there.) -
Jake,Ryan different photo/background
Christina Keddie replied to Cindy Young's topic in Help with editing
No, it's a simple mask. (And Quick Mask is just a different way of creating the same simple mask.) The levels layer itself should be making everything crazy bright -- check to make sure your levels settings are the same as the ones in Damien's PSD file. Then make sure you're clicking ON THE MASK before you try masking anything on or off. -
Jake,Ryan different photo/background
Christina Keddie replied to Cindy Young's topic in Help with editing
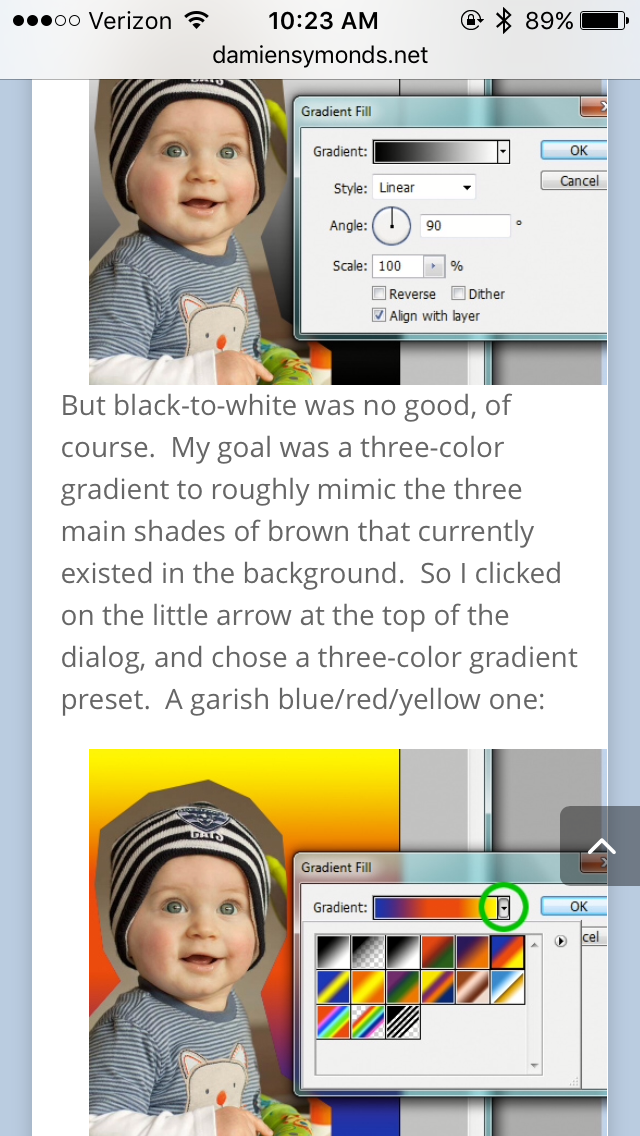
OK, so do you see how the Lara tutorial says nothing at all about angle, scale, dither, etc.? You're confusing the two tutorials. The Lara tutorial is simply about getting the dark bit of your wall background as light as the light bit. In some photos, the best way to do that would be a gradual fade, which is why you'd use the gradient TOOL directly on the layer mask of your levels layer. If you download Damien's PSD file, you'll see that the gradient isn't actually necessary for your photo. Turn off the color fill layer, and then turn the levels layer on and off to see what it is you're trying to achieve in this "Lara tutorial" step. -
Jake,Ryan different photo/background
Christina Keddie replied to Cindy Young's topic in Help with editing
Cindy, which tutorial are you trying to follow right now? The eyedropper tutorial, that you posted a screenshot of, with the photo of Lara as the example? I'm assuming so, but tell me if I'm wrong. -
Jake,Ryan different photo/background
Christina Keddie replied to Cindy Young's topic in Help with editing
Cindy, it's not a separate gradient layer at all. So delete that entirely. Click on the mask on the levels layer, and select your gradient tool from your toolbar. You can use gradients, paint buckets, etc. as well as the brush tool on a mask. You want to have a gradient going on the mask itself. -
Jake,Ryan different photo/background
Christina Keddie replied to Cindy Young's topic in Help with editing
Cindy, deep breaths. It looks like you're mashing together the two steps Damien suggested that you take. FIRST do the eyedropper step, using the tutorial with the levels layer, to get the dark side roughly matching the light side. THEN use a gradient layer to replace the background. When you're doing the levels layer, you use the gradient tool (from your tool bar) directly on the MASK of the levels layer. Don't add a whole separate gradient layer! Look at the MASK on the levels layer in these two screenshots from that tutorial: See how the mask itself has the gradient on it, and then the gradient-ed mask is further masked off of the subject? No separate gradient fill layers were added. It's all on the mask of the levels layer itself. Go sloooooooooooooooowly through the tutorials. Pay attention to each screenshot, looking at whether Damien has added a new layer or instead done something to the existing layer masks. It's all there in great detail, I promise!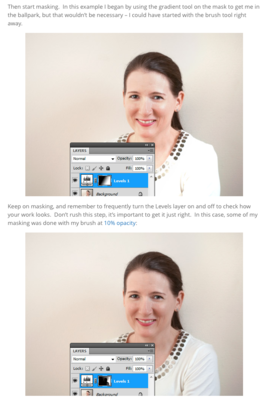
-
Clone tool help
Christina Keddie replied to lsin's topic in Photoshop / Elements / Bridge / ACR questions or problems
4GB of RAM is only half of the recommended for running PS, so that may be part of your problem. (You're also getting close to less than 1/3rd free hard drive space, so be sure to keep an eye on that!) What happens if you close all other images and just work on one at a time? You may need to do that as a general practice, given your low RAM. And also, of course, try rebooting your computer. -
Clone tool help
Christina Keddie replied to lsin's topic in Photoshop / Elements / Bridge / ACR questions or problems
Of course -- I just also wanted to see what your clone tool settings were. Those settings look fine -- and you're sure you alt-clicked to sample from this image, right? Can you also do this for us? http://www.damiensymonds.net/thread1.html -
Clone tool help
Christina Keddie replied to lsin's topic in Photoshop / Elements / Bridge / ACR questions or problems
Can you also post a proper screenshot so we can make out your settings? -
You're not trying to post a raw file here, are you? And with JPGs, here and anywhere else on the web, you'd need to resize the file to web proportions. Say 960 or so on the long edge.
-
You'll need to post a 700x700px 100% crop: http://www.damiensymonds.net/2013/09/grabbing-700x700px-100-crop.html
-
files on different effects
Christina Keddie replied to sahmwagner's topic in How to achieve a certain look or effect
It's the pinned post in this section. The one titled "READ THIS FIRST: Posting guidelines and download files." -
Can you show us some of the images you're working with, and some screenshots of the problem? That would help us understand what's happening here.
- 1 reply
-
- 1
-

-
Replacing bkgrd behind Ryan and Jake
Christina Keddie replied to Cindy Young's topic in Help with editing
This is the portion of the link that Damien gave you that answers the question of how to choose the correct type of gradient:
-
color cast on changing colour of blanket
Christina Keddie replied to Candi McGrail's topic in Help with editing
Yup -- be sure to look in the Properties panel of each layer and check any dropdown menus for different channels on each, to see all the different settings Damien changed. -
I strongly recommend following Squarespace's image guidelines: https://support.squarespace.com/hc/en-us/articles/206542517-Formatting-your-images-for-display-on-the-web Since it's a responsive website, I don't think you can sharpen precisely (as a different sized image will display depending on the screen/browser width, and Squarespace generates the different sized files from each image upload itself).
-
Yikes. Did you shoot these in raw?
-
LR 5 import error using card reader
Christina Keddie replied to Christy's topic in Lightroom questions or problems
So the file opens properly in ACR? Then what happens if you download all the files directly onto your hard drive, and then import them from your hard drive into LR? -
LR 5 import error using card reader
Christina Keddie replied to Christy's topic in Lightroom questions or problems
What happens when you just download then straight from your card onto your hard drive (leaving LR out of this entirely)? Are your raw files intact and visible then? Note that what you see on your camera or as thumbnails in a Finder window are just the tiny jpg preview files that your camera makes for every raw file. So just because you can see them on your camera doesn't mean that the raw files aren't corrupted, unfortunately.