Elliot
-
Posts
71 -
Joined
-
Last visited
Elliot's Achievements
-
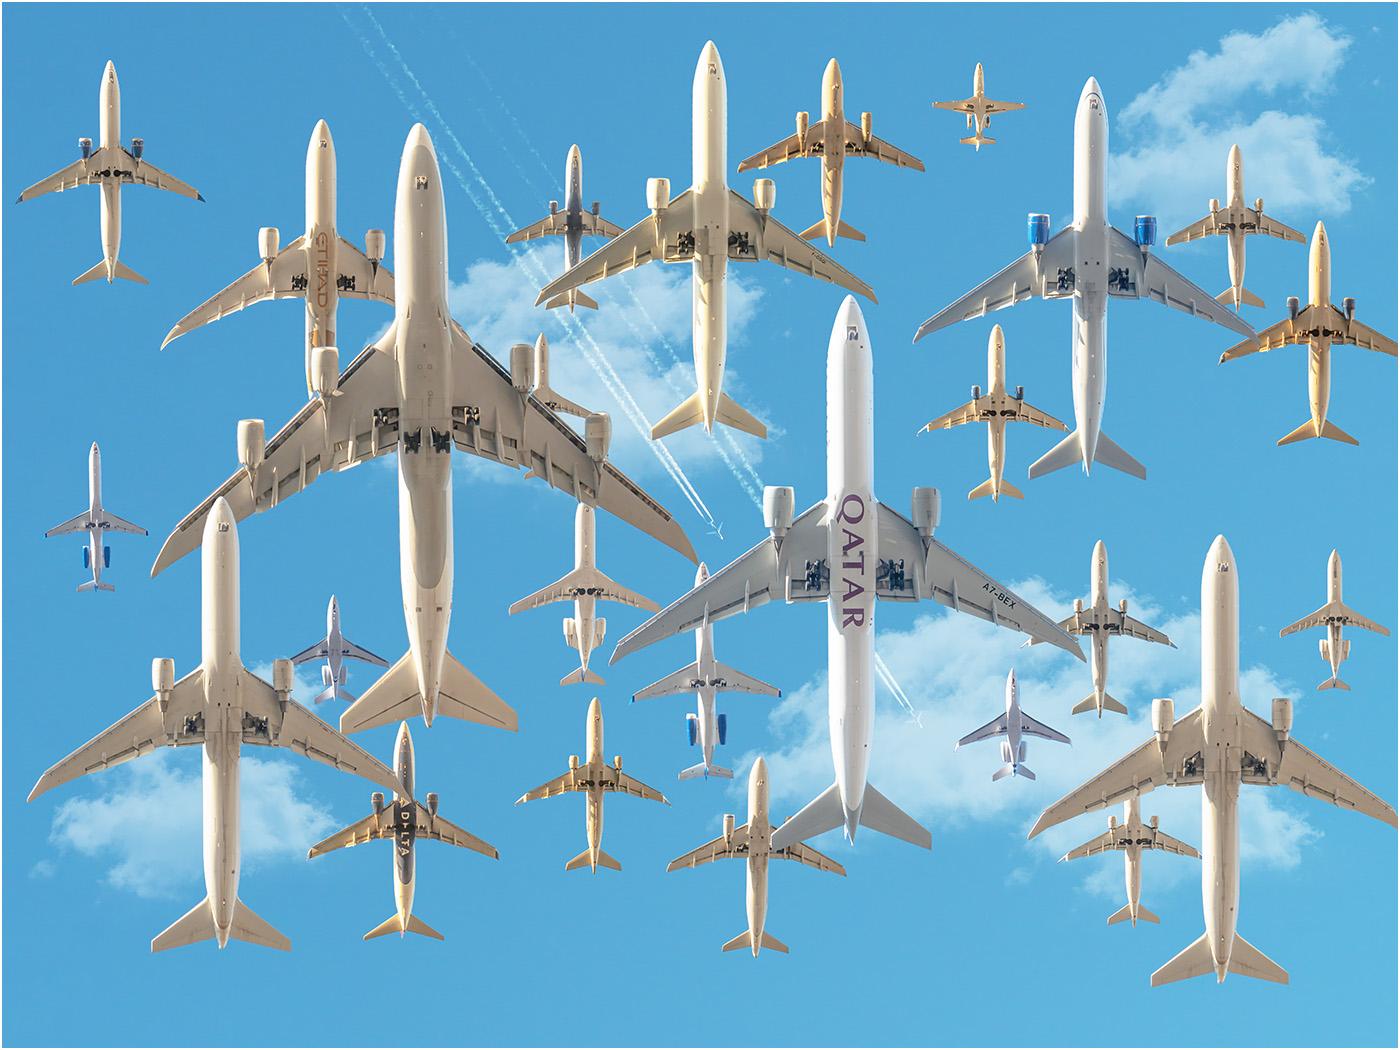
Composite with dozens of elements
Elliot replied to Elliot's topic in How to achieve a certain look or effect
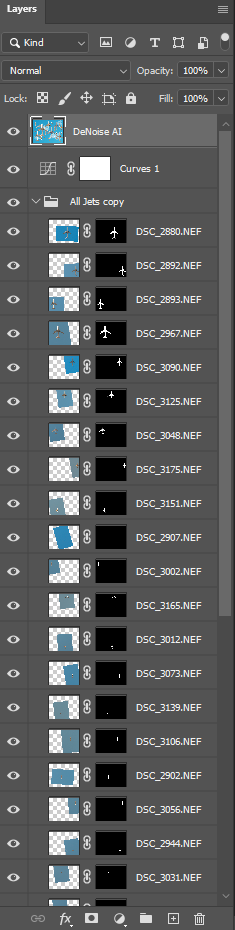
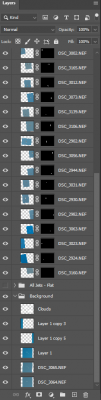
Update: I converted all the jets to smart objects. I should have done this sooner. It makes it a lot easier to move and resize them. I grouped the jets group with the background group. Then I applied the curves adjustment as a clipping mask to the new group. The Topaz layer breaks the ability to move the jets after post processing. I may dump that and just use ACR and unsharp mask (yes, I have taken the sharpen class). Thanks again. -
Composite with dozens of elements
Elliot replied to Elliot's topic in How to achieve a certain look or effect
Oh right. I loaded them in as layers from ACR, which I see doesn't automatically make them smart objects. Is there an option for that? I guess I need to convert each one separately? I also didn't know how to apply a single curve adjustment to all the visible layers without doing a visible stamp. Once I do the stamp, I can no longer move the individual jets. What is the correct technique for this? Thanks! -
Composite with dozens of elements
Elliot replied to Elliot's topic in How to achieve a certain look or effect
I have two sets of plane placement, thus the two jet groups. The clouds were added by a cloud brush. For raw processing, I did take a shortcut:I did the raw processing on one jet and then copied all the adjustments to all the rest of them. Not perfect, but I think close enough for this. I did use the Topaz DeNoise AI tool to eliminate the noise. That was on top of removing noise using the ACR sliders for the jets. On the background,using that technique made the contrails look funny. Thanks.
-
Composite with dozens of elements
Elliot replied to Elliot's topic in How to achieve a certain look or effect
Thanks for your advice. Work in progress on the placement, but the hard work is done.
-
Composite with dozens of elements
Elliot replied to Elliot's topic in How to achieve a certain look or effect
Got it. Thank you very much. -
Composite with dozens of elements
Elliot replied to Elliot's topic in How to achieve a certain look or effect
Yes. I sort of alluded to that: "I see that you recommend doing it the other way around, moving the layer up and select and mask the subject." As I think more about this, I have two issues. One is the method for adding a new element. I can either copy and paste using your recommended technique. Or, now that I think I have a recipe for blend-if, I should use that. The second is how to set up the overall flow. Should I load all my images as layers before I choose which actual ones I want to use, which may be up to 300 or more, or should I select one image at a time, open it in ACR, and then add it as a new layer to my working document? Or is there another method? Thamks. -
Hi Damien, Advice sought. My photo is inspired by the work of this photographer: https://mikekelley.art/?category=airportraits. After searching through this forum, I found at least one techniques that I did not use, I took about 10 photos each of about 20 different jets. I loaded all the photos at layered into one Photoshop image, thus 200 layers. I was hoping to use a blending mode to blend the images I wanted to use. I did not know which jets I liked, I wanted to try out different combinations. I could not find a blend mode that didn't change the color of the sky or one of jets. (But recently, I found a blend-if combination that seems to work.) I ended up looking through each layer for a jet I wanted to us in the perspective that fit the overall image. I selected it using select subject. I copied it and then pasted it into my new background, at the near top of the layer list. I made some small movements to make sure all the jets were in the same direction. Again, I used one (big) Photoshop document that ended up being 10GB. I see that you recommend doing it the other way around, moving the layer up and select and mask the subject. I am now working on an image that has more elements. Eventually, I'd like to try one that has 100 or more elements. Is the right way to do this to load 100 images as layers? Or do I need to bring each jet into its own document and load it as a new layer? Eventually, I'll still have 100+ layers. Is that feasible? Do you have any other advice? One more thing: after I positioned all the jets, I converted the whole thing into a smart object. I then used the Camera Raw Filter to do my clean processing over the whole thing, instead of applying raw processing for each jet. I figure the lighting is about the same for each jet, since I took all the photos during the same 2-hour span of the day. Thanks! --Elliot

-
Damien, wouldn't content-aware fill work, after selecting the wires with a hard brush (using the shift technique of course)? I've used this to remove wires in front of buildings. Would still need some touch-up afterward.
-
Dell UltraSharp vs non-UltraSharp
Elliot replied to Elliot's topic in The Windows & PC Hardware Forum
Thanks for that. I was a wondering a little bit. I do calibrate. Although I have read here that my i1 Display Pro from 2013 may be getting old (have I been taking Damien's classes for that long??). -
Dell UltraSharp vs non-UltraSharp
Elliot replied to Elliot's topic in The Windows & PC Hardware Forum
From what I have read, the -D and the -DX are exactly the same thing. Both have a HDMI port and a DP port. The only difference is which cable comes in the box. The difference in price on Amazon right now is $40. The price on the Dell page is much more. I'm going to pull the trigger. My current systems both have HDMI outputs. I have a bunch of HDMI cables that I bought from Monoprice or Amazon Basics. Thank you for the help. -
Dell UltraSharp vs non-UltraSharp
Elliot replied to Elliot's topic in The Windows & PC Hardware Forum
The only difference between the -D and the -DX is the included cable, correct? Currently, the -DX is US$50 more than the -D and has a HDMI cable. The -D has a DisplayPort cable. I can get an HDMI cable for a lot less than $50. Can you corroborate this? Thanks. -
Dell UltraSharp vs non-UltraSharp
Elliot replied to Elliot's topic in The Windows & PC Hardware Forum
Thank you. That's exactly what I wanted to understand. -
Hi Brian, This Dell monitor is not branded as UltraSharp: https://www.bestbuy.com/site/dell-32-led-curved-qhd-freesync-monitor-with-hdr-displayport-hdmi-usb/6375331.p?skuId=6375331. What is the exact specification that makes one monitor "ultra sharp" and another not. It's ok, I'm a technical person. Should I give this one a pass and stick to the "UltaSharp" branded monitors? And 2k is ok, but we should not bother with 4k? Also, what's "VA" technology? The spec says 178 degrees viewing angle. Is this a form of IPS? Thanks!
-
New Asus ROG laptop, greys are AWOL
Elliot replied to Elliot's topic in The Windows & PC Hardware Forum
Found it! There is an app that comes with some of the Asus ROG machines called "Armour Crate". It's meant so somehow tune a user's gaming experience. One of the user settings is called "Game Visual". It seems to globally set the display tones. I remember vaguely accidentally getting into this app and perhaps randomly playing around with the settings and not noticing they doing anything, so I put it out of my mind. I only found it by running Task Manager to see what was running and I saw this. I hope this helps someone who uses a Asus ROG laptop and runs into this in the future. (FWIW this setting was set to "Scenery". I changed it to "Default" and that brought back the grey in the maps. I will recalibrate now.) -
New Asus ROG laptop, greys are AWOL
Elliot replied to Elliot's topic in The Windows & PC Hardware Forum
The plot thickens. I had upgraded the SSD soon after I received the laptop. I've been using the new SSD since. Asus wanted me to ship it back with the original hardware, so I opened it and put back the original SSD, which was almost the same as restoring the factory default software. Guess what? The colors are back to normal, and the Windows gamma calibration worked fine. So it *is* a software issue. I guess I need to start uninstalling things until the colors are restored. Any ideas what software would cause this? I'll start with uninstalling Photoshop. Thanks.