Elliot
-
Posts
71 -
Joined
-
Last visited
Everything posted by Elliot
-
Composite with dozens of elements
Elliot replied to Elliot's topic in How to achieve a certain look or effect
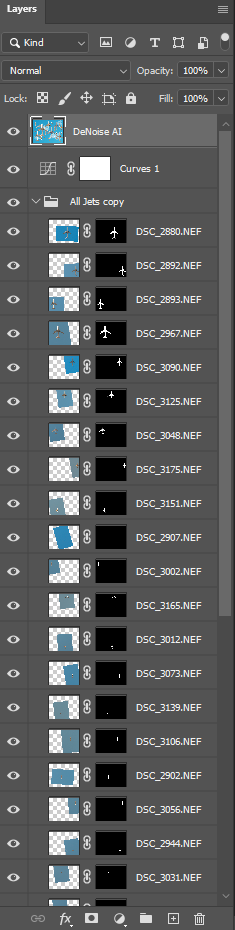
Update: I converted all the jets to smart objects. I should have done this sooner. It makes it a lot easier to move and resize them. I grouped the jets group with the background group. Then I applied the curves adjustment as a clipping mask to the new group. The Topaz layer breaks the ability to move the jets after post processing. I may dump that and just use ACR and unsharp mask (yes, I have taken the sharpen class). Thanks again. -
Composite with dozens of elements
Elliot replied to Elliot's topic in How to achieve a certain look or effect
Oh right. I loaded them in as layers from ACR, which I see doesn't automatically make them smart objects. Is there an option for that? I guess I need to convert each one separately? I also didn't know how to apply a single curve adjustment to all the visible layers without doing a visible stamp. Once I do the stamp, I can no longer move the individual jets. What is the correct technique for this? Thanks! -
Composite with dozens of elements
Elliot replied to Elliot's topic in How to achieve a certain look or effect
I have two sets of plane placement, thus the two jet groups. The clouds were added by a cloud brush. For raw processing, I did take a shortcut:I did the raw processing on one jet and then copied all the adjustments to all the rest of them. Not perfect, but I think close enough for this. I did use the Topaz DeNoise AI tool to eliminate the noise. That was on top of removing noise using the ACR sliders for the jets. On the background,using that technique made the contrails look funny. Thanks.
-
Composite with dozens of elements
Elliot replied to Elliot's topic in How to achieve a certain look or effect
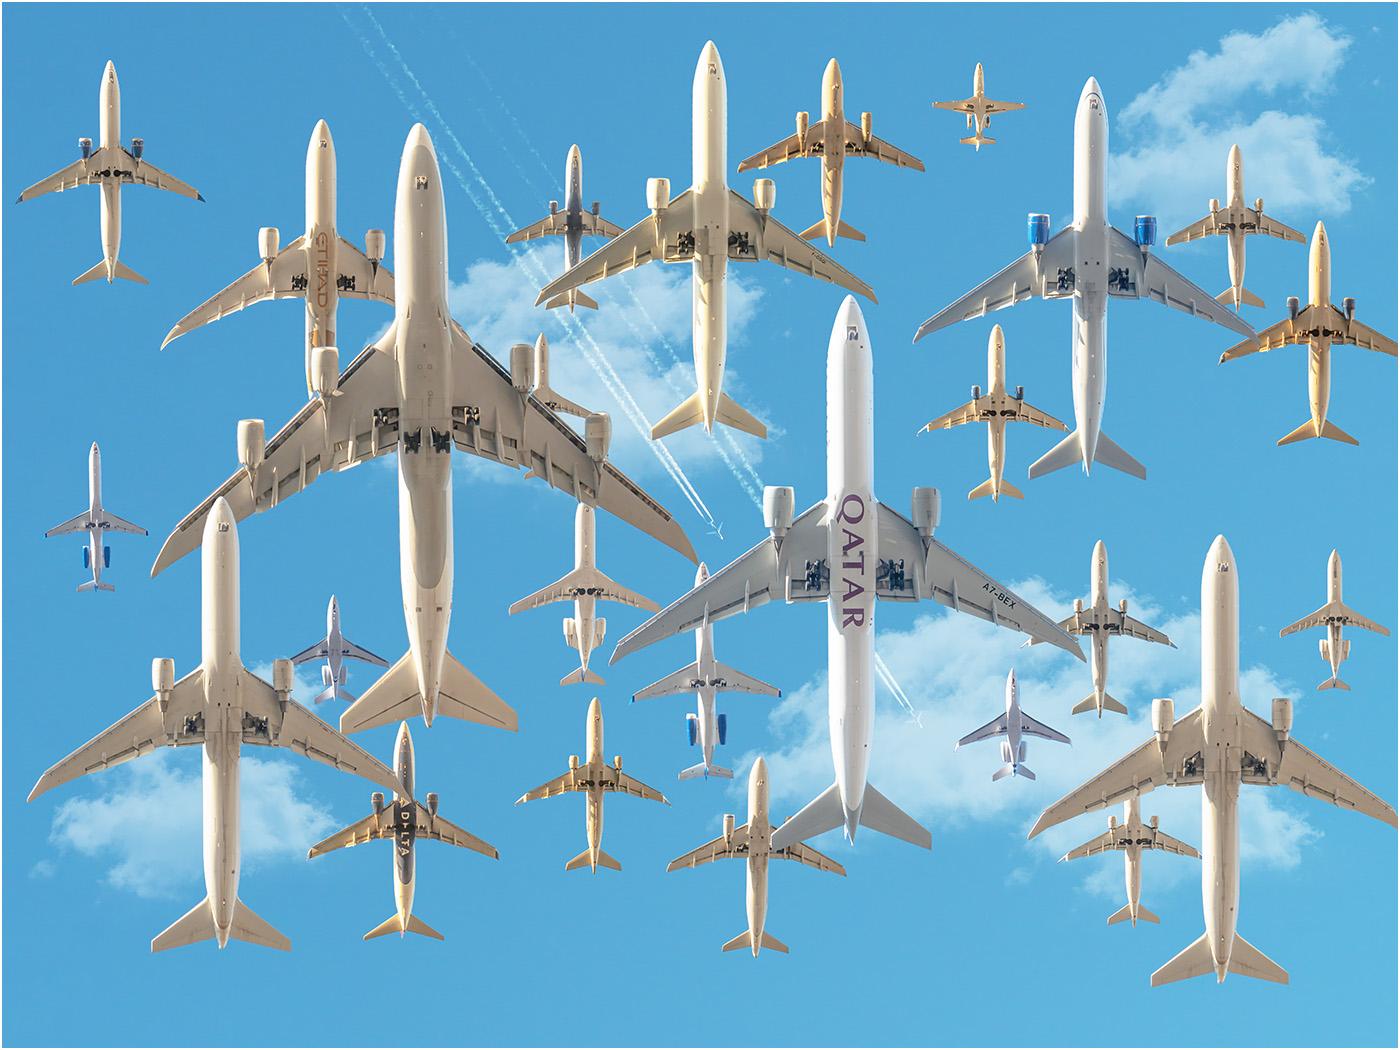
Thanks for your advice. Work in progress on the placement, but the hard work is done.
-
Composite with dozens of elements
Elliot replied to Elliot's topic in How to achieve a certain look or effect
Got it. Thank you very much. -
Composite with dozens of elements
Elliot replied to Elliot's topic in How to achieve a certain look or effect
Yes. I sort of alluded to that: "I see that you recommend doing it the other way around, moving the layer up and select and mask the subject." As I think more about this, I have two issues. One is the method for adding a new element. I can either copy and paste using your recommended technique. Or, now that I think I have a recipe for blend-if, I should use that. The second is how to set up the overall flow. Should I load all my images as layers before I choose which actual ones I want to use, which may be up to 300 or more, or should I select one image at a time, open it in ACR, and then add it as a new layer to my working document? Or is there another method? Thamks. -
Hi Damien, Advice sought. My photo is inspired by the work of this photographer: https://mikekelley.art/?category=airportraits. After searching through this forum, I found at least one techniques that I did not use, I took about 10 photos each of about 20 different jets. I loaded all the photos at layered into one Photoshop image, thus 200 layers. I was hoping to use a blending mode to blend the images I wanted to use. I did not know which jets I liked, I wanted to try out different combinations. I could not find a blend mode that didn't change the color of the sky or one of jets. (But recently, I found a blend-if combination that seems to work.) I ended up looking through each layer for a jet I wanted to us in the perspective that fit the overall image. I selected it using select subject. I copied it and then pasted it into my new background, at the near top of the layer list. I made some small movements to make sure all the jets were in the same direction. Again, I used one (big) Photoshop document that ended up being 10GB. I see that you recommend doing it the other way around, moving the layer up and select and mask the subject. I am now working on an image that has more elements. Eventually, I'd like to try one that has 100 or more elements. Is the right way to do this to load 100 images as layers? Or do I need to bring each jet into its own document and load it as a new layer? Eventually, I'll still have 100+ layers. Is that feasible? Do you have any other advice? One more thing: after I positioned all the jets, I converted the whole thing into a smart object. I then used the Camera Raw Filter to do my clean processing over the whole thing, instead of applying raw processing for each jet. I figure the lighting is about the same for each jet, since I took all the photos during the same 2-hour span of the day. Thanks! --Elliot

-
Damien, wouldn't content-aware fill work, after selecting the wires with a hard brush (using the shift technique of course)? I've used this to remove wires in front of buildings. Would still need some touch-up afterward.
-
Dell UltraSharp vs non-UltraSharp
Elliot replied to Elliot's topic in The Windows & PC Hardware Forum
Thanks for that. I was a wondering a little bit. I do calibrate. Although I have read here that my i1 Display Pro from 2013 may be getting old (have I been taking Damien's classes for that long??). -
Dell UltraSharp vs non-UltraSharp
Elliot replied to Elliot's topic in The Windows & PC Hardware Forum
From what I have read, the -D and the -DX are exactly the same thing. Both have a HDMI port and a DP port. The only difference is which cable comes in the box. The difference in price on Amazon right now is $40. The price on the Dell page is much more. I'm going to pull the trigger. My current systems both have HDMI outputs. I have a bunch of HDMI cables that I bought from Monoprice or Amazon Basics. Thank you for the help. -
Dell UltraSharp vs non-UltraSharp
Elliot replied to Elliot's topic in The Windows & PC Hardware Forum
The only difference between the -D and the -DX is the included cable, correct? Currently, the -DX is US$50 more than the -D and has a HDMI cable. The -D has a DisplayPort cable. I can get an HDMI cable for a lot less than $50. Can you corroborate this? Thanks. -
Dell UltraSharp vs non-UltraSharp
Elliot replied to Elliot's topic in The Windows & PC Hardware Forum
Thank you. That's exactly what I wanted to understand. -
Hi Brian, This Dell monitor is not branded as UltraSharp: https://www.bestbuy.com/site/dell-32-led-curved-qhd-freesync-monitor-with-hdr-displayport-hdmi-usb/6375331.p?skuId=6375331. What is the exact specification that makes one monitor "ultra sharp" and another not. It's ok, I'm a technical person. Should I give this one a pass and stick to the "UltaSharp" branded monitors? And 2k is ok, but we should not bother with 4k? Also, what's "VA" technology? The spec says 178 degrees viewing angle. Is this a form of IPS? Thanks!
-
New Asus ROG laptop, greys are AWOL
Elliot replied to Elliot's topic in The Windows & PC Hardware Forum
Found it! There is an app that comes with some of the Asus ROG machines called "Armour Crate". It's meant so somehow tune a user's gaming experience. One of the user settings is called "Game Visual". It seems to globally set the display tones. I remember vaguely accidentally getting into this app and perhaps randomly playing around with the settings and not noticing they doing anything, so I put it out of my mind. I only found it by running Task Manager to see what was running and I saw this. I hope this helps someone who uses a Asus ROG laptop and runs into this in the future. (FWIW this setting was set to "Scenery". I changed it to "Default" and that brought back the grey in the maps. I will recalibrate now.) -
New Asus ROG laptop, greys are AWOL
Elliot replied to Elliot's topic in The Windows & PC Hardware Forum
The plot thickens. I had upgraded the SSD soon after I received the laptop. I've been using the new SSD since. Asus wanted me to ship it back with the original hardware, so I opened it and put back the original SSD, which was almost the same as restoring the factory default software. Guess what? The colors are back to normal, and the Windows gamma calibration worked fine. So it *is* a software issue. I guess I need to start uninstalling things until the colors are restored. Any ideas what software would cause this? I'll start with uninstalling Photoshop. Thanks. -
New Asus ROG laptop, greys are AWOL
Elliot replied to Elliot's topic in The Windows & PC Hardware Forum
Ok, thanks. I just wanted a second opinion before I send it in. It is under warranty. I'll post when i get it back. Thanks. -
New Asus ROG laptop, greys are AWOL
Elliot replied to Elliot's topic in The Windows & PC Hardware Forum
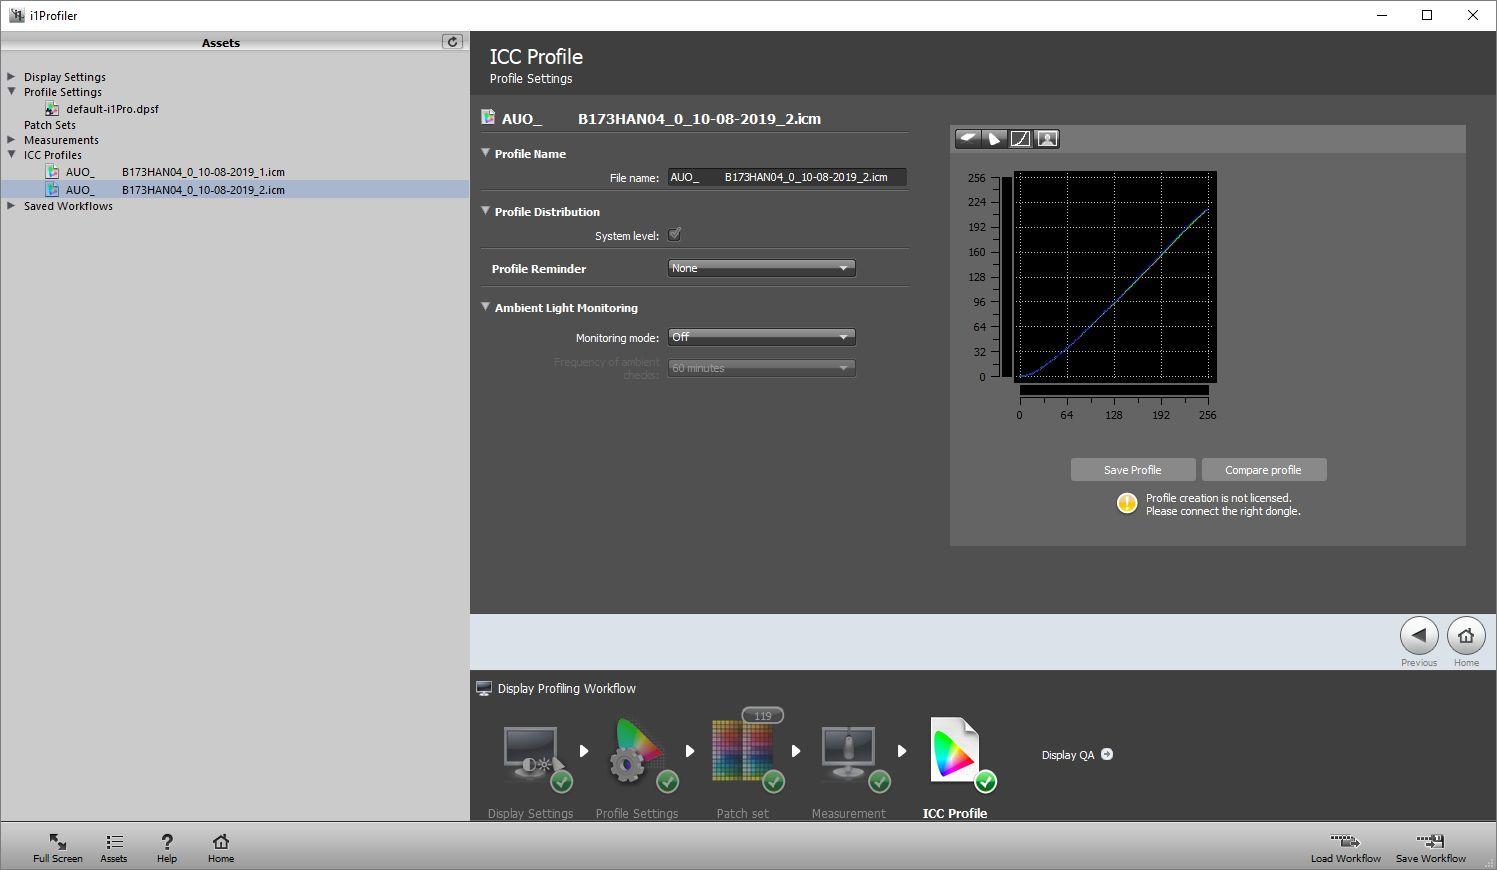
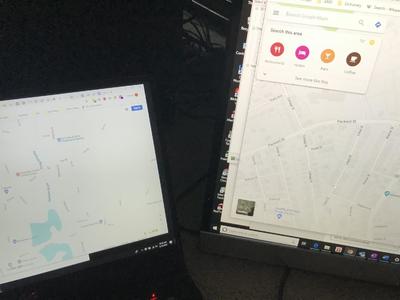
No. I noticed it, and then ran calibration to see if it could be corrected. What you see is after calibration. I have run calibration many times on other computers following your instructions, so I'm pretty sure I did the calibration correctly. Does the graph look funny to you? The slope is off. -
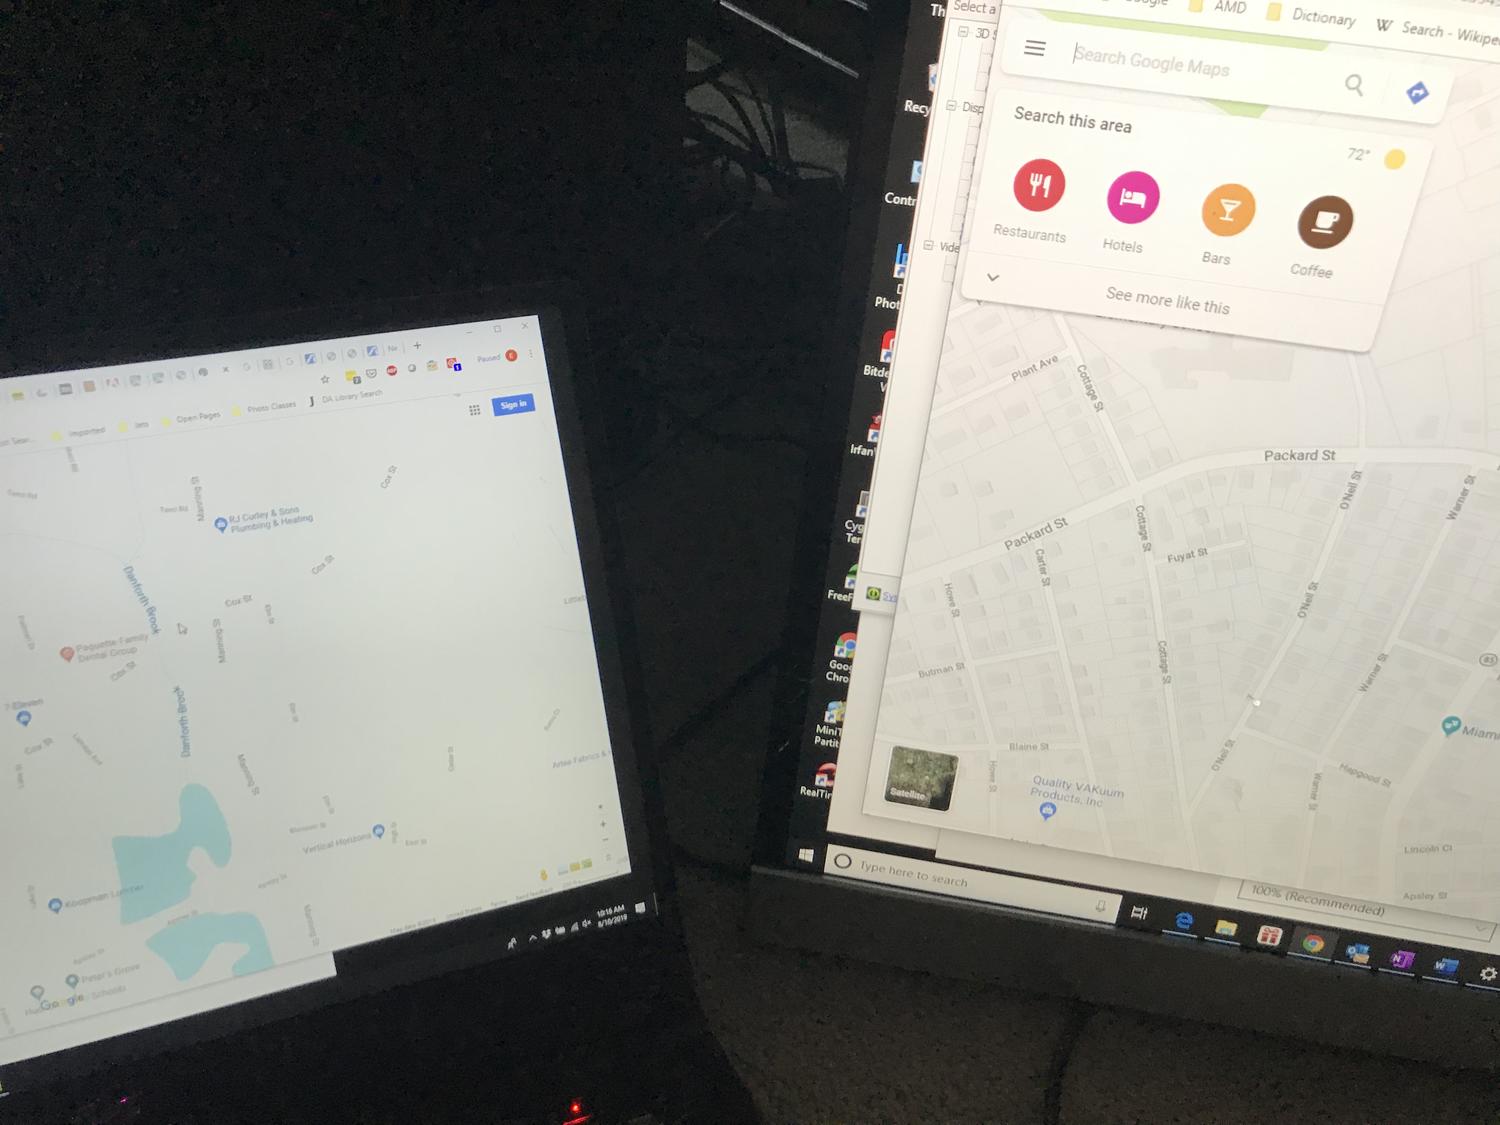
I bought a new Asus ROG laptop in May. I confess that I did not calibrate it right away. But the images looked good and matched the prints. Recently, I noticed that the greys were, well, missing. When I bring up, say, Google Maps (and this is not at all limited to Google Maps) I can no longer see the profiles of the buildings. The maps is mostly white. I connected an external (IPS) monitor, and the monitor showed the normal image. If I take a screen shot and copy it to another computer, the other computer shows the normal image. So I'm pretty sure its not a device driver problem. I think something happened to the display hardware itself. As a computer architect myself, I cannot imagine what combination of hardware issue would cause this problem. I have attached an iphone photo of the side-by-side comparison of the laptop display (left) and the external monitor (right). I have also attached the results of a calibration using the i1 Display Pro. When I ran the Windows calibration tool, just for fun, the first step is to set the gamma; there is that circle pattern where you make the center dots disappear. I can't get them to disappear. Before I ship the laptop back to Asus, I though I would post this just in case there is some trick I'm missing. Thanks.

-
Another "Which Laptop Should I Buy" thread
Elliot replied to Elliot's topic in The Windows & PC Hardware Forum
Do you have a specific recommendation for a proper online backup? Thanks. -
Another "Which Laptop Should I Buy" thread
Elliot replied to Elliot's topic in The Windows & PC Hardware Forum
Thanks Brian. I hate using laptops for photo editing, too, but for the foreseeable future, this is all I have room for. I don't have a problem upgrading components, so I can replace the SSD with a 1TB. I did that on my current machine. I generally only keep current photos on my laptop. I have a headless desktop that's connected to Backblaze where I store all my photos and documents. You gave me some useful information. Thank you again. -
Another "Which Laptop Should I Buy" thread
Elliot replied to Elliot's topic in The Windows & PC Hardware Forum
Thanks for the response. This laptop would definitely be used for Photoshop CC. I'm aware of the heavy laptops. But on one extreme, the Macbook is pretty light for the power. I'd prefer to stay with Windows. (Plus the Macbook would be around $4000.) I'm used to looking for the highest end processor. What is considered a "good enough" processor for CC? Do you have a specific Passmark number that you like to stay above? What is the thinking of 4k screens? Will it make me a better post-process person? I think you've convinced me that 15" will be sufficient. 16GB of memory, 1TB+ of SSD would round it out. I just need to know the processor an the screen resolution. Thanks! -
Hi Brian, I'm in a temporary apartment with little room, so I need to edit on a laptop. I currently own a 2015 Asus ROG G751. It has a 512GB SSD and a 1TB 7200RPM drive; 16GB memory, and a 17" IPS display. It's powered by an Intel i7 4710HQ quad core and GeForce GTX980M graphics. I generally still like this machine, except two things: it's heavy at eight and a half pounds, and the battery is pretty much dead and not easily replaceable (though I can do it if I really wanted to). I'm thinking of replacing it with something lighter. But I haven't found anything significantly better in the US$1500-2000 range. Full disclosure: I work for AMD. I was trying to find an AMD-based laptop, but almost all of them use the mobile Ryzen which is half the performance of the desktop (according to PassMark). I don't need 8 hours of battery life. 3 hours would be fine. So I'll go with Intel if I must. I don't know if the Ryzen 2700U is significantly faster than what I have now. My other question is this: if I'm going to stick with 1920x1080, would I be ok with a 15" screen if I've been using a 17" screen for the last 4 years? And does 4k really buy anything for photo editing? I don't know if getting a laptop that's half the weight but otherwise the same performance, etc, is worth spending $1500. Looking for some Life Coaching. Thanks! --Elliot
-
Ok, I found a tool called exiftool that will copy metadata from one file to another, regardless of format. I'll copy the metadata from the bloated DNG files back to the original raw files and delete the dng files, except for the few that I did some raw processing on.
-
That's odd. I just reconverted them into a different directory and they are, indeed, smaller. I thought I just used the same tool, but maybe not. Then I tried to use the Adobe DNG Converter tool to covert the DNG to DNG, and I got files the same size as the first DNG, which were larger. Then I tried to use the extract function of the converter to extract the embedded raw from the DNG, and it said it couldn't find any. So, I now have two sets of DNG files. One set that I converted two years ago and are twice as large as the original raw files, but with no evidence that they contain an embedded original, and one set that I just now converted that are slightly smaller than the original ray files. Is there something else, like full-sized jpg previews? Is there a way to get a status? Thanks.
-
Really. I thought I once read that there might be some data in the raw file that isn't in the DNG, and that I should keep the original raw Just In Case. I will happily delete the raw files for those that I converted to DNG. However, I do notice that the size of the DNG files are about twice that of the raw files. Not that I'm that pressed on disk space, I'm just saying. Thanks again.