MHalloran
-
Posts
704 -
Joined
-
Last visited
Everything posted by MHalloran
-

Dell Monitor and Graphics card
MHalloran replied to MHalloran's topic in The Windows & PC Hardware Forum
Good friendly advice --- Thanks Brian ! -
Dell Monitor and Graphics card
MHalloran replied to MHalloran's topic in The Windows & PC Hardware Forum
Update; Since the intel update removed my integrated graphics card driver, I had zero monitor. Therefore impossible to view the prompts to install the driver needed for the graphics card to function. I contacted Intel --- after answering their queries, they said I needed to reinstall the OS. I contacted Dell, and answered all of their questions, they said I needed to download my OS and use a drive that would automatically re-install my OS, because it is coded on the motherboard or something to that effect. Losing all my photos and data that had yet to have been backed up. I opened up my PC to remove the CMOS battery, and remove any electrical "memory" so to speak. I looked at the motherboard, and saw some connections directly to it --- HA ! I procured a cord that would connect directly to my motherboard and monitor. ___ VOILA--- I can see my PC ! All good now, was able to re-load my graphics card driver and update all. I am not educated in the computer field, and learn everything by doing --- so I post this in the hope that if this situation resolution helps someone else. Thank you for being there. :-) -
Dell Monitor and Graphics card
MHalloran replied to MHalloran's topic in The Windows & PC Hardware Forum
😞 harder than I thought — I was hoping somehow I could log into the startup and have it boot to the cd where I could have the driver _- thinking the pc and monitor could see a blue screen — where I could arrow the boot sequence — thank you Brian -
Dell Monitor and Graphics card
MHalloran replied to MHalloran's topic in The Windows & PC Hardware Forum
Thank you ! Very helpful — except my monitor won’t see anything — it stays black — because the driver is gone — 😞 -
Brian, I recently moved, when I set up my PC system, all turned on perfectly. An alert came up on my Windows 10 system, Intel Graphics card needs updating. The update removed the old drivers --- then the monitor went blank. Tried restarting, so maybe the driver might try to reinstall. Tried starting in safe mode -- maybe a back up driver. So my monitor cannot detect the graphics card, and stays black. Any suggestions ?
-
High Pass selective sharpening
MHalloran replied to MHalloran's topic in Miscellaneous questions or problems
That's why ! Now it makes sense ! Thank you. -
Hi Damien, I did some searching on your site to find if there was an answer to my question before I asked. https://www.damiensymonds.net/tut_hipass.html Do you feel that the use of the high pass filter at a correct radius, with a soft light blend mode or overlay blend mode can adversely affect the color of the photograph? If so, is there a way to rescue that color, as long as someone isn't using the High Pass at a really high radius setting? I've been studying on this, and somehow my experiments show that the colors are a bit deeper and stronger than I want.
-
Ok....I will work on that one.
-
I did....and since I want to move toward accurate printing, I will follow them exactly. I think that lab is excellent, but if they don't match again, I may send the same files to another highly rated lab to see how they compare before I turn my monitor all the way to zero brightness.
-
Well...I guess I should send 2 or 3 to the printer....the goal is to match isn’t it? Buggin me
-
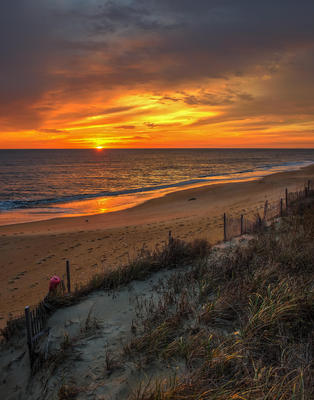
Since I re-calibrated....I now know if we follow Spyder recommendation on brightness of a monitor, you get pretty bright. That would mean everyone on the planet would be receiving prints that are not matching their screen? Heck.....I'm not so sure about that. My original calibration on my recently purchased monitor, which is pretty good......Dell U2518D-5-- https://pcmonitors.info/reviews/dell-u2518d/ Spyder had me adjust the brightness to 75%----giving me prints at least 2 stops darker. That's not the only thing: all of the photographs that I had edited in the last 2 months are going to print dark as well....but appear great on my monitor! That is my fault for sure....I guess.....I calibrated the monitor immediately, BUT, I didn't have any prints made from edits on this monitor settings...... Now re calibrating, and lowering the brightness in the Spyder4Elite preferences from 120 to 80, still brightens the monitor so it still doesn't match my recent print. I'm guessing, any editing that I have posted in Damien's Raw class are too dark....and any that I send in email are various shades as well. Print Matching -------I've got a way to go. The only difference in this calibration, is my monitor is now 14% on brightness, instead of the original pre-printed image of 75% brightness setting....I will assume that the colors will match on future prints, since they matched on this one. So, I erased all the settings on the photograph above, and re-edited it....the image is very close to what my monitor was seeing before, and what I wanted the print to look like, the white balance is slightly different....as it would be in a photograph like this one.
-
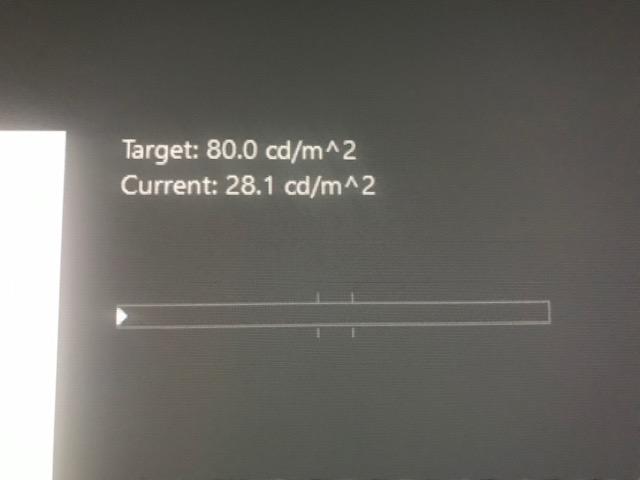
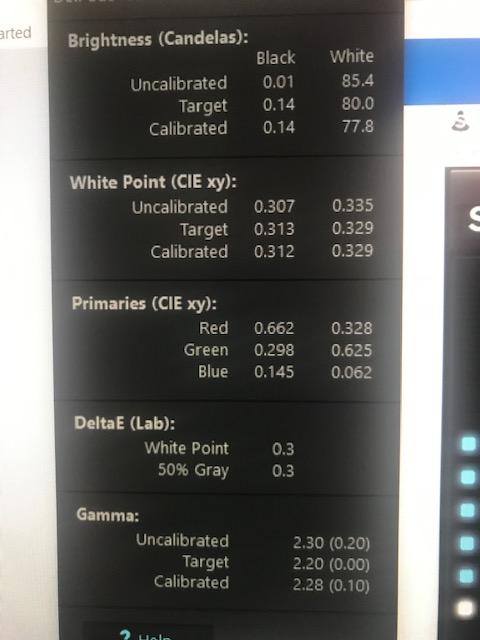
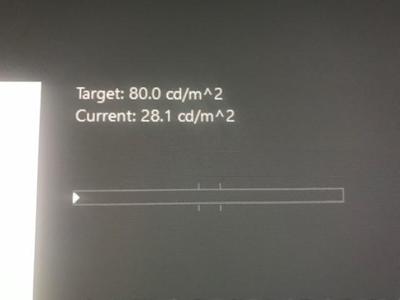
Hi Damien, I did re-calibrate using the Spyder5elite instructions....which included the 120 - 80 brightness settings on the monitor. So I did a total full RECal.....my brightness had to be set to zero to match the current print that I just received with no color correction. Once I did the recal, I found when getting to match the target of 80.0 cd/m^2----I had to move up to 16 percent brightness. I found when I finished the calibration, they didn't match brightness wise. The color has always been perfect, but now going through the different calibrations, and reading the lab very through support pages then it's simply the settings of the brightness. I don't find my office too dark, really.....maybe there is some kind of light calibration reader so that I can see if I am in the range of what the normal light should be in my office....I mean the walls are Revolutionary RED...... I moved on the the following links after the Spyder5Elite page, brightness problems, color correct, and I completely understand your suggestions on how to match the print....that would be bringing down the reading on the calibration below 80.....and you then suggesting I should check the light in my office first to make sure I have enough. I got out a spotlight that I do for light painting, and shined it on the print....when I do that, it looks pretty good....the the flecks of gold, and the bright sand then shines correctly......but.....it's one of those camping lights that match the highbeams on your car or truck. Somehow, I need to be able to check my office lighting with a gauge of some type? This is the lab page, I could not find anyplace there where they recommend color temperature settings....could it possibly be the lab? I wouldn't think so. https://support.bayphoto.com/customer/en/portal/articles/2115661-advanced-color-management Here are the settings results after my calibration. One is the brightness setting before optimizing it to match 80.0 cd/m^2.....the other the results of the settings produced from the calibration.

-
I’ll give it shot tomorrow...Thank you for the help...then maybe I can post properly in the Raw Deluxe area...maybe you aren’t seeing what I see in the editing department..
-
Which I mean the colors match great! But, the screen is still brighter than the print. The edited print, looks great to my eye's, on this monitor. So I must be doing something wrong.
-
I just finished my re-calibration with the Datacolor Spyder4Elite. Now I remember what happened before....which made my screen bright. During the recalibration there was a panel that popped up and it said this..... "Adjust the brightness control until the current value is within 4% of the target value-- target 120.0 cd/m^2" I did this, and that brought the brightness setting up to 60 percent....and a target of 114.0 cd/m^2 When I followed through, the calibration shows 100 % RGB matching, and very good color....but the existing screen no longer matches the print.
-
The lab is very good....and they really have all the information available to customers you suggest in your articles. In fact they are reprinting for free, adding 2 stops in brightness, since I chose no color correction....and suggested that I do test prints, with re-calibration.
-
Yes it does....so I think this means my previous edits made recently may need to be revisited because of the prints coming darker....I may be getting ahead of myself, but that seems to reason. Your tutorial is spot on......the monitor seems really dark.
-
I am following the calibration directions that you have for Datacolor Spyder 4 Elite, which is my calibration unit. Of course I have some prints that I have made from this computer...and am matching them in brightness.....when I match the print to the brightness, it has me all the way to zero. Should I be concerned? I will continue with the calibration.
-
They are hanging on walls that are not in my house.....I do have a few. I should dig them out, and see how they match. I think I am ready to get a newer calibration device, since I have the Spyder 4....and it's so light sensitive......and doesn't change the screen brightness I believe. Do you have a recommendation?
-
I will, but I don't quite understand how the actual file looks proper on other laptops and viewing online with other various monitors......THAT being said, the lab I used comes highly recommended, and they even suggested the test prints to compare to the calibrated monitor.....which is exactly what you teach. I've done other prints, not in a while....and they matched...how my monitor could become that bright is a conundrum....."ive been readin"......to me.
-
AND....I checked my brightness setting on the monitor it’s at 75%.... Everything looks so good on the monitor and on websites including social media photographs nothing looks washed out or overly bright. I’m using the suggested Firefox as well.
-
The screen is about 2 stops or so brighter... ?
-
Damien.....I sent some of my work to the printer, and they came back much darker than my calibrated monitor. I am sure it's something I did wrong. I used their profile to soft proof...looked great....I have a feeling my monitor is too bright, but it is calibrated by a spyder 4 model. The prints looked correct on many different monitor screens because I emailed them to my family in different area's of the country so they could choose. I should have uploaded it to the Raw Deluxe class.....man I've been traveling all over the country with no laptop! I'm gonna take a chance and upload the file.
-
Success! Yes Brian.....lots of windows updates.....hours even with an Ethernet connection.....worth it though. Thank you for the coaching.
-
So, when I purchased this ole laptop, I opted to get DVD's of the "REINSTALLATION DVD WINDOWS 7 HOME PREMIUM" and "DRIVERS AND UTILITIES DVD".....I think I am hearing, that replacing the old hard drive is as simple as installing the new SSD, and then booting from the DVD and re-installing the Windows 7....and simply installing the Network driver..... Going to DELL to update the newest drivers for the other utilities is a piece of cake....other than doing Windows updates a clean install should be that simple ?