

CanonGirl
-
Posts
26 -
Joined
-
Last visited
Posts posted by CanonGirl
-
-
12 minutes ago, Damien Symonds said:
Thanks.
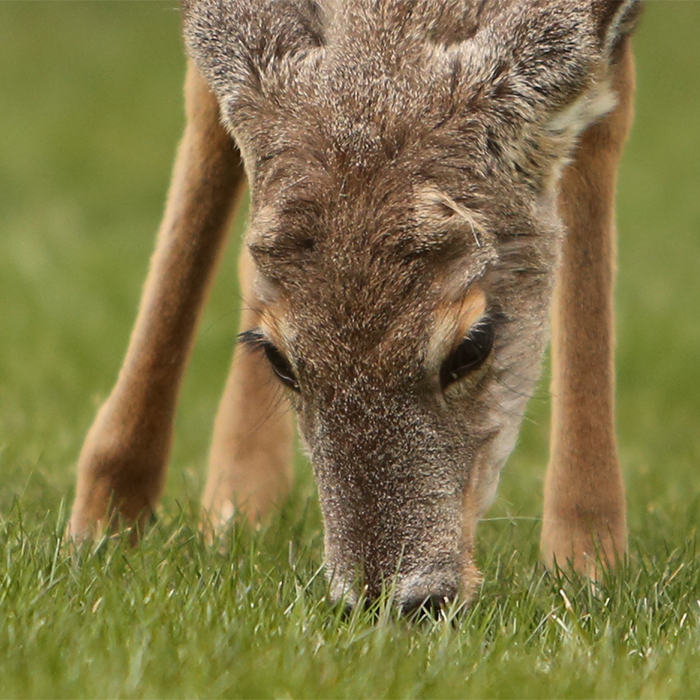
What you've done is great, and I believe completely adequate. We wouldn't expect to see a catchlight in an eye down there near the ground, on either an animal or a person.
If you like, just dodge the outermost part of the eye a bit, to lighten it a bit more.
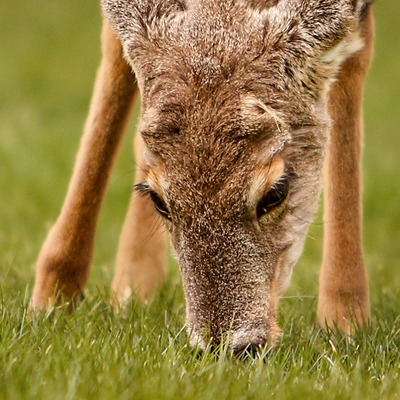
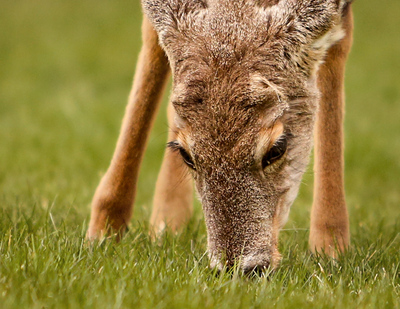
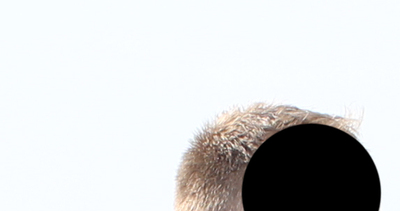
That deer was pretty close to me, and his eyes just looked black, there was no black pupil, and colored iris. I guess studying anatomy of the deer eye will be on my list now LOL
-
8 minutes ago, Damien Symonds said:
A 100% crop!!!! 700x700 pixels, exactly as you did before.
From the SOOR - that is, with the raw editing done, but no Photoshop work.
I didn't see the last 2 posts, I must have been typing while you posted them. This is after ACR. There is somebody without a model release in the picture, that's why I can't post the whole picture.

-
Just now, Damien Symonds said:
A 100% crop!!!! 700x700 pixels, exactly as you did before.
From the SOOR - that is, with the raw editing done, but no Photoshop work.
ok, I am still slightly confused, would this work? This is SOOC, no ACR work at all, no cropping, no resizing, just blacked out the rest of the image
-
just to clarify, you want the uncropped image? or the cropped, but straight out of camera?
-
11 minutes ago, Damien Symonds said:
May I see the 100% crop from the SOOR?
I would prefer not to post 100% resolution publicly, can I email it to you?
-
2 hours ago, Damien Symonds said:
Is this SOOR, or has there been some Photoshop work done also?
it's pretty much a finished image (ACR and Photoshop)
-
1 hour ago, Samantha LaRue said:
Can you get your crop like this please instead? http://www.damiensymonds.net/2013/09/grabbing-700x700px-100-crop.html It helps make sure your crop isn't stretched or resized so that we know exactly what we are seeing.
ok
-
11 minutes ago, Samantha LaRue said:
Is this the full sized photo or did you post a crop?
it's a crop out of the full size image
-
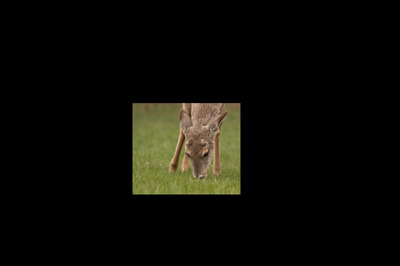
Just wondering how I would add catchlights to a deer's eye? I never had to do it on a deer, I am not sure how it even supposed to look like. The eye looks dead without the catchlight. It's the eye on your right (deer's left eye) that needs it.
-
7 hours ago, Damien Symonds said:
Yes, because it means it's only one step instead of two. Save time wherever you can!
I actually had the one with more steps already made into an action. And now I made the "pattern" way into an action too, so I have both methods available at one click of a mouse :-) I think originally I was not using enough noise to break up the banding, I was only applying it at 2% And I was painting in front of the baby too, so it made it look more fake-ish. Keeping the front of the blanket untouched really makes the difference. Thank you for helping out, and clearing up my questions!
-
 1
1
-
-
7 hours ago, Samantha LaRue said:
Because you already did this when you created the noise pattern. Once you created it, you can save it and use it on other images and will save yourself some time in the future. Did you see this tutorial yet?
Yes, I saw it, this tutorial is what actually prompted my question. Damien answered it, so I am good. Thank you!
-
11 minutes ago, Damien Symonds said:
Yes, because you can't add noise to a Solid Color layer. And anyway, even if you could it would be a bad idea, because it would be applied permanently, and you wouldn't be able to come back and adjust its strength layer. When the noise is a separate pattern layer, you have all the control at your fingertips, with the Opacity slider of the layer.
Maybe I didn't state my question properly. I am wondering why add noise via pattern rather then adding noise to the grey layer (like you would have done in the creation of the noise pattern)? In other words why "edit>fill>pattern" instead of "edit>fill>50% grey", and then "filter>noise>add noise"? Is there a difference between the two methods, or is it just another way to skin the cat?
-
OK, so this is pretty close to what I was trying to do, and does produce some banding, but the suggested amount of noise does help break it up. Now when I try to add a bit of a vignette, I end up with a lot of banding, and have to add a lot of noise to get rid of it. I guess I'll have to do some test prints to see if the noise will be visible. I do have another question though, is there a reason you create and use pattern to add noise to the grey layer, instead of just adding noise via Filter>Noise>Add Noise?
-
I have not, it looks like this would work. I will try it when I get home.
-
-
I have two issues with this background - color contamination from the window light, so I have bluish color going in spots, and wrinkles (it's off white jersey fabric, the wrap is more cream color). I thought an easy fix would be just sampling a lighter color from the background in front of the baby and paining with it. Of course I used lower opacity going over the shadows (to prevent "floating" effect), and guess what I created - gradient which equal banding in print. I tried adding some noise, but it only helped some. I am not sure how to replace the background without loosing the shadows on the blanket. What is a better way to fix this background? Including a photo that's been adjusted in ACR (let me know if it needs to be larger, this one is 1500x1000 pixels)

-
2 hours ago, Damien Symonds said:
It would be ok as long as you are replacing the sky with another very light sky. But yes, if you were wishing to replace it with anything much darker, it won't work.
Oh, I see, you are relying of the multiply blending mode to make the darker thing (hair) to show through. Got it, I know what I am doing now.
-
1
-
-
4 minutes ago, Christina Keddie said:
OK, so go ahead and do your raw processing and post it again.
") I *think* the hair might be too light (not enough contrast with the existing sky), but do the raw processing properly first and Damien can help you see if this method will work for this image.
I *think* the hair might be too light (not enough contrast with the existing sky), but do the raw processing properly first and Damien can help you see if this method will work for this image.
I'll just find a different photo to practice on (with dark hair). This one is an outtake, not worth wasting that much time on it, especially if I am not sure if it will work for this tutorial.
-
1
-
-
1 minute ago, Samantha LaRue said:
I think it might be. Can we see the SOOR? (all raw editing done, but no photoshop work)
That's SOOC, I didn't do any raw editing on it (it's a JPG out of camera), I just pulled it out to practice the sky replacement tutorial.
-
28 minutes ago, Anna-Lena Ström McGrath said:
Can you also show which image you are using? I think you will get stuck if the person has blonde hair for example.
Is this too light of hair?
-
I read through the tutorial, and I can't comprehend it completely in my mind, so I do it or see it done by somebody else (visual learner), so I start reading a little and carrying out that step, then read and do next step. But somehow I keep skipping something, so I go back and correct it, and I miss some stupid things like that you are supposed to change a blending mode on one layer but not the other. So I kind of kept going back and forth fixing this, correcting that. So it's not one thing I am getting stuck on, I just have hard time putting it together (again, not you, just the way I process information). I'll try it again later, when I have less caffeine in my body :-)
-
I just read this tutorial http://www.damiensymonds.net/replace-background-hair and decided to try it out, but I keep getting lost (I have hard time with written PS tutorials in general, so nothing against your writing). Do you by any chance have a video tutorial of it?


Catchlights in deer's eyes
in Help with editing
Posted
"100% crop" trips me up, I guess. To me "100%" is uncropped image, and "crop" is cropped; put them together, and you got me.
Thank you!