Snook
-
Posts
56 -
Joined
-
Last visited
Everything posted by Snook
-

Making torso look embedded in the ground
Snook posted a topic in Miscellaneous questions or problems
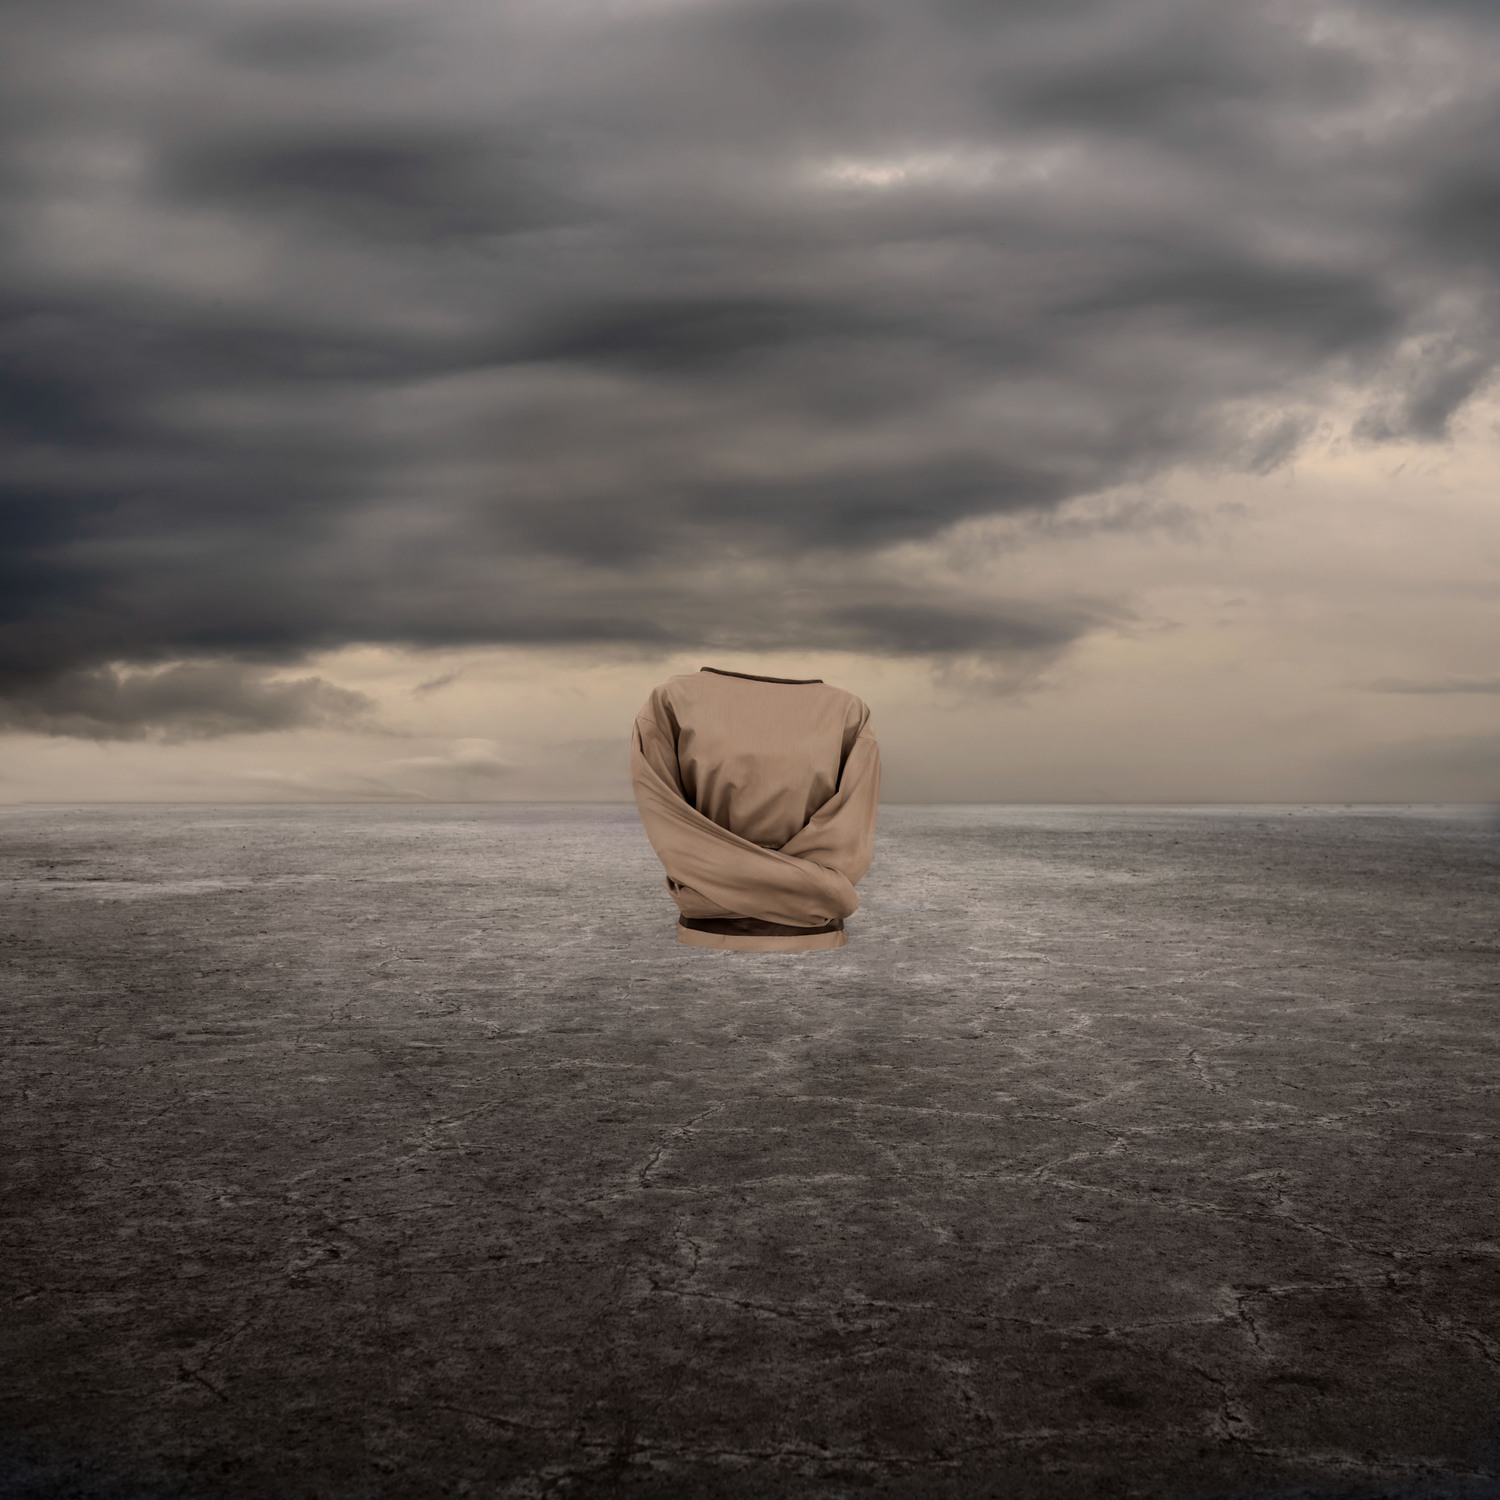
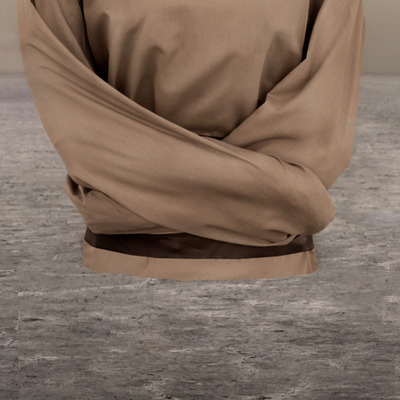
Hey Damien. This is a mannequin torso that was photographed on the salt lake that makes up the ground in the image, although I've copied the torso from another photo taken at the same time that was a bit closer so that it's bigger than the original and sits higher in the frame than the original. The sky has been added afterwards as it was shot on a different day (not sure if that's relevant but thought I'd mention it in case it somehow affects lighting etc with what you're looking at). I've cloned some of the salt lake over base of the mannequin to try and make it look like the torso is embedded in the ground rather than sitting on top of it and I've done a bit of burning to try and make it look more realistic but it hasn't helped much. How would you go about making this look real (well, as real as something like this can look)? I've attached the full image as well as a 700x700 crop of the area in question. Please ignore the horrible toning.. it's still a work in progress.
-
Best way to extend image to cover canvas wrap area
Snook replied to Snook's topic in Help with editing
Thanks so much, Damien. I'm not keen on doing that again in a hurry.. lol. Thanks again for all of your help, Christina. -
Best way to extend image to cover canvas wrap area
Snook replied to Snook's topic in Help with editing
Can I please get a second set of eyes on this to see if there are any issues I've overlooked? This is the original image with 1.5" canvas wrap on each side filled in. I just want to make sure I haven't missed any obvious duplications/patterns etc.. as I'm going a bit crosseyed at this point.. lol.
-
Best way to extend image to cover canvas wrap area
Snook replied to Snook's topic in Help with editing
She wants the photo on the wrap. Thanks for your help, Christina. I'll keep working on the editing for the wrap and if after I speak to the lab on Monday there's no way for them to do it (which I find hard to imagine) I'll have to risk using a different lab. -
Best way to extend image to cover canvas wrap area
Snook replied to Snook's topic in Help with editing
I might contact the person who wants the canvas and see if they're okay with black if I can't submit the wrap area myself. I really don't want to use a different lab because I'm calibrated to match this lab and my PSA is based on prints from this lab. -
Best way to extend image to cover canvas wrap area
Snook replied to Snook's topic in Help with editing
Atkins Technicolour in Adelaide. They're a fantastic lab and I love their work and customer service but I've never ordered a wrap through them before. They have one lot of software for non pros and another one for pros and since I'm not a pro, I've got the first kind. I suspect they wouldn't expect non pros to know how to prepare the wrap so they do it for them but unless I go with plain black, it's not going to work with this image. -
Best way to extend image to cover canvas wrap area
Snook replied to Snook's topic in Help with editing
This is what it looks like with the wrap area filled with mirrored parts of the image and using two layers for the top section, one with the Milky way flipped both vertical and horizontal so it's going in the right direction and one for the rest of the area just flipped vertical. I'll need to do a lot of cloning to resolve the mirrored patterns that look odd and I have no idea how I'll fix the dark line that is visible where the right side was added because the edge of the original frame was darker than the rest . Anyway, having done this I put it in to the lab's software to make sure what I'd done would fully cover the wrap area before I do any more work on it and they don't have an option for me filling the wrap area. I have the choice to fill with a solid colour or have them mirror the image to fill the space, which is going to look like crap with straight mirroring and no other work done and the Milky Way will bend back to the left if they do that. I think I'm going to have to ring them again on Monday when they open and talk about what they can do because I'm not spending potentially hours getting it perfect only to not be able to use it anyway.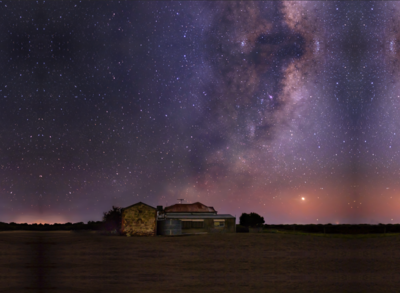
-
Best way to extend image to cover canvas wrap area
Snook replied to Snook's topic in Help with editing
Thanks. I know what mirroring is but if a gradient is flipped, the flipped part has the gradient running in the opposite direction and looks off. Anyway, I'm just organizing coffee and then I'll give it a crack and let you know how I get on. I'd like to avoid using black for the wrap as I don't like how it looks. Thanks for your help. -
Best way to extend image to cover canvas wrap area
Snook replied to Snook's topic in Help with editing
I had thought that the the tones and light/dark areas wouldn't match up terribly well doing that? I'm very happy to be corrected though. I'm about to head to bed but I can try it tomorrow and report back. -
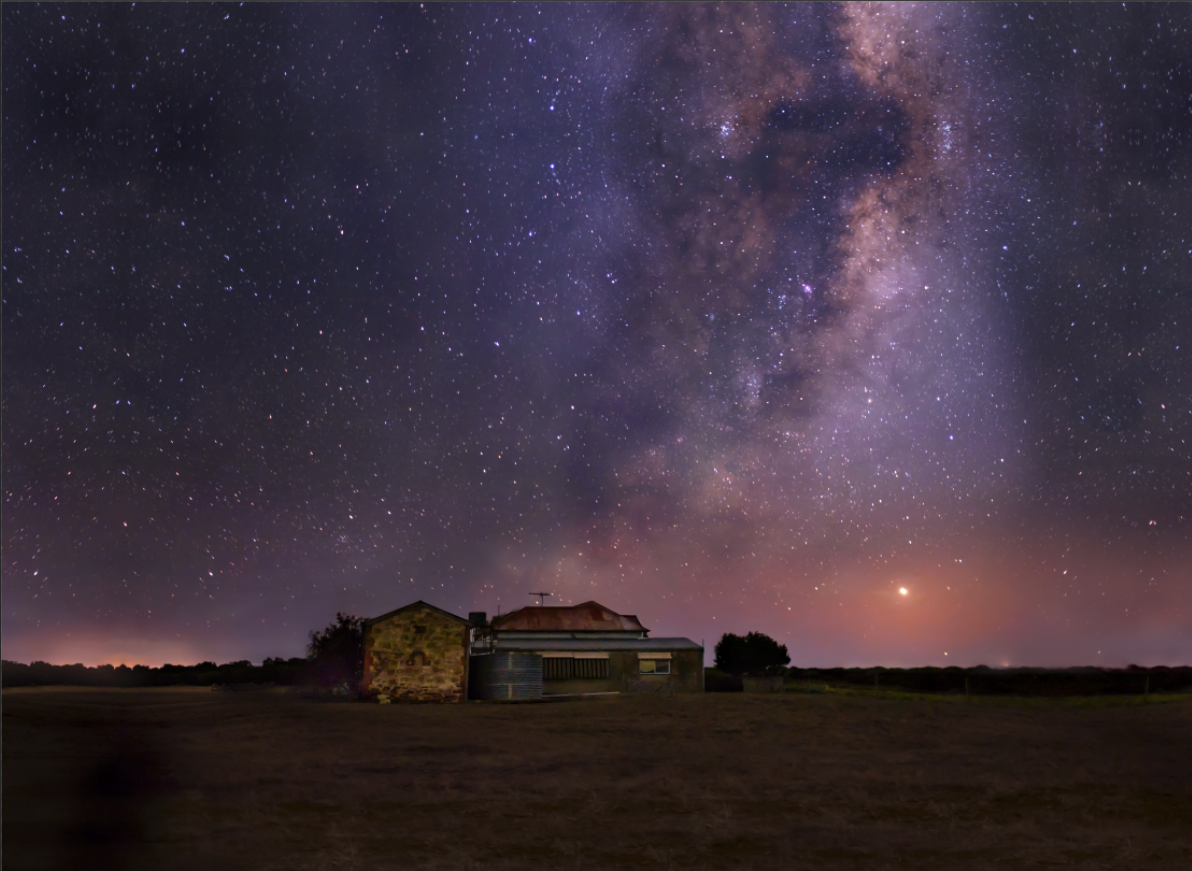
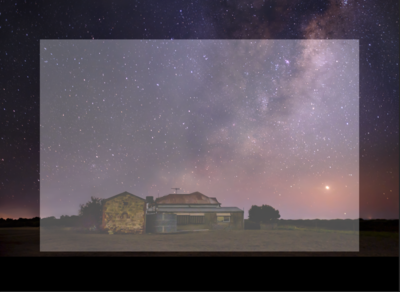
Hey Damien I've been going through your tutorial on preparing images for a wrapped canvas and I'm feeling a bit stuck. I took a photo a couple of nights ago and framed it exactly as I wanted it and even ended up using a couple of other shots to fill in areas that needed a bit extra, so there's really no extra parts of the image that I planned to crop out. While I know you should shoot loosely if there's any chance of your photo ending up on a canvas etc.. I only shot this for me and some friends and family have gotten a bit excited about it and I've been asked for prints and a canvas. The canvas is 20cm x 30cm (8"x12") and I've created the new document, extended the canvas size in black for the wrap area and and placed my photo, as per your tutorial, and I've attached a screen shot of this. Obviously I can stretch the image out a bit and cut some off of what you will see when the canvas is hanging up but a huge part of what people seem to love about the photo is how high the Milky Way goes up and the general composition, so I feel like I'd be losing impact by just stretching it out to cover the whole wrap area (although the ground at the bottom is so narrow that I'd have to closet some of it in to the wrap area or the house would be sitting on the bottom of the canvas). I've added a second screen shot with the image extended out to cover the whole wrap (reduced to 70% opacity) but I've had to push it up so that there's still ground under the house and would have to clone in the black area at the bottom of the frame. Because I have to push the image up so much to compensate for the narrow ground area, I lose even more of the Milky Way than I otherwise would. The way the light and colours change through the sky make me feel like it's an impossible job to clone the wrap areas in and I don't think I'm too shabby at cloning in general (although obviously not as good as you are). Do you have any suggestions on what the best way is to get the wrap areas filled without losing a huge chunk of the photo in the area that will be visible? ETA: I put this in here rather than in preparing for print as it's more about the cloning/editing part than the preparation process, if that makes sense?

-
Clone Stamp Not Working
Snook replied to Snook's topic in Photoshop / Elements / Bridge / ACR questions or problems
I had to google how to do it but I went in to my brush settings and checked the box for Shape Dynamics and locked it on with all the options set to off, because I don't like my pen being pressure sensitive. It's fixed both the clone stamp and the healing tool. :-)
-
Clone Stamp Not Working
Snook replied to Snook's topic in Photoshop / Elements / Bridge / ACR questions or problems
Wheeeee! I'm sorted. Thank you so much! -
Clone Stamp Not Working
Snook replied to Snook's topic in Photoshop / Elements / Bridge / ACR questions or problems
Tablet. I just tried it with a mouse and both clone stamp and healing tool are working properly, so it must be the tablet settings! You're a clever, clever man, Damien Symonds. -
Clone Stamp Not Working
Snook replied to Snook's topic in Photoshop / Elements / Bridge / ACR questions or problems
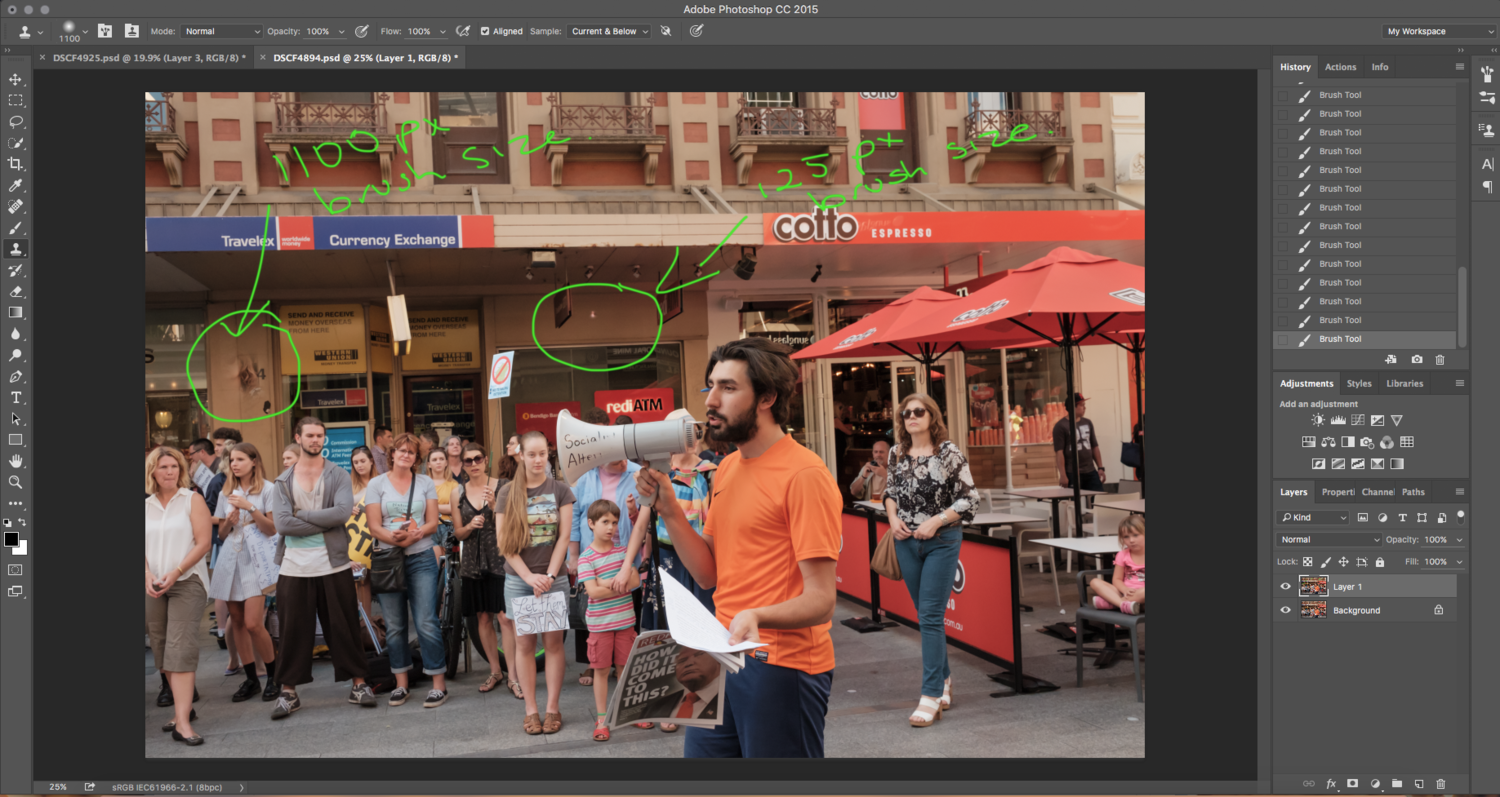
I've just done random cloning on a fresh image so you can see what is happening. I've circled where I've tried to clone people's faces on to the building (obviously not my aim but it's easier to see than proper cloning) and written the brush size. On both spots I only applied the brush one time but brushed back and forth over a small area to build up the cloning a bit.
-
Clone Stamp Not Working
Snook replied to Snook's topic in Photoshop / Elements / Bridge / ACR questions or problems
Yes, the brush works normally if I just try and paint on either a duplicate of the background or a blank layer. -
Clone Stamp Not Working
Snook replied to Snook's topic in Photoshop / Elements / Bridge / ACR questions or problems
Yep, it's the same on a duplicate of the background layer. I appreciate your help. -
Clone Stamp Not Working
Snook replied to Snook's topic in Photoshop / Elements / Bridge / ACR questions or problems
I've restarted my computer and I've run a clean up with Clean My Mac since it was almost due to be done anyway and there's no change. The healing tool isn't working and the clone stamp is still doing the same thing. No, it's happening on multiple photos. -
Clone Stamp Not Working
Snook replied to Snook's topic in Photoshop / Elements / Bridge / ACR questions or problems
I've just reset them and it's still doing the same thing. I'll try restarting in case that's why the reset hasn't changed anything. -
Clone Stamp Not Working
Snook replied to Snook's topic in Photoshop / Elements / Bridge / ACR questions or problems
I've turned on the document profile indicator and am in sRGB. I have a Mac desktop running El Capitan and Photoshop CC. It is under 12 months old, and has 8GB of RAM. Its hard drive has 465.95GB free out of 999.03GB. The last time I shut down was earlier today. I run a cleanup program about once a week. Yes, I know I should do my cloning before my adjustment layers but I didn't. Yes, I've tried increasing the brush size and it clones a larger area but still much smaller than the brush size and it's very hard, unlike when I cloned prior to reset my PS preferences. No there are no pixel layers above my background layer and by not working at all, I mean that I click on the spot I want to heal and nothing happens. -
Clone Stamp Not Working
Snook replied to Snook's topic in Photoshop / Elements / Bridge / ACR questions or problems
I also just tried using the healing brush on the background layer and that's not working at all either. No, I haven't restarted my computer because I only just turned it on before I opened PS. -
Clone Stamp Not Working
Snook replied to Snook's topic in Photoshop / Elements / Bridge / ACR questions or problems
No, I don't. I've kept trying with it and now it will clone but when I sample an area and then try to clone, it's only cloning like it's set to a fine pen kind of hardness and width, even though I have a soft brush selected. -
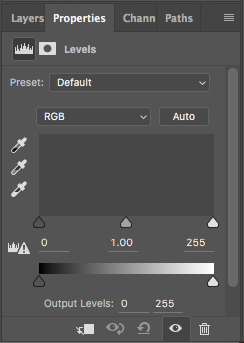
Hey Damien and co. I've just tried to use my clone stamp tool for the first time since resetting my PS preferences to fix a different problem and it's not working and I can't work out why. I've searched the AD FB group and can't find an answer. I've attached a screen shot of my workspace with the clone stamp tool selected. Thanks!
-
Need help with editing sessions
Snook replied to Krista's topic in Miscellaneous questions or problems
I might be able to take some of your editing on but I'd need to know a bit more a out your style and what you're delivering to clients. -
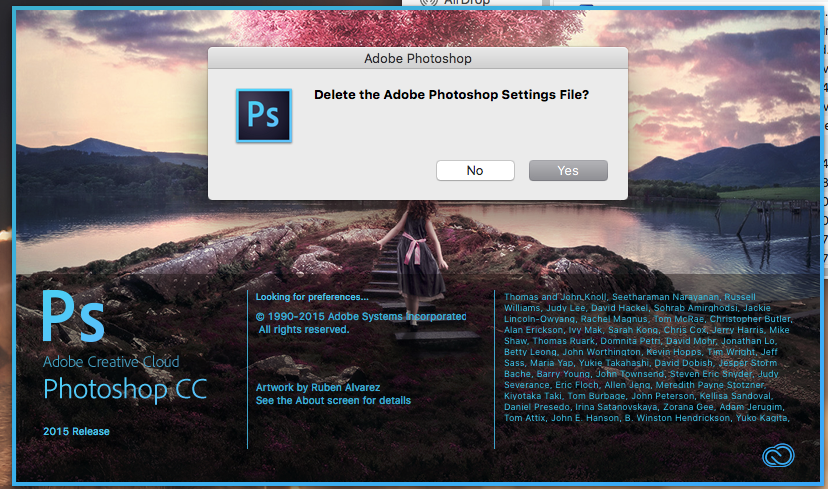
Since updating to El Capitan more than three months ago, I've been unable to create a selection on my photos and use that that selection to create an adjustment layer because the mask would be completely transparent and there would be no information at all in the histogram on the adjustment layer. It didn't matter which tool or method I used to create the selection, the mask and histogram were blank. I've attached a screen shot of what the histogram would look like, which is the same as if you have a black layer mask in place, and the layer mask instead of being all white or all black, would be filled with grey and white checks like what you see if you create a new file with a transparent background. As you can imagine, it's been driving me nuts the whole time and significantly increasing how long it takes me to edit. I posted for help on the Adobe help forums and did endless amounts of googling but couldn't find a solution, until tonight. I saw on a forum that someone had suggested resetting the Preferences in Photoshop to see if it fixed some glitches a member was experiencing in PS. This is the link that was posted https://helpx.adobe.com/photoshop/using/preferences.html#Restore%20preference%20files%20to%20default and I used the shortcut Option+Command+Shift and held them down while opening Photoshop. A window will pop up saying 'Delete the Adobe Photoshop Settings File?' and you click 'Yes' and that's it. It's completely fixed the problem although it has set my Preferences to the default option so my window layout was not how I like it and there may be other things I discover that have changed from what I was using but they will be easy enough to change back to how I like things. I would recommend before resetting your Preferences, that you save your current workspace set up by going to Window - Workspace - New Workspace in the menu options and giving it a name like My Workspace (or whatever works for you). Then when you've reset the Preferences, you can just go Window - Workspace - My Workspace and it will all change back to the layout you had before the reset (thanks to Damien for teaching how to do that in his Bridge video).

- 1 reply
-
- 2
-