Lara
-
Posts
144 -
Joined
-
Last visited
-
Days Won
5
Everything posted by Lara
-

How to navigate this site
Lara replied to Lara's topic in Getting started, Guidelines and Announcements
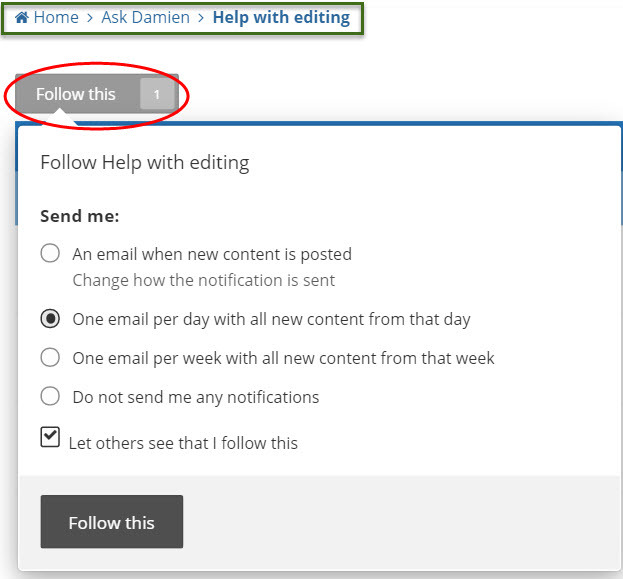
How to follow a specific post for replies If somebody else asks a question and you would like to be notified when it is answered, open up the post and click the Follow This button and choose the frequency of notifications. This is the only way to follow a post, because you can't comment with "following" or anything to that effect because generally only post authors can reply on a post. You will then be asked to select your notification preferences. Make a choice and click the Follow This button. To change your post notification preferences for a particular post, open up the post and click the Following button, change the setting and click on Update Preferences. To stop following a post, open it up and click the Following button, and there is an option in the bottom right of the drop down box that says Unfollow.

-
How to navigate this site
Lara replied to Lara's topic in Getting started, Guidelines and Announcements
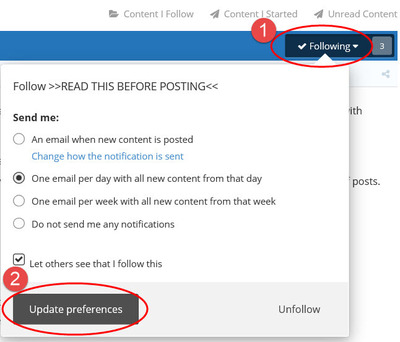
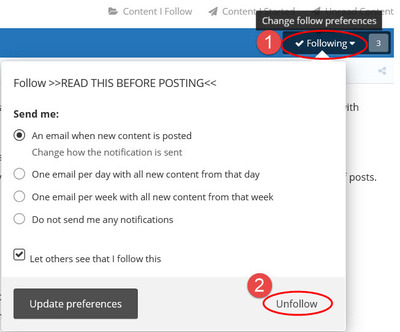
How to follow a whole section This is really useful to be notified of all of the posts in a topic area, such as "Help with Editing" or "The DSLR Bistro" etc. Some sections will be of interest to you, and others not so much. To follow the whole topic area, open it up and in the top left there is a gray Follow This button. Choose your email notification preferences and you will be sent a regular email with the posts, including links. In this way, you can keep on top of what's happening (in areas of interest to you) without actually visiting the site, unless you want to read more, or ask a question yourself. How to stop following a whole section or change section notification preferences Go to the relevant section and click on the gray Following button in the top left corner: You will then be able to choose less frequent notifications, and then click Update preferences. You will also see an Unfollow option in the bottom right corner. To stop following a section altogether, click on Unfollow.


-
How to navigate this site
Lara replied to Lara's topic in Getting started, Guidelines and Announcements
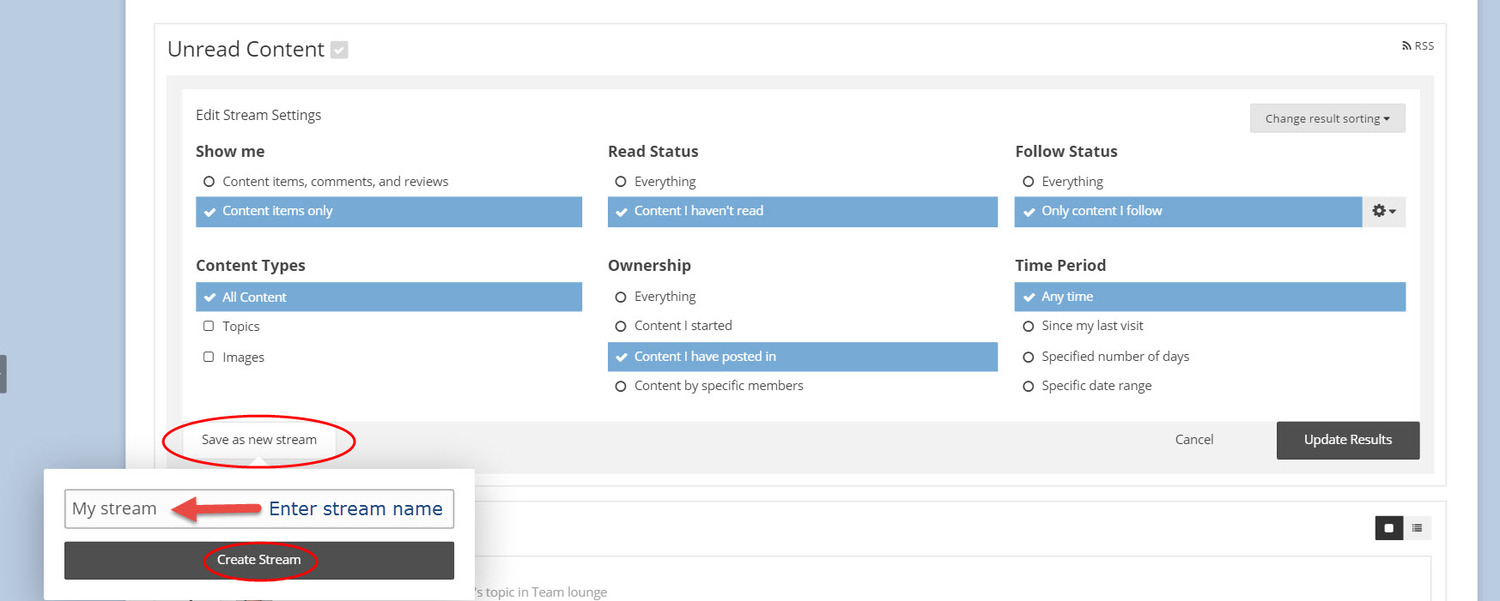
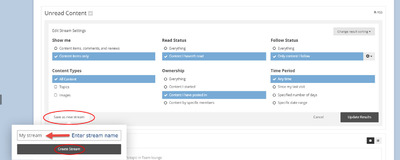
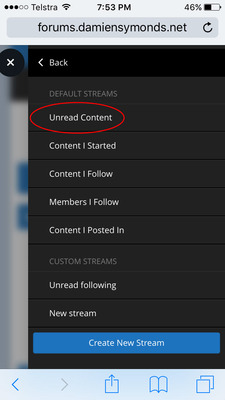
Seeing specific new content since your last visit On a computer, go to the top right and you can view new content that you have either followed or started: Customizing your Activity menu: You can make a customized Activity menu, and you can have it show next to the above default options. To do this you need to create a new activity stream. On a computer: click any of the default options, and once it opens, click Edit this stream: Make your selections and then click Save as New Stream, give it a name and click Create Stream. To make this custom activity stream to show in your view options, tick the box next to the activity name and you will see it appear in the right side of your screen, alongside the default activity view options.


-
How to navigate this site
Lara replied to Lara's topic in Getting started, Guidelines and Announcements
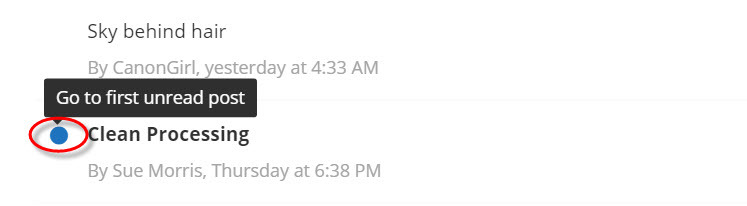
Jumping straight to fresh/unread content on a thread Once you have read a few threads, next time you visit you may notice a big dot next to some post titles. If you click this dot, it will open the thread and jump to the content you haven't read yet. This saves you scrolling through the thread to work out where you were up to. You will also see a black line in the thread showing the cutoff between content you've read before, and content that is new. The dot works on computers and mobile devices (although it can be challenging to tap the dot on a small mobile device). The dots can also be seen in the Unread Content view. Note that if you want to read the thread from the beginning, just click the post title instead, rather than the dot.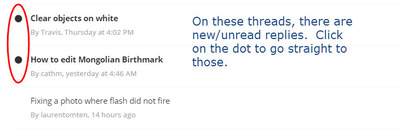

-
How to navigate this site
Lara replied to Lara's topic in Getting started, Guidelines and Announcements
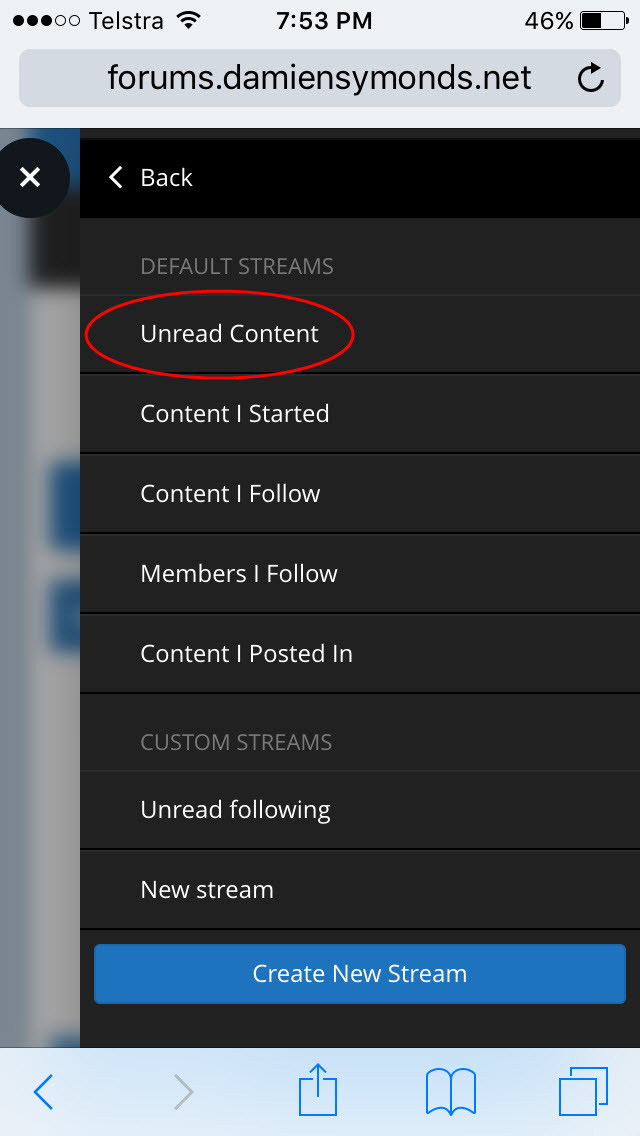
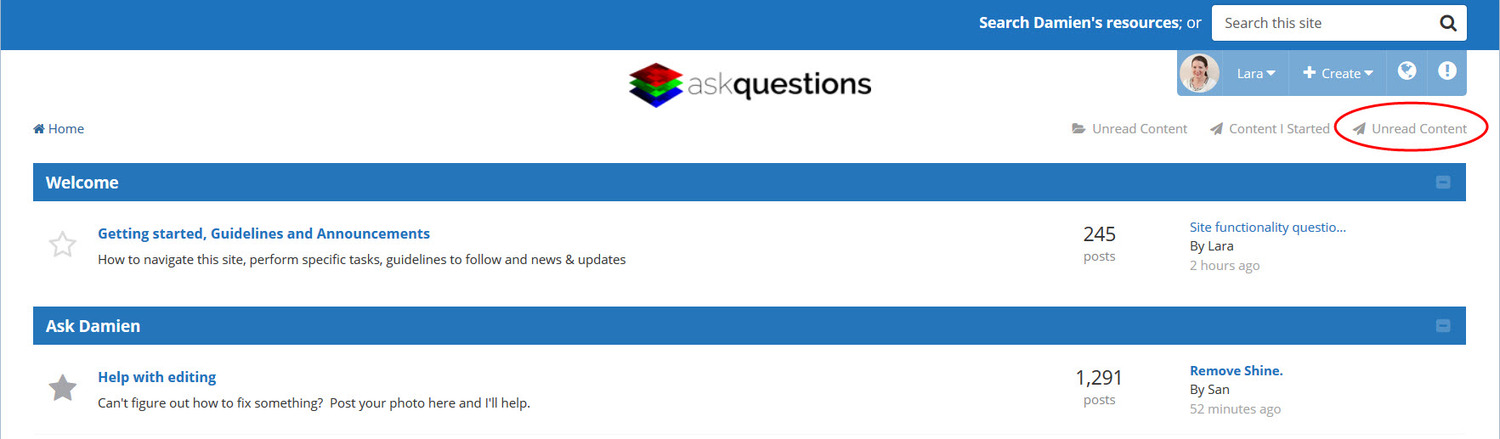
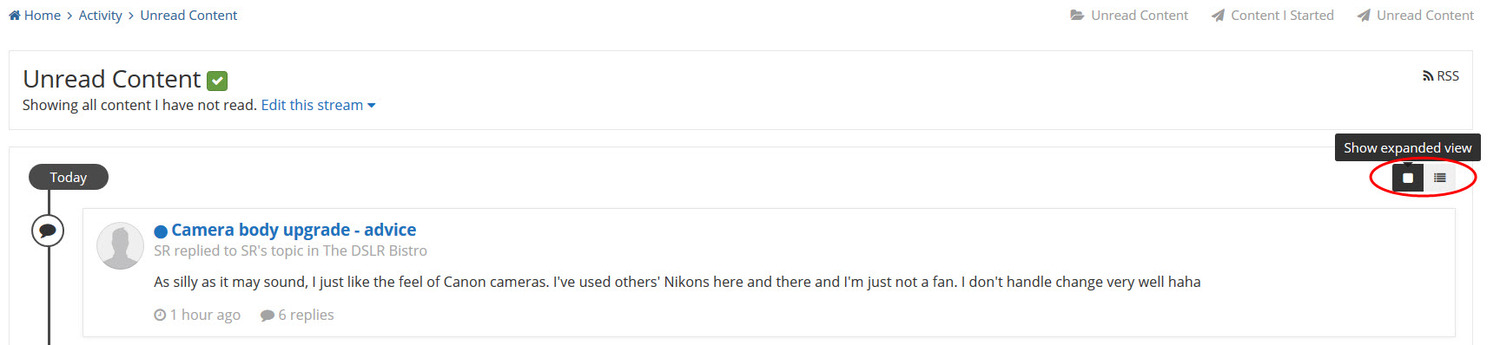
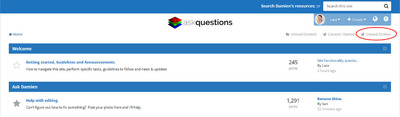
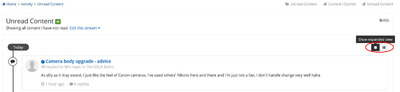
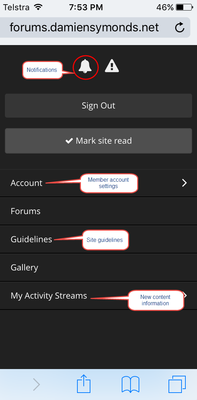
Seeing all new content since your last visit On a computer: in the top right corner below your member name there is a link called Unread Content. This will show you all activity since you last visited, across all of the topic areas. You can choose to see the activity in either a "condensed" or "expanded" view by clicking the icon in the top right of the screen. They key difference is that the expanded view shows you the comment made, not just the title of the post that has some new content. See below: On a mobile device: first access the menu (3 stripes in top right corner), then select My Activity Streams, then Unread Content. The condensed or expanded view works as it does for computer, outlined above.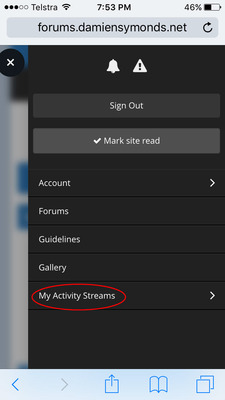
-
How to navigate this site
Lara replied to Lara's topic in Getting started, Guidelines and Announcements
How to change your member name If you have a need to change your member name, please go to the Contact section and create a post to log a request and provide your new preferred member name. The site administrators can arrange this for you. -
How to navigate this site
Lara replied to Lara's topic in Getting started, Guidelines and Announcements
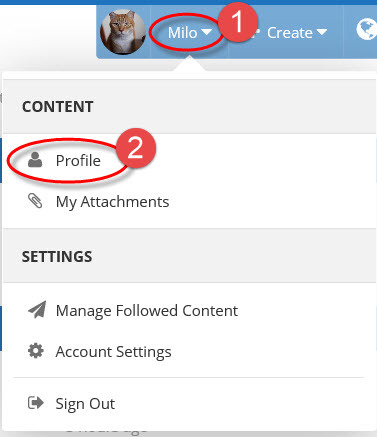
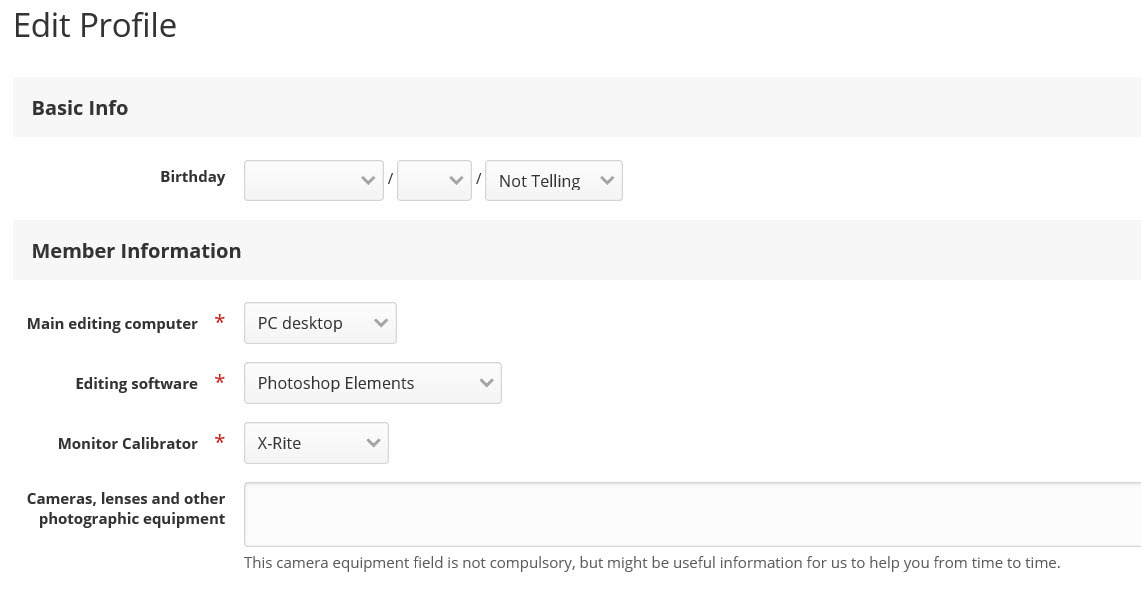
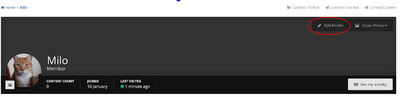
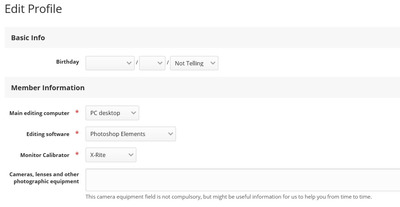
How to change your computer software or equipment details Your computer/software/calibrator information provided upon sign-up as a member is very important to help Damien and his team answer your questions and it appears on all of your posts automatically. If you need to update this information, click on your member name and select Profile, and then in the top right, click on Edit Profile and in the Member Information section, make any adjustments and click on the Save button.
-
How to navigate this site
Lara replied to Lara's topic in Getting started, Guidelines and Announcements
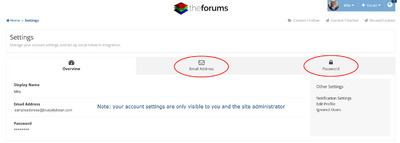
How to change your email address or password You can do this via accessing your account settings. Click on your profile name in the top right, and select Account settings. From there you can make any changes. Only you and administrators can see your details. Your password is not visible.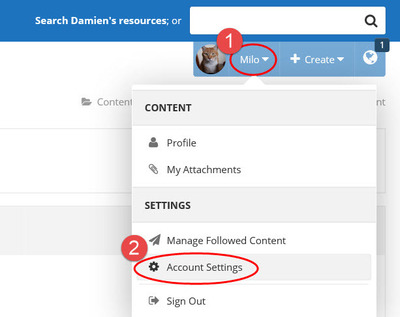
-
How to navigate this site
Lara replied to Lara's topic in Getting started, Guidelines and Announcements
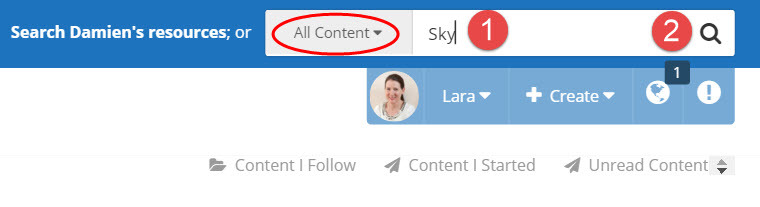
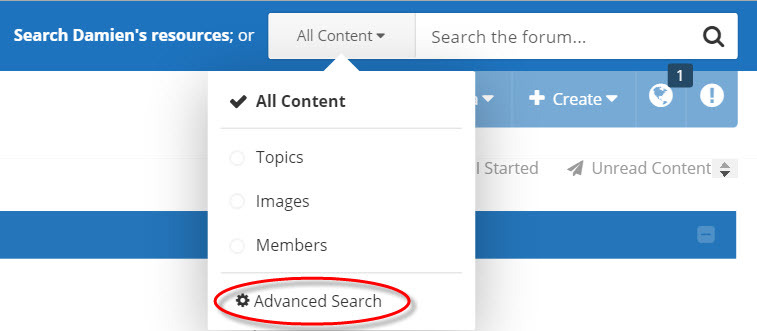
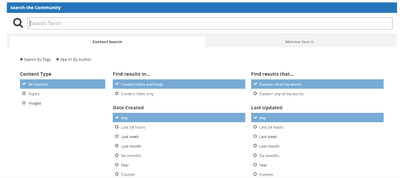
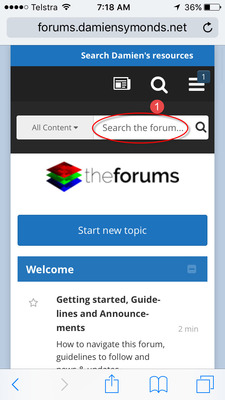
Searching the site on a computer To search the site, use the search bar in the top right corner. Click once in the search box and enter the key word, then click the magnifying glass for the results. The default option is to search "All Content" but you can specifically search in Topics or Members if you wish by using the drop down arrow next to All Content: Advanced search: click on the All Content drop down box next to the search bar and select Advanced Search. You will have options such as selecting a particular date range or to search topic titles only.

-
How to navigate this site
Lara replied to Lara's topic in Getting started, Guidelines and Announcements
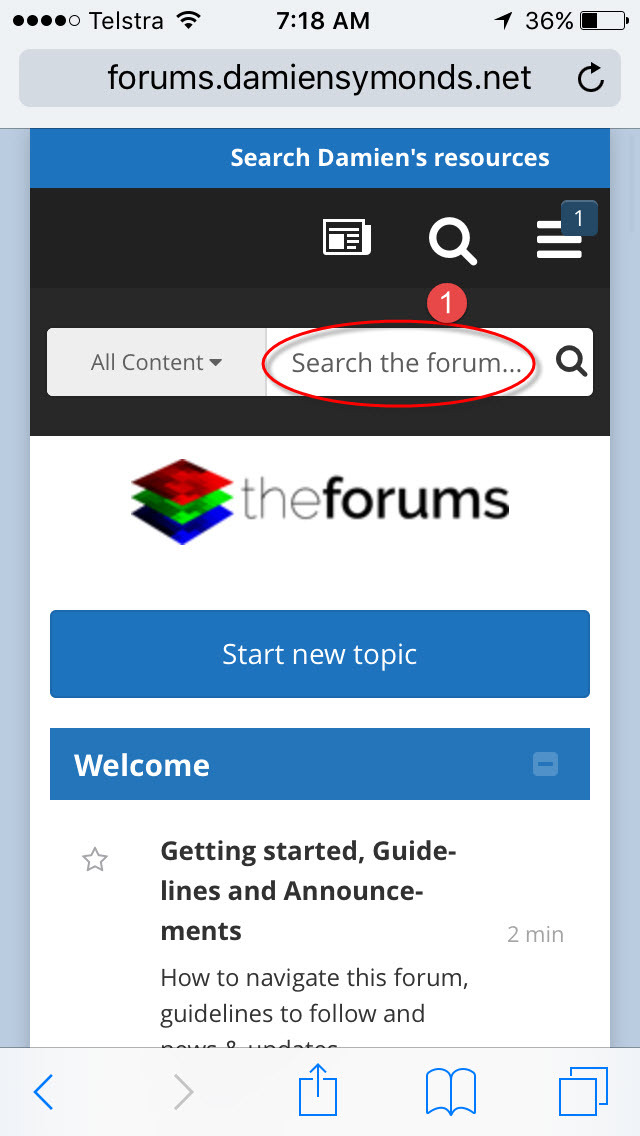
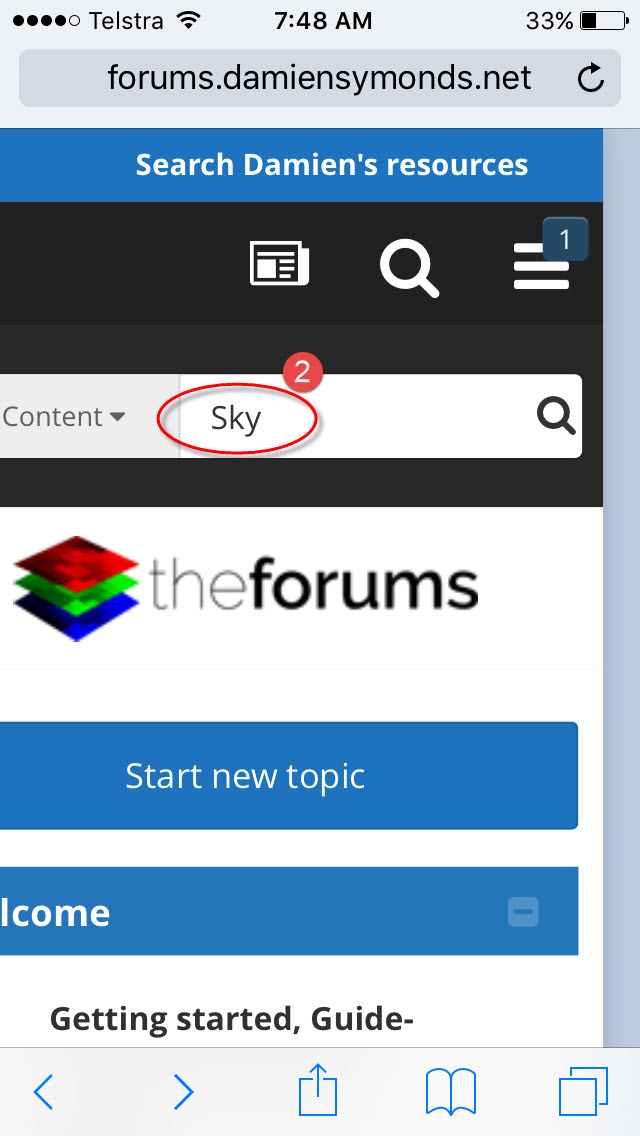
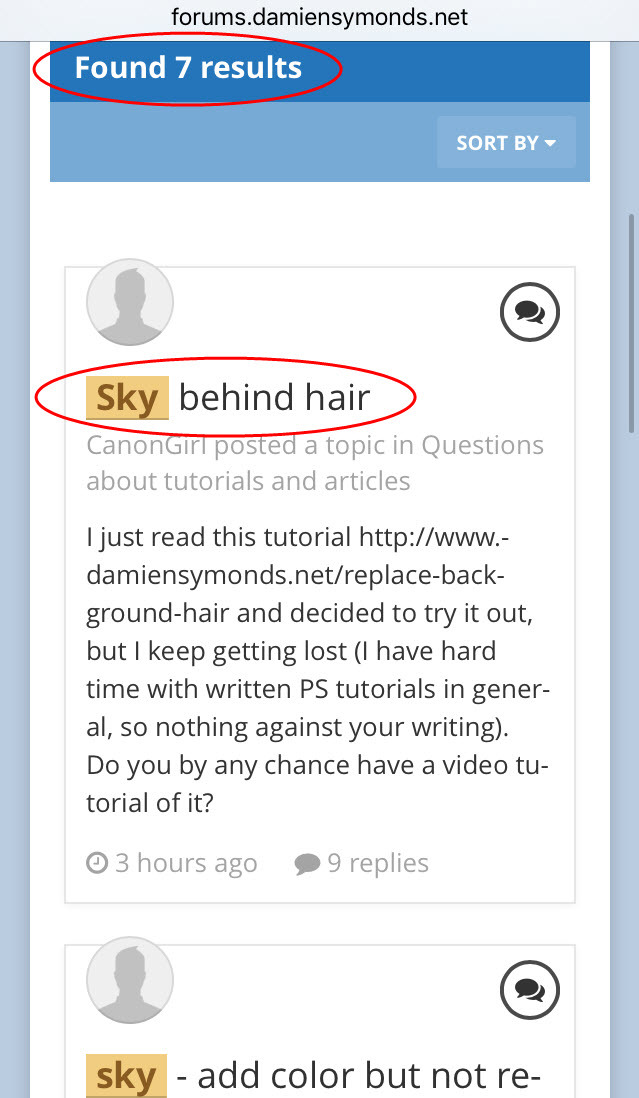
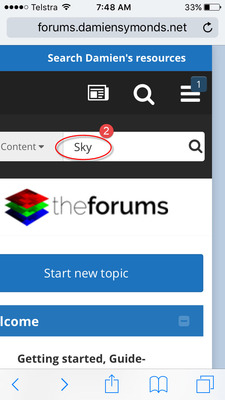
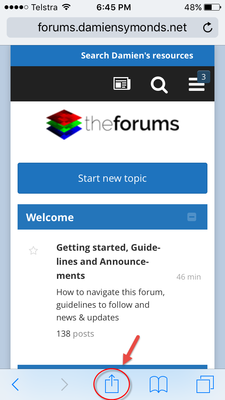
Searching the site on a mobile device Open the website (via a home screen icon is quickest!) and click on the magnifying glass. Next you tap in the search box (point 1 below). Enter your keyword/s (point 2) and then click the the magnifying glass (point 3). In this example, I wanted to check if there are some posts about changing or replacing the sky in a photo, so I searched for "sky". Scroll down a little and you will see the results. If you find a relevant result, click on the post title and it will open up the post. If you don't find what you are looking for, try a more general keyword, or go to the appropriate section and ask a question!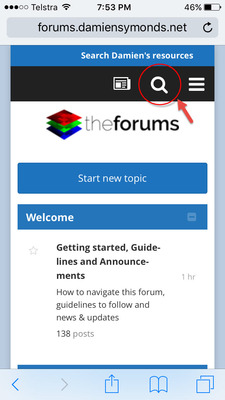


-
How to navigate this site
Lara replied to Lara's topic in Getting started, Guidelines and Announcements
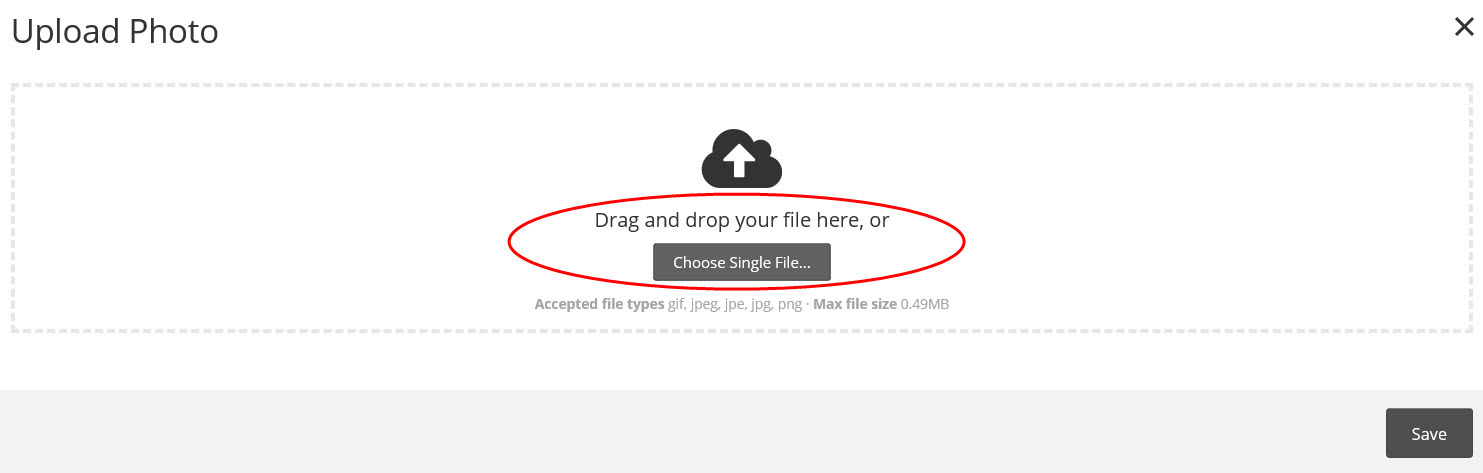
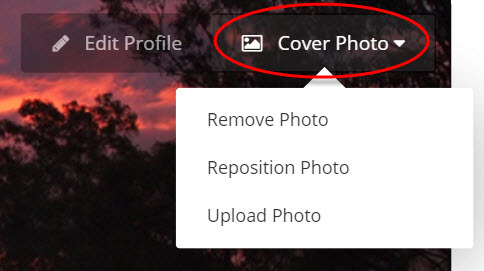
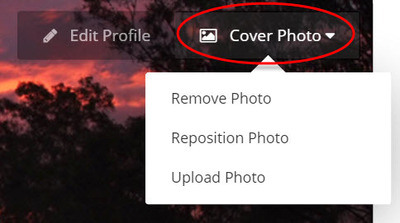
Adding a cover photo to your member profile If you want to, you can change the cover photo/banner behind your profile photo. Note that other people will only see your cover photo if they choose to visit your member profile, or if they hover their mouse over your name on a post. If you don't choose one, it will remain as a black rectangle banner behind your profile pic (if you have chosen to have a profile pic). First, visit your member profile area by clicking on your member name in the top right corner and then selecting Profile. Then click on Cover Photo in the top right corner of your member profile and select Upload Photo. Select a photo to upload. The file size limit for a cover photo is 500kb (.5 megabyte), so use a web res version of your image so it is small enough. Click Save. On the next screen you will see your photo as a cover photo and can move it around to reposition it and then click Save. Updating or deleting your cover photo: Go back to your profile. Click on Cover Photo and the following options are available: Remove Photo will take you back to the default black rectangle instead of an image. Reposition Photo lets you move the current image around and Upload Photo lets you add a different photo.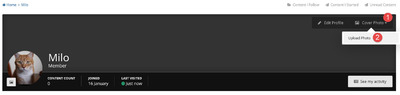
-
How to navigate this site
Lara replied to Lara's topic in Getting started, Guidelines and Announcements
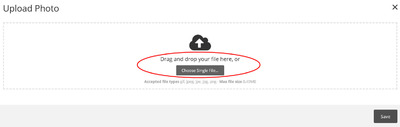
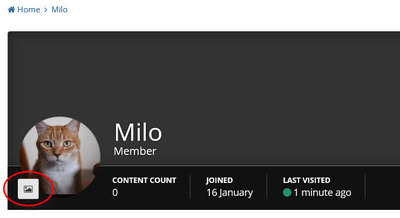
Adding a profile photo The profile photo is the small round photo next to your member name in the top right corner of your screen. It will not show on your individual posts. This is so the posts are not unduly lengthy, and easier to scroll through. Your profile photo is visible on the Unread Content activity views. It is also visible if somebody views your member profile. To set up a profile photo, go to your member area. The quick way to do this (on a computer) is to just click on your profile photo circle next to your member name in the top right. The longer way is to click on your member name and then select Profile: In your member profile area, you can add a profile photo by clicking on the image icon shown below. Repeat this process if you decide to change your profile photo later on.
-
How to navigate this site
Lara replied to Lara's topic in Getting started, Guidelines and Announcements
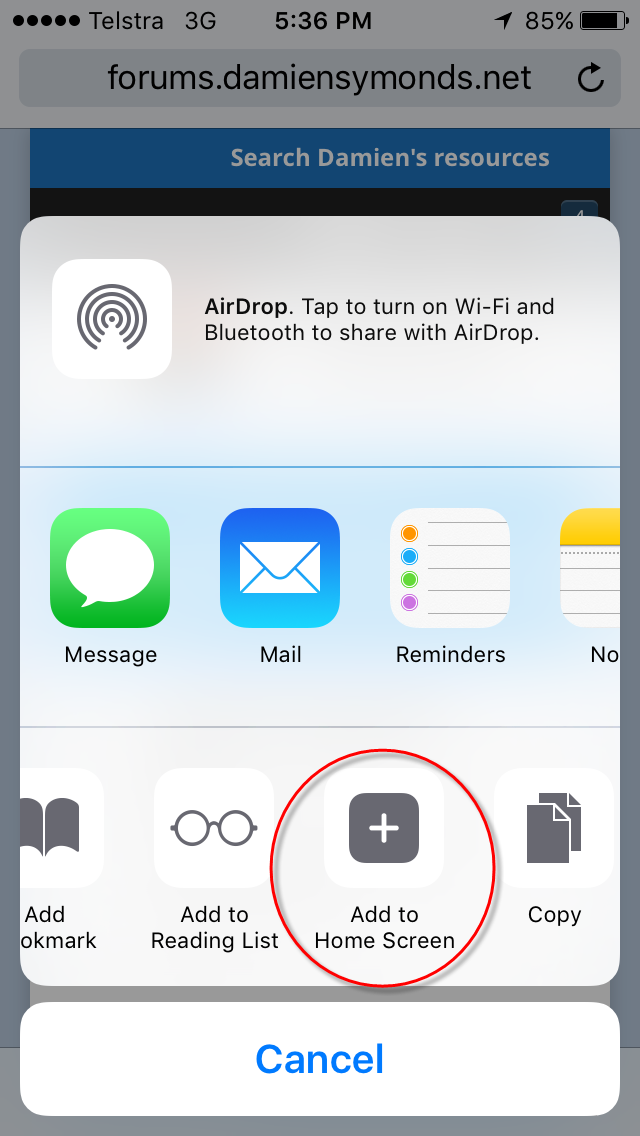
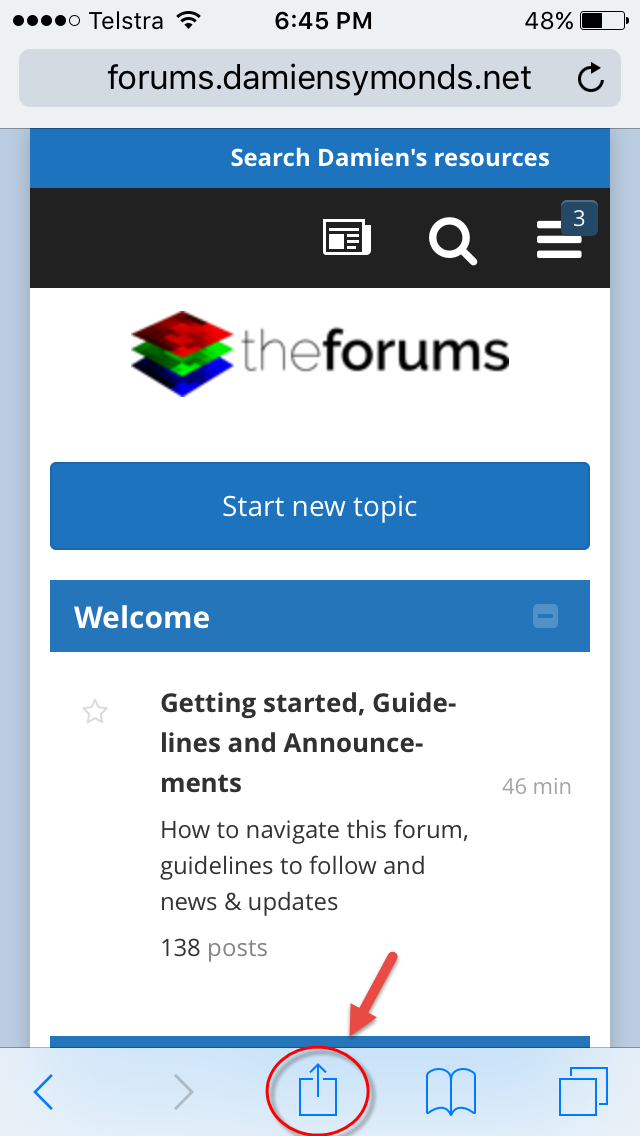
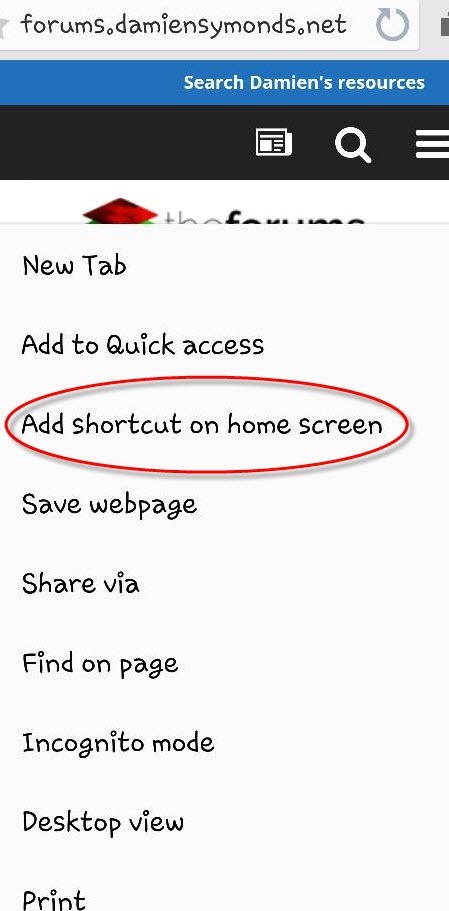
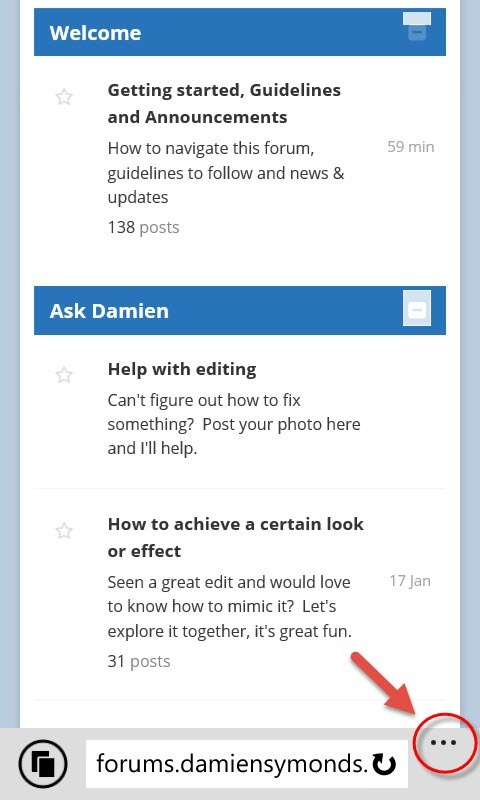
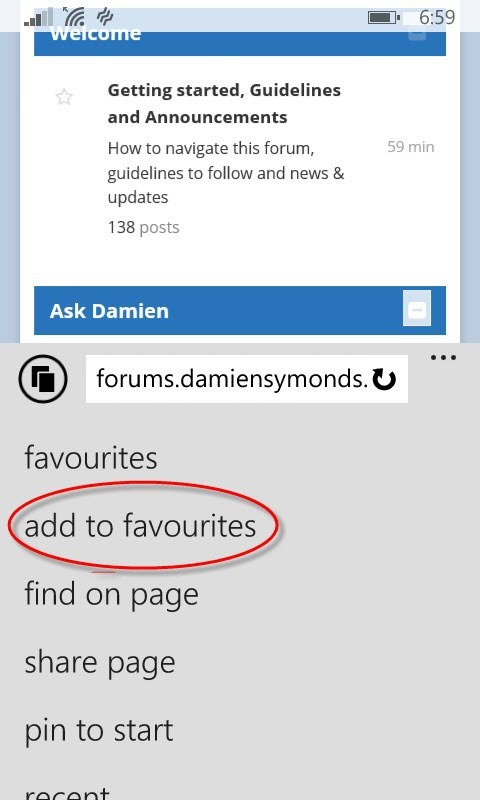
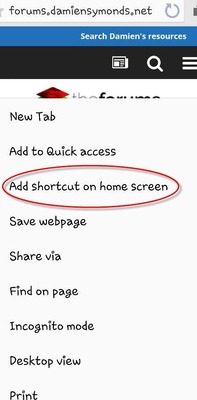
Setting up a home screen icon on your mobile device This makes the website appear as an app icon and it means you don't need to type the address into your mobile web browser. It makes it a lot quicker and easier to access the site. On an Apple device, open the site on Safari and click on the square & arrow box, and then scroll until you find the Add to Home Screen option. On an Android device: open the site, go into options and add a shortcut to your home page. On a Windows mobile device, open the site, click the 3 dots in the bottom right corner, and then select Add to Favourites:

-
How to navigate this site
Lara replied to Lara's topic in Getting started, Guidelines and Announcements
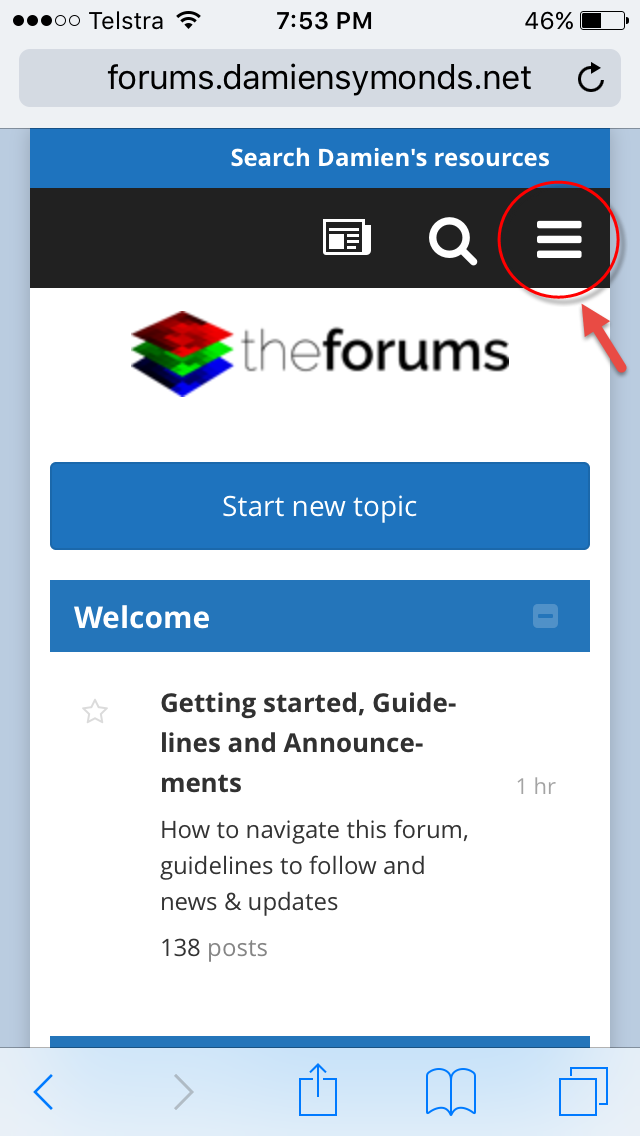
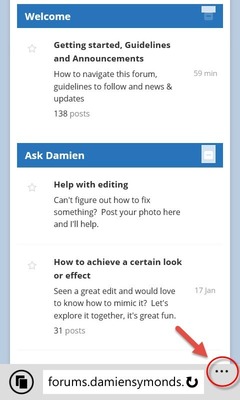
Viewing the site on your mobile device Breadcrumb: In a portrait orientation, there is no breadcrumb viewable, but if you turn your device sideways into a landscape orientation, you should see it in the top left corner. Use the breadcrumb to quickly navigate back to a particular area of the site. Site menu: You will see a menu icon (with 3 stripes) in the top right corner. (If you can't see this icon, it could be because you are holding your device in a landscape orientation. Rotate your device so it is in a portrait orientation and you will see it). There are a number of options available to you via the menu icon: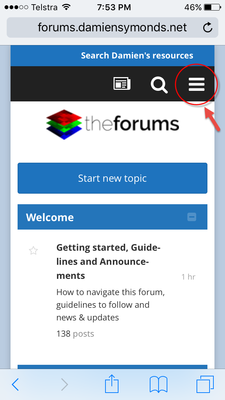
-
How to navigate this site
Lara replied to Lara's topic in Getting started, Guidelines and Announcements
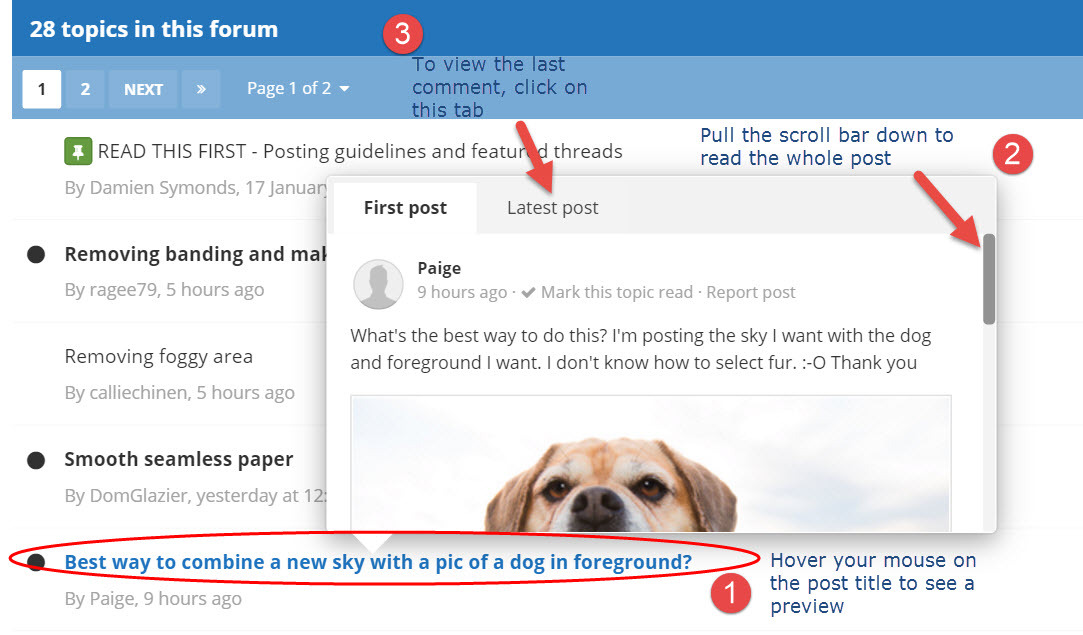
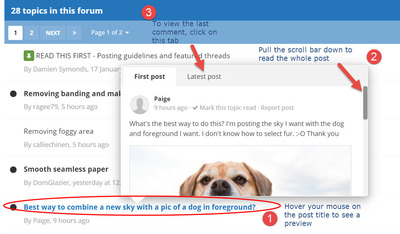
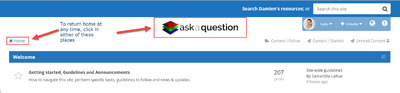
Viewing the site on your computer Home: The home page shows each of the sections and topic areas. To find your way back to his page at any time, either click on Home in the top left corner, or click on the "ask a question" icon in the top centre of the screen. Breadcrumb: As you visit the various sections to view posts, you can see where you are in the site by looking at the "breadcrumb" in the top left of the screen that looks like this: In the above example, the section is "Ask Damien", the topic area is "Help with Editing" and the post/thread is named "Neck Liquify or dodge or both". These are all hyperlinks, so if you want to go back to the Help with Editing area, click it in the breadcrumb. Likewise, if you want to return to the Ask Damien section, click on that. To go back to the main page to see all sections and areas, click on Home. Scroll up button: As you scroll down the page, you will see a white up arrow in a circle in the bottom right of your screen. Click this to jump up to the top of the page. Previewing a post: when browsing on a computer, hover your mouse over any post title and you will see a popup box containing a preview of the post content. If it's a long post, you will see a scroll bar on the right of the box and you can use your mouse to scroll through the whole thread without actually opening it. This makes it easier to identify the posts you are interested in.

-
Welcome to this site - a place where you can ask questions about image editing, and learn from other people's questions as well. Here are some tips to help you find your way around. Sections The sections are: Ask Damien - for questions and problems related to image editing (Photoshop, Adobe Bridge, Lightroom etc) Ask Brian - for questions about computers and camera gear Classes - only visible to students who have been admitted to classes Contact - to send a message to Damien and the team. Access Guest vs member access: As a guest, you can view the majority of site content, but some areas will not be visible and you will not be able to ask a question. You will also need membership to access classes on this site. Membership is free. An overview on the sign up process can be found here. About the site This is a Question & Answer website, where you can get one-on-one help with your image editing questions from Damien and his team. In most of the sections, you can post new questions, which will be answered by Damien or the team. Please feel free to read everybody else's threads, and reply if you have a directly related question; but if the thread triggers a different question in your mind, please start your own thread. How to do specific tasks Click on the links below to jump straight to further information on the topic. If you have a question not covered below, please reply to the Site functionality questions post. Looking around: On a mobile device: Setting up a home screen icon on your mobile device Viewing the site on a mobile device Searching the site on a mobile device On a computer: Viewing the site on a computer Searching the site on a computer Your member profile / details: Adding a profile photo Adding a cover photo How to change your email address or password How to change your computer software or equipment details How change your member name Keeping up with activity: Seeing all content since your last visit Seeing specific new content since your last visit Jumping straight to fresh/unread content on a thread How to follow a whole section How to set up notifications of replies on posts (including setting an automatic notification to get replies on all your posts) How to follow specific posts for replies Follow another member's activity Mark a section (or site) as Read Posting a question / creating a topic: Sections members can post on How to create a post / ask a question How to add one or more images to a post Deleting an image in a post (before you have submitted it) Repositioning an image in a post Replying on your post / using the Quote function How to use Multi-quote Editing your post after submitting it: After you submit your topic, the option to edit it is available for a brief window of time. Other: Enlarging an image in a post: Simply click or tap the image once and a larger version fills your screen. Click the X in the top right to close the enlarged view. This applies to all the images posted on threads, including the screenshots in this thread. Share a post (eg in an email or on Facebook) Signatures: These are not enabled by design, to make it easier to view content on computer screens and mobile devices. Private messaging: This is not enabled, but if you need to contact Damien and the team, you can create a post in the Contact section. If you have a question about how to use this site that has not been covered on this thread, please ask your question here.
-
Hi Emma, could you please post this on the Raw class on Facebook? The classes haven't moved to the forum yet.
- 1 reply
-
- 1
-

-
ACR: Adobe camera raw (the raw processing plug-in that comes with Photoshop and Elements) CA: Chromatic aberration: a type of distortion in which there is a failure of a lens to focus all colors to the same convergence point. "The purple fringe" CC: 1. (Adobe) Creative Cloud or 2. Constructive criticism CMYK: Cyan/Magenta/Yellow/Black (the colours of ink from which all other colours are printed) (K is black because B was already taken for Blue. Also it used to be called the "key" colour.) CR2: Canon raw format CS6(/5/4/3/2/etc): Creative Suite 6. Strictly speaking, this refers to the whole Adobe suite (InDesign, Illustrator, etc). But mostly, in this group, when we say "CS6", we're just talking about Photoshop. DNG: Digital Negative (a generic raw file format) DOF: Depth of field DPP: Digital Photo Professional (Canon's raw processing software) DR: Dynamic Range ETTL: Expose to the left ETTL (flash): Evaluative-Through The Lens (auto) ETTR: Expose to the right HDR: High Dynamic Range JPEG: Joint Photographic Experts Group (named after the organisation who made it - compressed file format; the most common image format in the world) LR: Lightroom NEF: Nikon raw format NR: Noise Reduction / Removal OOC/SOOC: Out Of Camera / Straight out of Camera (as in straight out of camera with no processing) (Only applies to jpegs. Cannot, by its nature, refer to raw files, which always need at least some processing in order to be viewed). OOF: Out of focus PP: Post-processing PS: Photoshop PSD: Photoshop Document (the all-encompassing file format - layers, channels, high-bit, etc) PSE: Photoshop Elements RGB: Red/Green/Blue (the colours of light from which all other colours are made) (The three colour channels which make up all digital images) SOOC: Straight out of camera SOOR: Straight out of raw - a file that has only clean raw edits done, no Photoshop work as yet sRGB: standard RGB colour space, used on monitors, printers and web browsers. SS: shutter speed TIFF: Tagged Image File Format (similar format to PSD, but not specific to Adobe) WB: White balance
- 1 reply
-
- 15
-