Lara
-
Posts
144 -
Joined
-
Last visited
-
Days Won
5
Everything posted by Lara
-
Wow, that is stunning!
-
If you can provide a crop of the shirt that doesn't show the subject's face then he won't be identifiable, hence there is no need to worry about a model release.
-
 Because you shot in RAW, when you edit the images, you can give them the sRGB colour space.
 -
Yes, it's possible in Elements (including 14), but Damien doesn't have any tutorials on it. You should be able to find quite a few tutorials via Google.
-
All the tutorials are here: http://www.damiensymonds.net/tutorials.html
-
You can find the "multiplicity" tutorial here: http://www.damiensymonds.net/2010/05/what-do-you-do-for-kicks-on-weekend-i.html
-
Using Damien's Workflow with Mastin Labs Presets
Lara replied to black_roses426's topic in Lightroom questions or problems
Don't mind him, he is just not a fan of the film look and prefers clean edits. Damien also hasn't used the Mastin presets. If they can't easily be used later (after global adjustments) then I'd say they don't really fit with Damien's recommended workflow, but experiment a little and see. -
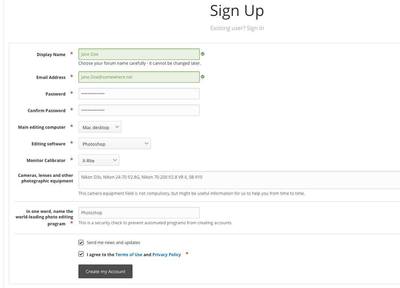
For any guests who would like an overview of how to sign up as a member, see below: 1. Click the blue Sign Up button at the top 2. A Sign Up form will appear for you to complete. See below for an example of how to fill it out. (If you click or tap on the below image, it will enlarge on your screen so you can see it more easily). Tips here are: Your display name can be whatever you like (if it's not already taken). It doesn't have to be your actual name, but choose carefully because you can't change it without help from an administrator. Type your email address carefully as you only enter it on the form once. Fields with a red star are mandatory. There is quiz question you need to answer to prove you are a real person and not a spambot. The answer is Photoshop You need to accept the terms of use and privacy policy. Click on Create My Account and you are now a member. You should receive a confirmation email in your inbox. If the process didn't work: Check that you completed all of the mandatory fields (that have a red star) Check that you ticked the box to accept the terms of use and privacy policy Make sure you got the quiz question right. The answer is in bold above. You might have entered your email address incorrectly - if so, start the process again.
-
- 2
-

-
Sarah, is it just that one troublesome file?
-
If you taper a shirt, you take out some of the bulk and make it fit more firmly.
-
Screen changes when laptop plugged in vs unplugged
Lara replied to Shaun's topic in Miscellaneous questions or problems
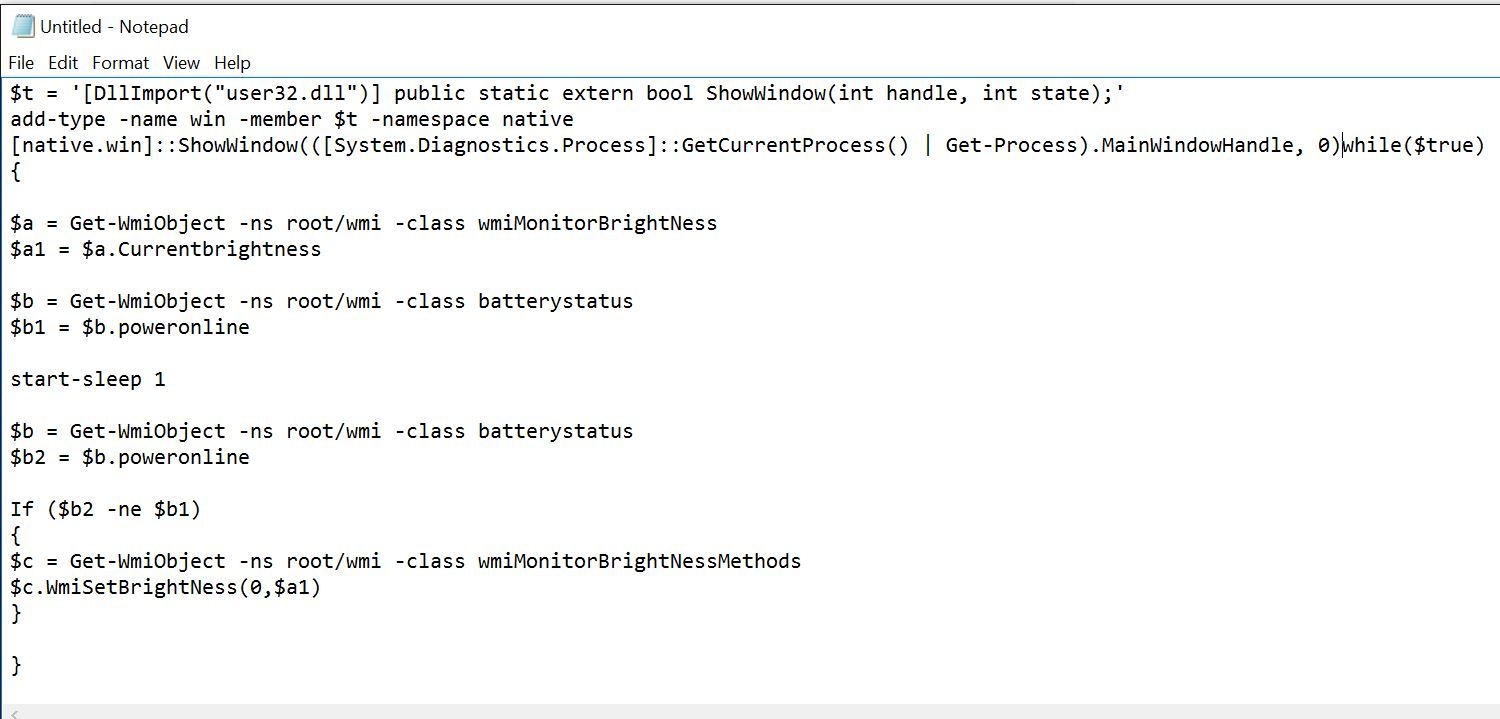
I observe this on my laptop too, but to my eye it's a brightness shift. If it really is a brightness issue, there could be a solution to your problem here: http://superuser.com/questions/471073/how-to-prevent-laptop-screen-brightness-from-changing-when-un-plugging-battery-p The process is to enable Powershell commands, make a script (i.e. copy text into a notepad file), save the notepad file in your Windows folder and make a shortcut in your Startup folder. The script ensures that even if the power source changes, the brightness of the screen will not change. So sign in as an administrator and follow these steps: 1. Run Powershell (search your computer for "Powershell" and run the desktop app). Check your current Powershell policy setting by typing Get-ExecutionPolicy. It will probably return the result Restricted. 2. Change Powershell policy to Unrestricted by typing the command Set-ExecutionPolicy Unrestricted (More info here: https://technet.microsoft.com/en-us/library/ee176961.aspx). This will allow the script to run, otherwise it will be blocked. 3. Make a notepad file containing the script. It looks like you need to combine the two scripts on that superuser thread (copy the script text from user Jacopo Irace's answer, then DrNT007's answer). My notepad file ended up looking like this: 4. Save this file into your Windows folder. Give it a file name with no spaces in it and make the extension of this file ".ps1" Make a shortcut to this file in your Startup folder. If you try it and this doesn't fix your problem, reset your Powershell policy: go back into your Powershell desktop app and change your settings back to Restricted by using the command Set-ExecutionPolicy Restricted. And you can delete that script file if you want to.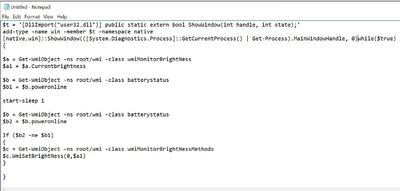
-
How to navigate this site
Lara replied to Lara's topic in Getting started, Guidelines and Announcements
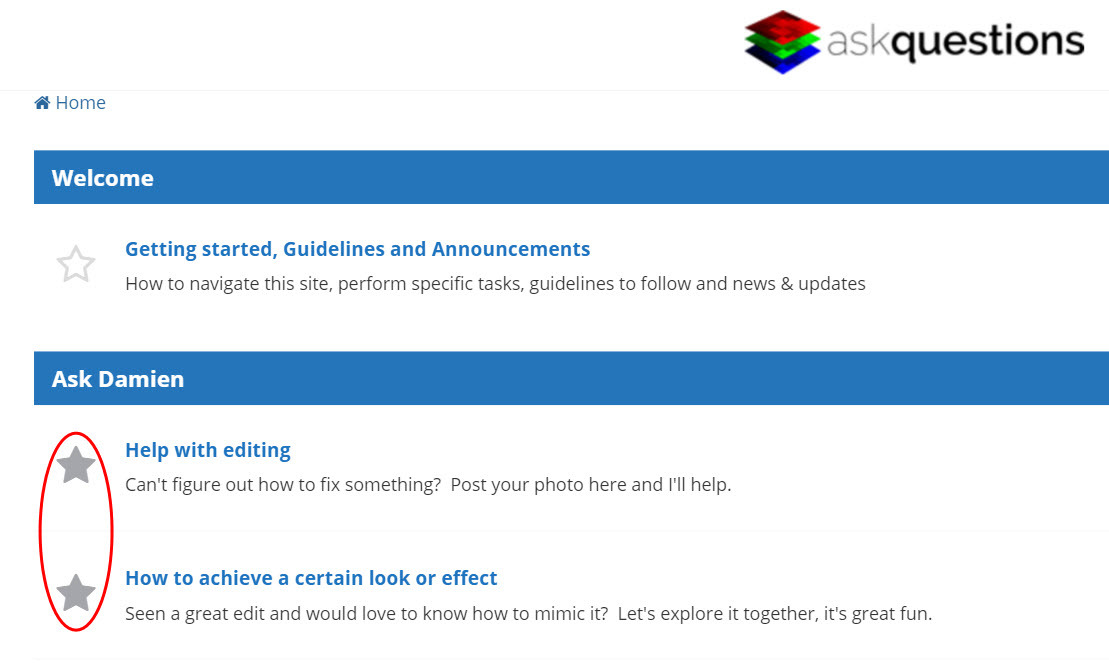
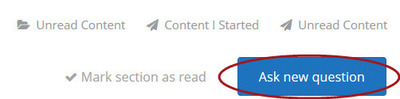
Mark sections as Read If you visit a section and see a solid star next to the section name, there are new posts & replies in that section. If you are not interested in that topic area, you can mark the section as read (without actually reading the posts) by clicking the star. It will then change to an outline of a star. The benefit of doing this is that it will clear those posts out of your Unread Content feed (accessible via the Unread Content link in the top right corner). If you want to mark everything in the whole site as Read, scroll down the bottom of your screen and click on Mark Site Read. This will clear everything out of your Unread Content feed in one go.
-
There is a lengthy thread here on how to do various things on this site, however the top things to do are: 1. Make a shortcut icon on your phone or tablet 2. Set up automatic notifications so that you will be notified of replies on all of your posts 3. Follow whole topic areas you are interested in (eg Help With Editing) so you will receive emails about new content 4. Set up your member profile and add a profile photo if you want to When you visit again, check on what's new via the Unread Content view (link in top right). Maybe even ask a question!...
-
- 2
-

-
-
Cropping
Lara replied to Emmam17's topic in Output - print, websites, Facebook, email, client disk, etc
Hi, take a look at this article and see if it helps: http://www.damiensymonds.net/2014/03/how-aggressively-can-i-crop.html If you need further help , please reply so we can assist. -
How to navigate this site
Lara replied to Lara's topic in Getting started, Guidelines and Announcements
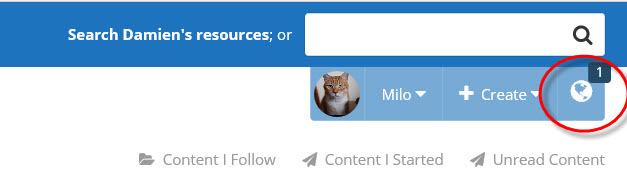
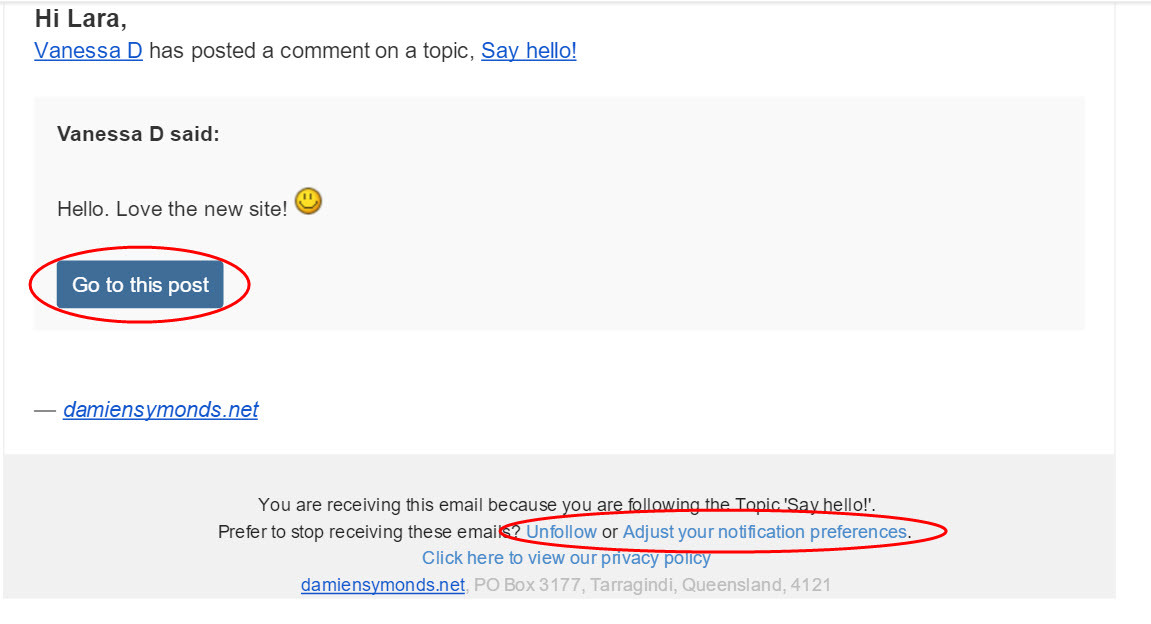
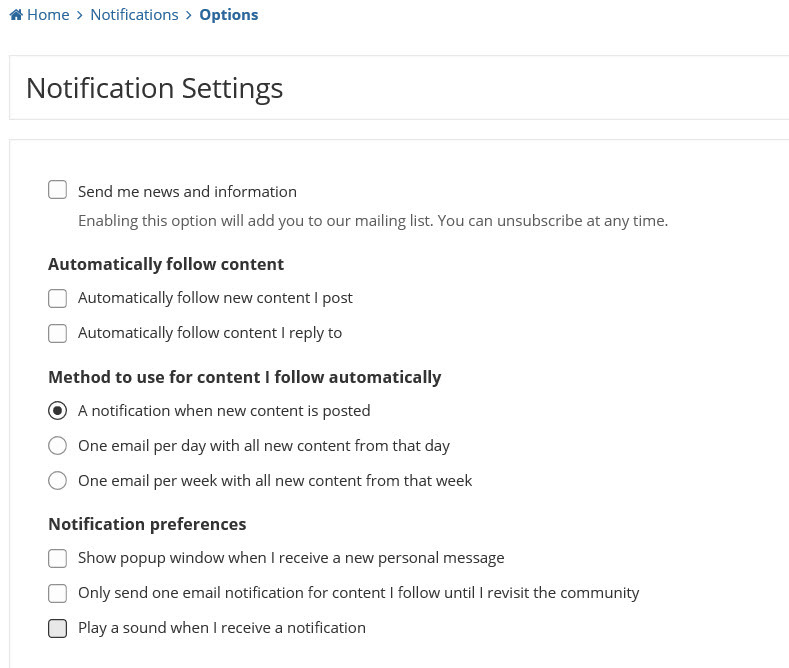
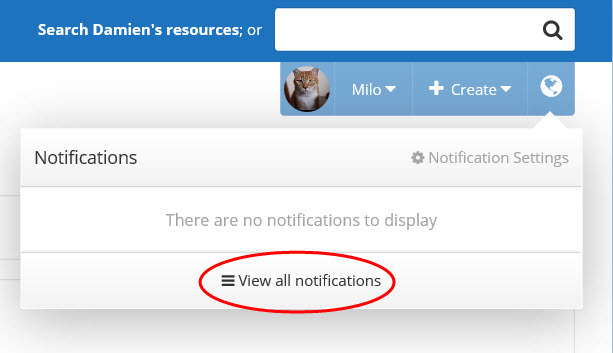
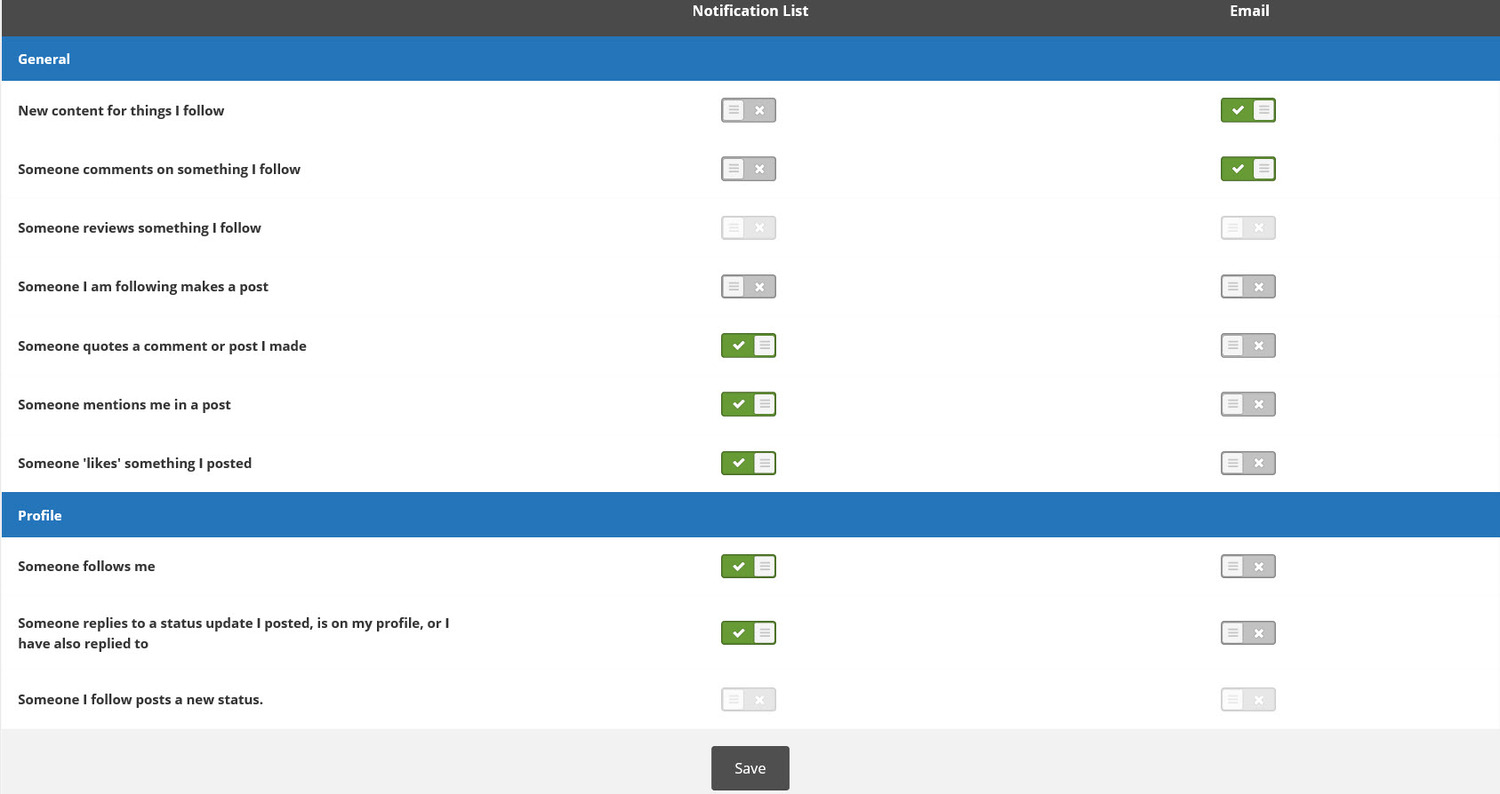
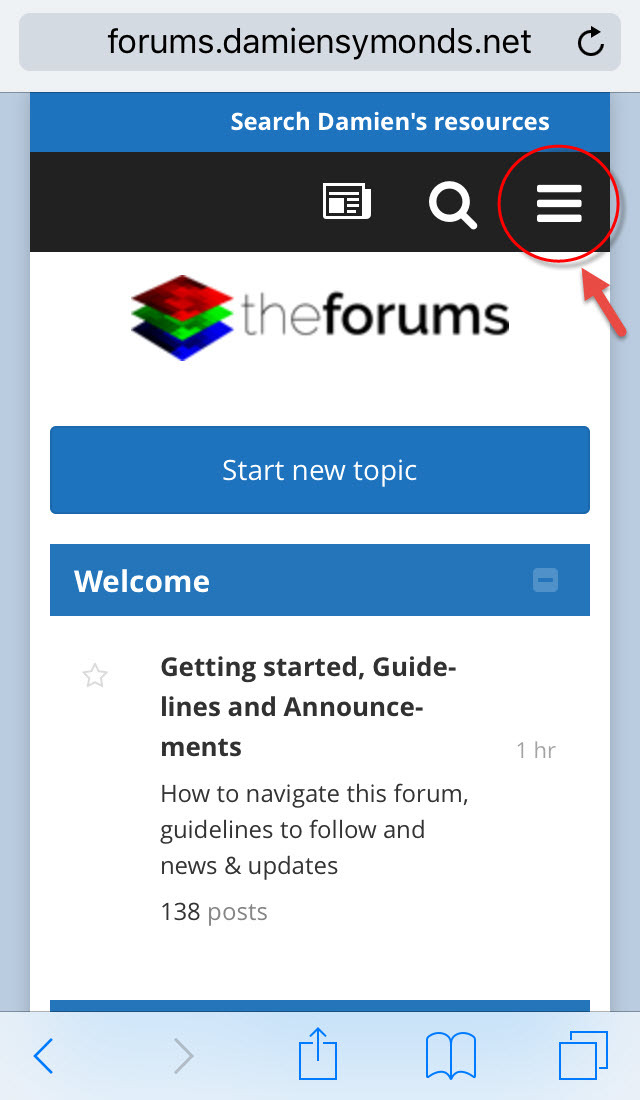
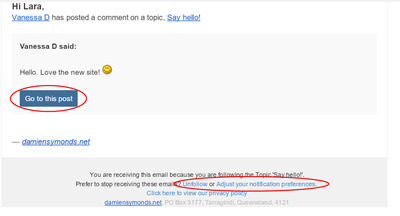
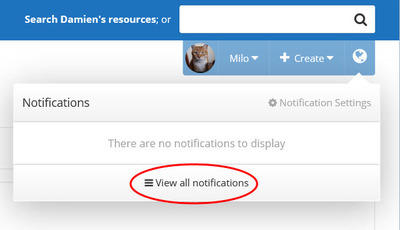
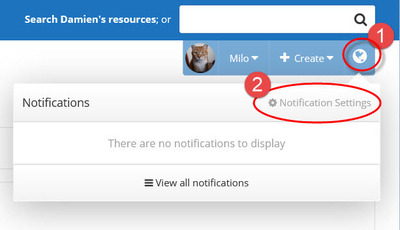
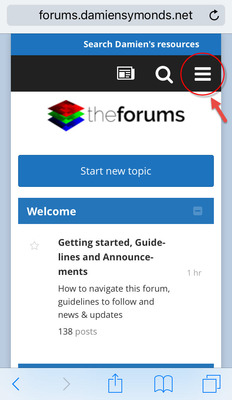
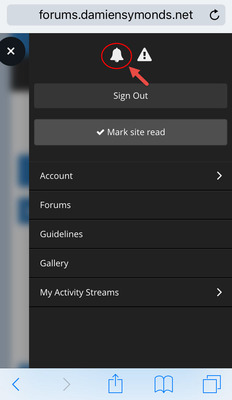
Notifications On the site: You can see certain activity since your last visit via the notifications icon. It's the globe icon in the top right corner. If there is a number on the globe, this refers to the number of notifications you have. Click on the globe and a preview of the activity will be listed. If you would like to see the notifications listed on a separate page, click on View all notifications: By email: Certain activity will also be emailed to you by default. For example, if you have followed a thread and there is some new activity on that thread, you will receive an email that looks like this: You can click the Go to this post button in the email to go directly to that post if you want. The name of the member who has posted a comment shows as a hyperlink (Vanessa D in this example). You can click that link to visit their member profile on the site. At the bottom of the email are links to change your preferences and stop receiving emails if you wish. Activity that appears in both site notifications and via emails by default includes: New content for threads you follow Someone comments on something you follow A member you are following makes a post A member quotes a comment or post you have made Someone mentions you in a post , i.e. tagging. To tag a member in a post, it is the usual format of @membername. Activity that appears just in the site notifications (and not via email) includes: When someone 'likes' something you posted (The like button is on the bottom right of any threads/replies) When someone follows you Notification settings: On a computer, you can change your notification settings by clicking on the globe and selecting Notification Settings On a mobile device you can find the Notification Settings by clicking on the Menu icon (3 stacked bars in the top right corner) and then clicking on the bell icon at the top of your screen, as shown below: You can choose the frequency of notifications as follows. (Ignore the "send me news and information" box as we are not using a mailing list. Also ignore the option to "show popup window when I receive a new personal message", as we do not have personal messaging on this site): Note that if you think it likely that you will forget to use the "Notify me of replies" switch on your threads, tick the box that says Automatically follow new content I post. Scroll further down to change the type of notifications you receive in your site notifications, and in your email inbox. Once you have made your adjustments, click save. Repeat the process to change these notifications at any time.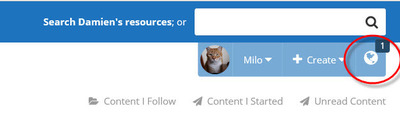


-
My understanding is that there aren't image size choices for RAW for Nikon, except for 12 bit or 14 bit compression, which is set in the NEF recording area. So maybe the medium setting is greyed out because it's not relevant if you are shooting just RAW (?) You can, however choose to shoot RAW + Jpeg, and you would have the choice of small / medium / large for the Jpegs. As for changing settings, try pressing the Qual button while turning the rear dial to choose RAW or RAW + Jpeg etc. Press the Qual button and turn the top dial to change the image size - but as above, this is only applicable for Jpeg or TIFF. If you've had a factory reset and need to change a bunch of other settings, I found a setup guide here that might be useful.
-
How to navigate this site
Lara replied to Lara's topic in Getting started, Guidelines and Announcements
Sharing a post To send a link to the post to an email address, or to share on facebook or google plus, click the Share icon in the top right (the three connected dots icon), then choose where you want it to go. You can also right click on the highlighted link and select Copy and then paste the link wherever you need it.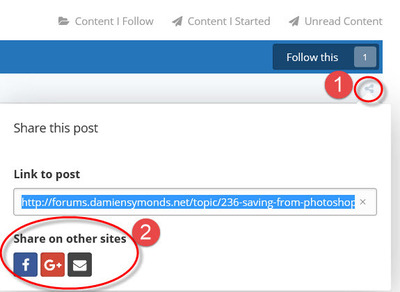
-
How to navigate this site
Lara replied to Lara's topic in Getting started, Guidelines and Announcements
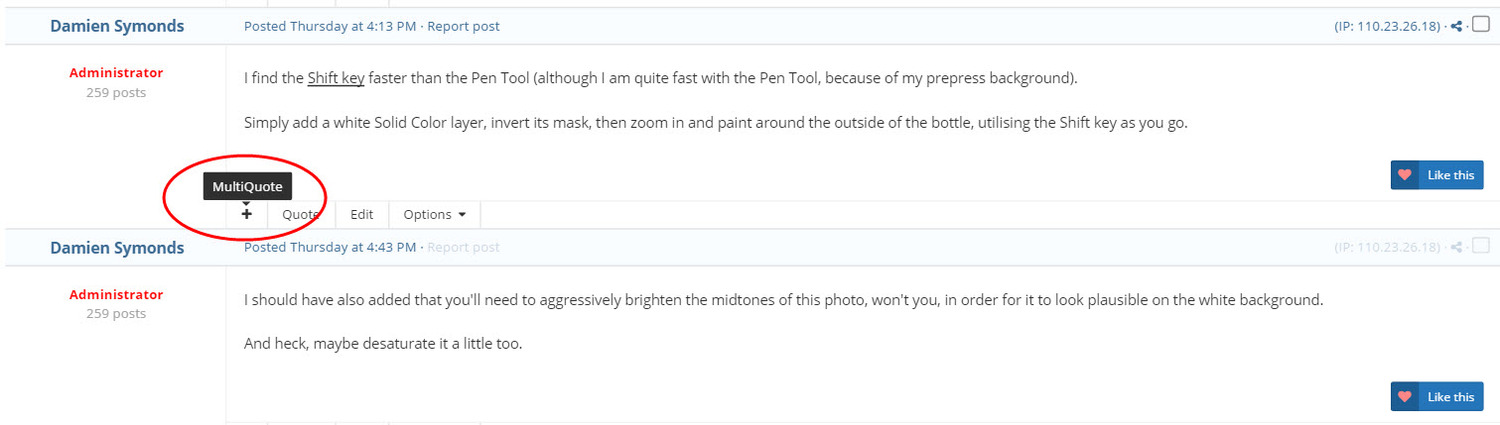
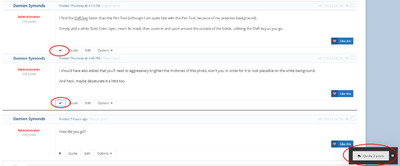
How to use Multi-Quote If you want a number of whole posts to be nested in your new reply, click the + sign next to the Quote function and it will show the tally of how many you are going to add. Then click the button in the bottom right corner: All of those posts will be nested inside your reply. You can also use this to insert quotes from a completely different thread altogether. Or from multiple different threads.
-
How to navigate this site
Lara replied to Lara's topic in Getting started, Guidelines and Announcements
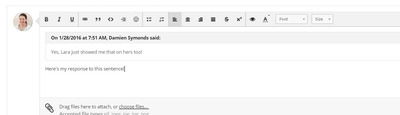
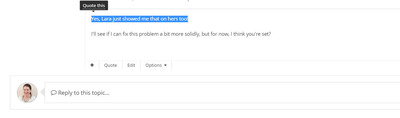
Replying on one of your posts / using the Quote function If you are the author of a post, you are able to reply on it, too. Some questions may have some ongoing correspondence between you and Damien or his team before you land at the answer. To reply, just starting typing in the Reply to this topic box at the bottom of your post. If you want to respond to a specific comment or question from anywhere in the posts in your thread, you can use the Quote function. Click once so your cursor is in the Reply to this topic box. Then scroll up and highlight with your mouse the sentence you want to respond to, and a Quote This box appears. Click on the black Quote this box, and the highlighted sentence will appear in a box, so that it's clear that you are responding to a specific sentence, or part of a sentence. See below for how the quoted sentence looks in your reply: Remember, you can only reply on your own questions. If you are reading someone else's question and have one of your own, please ask a new question. In this case, it is helpful to include a link to the other person's question in your post. Just open up the other person's post, copy the URL and paste it in your post body (or add it as a hyperlink if you want).
-
How to navigate this site
Lara replied to Lara's topic in Getting started, Guidelines and Announcements
Repositioning an image in a post If you want to shift your image from left justified, to centred, or right justified, first place the image in the post. Then click on it once and it will turn blue. Then use the formatting buttons in the posting section to shift your image. -
How to navigate this site
Lara replied to Lara's topic in Getting started, Guidelines and Announcements
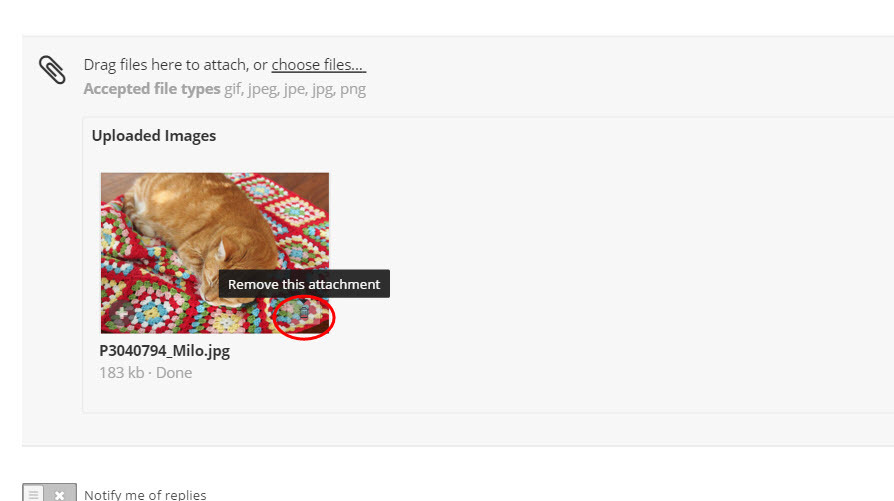
Deleting an image in a post (before you have submitted it) If you upload and place an image in your post, but want to remove it, go to the Uploaded images area at the bottom, find the image and you will see a rubbish bin in the bottom right hand corner of it. If you click on the bin, the image disappears from your image area, and from the post.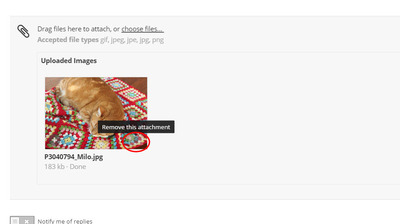
-
How to navigate this site
Lara replied to Lara's topic in Getting started, Guidelines and Announcements
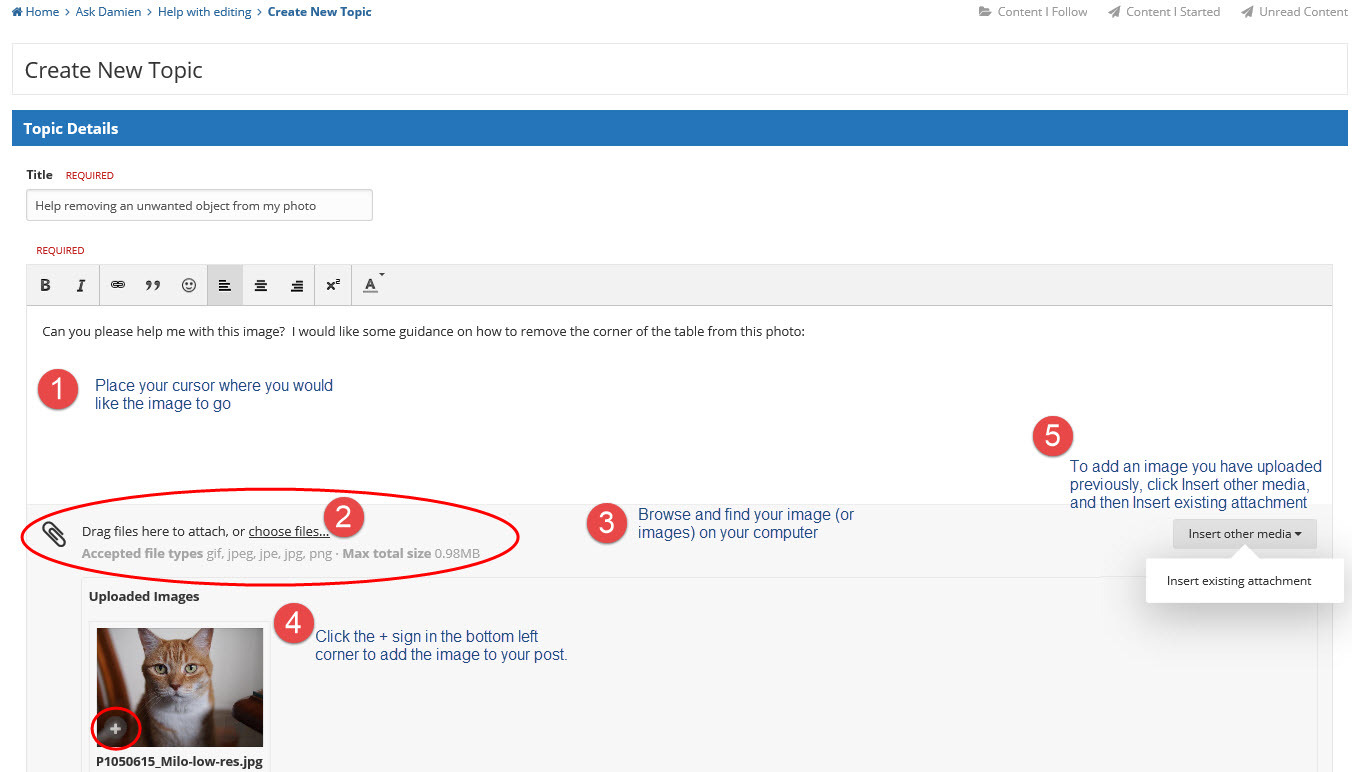
How to add one or more images to your post You are encouraged to add images to your posts and in some cases it will be hard for us to answer your question without seeing the image! Note that you must own the copyright for any images you upload, in line with the site terms and conditions and Copyright laws. It's a two-step process to add an image: Upload the image to the library, called the Uploaded images section, found underneath the post body Insert the image into the post. First, click your mouse in the position in the post body where you would like the image to go. Then upload your image to the library: either drag a file to the paperclip section under the post text, or click the "choose files" link to browse for your file on your computer, and upload it. You should then see the thumbnail of the image in your library. To insert the image into the post: click the + sign in the bottom left of the image thumbnail. If you forget to click on the + sign, your image will still be added to the post when you submit it, but it will be placed at the very bottom of your post, after the final sentence. You can upload multiple files at once, and the thumbnails will appear in your library. You can then click on the + sign on each image in turn, so they are added to your post in the desired order. You can place images side by side in the post. To do this, upload both images into the library, then insert one, add a few keyboard spaces and then insert the other one. We recommend that you upload jpg files. Once you have added an image, you may notice that it's quite small on the post. This is so threads containing images are easier to scroll through. When reading posts, if you click once (or tap once if on a mobile device) on any image, it will fill the screen. To close that enlarged view, click the X in the top right corner. So don't worry if it appears a little small on your thread.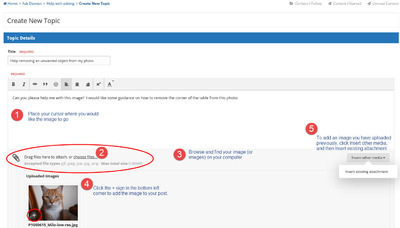
-
How to navigate this site
Lara replied to Lara's topic in Getting started, Guidelines and Announcements
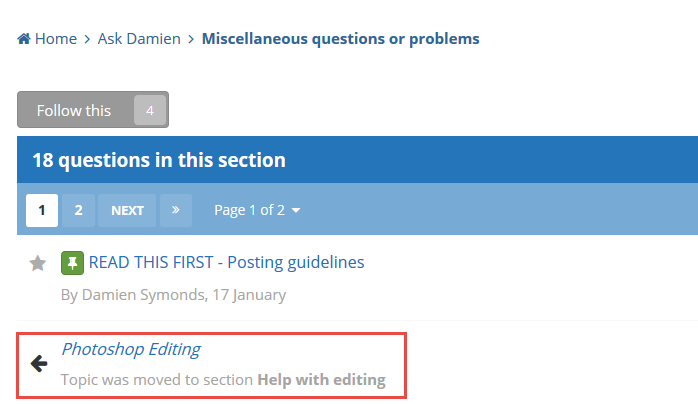
How to create a post / ask a question If you have a question, use the search bar in the top right and check that it hasn't already been covered. More guidance is above for searching on a mobile device and searching on a computer. If your question hasn't been covered, go to the topic area relevant to your question and click the Ask new question button, which is in the top right corner. Enter the title and body of the post. Once complete, if you wish to be notified of the response, set the slider switch that says Notify me of replies , underneath the post text.in the bottom left corner. Note that if you forget to do this, you can still check on replies to your threads via the Content I Started menu in the top right. You can also set a permanent automatic notification for all of your threads via a notification setting. Finally, click the Submit Topic at the bottom of the post. Be aware that if you post your question in an area and it better belongs somewhere else, Damien or the team may move it, just to keep the information well organized. So don't worry too much about posting in the wrong place, we can fix it later if need be. In the below example, a question that was posted in the Miscellaneous section of Ask Damien was shifted to the Help with editing section. In the old location, you may see a temporary message like this. It will disappear after 2 days. You can keep track of any of your moved posts by using the Content I Started link in the top right. Wherever your posts end up, you can access them from there.

-
How to navigate this site
Lara replied to Lara's topic in Getting started, Guidelines and Announcements
Sections members can post on There are only two places where you cannot post a question: Ask Damien / Questions For The Members - Can You Help? Ask Brian / Land of the Misfit Toys This is because these sections are comprised of posts that were started in other areas and have been moved there for general member input. So you can answer on these threads, but not start a new question in this section. In all other sections, you can ask a new question. -
How to navigate this site
Lara replied to Lara's topic in Getting started, Guidelines and Announcements
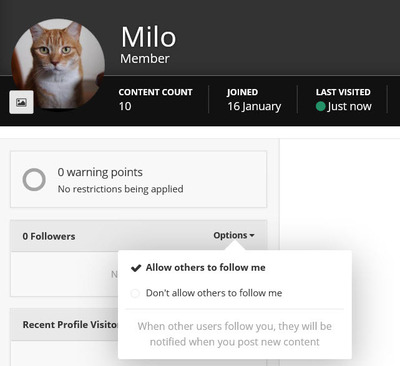
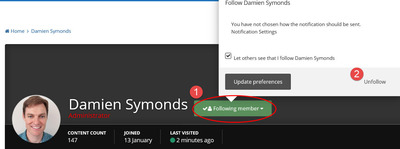
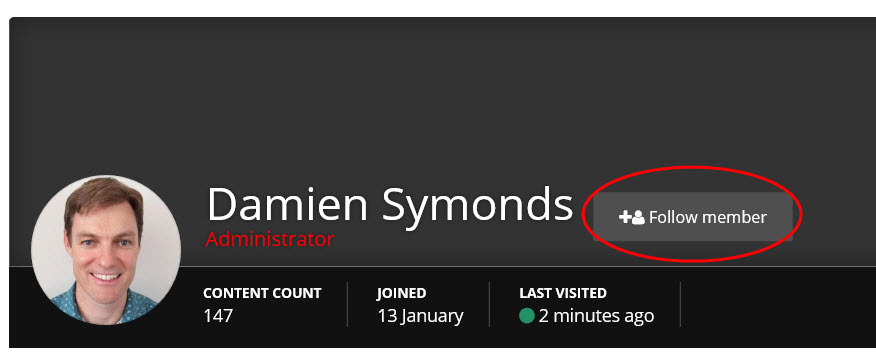
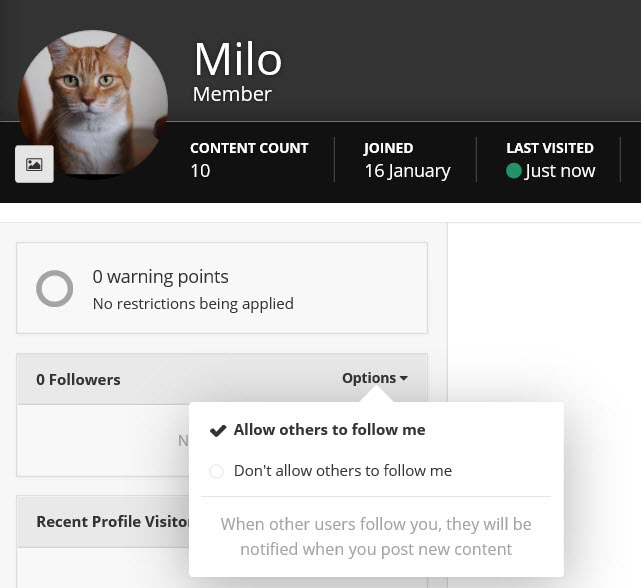
Follow another member's activity You can follow another member and be notified of all of their subsequent posts. Open one of their posts, click on their member name at the top left corner of their post and it will open their member profile. From there you can follow that member. If you do not wish other members to follow you, you can change this in your member settings. Click on your member name / Profile / Followers section and in the Options drop down arrow, select Don't allow others to follow me. Note that even if you stop other members from following you, it is possible for a member to search for all the posts you have made. To stop following another member: Open up one of their posts, click their member name hyperlink, and in their member profile, click the green Following member button. In the pop-up box, click Unfollow.