

Damien Symonds
-
Posts
198,671 -
Joined
-
Last visited
-
Days Won
2,917
Posts posted by Damien Symonds
-
-
Something like this?
-
Oh my. That's beautiful.
-
 1
1
-
-
Of course. The dress is still blue.
-
Both looks great to me. Dell are the more established player, but my own experience with LG has been excellent too.
-
1
-
-
You'll need to either:
- Take the studio photo again with your lighting at the side, to make the same shadowing that the background photo has; or
- Pick a different background photo with lighting suitable to the studio photo.
Don't waste another minute trying to make this work - it won't.
-
1
-
Which Spyder3 did you have? Also the Express?
-
7 hours ago, kathy1965 said:
So what printing company is good in the U.S.?
There are some reviews assembled here: http://www.damiensymonds.net/lab-reviews
Avoid any labs (like Millers) which make a calibration recommendation of 5000K or 5500K. 6500K is the modern standard.
7 hours ago, kathy1965 said:So I don't calibrate at night in the pitch dark correct? That is what I had done before.
Well, the trouble with calibrating at night is that you have to wait until the next day to see if the calibration was successful - that is, compare your prints to the screen. Then, if it's not successful, you have to wait until the next night to re-calibrate, and so on.
Calibration should take minutes, not days.
7 hours ago, kathy1965 said:I do close both blinds as I edit. This is the only spot in my house that I can edit.
The blind (where the at is) would be closed for editing as it puts a glare on the screen.
![14571918_1305752859437330_1661336431_o[1].jpg](https://ask.damiensymonds.net/uploads/monthly_2016_10/57f8f8c51eda4_14571918_1305752859437330_1661336431_o1.thumb.jpg.fbfe60686167af9c34c78a0164aba2e5.jpg)
Yeah, I reckon with that blind closed, this would be ok.
-
Sorry Elisa, the brutal truth is that they're probably going to be way too terrible.
But let's try. Did you shoot raw?
-
Almost there, but not quite.
-
Well? Can you post it?
-
Sorry, can you explain the problem a bit further?
-
Great! Then that's easy.
-
Of course. It's a white dress, isn't it?
-
No, here we are again. You have to do the raw processing first.
-
Go for it.
-
Is this anywhere close?

-
1
-
-
Well yes, there's one here that would give you the rough idea.
It's really simple. You'll open one photo, then choose your Crop Tool and set it to 900x900 pixels at 300ppi in the Options Bar. Then you'd crop your photo square.
Then you'd make your new action (called "Brian's Polaroid" or whatever) and start recording. You only need to record two steps and they're both Canvas Size steps:
- First, open Canvas size and leave the little square in the middle of the grid of nine squares. Make sure the Background Extension Colour is white, and enter 1000 pixels for both the height and width, then press OK.
- Then open Canvas Size again, and this time put the little square at the top of the 9-square grid. Change the height to 1500px and press OK again.
- Stop recording.
Voila! That's your action.
Once you've done that, let me know and we'll discuss how to actually use it for all your prints.
-
No, it's ok, let's call it a neat 900x900, that'll work.
So, let's make this action! Have you made actions before?
-
That's nowhere near square. Aren't polaroid images supposed to be square?
-
6 minutes ago, Lynnegrace said:
Then I guess my next question is the greens.
Im also very curious about your statement regarding skin tones in Raw. If I were to pull my image into ps, what would be the best method to removing that orange skin tone?
With the gentle application of Photo Filter. I find "Cooling LBB" to be excellent in these cases. Remember to apply it with a very light touch - no greater than 5% opacity brush - and gently build it up.
-
4 minutes ago, Lynnegrace said:
And may I say thank you for spending bits of your Friday night speaking with me. ?
Saturday morning here
")
-
Great! So what's the exact size of the black square?
-
I'm working on your image, but it'll be in between loads of washing, and vacuuming and stuff (my Mum is coming to stay!) so please be patient with me, it might be a little while before I have something to show you.
-
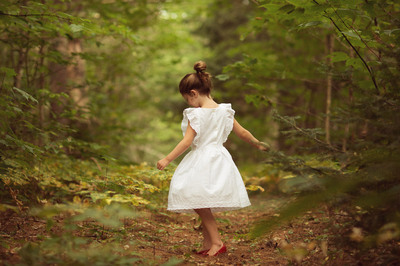
It's more likely Lens Blur, but it's very badly done. You can see the halo either side of the trees in the foreground. Blurring MUST begin with the cloning step, it's so important: http://www.damiensymonds.net/2010/06/blurring-background-false-dof.html

![14571918_1305752859437330_1661336431_o[1].jpg](https://ask.damiensymonds.net/uploads/monthly_2016_10/57f8f8c4b0f00_14571918_1305752859437330_1661336431_o1.jpg.a26cb2c9e5bf89dec1fd8cf857ee4879.jpg)

New calibrator
in Monitor calibration questions or problems
Posted
Oh heck yes you should do it!!! The Spyder Pro is SO much better.