LSSmith
-
Posts
264 -
Joined
-
Last visited
Everything posted by LSSmith
-
Background info: Over a week ago, my external hard drive suffered some kind of abuse that led to corrupted files, which led to being unable to access anything on that drive. The local IT God performed his wizardry, and recovered nearly everything (based upon sheer volume of files recovered). Unfortunately, all of the files' names were replaced with whatever number the recovery tool decided to give the files. There is no rhyme or reason to the file numbers, which is making rebuilding my file tree structure very interesting. In the process of finding and reorganizing the files, I came upon xmp files. If I recall correctly, these files are related to the changes I make to a raw file as I run it through ACR/Photoshop. I cannot find a way to match up the xmp files with either the raw or the psd files to which they correspond. Questions: 1. Should I NOT* waste my time copying xmp files to my new hard drive from the recovery folders? [*capitalized for emphasis, not for yelling.] 2. Since the xmp files cannot be matched up to the corresponding raw and psd files, will the psd files still be usable in Photoshop? 3. If "no", should I not bother with copying the existing psd files to the new hard drive? 4. Are there any other options that I could be pursuing, but am not, out of sheer ignorance? I can live with having to re-process a raw file. I'd rather not waste time and energy on moving files that can no longer be manipulated because necessary info is no longer linked to the image files. Thank you, in advance, for your help. Sincerely, Stephanie Smith
-
Guidelines for desks and chairs while editing
LSSmith replied to LSSmith's topic in Miscellaneous questions or problems
Thank you, Damien. I felt silly asking the question, but not any more! -
Are there any recommended guidelines for appropriate desk heights/chair heights and distance from one another? I ask because whether I'm using my mouse, or practicing with my wacom tablet, for photo editing, my right arm (the editing arm) becomes painful to the point that even massaging the knots out doesn't help much. I have a conventional desk with a drawer for the keyboard, which is where my wacom tablet lives. My mouse sits on the desk surface adjacent to the monitor. My chair, however, is not a standard issue desk chair. It was available, and I nabbed it for desk duty. The seat is approximately 5 inches below the desk drawer. At present, my schedule doesn't allow me to take frequent breaks of over 10 minutes, so most of my editing is done in one shot over the course of a few hours. I'm wondering if my chair is too tall, or if I'm sitting too close to the desk.....or if I'm doing something else wrong. Any helpful advice will be gratefully received. Thanks, in advance.
-
Well, that's good to know! No one has ever explained that before. I don't recall any word in the two classes that I've taken so far, that mentions tagging files as part of the workflow when saving an image. (Another reason to go back through the lessons.) If I don't know to do something, I'm unlikely to do it on purpose. Welcome to the wonderful world of assuming facts not in evidence. I had no idea that I was supposed to embed the profile. And, because I did not know it, and because some aberration is expected when looking at an image on different devices, I chalked up the variations to equipment, not to the files. One of the reasons that I'm taking your classes is that I lack fundamental knowledge of Photoshop and its capabilities. Just because I use it, does not mean that I understand it. Worse, I don't know how much I don't know, nor which of the things I don't know is actually critical to know. Up until your classes, I did enough to get by, but I had reached a point where what I saw in the camera is not what I was getting on the screen, and certainly not what I wanted to give to a client or post on my site. I knew that I wasn't getting the results that I wanted, but I had no idea what questions to ask to begin learning what I needed to know. It's like what I pointed out in my email to you: If I don't know that I've made a mistake, no amount of practicing is going to correct it. Thank you for explaining why tagging/embedding the color profile is an important part of the process from raw file to finished image.
-
Good morning, Damien! Sorry for the delay in responding to this post. I looked up embedding color profiles under your "all content" but found no explanation of why it's so important, only that it's a "must do" kind of thing. (I made the colossal mistake of looking for the reason on the internet, and found myself face-to-face with technical explanations that hurt my brain.) So, why is tagging the photo so important? What does embedding the profile do? How does this benefit me? Thanks!
-
Update: The profile app worked just fine, toggling back and forth between the laptop's and external monitor's profiles. Thank you so much!
-
Yaaaay! I have learned something new. According to my great-grandmother, that means that my day has not been wasted! In all honesty, I am both flabbergasted by and grateful for all that I've learned from you. Time to take the Levels class and the Sharpening class.
-
*pondering* Perhaps it would be more accurate to say that if the images are not bright and washed out on the laptop screen and look like they're supposed to on the external monitor, then I will have successfully managed to switch from profile to profile? *hopeful grin*
-
I just tested it on my laptop and it worked like a charm. I'll test it on my external monitor, tomorrow morning (5/16/2017, Eastern Time), when I'm back home. The true test will be whether or not the images look like they're supposed to. Thank you!
-
To make sure that I understand you correctly, all I have to do is to unzip the xrite file, run it (paying attention to click on only asterisked profiles), and I should be good to go? I do NOT need the TOGGLE.icc As a side note, I have noticed that my laptop screen does seem to have reverted back to it's original, bluish tinge. I'll double check it, tomorrow, once I'm back at my workstation. (I had to abandon ship due to an area outage for the phone/internet lines. One of the few drawbacks to living in rural Georgia!) I'll let you know how it goes. In the meantime, thank you so much!
-
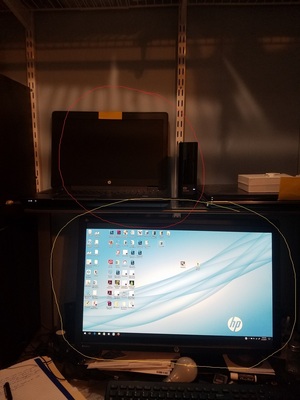
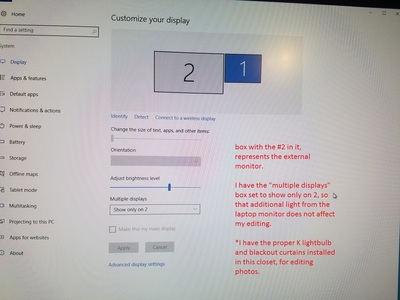
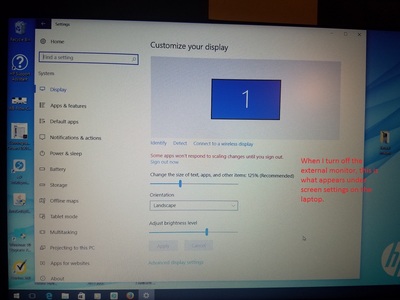
Basic Info: I purchased both my laptop and monitor at the end of 2015. The laptop is an "HP zBook 15". I upgraded its RAM capabilities at that time. My monitor is an "HP 24 z24X Dreamcolor LED backlit professional IPS LCD Display". (Sorry for the huge first file. I forgot to resize before posting and I couldn't figure out how to delete it from the post.) Addendum to calibration problem: I had thought that the ColorMunki calibrator stored the saved profiles somewhere on my hard drives (either the C [laptop] or the G [external hard drive]). I searched both, this morning, and couldn't find anything that looked like the saved profiles. I had hoped to switch the external monitor back to the original profile settings, so that I could do the final retouching on client images. EEEEEEEeeeeeek! (I did not have the ColorMunki connected to my laptop when I did the search. I will try again, with the darned thing plugged in.) If I have to re-profile the monitor, I'll do it, because I have to finish the job for the client. I was just reaaaaaaalllllllyyyyyyy hoping that it would be a matter of switching between saved profiles. If, in order to solve this problem, I need to look for files, please do NOT assume that I'm computer literate. I'm not. Please do not skip steps. Detailed instructions and labeled drawings are most appreciated. (I've barely graduated from tallow candles to whale-oil lamps, in terms of technology. Please revisit my favorite quote from the Harry Potter novels, if you have any doubts about my fear/distrust of technology. *siiiiiigh*) Thanks, in advance, for your help.

-
Just ran into an interesting "problem". I edit my images using my laptop as the CPU and an external monitor that I had calibrated according to your instructions. For the most part, everything looks great. (There are separate issues that are better addressed later and under a different topic thread.) However, I have to do digital reveals and my laptop was not calibrated properly. The images look too bright and washed out. (It's very difficult for clients to imagine better colors and brightness.) So, in a cheerful fashion, I calibrated the laptop. Bingo! The images look like they're supposed to. Lovely colors and not washed out. Yaaaaaay! Then, just for kicks, I opened the files after switching back to the external monitor. Ick. Horrid, yellowy cast. Booooooo! Now, both ColorMunki profiles are saved (under different names) on the laptop's hard drive. Am I correct in assuming that I shall have to switch back and forth between the profiles, depending upon whether or not I'm editing at home, or showing images to the client?....At least, until I can afford a stationary, dedicated CPU for the external monitor..... Thanks!
-
Damien, I owe you an apology. Last Friday, when I could not make your solution work, I panicked and asked you for more help. Due to the time difference between our respective locations, I didn't see your request until late Friday night, when I was getting ready to pull an all-nighter on a different editing job. I took my temper out on you with my snippy questions, and I apologize. You did nothing to deserve that kind of treatment, and I do know better than to treat others that way. I hope that you can forgive me for my poor behavior. In the good news department, in the process of doing the other editing job, I realized what I was doing wrong with the eye-dropper technique. Naturally, it turned out to be a simple thing. (I excel at screwing up simple things.) I am accustomed to selecting specific portions of images to which to apply adjustments. I completely forgot that all I had to do, this time, was to switch the mask from white to black, and simply paint the flesh tones onto the areas that needed it. I double-checked my suspicions against your Masks and Layers class, and discovered that the solution was, indeed, as simple as inverting the mask before painting. Verily, I am a moron. So, thank you for your help. It did do the trick, and I'm grateful. Thank you. Thank you. Thank you.
-
A screenshot of what specifically? The before and after of applying the eyedropper? Of my selection process for just the bra strap? Something else....God forbid....? Thanks!
-
I must not be doing something correctly. I cannot get the color change to affect ONLY the bra strap. I followed the instructions in the article link. The change was image wide. I've tried using the quick selection tool to create a layer with only the bra strap areas selected. No dice. The eyedropper effect is image-wide. What am I doing wrong? I'm under a time constraint and I'm beginning to panic. Thanks, in advance, for your help.
-
Good morning, Damien et alia! I just watched your tutorial video on the Wacom tablet in which you describe the basic differences between a mouse and the Wacom pen. I have a medium-sized tablet with buttons on the left-hand side. I've had it for over a year, and, because I am change-phobic, I've been putting off learning how to use it. What is the best way to become adept at using the tablet and pen? I've had people recommend playing computer games (solitaire, poker, etc.), and others who've recommended pulling up an image and playing with the Wacom that way. Do you have a recommendation? Also, you used your keyboard to select Photoshop "functions" for the pen. Do you recommend that over setting up the tablet for Photoshop shortcuts? (To be honest, I really want to follow the K.I.S.S. model, here. My brain is already on overload.) Thanks, in advance, for your advice. I've enjoyed your classes and responses to previous questions, and I've learned tons! (Hence the brain overload!)
-
*AGOG!!!!* *FLABBERGASTED* *UTTERLY GRATEFUL* Thank you, Damien! I can't wait to get cracking on it, tomorrow morning!
-
Here 'ya go!

-
Aha! Absolutely, I can. Gimme a few. *humming the Jeopardy theme tune*
-
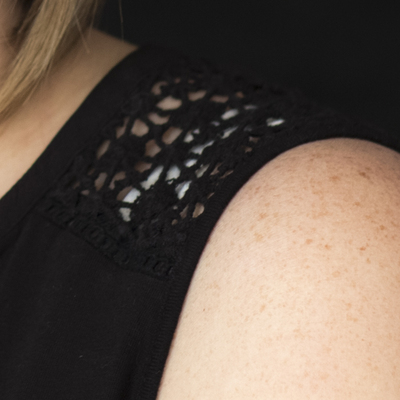
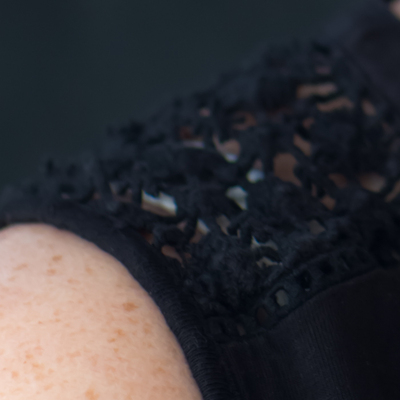
This problem pops up several times in this particular photo session. Most clients take me seriously when I emphasize the importance of nude-colored "foundation garments". Why? *curious*
-
Good morning, Damien! I have an image in which the lady is wearing a white bra under a black lacy top. I'd like to remove the white and replace it with flesh (or at least flesh tones). The only way that I can think of is to paint the white with a flesh tone and then superimpose cloned/patched skin on top of the paint. I'm hoping that there's a simpler way to do that. I have enrolled in the layers/masks class, so if the answer is there, please point me to it. Thanks, in advance for your help. Cropped image is attached for reference.