Charliepw Posted April 10, 2016 Posted April 10, 2016 Hello Following on from hnicholson post on Feb 2nd where he wanted to emulate Winterwood photography (who did your raw and levels classes) I'd love to try to emulate that beautiful skin texture. Here are three photos of my daughter with varying amounts of light on her face, just basic raw tweaks.
Damien Symonds Posted April 10, 2016 Posted April 10, 2016 You needed to have her turn her face towards the light more. The nose shadow is much too strong. Also, it needs the darker background.
Charliepw Posted April 10, 2016 Author Posted April 10, 2016 i know the first images were not matched very well, but thank you for whatever help you can offer. what about any of these photos from Lisa Visse, the one with the hat has shadows down the left hand side. Can you give any insight into finished look, i know it's cleaner skin and a texture on the background on some of them. I've darkened my image a little bit (perhaps too much) and i've cleaned up the shadows with colour and luminance Is this any better to work with?
Damien Symonds Posted April 10, 2016 Posted April 10, 2016 Take your photos again. Lighting lighting lighting. This is primarily not an editing matter. 1
Charliepw Posted April 10, 2016 Author Posted April 10, 2016 I do really appreciate your feedback, thank you. I will shoot again but i won't be able to do it until next weekend unfortunately, sigh... In the meantime are you able to give me a pointer in changing the lighting please, as i think i'm a bit lost, i do think that this image of mine is similar in lighting to this one of Lisa Visser. sorry there are two files attached, i can't figure out how to delete one, and the second has had colour and luminance tweaked and shadows lifted a little.
Damien Symonds Posted April 10, 2016 Posted April 10, 2016 No it's not, look at the how the light is falling on her face. In particular, look at the camera-left side of the mouth in Lisa's photo and in yours. I would say that Lisa is using a much bigger light source that you are, but you would need to seek advice from a photographer about that. All I know is that the angle of your light is too far around to the side.
Charliepw Posted April 10, 2016 Author Posted April 10, 2016 ahhh, ok, thank you. i'll try again at the weekend (or earlier if i can) and repost.
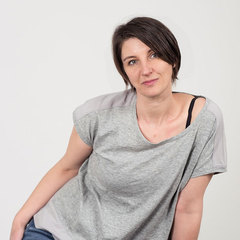
Charliepw Posted April 21, 2016 Author Posted April 21, 2016 Hello again, i finally persuaded my child that it was a good idea to sit on a stool and look grumpy at me. As you can see she simply adored doing this for me. ...anyway though i tried to recreate the lighting for this shot from this gorgeous one by Winterwood Photography and hopefully it's similar enough for you to be able to give some feedback. I can upload a higher res version if you like. I would love to know how to create the painterly look that appears with this shot and other shots by Lisa Visser, i'd then like to play around in my own style. I love how creamy it is and how it seems completely timeless. Thanks for any help Charlie
Damien Symonds Posted April 22, 2016 Posted April 22, 2016 Definitely closer, well done. May I see the SOOR?
Charliepw Posted April 22, 2016 Author Posted April 22, 2016 thank you this is SOOR with wb, noise edits done. i'll post a big jpg below, or i can post a .dng if that's better
Damien Symonds Posted April 22, 2016 Posted April 22, 2016 No, that's nearly square. It can't be the SOOR.
Charliepw Posted April 22, 2016 Author Posted April 22, 2016 doh, didn't even think of that. and bizarrely you just popped up on my desktop saying you'd replied, very clever.
Damien Symonds Posted April 22, 2016 Posted April 22, 2016 I'm really worried about this, I fear there's clipping in her cheek.
Charliepw Posted April 23, 2016 Author Posted April 23, 2016 there isn't any clipping showing up on her cheek. what can i do to check?
Damien Symonds Posted April 23, 2016 Posted April 23, 2016 In Photoshop, add a Levels layer. Hold down the Option key while grabbing the white slider.
Charliepw Posted April 25, 2016 Author Posted April 25, 2016 Hello, sorry for the delay, i managed to do the above just now and there is a little bit of clipping on the cheek, you were right, what can i do to remove that?
Charliepw Posted April 25, 2016 Author Posted April 25, 2016 i've lowered the exposure slightly and now there is no clipping
Charliepw Posted April 26, 2016 Author Posted April 26, 2016 Thank you Damien, i really like the overall colour and the look of the textured background. what did you do? did you do anything to her skin at all?
Damien Symonds Posted April 26, 2016 Posted April 26, 2016 For the texture I used a file from a texture collection I have on my hard drive. Do you have any such files?
Charliepw Posted April 26, 2016 Author Posted April 26, 2016 Yes i do have a few, i've taken a few textures myself to experiment with, which one did you use?
Damien Symonds Posted April 26, 2016 Posted April 26, 2016 What I used is irrelevant. You'll need to choose one from your own collection that you like.
Damien Symonds Posted April 26, 2016 Posted April 26, 2016 I got the Levels layers the wrong way around. The first layer (should have been "Levels 1") is on Soft Light blend mode, with the middle slider aggressively to the left at 3.00. The second layer (should have been "Levels 2") is on Normal blend mode, with the sliders thus: Red channel: 14/1.06/248 and 0/255 Green channel: 0/1.04/255 and 5/253 Blue channel: 0/0.97/255 and 14/249 Then I Placed the texture layer (File>Place, remember, never copy and paste). I dabbled with blend modes, and found that "Lighten" worked best. It probably will for you too, but no guarantees. You might need to experiment like I did. Then I masked it on very gently. Because my texture was a bit too sharp, I had to apply blur to it. You might not need to do this. Likewise, its colour was kinda too green, so I clipped a Hue/Saturation layer to it and shifted the Hue slider a bit until it was the colour I wanted. Again, you might not need to do this; or you might need to do it even more than I did. Hope this helps. 3
Charliepw Posted April 26, 2016 Author Posted April 26, 2016 Wow, that's fantastic, i shall now go in and have a play with adding a couple of layer levels. I love those colours.
Charliepw Posted April 26, 2016 Author Posted April 26, 2016 Hello, i'm just having a go at this. did you mask the texture onto the background only? and leave the face clear? and did you do anything to her skin at all?
Recommended Posts
Create an account or sign in to comment
You need to be a member in order to leave a comment
Create an account
Sign up for a new account in our community. It's easy!
Register a new accountSign in
Already have an account? Sign in here.
Sign In Now