Christina Keddie
-
Posts
808 -
Joined
-
Last visited
-
Days Won
5
Everything posted by Christina Keddie
-
 Just checking: did you follow Damien's link above to make sure that the files you sent to print were sRGB?
 -
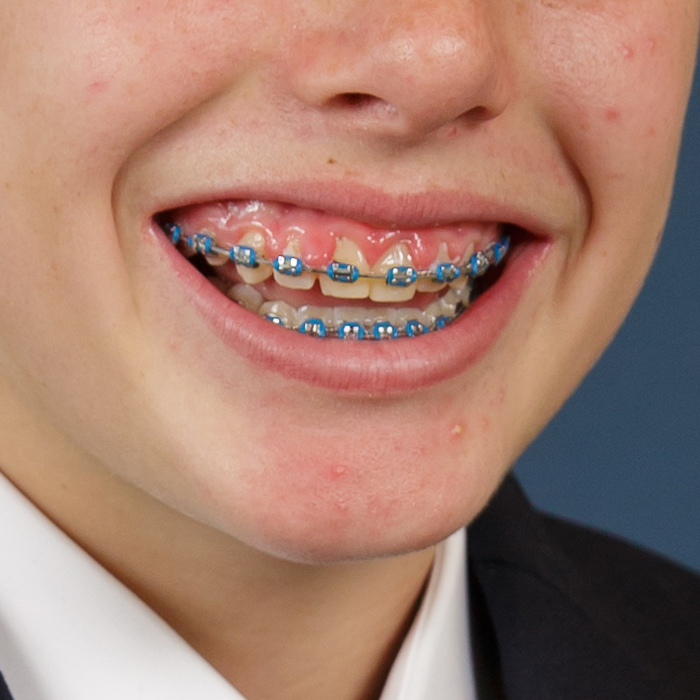
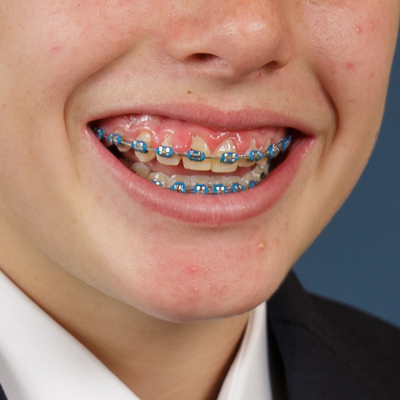
Client has asked if I can reduce the swelling on her son's gums in this portrait -- he had just had his braces tightened and gums cleaned, and he's a little self-conscious about how they look in this shot. I'm thinking probably a combination of flipping, cloning, and maybe some liquify? Just thought I'd ask for your opinion before diving in!
-
Oh, you have a calibrator? Is it not one of Damien's recommended ones? Or is your member info just incorrect, in listing you as having "Other/none" for calibration?
-
Calibrating your screen would be job one. http://www.damiensymonds.net/what2buy_cal.html http://www.damiensymonds.net/calibration.html
-
Please tell us you actually saved your actions and brushes onto your old hard drive? (Not just within PS, but saved into a folder on your hard drive).
-
Would you mind filling this out for us, so we have all the info we need?
-
Tutorial on Facebook resize action
Christina Keddie replied to dermotcw's topic in Questions about tutorials and articles
Here you go!- 1 reply
-
- 1
-

-
If you have at least 6MP (which you do), and the image is in good focus and good quality, that means you can safely *enlarge* the file to print as large as you'd like. So you'd prep this file for print by cropping it to the exact size and shape needed for this print (40x60cm at the lab's minimum required PPI), then sharpen for that output size, and you're set!
- 1 reply
-
- 1
-
-
A lot, yes. But until you're working with a calibrated screen, you're literally editing blind. So once you've got that sorted out, come on back and we'll see what we can do to help you with this image!
-
Note that Damien's instructions have a giant red box saying not to proceed until you have your test prints in hand.
-
Ohh, so sorry, you're right. He filled the mask with black. Make sure your color swatches are set to black and white (hit D to default them if they're not already there), and then while on the mask, hit alt+backspace (opt+backspace on Mac) to fill the mask with the foreground color, or ctrl+backspace (cmd+backspace) to fill with the background color.
-
He inverted the mask. Ctrl+i (or cmd+i on a Mac) in most versions of PS.
-
Wrapped Canvas
Christina Keddie replied to Arthur.N's topic in Photoshop / Elements / Bridge / ACR questions or problems
If this is all foreign to you, I HIGHLY recommend Damien's Layers & Masks class! http://www.damiensymonds.net/trainingialm.html -
Wrapped Canvas
Christina Keddie replied to Arthur.N's topic in Photoshop / Elements / Bridge / ACR questions or problems
Just like he shows in the screenshots. Click on the layer in question, then use the layer opacity dropdown menu right on top of the layers palette (defaults to 100%) to bring down the opacity to around 70%. -
Please follow these instructions to calibrate, starting with the "read this first" link. You aren't calibrated unless and until your screen matches your pro lab prints. http://www.damiensymonds.net/calibration.html
-
Well, yes, you do need to calibrate your screen. Start here with what calibrator to buy: http://www.damiensymonds.net/what2buy_cal.html And then here for how to use that calibrator: http://www.damiensymonds.net/calibration.html But you also really need to make sure that you're editing and saving your files in the sRGB color space. Go through every single step of this troubleshooter to make sure: http://www.damiensymonds.net/art_tscs000.html
- 1 reply
-
- 2
-
-
Exporting from Lightroom
Christina Keddie replied to Allie's topic in Lightroom questions or problems
Glad you figured it out! You can also use the filter menu (at the bottom right of your screen, just on top of the filmstrip) to filter by stars, colors, and all kinds of other metadata. -
Exporting from Lightroom
Christina Keddie replied to Allie's topic in Lightroom questions or problems
Nothing at all to the size (the pixels). The whole point of the 11:15 shape is to give them as much leeway as possible to print at any size, so you need to give them as many pixels as you can (minus, of course, the bits that you cropped off in making it the 11:15 shape). -
Exporting from Lightroom
Christina Keddie replied to Allie's topic in Lightroom questions or problems
No!!!! This is the wrong screen if you're trying to crop to the 11:15 shape -- resizing on export changes the SIZE and does nothing at all to the shape. I'm assuming you're trying to prep files for giving digitals to a client, and that's why you want the 11:15 shape? If so, you must not change the SIZE at all. If you're going to do this in LR, you'll need to crop each file to the 11:15 aspect ratio -- open the crop tool and enter a custom ratio. Then export with the resize section left entirely unchecked. -
You need to remove all the noise in your raw processing -- just like it says in the article Damien linked for you.
-
PS: Lynn, if you're calibrated, please input that info in your profile here -- that's why Damien kept thinking you weren't calibrated.
-
Could you post your SOOR, please? Your background is looking super funky, and it would help to see what you started with after your raw processing.
-
What are the pixel dimensions of your full-sized JPG? I'm really, really hoping that there's some kind of web upload compression going on here...
-
Can you screenshot it for us, please?
-
Mariann, click on the apple icon at the very top left of your desktop (the one shaped like the Apple logo apple), and choose "About this Mac." Then tell us what it says in the window that pops up.