Brian
-
Posts
4,131 -
Joined
-
Last visited
-
Days Won
54
Everything posted by Brian
-
Starting with iOS 11, when you enable two-factor authentication, it's permanent and can NOT be turned off. A phone call to Apple is in your future. The CIA has difficulty getting into Apple's products, a guy like me has no chance to help you. LOL!!
-
Actually, a D500 isn't as scary as it would seem. It's nice having an external button for all your main choices and not having to dig into a menu. The tough part is going through the manual and setting each of the camera settings but once you get it setup, it's quite easy to operate. My vote is either a D7500 or D500 and personally, I'm leaning towards a D500.
-
-20 on all of your lenses? That is not normal. Hmm...I'd say your D7000 needs tweaking from Nikon. I could see a -2 or even a -5...but -20? That's way too far out of tolerances. Now for even more bad news. The D7000 is discontinued, and I even think the D7200 is as well. The next step is to determine which new body you are going to purchase. Plan on going FX or sticking with DX? The D7500 is the current model that replaces your D7000. I just can't justify spending $300 or so to have a D7000 fixed since camera bodies only last for about 3-4 years or so. Six years is a good run for a camera body as today's camera's are computers that think they are cameras. So let's talk lenses...which ones do you have?
-
As far as memory capacity, 512GB HD is pushing it, I’d rather have a 1TB Main Drive at a minimum, for both laptops and desktop computers. RAM? 16GB is the minimum that you’d want going forward, 32GB is a better choice and what I prefer. Today’s 16GB/32GB is yesterday’s 4GB/8GB. Just like 16MB/32MB back in the late 1990’s.
-
A Mac Laptop for decent photo editing? Up your budget by $1000. Take the most expensive MBP, increase the HD and RAM at the time of purchase. I can not recommend a Mac Laptop in good conscience due to their high cost. I second the notion of a Asus ROG Laptop. Why? Laptops being manufactured today aren’t built like they once were. Your $500 laptops last 12-18 months, the $1000-ish Laptops last about 3 years or so, and the fancy MBP last about 4-5 years. So in essence, you are “renting” your laptop from Apple @ $1000 per year. Of course, your mileage may vary and it’s your money. Here are the specs that I would choose with a MBP:
-
Honestly? I don't think it's your technique as it's just a crappy lens. You might think it's due to your hands shaking; I think it just doesn't focus correctly. All of the folks who had issues with the original Canon 24-70 have not complained / had issues with the Version II. What would I do? Buy the new Canon 24-70 Version II lens while it's on sale.
-
Oh, I feel your pain. The Canon 24-70 Version I lens is a piece of junk. Normally, I'm a OEM Snob...but that original Canon 24-70 f/2.8L is just garbage. I know several photographers in real-life and online who can not trust their 24-70 lenses on a gig. Heck, there is a camera store in New Jersey that would make you take home a lens for a weekend to try it out because they got tired of the returns. According to them, 4 out of 5 original Canon 24-70 lenses where defective. You can not trust the used market either, because Photographers dump that lens. That said, there are a few good copies, so if someone reading this has one and it's fine...don't worry too much about it. The good news? They fixed all of the issues with the "Version II" lens and it's on sale!! Personally, I'd get the Canon EF 24-70mm f/2.8L II USM Lens. What do you shoot? Moving kids or more stationary subjects? You might find that using a tripod will help. Also what shutter speeds are you normally at and what body are you shooting with? Because the more MegaPixels a camera has, the less forgiving it is and the better your technique needs to be. Even with IS.
-

How to back up external hard drive
Brian replied to seepea's topic in The Windows & PC Hardware Forum
Try Microsoft Sync Toy: https://www.microsoft.com/en-us/download/details.aspx?id=15155 As long as your Drive Letters do not change, it should work. -
I’m glad you found a monitor and I totally get what you are saying, after shooting with a Nikon D3s and Nikon D3s, other camera bodies feel like toys. I’m thinking of putting that Eizo on my wishlist. Thanks for the head’s up.
-
You could upgrade the RAM, though as Damien pointed out, he has 16GB and the speed is normal. The main problem is today’s camera sensors. Gone are the days of 10MP and 12MP sensors. The more MP you increase, the harder your computer has to work. Just think how much horsepower you’ll need for a camera that is 36, 45 or 50MP I’ve read that the next batch of sensors are going even higher So the real answer to solve your problem? Purchase a much higher performance laptop or better yet, a desktop computer. You could purchase a gaming laptop to help cut down the time, though that will be more expensive. My advice: Upgrade the RAM to 16GB if you can, though that might only help things slightly You are going to have to live with this problem and that’s the main issue with laptops...upgradability.
-
Oh good. If it happens with another card, or keeps happening, the slot in your computer might be a suspect. Let’s start with the card first.
-
Yep. Probably a bad card. That said, how are you trying to download the images from your cards? With a card reader or are you trying to use your camera? It's really in your best interest to purchase a card reader.
-
If you want to connect a new 2018 MBP to a Monitory via a HDMI cable, you'll need one of these. Enjoy your purchase!
-
Yeah, these new MBPs are basically sealed units and the RAM is soldered to the board. Which sucks. 32GB isn't bad to have though. I have 40GB in my maxed out 27" iMac and it works really well. What I'm not sure about is how well the new video cards that come with a MBP work with Photoshop. That's why I didn't upgrade the video, I know the Radeon Pro 560X works just fine with PS.
-
You have 8GB of RAM! That's one thing that isn't helping things. I'd purchase a RAM 16GB kit (two 8GB sticks) to take you from 8GB to 24GB. How for the Internal HD. How much is your total capacity? How much is free? Same thing goes for your externals. Are they really full? If so, I'd unhook them from your Mac and see if the performance improves.
-
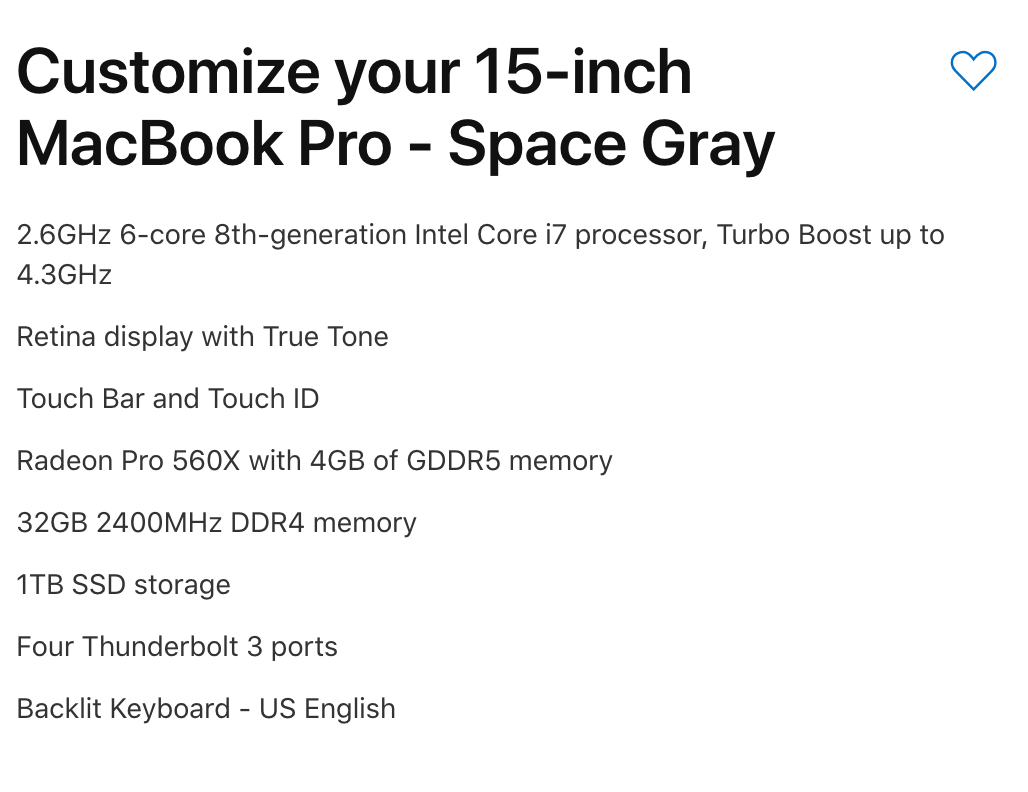
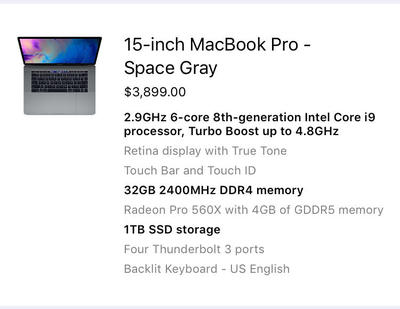
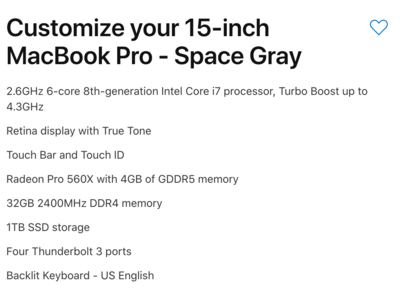
For starters, if you are just editing still photographs and not doing anything with video, you don't need a iMac Pro. In fact, Adobe Photoshop will run slower than if you were to run it on a tricked-out 27" iMac. It has to do with the CPU chip and other items in the Mac Pro...Photoshop doesn't take advantage of them. Now, if you were editing video, then that's a whole other ballgame. If you are set on a Macbook Pro, then start with the $2799 15" Model. Even though it pains me to say this, since Apple solders the RAM to the motherboard with the current MBP Models, be sure to upgrade the RAM to 32GB!! YOU CAN NOT UPGRADE THE RAM YOURSELF AFTER THE FACT! Yes, Apple's RAM is severely overpriced, but you have no choice. While you are at it, upgrade the HD to a 1TB SSD Drive. Your price before Tax / Shipping and AppleCare is $3599. You don't need to spend the money on a i9 CPU now, unless you want to Max things out and spend another $300. It's only money, right? Photoshop is just starting to take advantage of the architecture that makes a i7 and i9 so fast, but from the benchmarks that I've seen, there isn't a HUGE difference between a Intel i7 and i9 but give it time. I'm sure PS CC 20-Whatever will utilize faster CPUs in the future. As for a Monitor, Damien has a Eizo. They are excellent monitors but really overpriced for what they are. There are lots of decent 27" IPS-based Screens for way less money and you really want a USB-C display to use with a 2018 MBP. I tend to recommend Dell Monitors, since they tend to be easy to calibrate. The Dell S2718D caught my eye. It's a IPS screen and will charge your new MBP while you are using the display. Just a note, it won't charge as fast as the power supply that came with the MBP. (47W from the Display vs 87W from the MBP Power Supply.) BENQ displays, I've delt with them at customer sites and they always seem to die. HP and Dell Displays last forever. In the past, BENQ displays were extremely difficult to calibrate so they normally do not get on my recommended list. That said, this could have changed, though for me, I tend to like and stick with Dell and HP monitors. Oh, I'm moving this thread to the Macintosh Users Group.
-
How old is your Mac? What specs does it have? RAM, HD capacity, etc. I think Apple has stopped authorizing old Operating Systems, so you are kinda stuck with it and can’t go back to Sierra / High Sierra or Yosemite I have noticed with my 2009 iMac, that it’s very sluggish with High Sierra, though that computer is being retired. I’m about to format it and redo everything hoping to get some performance back; though I’m not 100% sure if it will work. That said, a complete format and re-install has been successful for me in the past. I have a feeling this procedure will be in your future too. So lets start with the specs and age.
-
Dual Core with more Ram vs Quad Core with less Ram?
Brian replied to lbg27's topic in The Macintosh User Group
Thumb Drives are so easy to lose. That SSD Drive is meant to walk around with, the big loop allows you to hang off a backpack. It has my attention. Without any consistent Ethernet, you are going to have to live off an external HD. If you do go smaller with an internal drive, do not go any smaller than 500GB. -
Dual Core with more Ram vs Quad Core with less Ram?
Brian replied to lbg27's topic in The Macintosh User Group
If you don’t always have internet you probably should invest in one of these: SanDisk 1TB Extreme Portable External SSD - USB-C, USB 3.1 - SDSSDE60-1T00-G25 -
Dual Core with more Ram vs Quad Core with less Ram?
Brian replied to lbg27's topic in The Macintosh User Group
I’d upgrade the RAM in your iMac to 32GB before forking our money for a Mac laptop that you’ll only get about 4 years out of. But if you are set on getting a laptop, one with a Quad Core, 16GB RAM and 1TB HD should work just fine. -
Dual Core with more Ram vs Quad Core with less Ram?
Brian replied to lbg27's topic in The Macintosh User Group
Good question!! Since you are using this as a editing computer, I’d say Quad Core, though this is a tough answer. The latest versions of PS CC is being programmed to take advantage of a multi-core CPUs and the architecture that makes a i7 fast. So going forward CPU and GPU will be just as important as RAM. For general computing, checking e-mail, wasting time on FB, then I’d lean towards Dual Core. In reality, I’d like Quad Core and 16GB of RAM. -
One more thing, the new Canon 70-200 f/2.8L Version III (The latest and the greatest version) is getting awesome reviews. If you do decide to purchase one, spend a little extra and get the Version III over the older Version II. Both versions are great lenses, but since you are around the $2000 mark, it's better to get the latest and greatest. Second, DO NOT JUDGE A RENTAL LENS to make your final decision. Sure, it's a great way to test drive things but often rental gear is USED AND ABUSED. The "It's not my lens. I bought the insurance...I don't care what happens to it..." mentality is what kills equipment. You could have recieved a working-but-worn-out-copy, so take things with a "Grain of Salt" as the saying goes. Also, it takes a bit of practice, about a month or two, of fiddling with it and getting to know what the lens will do and what it won't do. Going in cold with a new piece of gear expecting your images to be #amazeballz isn't realistic. LOL!! I wish it were. Fortunately, gear is on sale due to the Holidays. The 7D Mark II you can purchase now, it's on sale as I type this, and you can use all of your current lenses with it. Your main job is to learn ALL of the focus modes and AF selections. You are shooting sports, the camera's AF System you MUST master in its entirety. This way when you mount a 70-200, you can hit the ground running.
-
Yes...but wait there's more!! Not only do you lose a stop of light, you lose Image Quality! Umm, Yippee? That is why you pair a TC / Extender with a 300mm f/2.8 or 400mm f/2.8. Those Prime Lenses are the top of the line in terms of sharpness and IQ. Those lenses can take the IQ hit and loss of light. You could mount a 1.4 Extender on a 70-200, but...meh. I think it would be better to mount it on a 7D Mark II, get a 1.6 boost with the angle of view that you get with crop bodies, and not take a IQ hit or loss of a stop. Nope. Everything I recommend or link to, I don't get any kick-backs or affiliate money. I do have a "Buy Brian a Beer" Paypal Link if you are so inclined. I do this for two reasons, one PA Tax laws are really funny with affiliate links and I don't want to give the state any more money than I absolutely have to. Second, what I recommend is what I personally would buy with my own money and I like to be as honest/transparent as possible. I hate-hate-hate wasting money on this SH*T. I've done that lots of times and have learned the hard way to pony up the cash and get the good stuff, it will save you money in the long run. Glad to be of service!! That's why I'm here. Please, by all means hit me up for gear talk and tell your friends. Most of the time, crickets chirp here.
-
Oh, this is quite a rabbit hole to go down and your wallet will feel pain. LOL! There is a reason that sports shooters have a 70-200 on one body and a 600mm f/4 mounted on a Monopod with another body. I’m also pretty sure you aren’t interested in spending $25,000+ I’ve done this very thing and you are right, the 70-200 is a limited focal range when you want to shoot down the other side of the field. It’s great if they are in front of you though. Having a body that performs well in the 6400 - 25,600 ISO range is also key. Football stadium light is crappy light, it’s worse than Gym lighting. Even though the 55-200 and 70-200 lenses cover he same focal range, there is one key advantage, fixed aperture. Being able to use f/4 or f/2.8 at any focal range can give you one or two stops. Which can help raise that shutter to at least 1/500th. We really want to try and get 1/1000th. Of course you could have been at f/2.8 and still had crappy light. With variable aperture zooms, as soon as you zoom out you are at f/5.6...period. So that’s the difference. You are also correct in that this will be a major investment if you decide to go full frame and will more than likely be spending around $4000 $5000...to start. Are you prepared for a cost like this? Would you consider switching to another brand, like Nikon or Sony? One thing to keep in mind with full frame is you will lose that "Crop Factor / Angle of View Change." It's like having a built-in Teleconverter. Your reach at 200mm of FF will be more like 125mm on a canon crop body, so that's something to consider. Bodies for sports, you are looking at a Canon 5D Mark IV for Full Frame and a Canon 7D Mark II for a Crop Body. This is not only for ISO performance, but for the auto-focus systems as well. While you might be able to capture a scene at ISO 12,800, it won't do you any good if it's blurry. Even though you didn't find the 70-200 useful, your EF-S lenses aren't meant for full frame and I really think you need to play with the Canon 70-200 f/2.8 L III lens a bit more and use the IS to your advantage. Other lenses to consider is the 300mm f/2.8L and 400mm f/2.8L. Possibly purchase a Canon Extender EF 1.4X III. You could try a Canon 100-400 L lens, though that is another variable aperture lens and won't help you with crappy light since you will be locked in at f/5.6 all over again. Oh, purchase a high quality monopod or tripod with ball head. It's only money, right? I haven't tallied up the cost for all of this, but I can say with confidence that this isn't going to be cheap. "All I wanted to do is take better photos of my kids at ________________" is a very dangerous statement. I have the receipts to prove it. I'm thinking your best bet is to get a Canon 7D Mark II for around $1400 and then get a 70-200 f/2.8L III lens. Even though you weren't impressed, I think its because you were using it on a consumer-grade body. It's like having the most expensive tires mounted on a 4 cylinder beater-car from 1993. There is a difference with the larger bodies. Other than that, you don't have many options except renting lenses because a 300mm f/2.8L is around $5000 - $6000 these days.
-
One more thing, you will need to find a source that will allow you to license the fonts so you can bundle them with your templates or whatever. More than likely, you can't "give" them away or "sell" them without some sort of permission. Unless they are Public Domain.