Brian
-
Posts
4,137 -
Joined
-
Last visited
-
Days Won
55
Everything posted by Brian
-
5D3 has already been replaced with the 5DM4. What I would do is see if you can find a Best Buy Flagship Store that’s near you. They have all sorts of bodies on display. Even the big bodies like a Nikon D850 or Canon 5DM4. Hold the cameras, go into the menus and fiddle with them. Right now everything is on the table. Budget-wise, sticking with Canon will be the cheapest route. I still would upgrade to Full Frame, but that’s just me.
-
I just had another thought: What about buying a used body and a new lens? You could start with a Nikon D700 and purchase something like a new Nikon 24-120 f/4 VR or How about buying a used Canon 5D Mark III and using your 24-105? I know you don't want to go crazy, but getting a camera that you could grow into, might be the best option for you. It would help with your Noise problem.
-
Since you are coming from a Rebel T4i / 650D, to keep your budget low, I'd look at a Canon 6D Mark II if looking to jump to full frame. You could use your 24-105 f/4 lens on it and your 50mm f/1.8. The good news is that you'll get your "wide" back with your 24-105, so it's similar to your 18-55, well, more like 15-66mm...meaning you will have more reach and have a wider angle of view with your 24-105 on a Full Frame Body vs. a crop. The 24-105 is really meant for full frame cameras. It seems the 7D Mark II is discontinued at B&H and I can only seem to find them in "kits" with battery-grips and a bunch of other stuff. That tells me either a Mark III version is coming or Canon is not paying attention to this class of camera. Unfortunately, all the current buzz is about the recently released mirrorless camera bodies, on both Canon and Nikon. So for us DSLR folks, our choices are a bit long in the tooth. If you do decide to jump ship and head over to Nikon or another brand, I could point you in the direction to the same class camera that you currently have, or recommend something like a Nikon D7500 and 16-80 lens...but that puts your budget over $1500. You could also get a model that is one step up from yours, is equivalent to a 80D, and that is the Nikon D5600 with a 18-55 and 70-300 lens. Or if going full frame with Nikon, there is a heck of a deal on a D750 w/ battery-grip and 24-120 lens. Edit: The Nikon 750 is a fine camera and I love the sensor in that thing. In fact, if they could put that sensor in a D810 body, it would be a dream camera. The downside to the D750 is it' not very rugged, so if you are hard on your gear, this could pose a problem. It has also suffered from multiple recalls, but Nikon has seemed to have gotten past that, so while now would be the time to purchase this camera, it's a bit old in the line-up and is overdue for a replacement. Still, if looking to switch to Nikon, personally, I'd start with this camera. Especially since it's such a good price with the current instant-rebates. The toughest part about switching brands is the up-front cost. It's not only the camera body, but lenses. Long term, if I were to invest in camera gear, it would be upgrading to full-frame, regardless of brand. Not only for the lens choices, but if you were to switch to Mirrorless at some point, you have a greater chance of full frame lenses working with the Mirrorless Adapter mount. Plus, it seems that there has been a push more towards full frame and there just doesn't seem to be any real development with Crop Bodies. It's just refreshes on the current stuff and crop lenses seem to be not a priority either.
-
OK, so you have two kit lenses for a crop body and two full frame lenses (the 50 and 24-105). Which direction were you planning to go? Stay on a Crop Body or upgrade to Full Frame?
-
Well, lets talk budget and what lenses you currently have.
-
Not "Less Usable," but as things get upgraded, patched, etc. there is more being drawn from the same pool of RAM. Think of your computer as a library. You are the CPU chip, the bookcases are the hard drives, the shelves are partitions and the programs are the books. Are you with me so far? Inside this library are tables and chairs in addition to the books. The Table is the RAM. So say you want to use a program, lets use Photoshop for this example, so you go over to the bookcase and pull out the very large book called Photoshop. You then place it on the table. Now the "rules" state that none of the edges of the book can go over the sides and there needs to be a 1/4" gap between other items (such as other books) and Photoshop. It all needs to be neat and tidy. The problem is, that the Photoshop Book gets larger and larger. There are also other things on this table. A laptop, a bag of some sort, a lamp, a drink...all sorts of various things. These "things" are background processes/drivers and other programs, that are all competing for space on the table. Since you have told PS to use 85% of the table, the CPU chip (You) needs to spend lots of time shuffling things around, because you need to keep that 1/4" gap between things at all times AND you can't go over the edges of the table. This is the "slowness" that you are experiencing, all that shuffling around since PS is so massive these days. The other thing is that PS and the operating system uses portions of the HD to supplement RAM. As our cameras get more Megapixels and Dynamic Range improves, the larger our Raw files become. Since you have 4GB of RAM, the extra horsepower to meet that request has to come from somewhere, and that's the PS Scratch Disk. So if you have a full HD, in addition to a small pool of RAM, things are going to get slow. Why all of a sudden? It could be that last Mac OS Update that you did now requires more RAM and processing power, or the latest PS CC Update is doing the same thing. Honestly, there is a big difference in performance between 4GB and 8GB. Not as dramatic going from 8 to 16GB, though 16GB these days is a good thing to have. Now for the good news... You have a Mid 2012 MBP. You can upgrade the RAM yourself!!! It also seems that you can go to 16GB though Apple says 8GB. I'm confident that 16GB will work fine, though some users did report problems so I will link to a 8GB Configuration. What you will need to do is pull the existing RAM, which is made up of two 2GB sticks and then replace them with two 4GB sticks. It's pretty straightforward, just remove some screws from the bottom of the laptop, disconnect the battery cable and then remove the existing RAM. It only comes out / goes in a certain way and should take you no more than 15 min total to do this. Here is the 8GB RAM Kit from Amazon. Here is a YouTube Video Demonstrating the Installation Process. Just be sure to have a small screwdriver and to touch something metal before handling the RAM / taking things apart. Electronics do not like to be zapped by static electricity. Oh, yes...you can do this. Even if you don't think you "know enough about computers." If you can follow directions and assemble a Lego Set meant for a 12 year old, you can upgrade your RAM yourself. Now for the "Bad" News. Once you install 3rd Party RAM, Apple will blame ANY PROBLEM that you have on the Crucial / 3rd-Party RAM. Keyboard Batteries are dead and you can't type? Oh, that's the Crucial RAM. The Magic Mouse's Power Switch is turned to the Off position and it won't work? It's the Crucial RAM's fault. You accidentally deleted that file? It's the Crucial RAM's fault. Screen is flickering? Oh the Crucial RAM damaged the computer, blah-blah-blah. It's complete BS. The truth is, Apple Memory is insanely over-priced and is no better than other memory out there. In fact, I remember reading that the New iMac Pros use Micron Memory, and Crucial is a division of Micron. LOL!! The other hard truth is the Apple Genius Bar isn't made up of Geniuses. Sure, they have access to tech bulletins and have special diagnostic tools, but they are usually made up of regular users that have just been put through a few training courses. They also have to be very careful on what they say and tow the Apple Company Line at all times. That's why they were thinking of replacing the hard drive cable because they had no idea of why it was running so slow. I hope you didn't pay for that HD cable. Now don't get me wrong, I have used the Genius Bar in the past and they are usually quite helpful and I've had my issues resolved quickly. I also am a Professional Computer Technician for the last 25 years and am Apple Certified. So I know what to expect and what to look for. It's kinda like being a Auto Mechanic shopping for a car. Now for more good news, if you were planning on nuking the HD and starting all over, why not upgrade it to a SSD Drive? I will say, that there is a lot more steps involved with that and that's a topic for another thread. Let's start with the RAM first.
-
I just looked at the specs of your machine again from the Apple Repair order. 4GB RAM 500GB HD *SIGH* I should have paid more attention. Of course it’s going to run slow. YOU ONLY HAVE 4GB OF RAM!! You do not need a HD cable, you need more friggin’ RAM!!! 4GB is bare minimum for general use and then you tell PS to use 85% of it? 4096MB is 4GB, so you have left your poor MBP only 615MB-ish to work from!! MBPs are funny, some can be upgraded, others stay at what you purchase. See if Apple can get it to at least 8GB, or if it can go to 16GB do it.
-
Well, such is life when it comes to laptops. You really only get 4-5 years or so out of MBPs. I think it's planned obsolescence. I know my iPhone 6s is running a lot slower with the new iOS update.
-
No. You use them like you always have. Just pay attention to the amount of "stuff" you have on them. The reason that I say 75% - 80% is based on my own personal experience with Macs since the 1990's. I have found that once you cross the 80% threshold, performance becomes an issue. Technically, you can go a bit higher, like 85% full...but I like to keep things conservative. Hard Drives that are 90% Full and above, is definitely not a good thing. As a test, why not try removing your externals that are really full and see if your performance improves? If it does, no sense paying Apple to replace the HD cable (and charge you) if it's not going to fix things.
-
Yep. They are just taking a guess and you are paying for it. I personally don't think it's the HD cable. I would purchase and run CleanMyMac X first and see what happens. Keep this in mind: With Macs, Hard Drives are not dumping grounds. I have found that if you attach externals that are almost full, it will kill performance. The Mac OS treats external drives just as if they were built into the computer, so try not to go above 75% - 80% Full on any hard drive.
-
Well, that's a decent budget for a change. My recommendations are based on you using PS CC 2018 and not editing video, only stills. Intel i7 CPU 8700K 6-Core CPU at a Minimum: Photoshop has been making improvements to take advantage of the architecture that makes a Intel i7 or i9 so fast. The new AMD Ryzen chips seem interesting and they are getting a lot of buzz...but Intel chips are proven for Photoshop. If budget allows, you could go up to a Intel i7 9700 8-Core CPU instead. Motherboard: I like Asus, MSI and Gigabyte Motherboards. Get one that supports your CPU and has at least one m.2 SSD slot. 16GB RAM at a Minimum. 32GB or more preferred. I have 40GB of RAM in my iMac computer, and am thinking about maxing it out to 64GB next year. A Samsung 1TB m.2 NVMe Drive or WD 1TB Black m.2 NVMe Drive for your Operating System and Programs, or you could go with a traditional SSD Drive. Just make sure it's a least 1TB, for whichever drive you choose as your (main) boot HD. A second larger traditional HD, at least 4TB. I like Western Digital Caviar Black 7200 RPM Drives. You could go larger if you choose to, this is where your data files / photos would reside on. Video Card: Get one that has it's own dedicated video memory. You don't have to go nuts and purchase an expensive card, though I'd shoot for at least 4GB Video Memory these days, 8GB if you can swing it. Any card made after 2015 should suffice. Here is Adobe's tested video cards list. Personally, I'd look at a GeForce 1060 card with 6GB of Video Memory. Power Supply: I'd get at least a 650 Watt Power Supply these days. 800+ Watts if you plan on overclocking and doing other stuff. Case: This is a personal preference. One that makes mounting things easy, provides cable organization and has room to grow. In the past, I would recommend a Lian-Li Aluminum case, but there are tons of different brands now. Actually, this is one area that you might want to invest a little more in as you can replace / upgrade things in the future, while still keeping the same case. Now you don't have to spend big-bucks on this, just don't skip out and get a el-cheapo $50 case either. Windows 10 Pro 64-bit. You could get Windows 10 Home, but since you are building one, might as well get the full OS. Display: At least a 24" or a nice 27" IPS-based Display. Matte Coating or Matte Screen. Dell makes decent ones and there are others out there. Just make sure it has a IPS Screen.
-
Just remember to right click the XQD Card on the desktop and select Eject when finished. Otherwise the OS will yell at you.
-
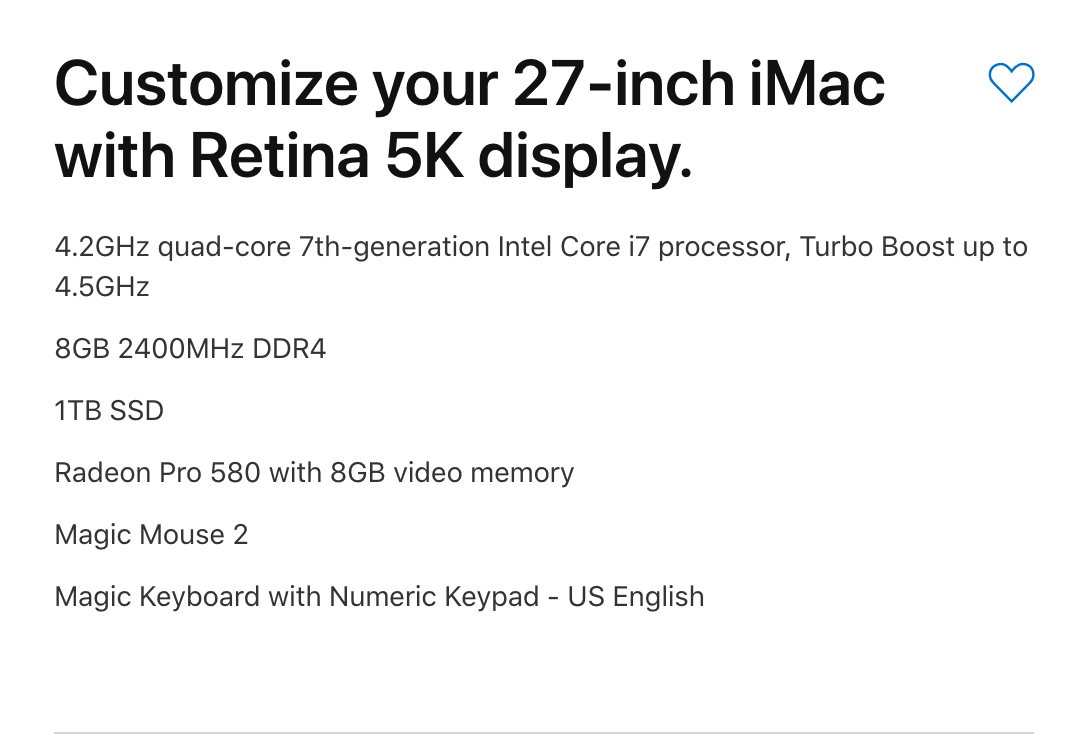
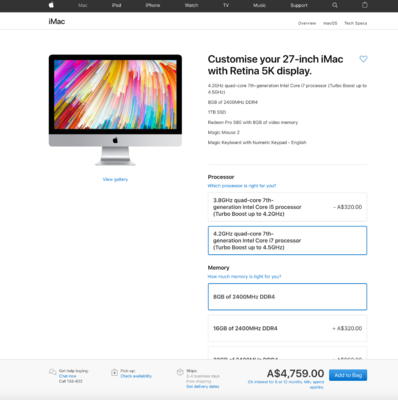
No new iMac models. Apple just released laptop updates and a new Mac Mini. I'm sorry, I forgot you were from Australia. I was quoting US prices. Yes, they do have a 4.2 GHz model in OZ. Start with the A$3449 model and configure things. With the same specs as my iMac, we are @ A$4759.00 plus AppleCare and Taxes. It's only money, right? Yep, I keep all my images on my 12TB G-Drive. I don't save any images on my internal HD. Just programs and my iTunes Library. So 1TB for me is fine. As far as a Fusion Drive, I'm staying away from them. The main reason is you do not have the ability to decide where your data resides on. Will it be on the small SSD Drive, or the larger Traditional HD? Only the Operating System knows. In the even of a catastrophic crash, recovering from a Fusion Drive is much more difficult for the data recovery places, than if you sent them in a SSD drive OR Traditional HD. I know in the past I was concerned about SSD Drives and them wearing out. While this is true, technology has greatly improved over the last 10 or so years and I've taken the leap of faith and bought one. Since Apple doesn't sell full traditional HDs any longer, your choices are limited once again. I'd rather have a little more capacity than pure speed so I chose a 1TB SSD Drive. I couldn't stomach the cost of a 2TB SSD drive.
-

Blackouts and Recommendations
Brian replied to oldschoolgirl's topic in The Windows & PC Hardware Forum
Black flickering when browsing? It's probably a inverter board problem, worn display cable, possible bad display OR the port on the motherboard that attaches to the video cable could be wacky. Tough to tell. Can you move/wiggle the screen and see if you can force the issue? I do agree, 3GB of RAM is NOT what you want with Windows 10. Actually, I recommend RAM be 16GB at the minimum with Windows 10. As far as selling you a new 240GB SSD drive. >> *SIGH* << If you are going to go to the trouble of replacing that HD, get a larger hard drive. A 240GB HD is microscopic by today's standards. You want at least a 500GB main drive, better if it's 1TB. I don't care how new a 240GB SSD Drive is or how fast it is, the thing won't do you any good if it's full. I do agree with future Windows Updates you are going to run out of room but they are not looking long term. I hate bad advice mixed in with decent advice. It just confuses people. That said, I'm surprised they didn't recommend a larger hard drive, though I'm sure they didn't have one in-stock. Sure! Let's tell her she is going to run out of room but sell her the same sized HD. (Approx.) Stupid up-sell. SMDH. Now for the 4000 days part. While it is true that SSD media does wear out over time, you would have to do something silly to really kill it. Like Defrag a SSD Drive. Never do that. I think Windows 10 won't let you, which is a good thing. If you just use the computer and don't write / erase stuff on a constant basis, it is probably fine. To clarify, if you aren't writing and erasing 40GB+ on a daily basis for the last 10 years, the drive is probably fine. Especially if its passing S.M.A.R.T. tests. I'm more concerned about the remaining free space than anything, plus SSD drives have come a long way during the past 10 years, so replacing it with a larger one isn't a bad idea. Here is a decent article: How Long do SSDs Really Last To quote the article: Now we come to the hard part. It sounds like this is a 10 year old laptop. Are you really sure you want to put money in this thing? Because if it were me, I'd be looking at a new laptop. Here is why: RAM prices are pretty high right now. They usually are at this time of year. So figure about $200 for the RAM. This might be less, or it might be more. Now, let's look at the cost of replacing that SSD Drive: Samsung 860 Pro - 1TB. That's about $300. So we are at $500, conversationally speaking. Plus, we need to purchase a program such as Acronis to clone the data from your old HD to your new HD, unless you want to install a fresh OS. Or pay someone / some tech place to do this for you. Figure about $150. So now we are up to $650 on a 10 year old laptop that would be best to nuke and start all over again with a fresh OS / New HD. With your anxiety, this sounds like a recipe for disaster. Personally, I'd rather have you network the two laptops together (it's easier than you think) and copy stuff over. This way if anything were to screw up, you have the original Laptop to go back to. As soon as you start messing with the old one, you introduce variables. So let's talk budget. -
If budget is an issue, a stock $1799 iMac is fine. I'd still get a 16GB RAM upgrade kit. Big difference between 8GB of RAM and 40GB. (You keep the existing two 4GB Sticks and add the two Crucial 8GB Sticks to the empty slots.)
-
First Question: Budget? I still do not recommend a 21.5" iMac. So at this point, we will configure a 27" model. Start with the $2299 model and tweak things: Here is the iMac that I recently purchased: I plan on having this computer for the next 7-8 years. Oh, having the keyboard with the built in number-pad is AWESOME. Spend the extra $30. Plus AppleCare and Tax, you are looking at $3600-ish. I had mine sent to a local Apple Store and I picked it up. (Actually, I had them walk me to my car with my purchase.) I also purchased this Crucial RAM kit from B&H to take the RAM from 8GB to 40GB. It's cheaper if you buy the kit from B&H than from Crucial's Website. Well, the last time I checked. I also bought this G-Drive Thunderbolt 3 12TB EHD. Actually, I purchased the RAM and HD together a few months before the iMac, so I could pay it off. Then I bought the iMac. My iMac from a powered-off state to me logging in with my password takes about 15 seconds. This sucker is fast. Oh, in case you are wondering, if you aren't a serious video editor, then you don't need a iMac Pro. In fact, Photoshop won't take advantage of a iMac Pro's features and will actually run slower than if you ran it on a tricked out iMac.

-
I also have Photo Mechanic 5. I haven't bothered to use the ingest feature either. Copy & Paste works well for me. Maybe if I was shooting sports or events again, I might use the Ingest feature to help speed things up. Right now I just 2nd Shoot Weddings and use a simple Copy & Paste to my EHD.
-
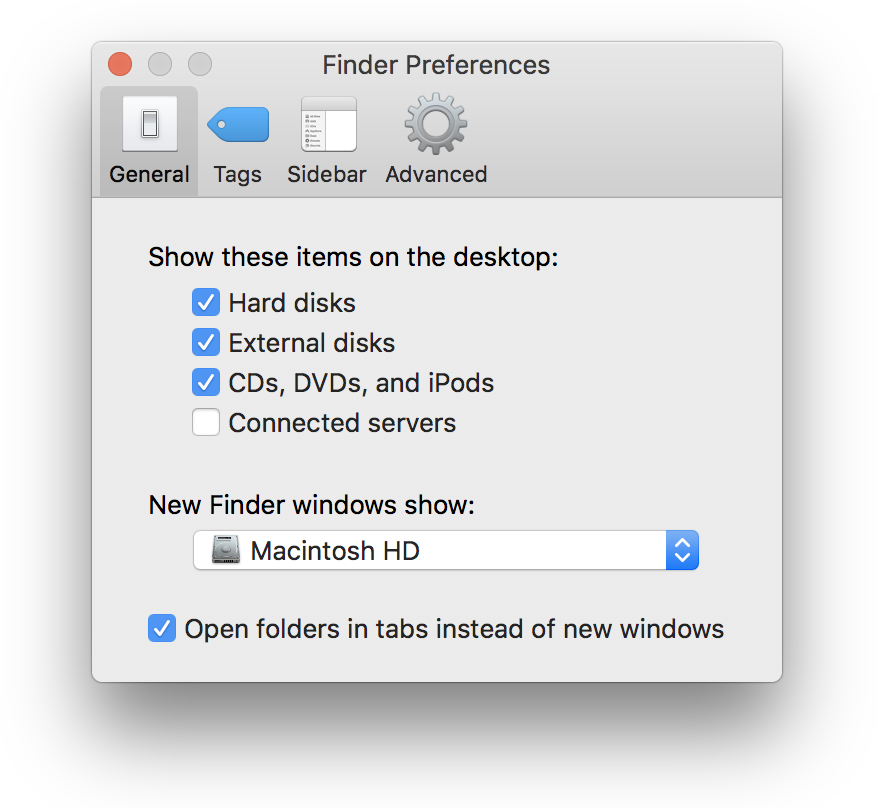
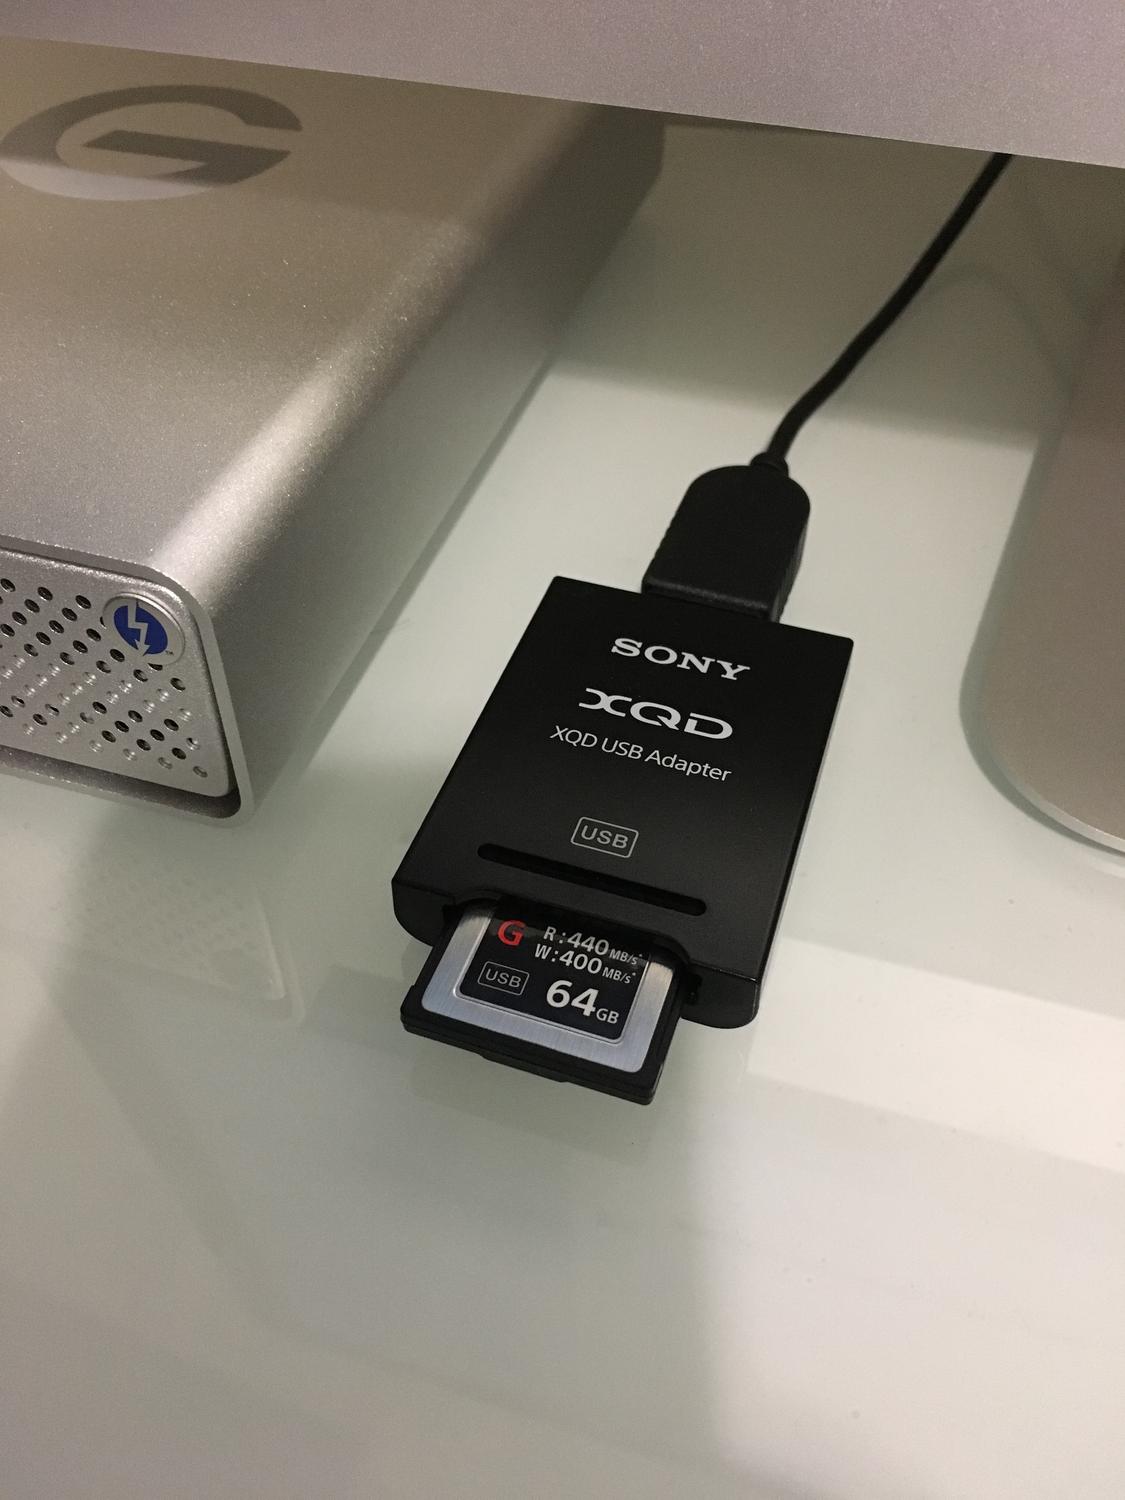
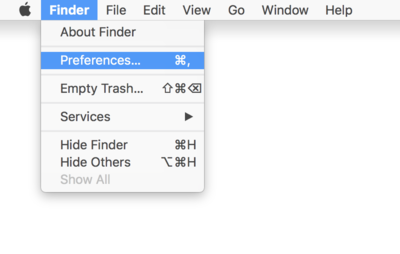
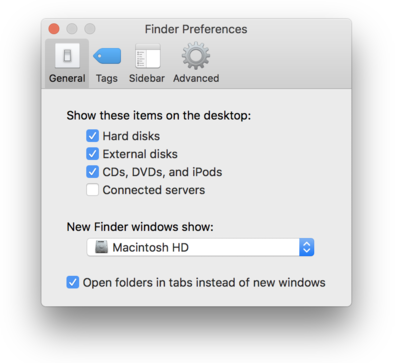
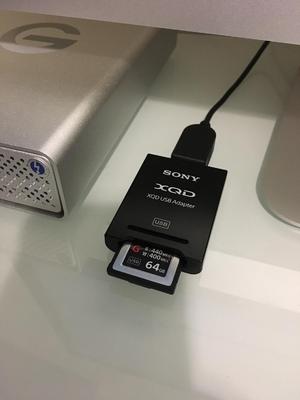
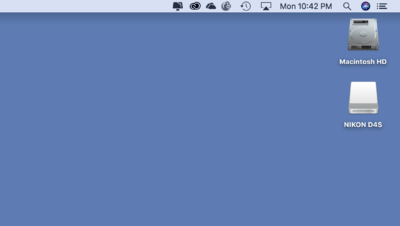
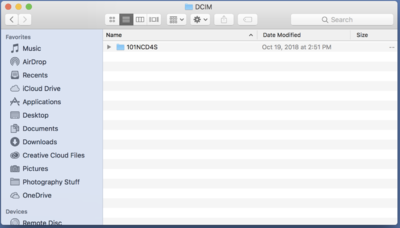
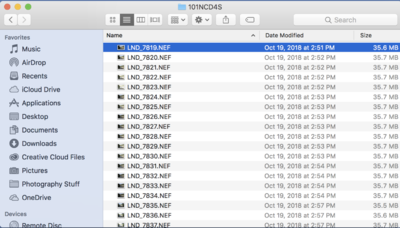
Do not use any blasted downloader programs. I don't care if it's Adobe or Nikon or Canon. Life is too short to complicate things. I have a XQD Reader hooked up to my iMac via a USB 3.0 Port. It works great! What you need to do is first turn on the ability to view your cards on the Desktop. When you are finished, you will be able to see your XQD Card / SD Card just like a EHD. First, open your finder: Then select the Finder Menu, next to the Apple Menu and click Preferences... Then check the following boxes so that they appear on the desktop: Then Click the Red Circle in the Upper Left Corner to apply the changes. Now when you insert a XQD Card, it will appear on the desktop: Simply double click on the XQD card, then double click on the DCIM folder, then you should see folders that contain your images. If you setup different banks and give each of them their own names, there might be a few folders in the DCIM Folder. If you just shoot with one bank, then there should be one. For example I shot this card with only one bank selected: Double click on your camera's folder and you should see your Raw Files. Then you simply do a "Select All" (CMD + A), right click and select "Copy" and then paste them into the folder of your choosing. Easy-Peasy! No fancy software to screw things up. Just a simply Copy & Paste. Why not Cut & Paste? Because if something screws up during the data transfer, you might lose images. So if it does screw up and you click Cancel during the transfer, you can attempt things again.

-
One more thing, purchase CleanMyMac X from MacPaw.com. I use this program at least once a week, if not every few days. Apple will say that they don't recommend this program, they are also the ones that say your HD cable was faulty when it wasn't. It's the best $40 on software that I've spent and have been using the program over the past 10 years. It helps keep the junk off your HD. Yes, you can download the trial and it will clear about 500MB of files, but if you want it to really work, you'll need to pony-up the cash and purchase it. Oh, it also has a Malware Remover built in.
-
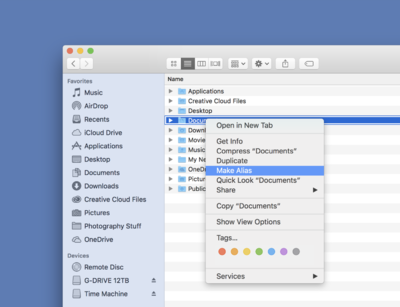
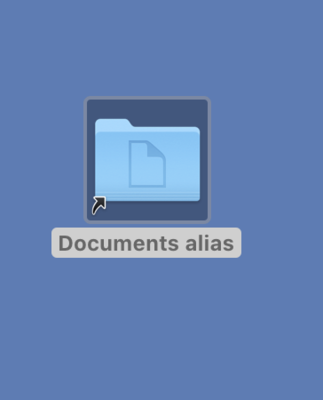
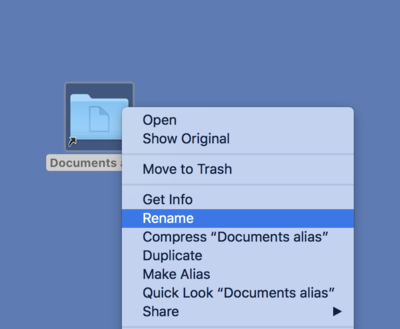
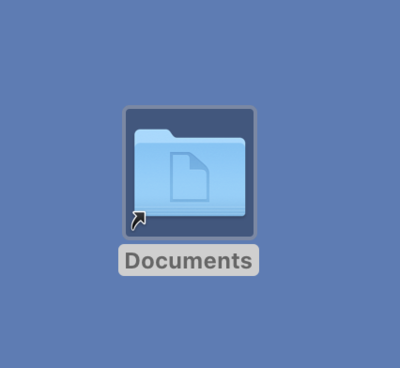
Here is the process to create an Alias. We will use the "Documents" folder as an example. Open the finder: Then find the Documents folder under your profile right click on it and choose Make Alias: The Documents Alias should appear just below the Documents folder: Simply Drag the Alias to the Mac Desktop Then Rename it: Now you have a "Documents" Folder on your desktop that won't kill performance. You can drag files to the Documents Alias Icon and the Mac OS will put the files in the Documents folder. You can do this with any folder on your hard drive and it's the way Apple wants you to do things, though it's really not broadcasted.

-
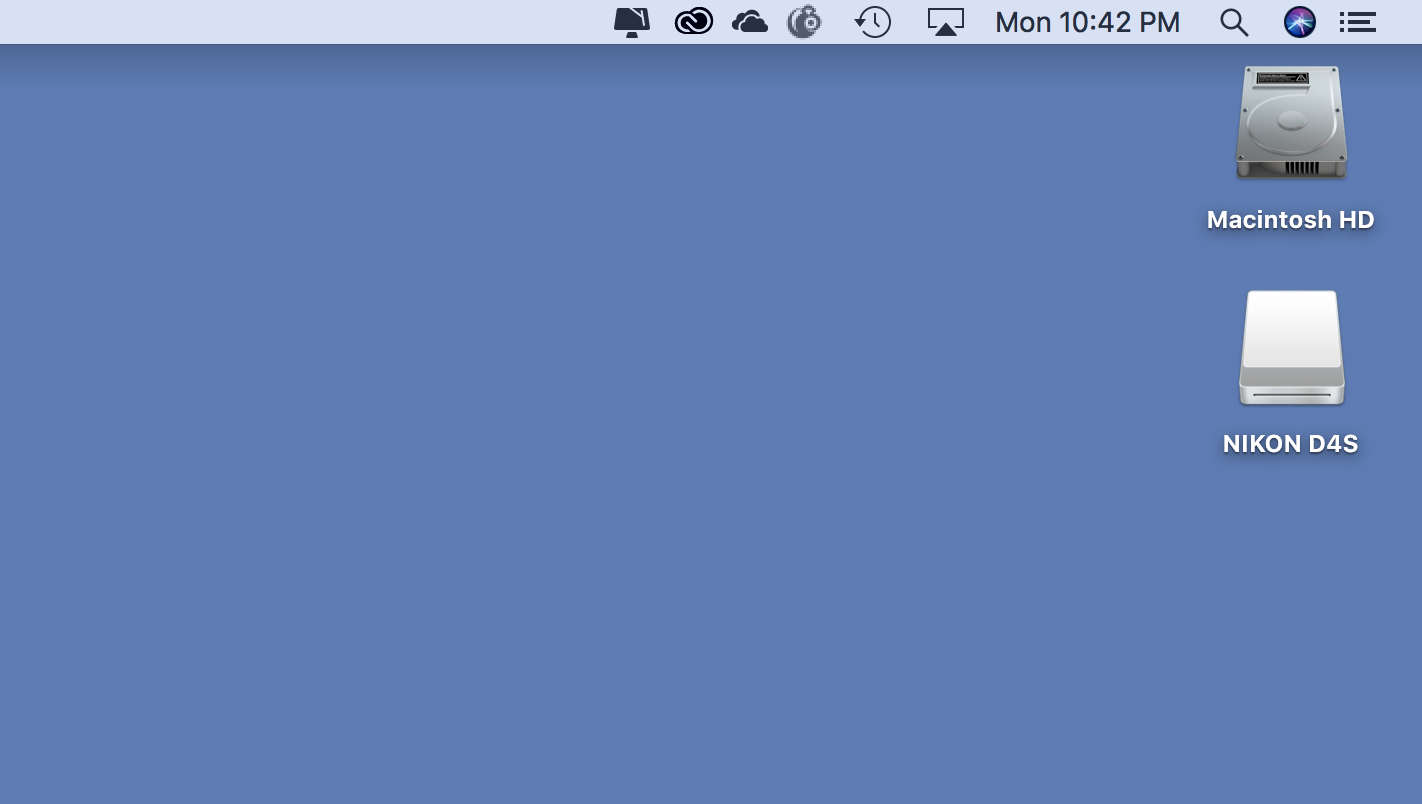
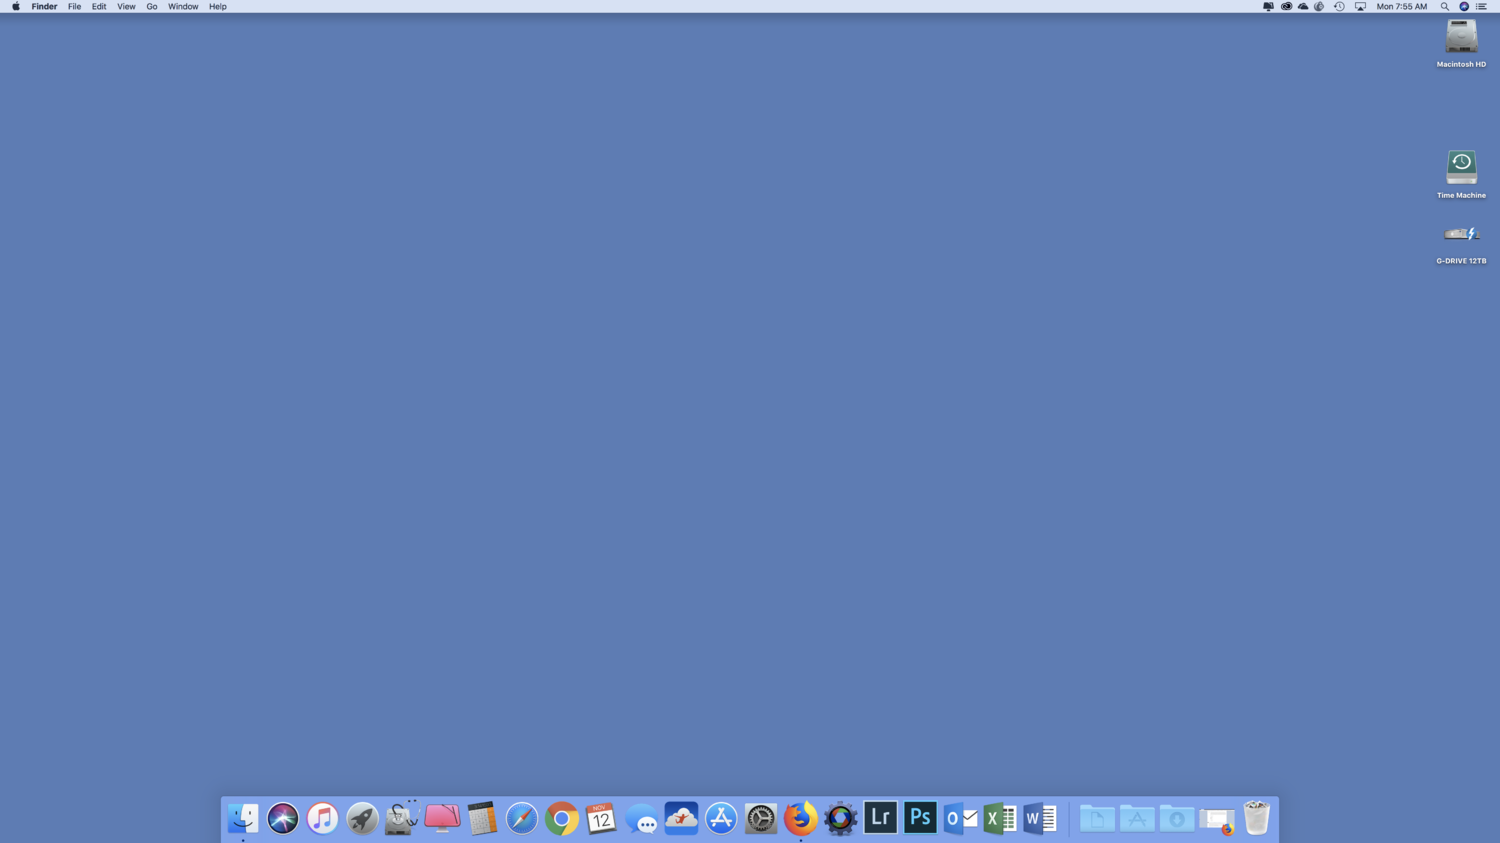
It is true that a traditional hard drive or what apple calls a Fusion Drive (Hybrid Drive, more on this in a bit,) does having moving parts. Cables do fail, but it doesn't sound like this is the issue. The biggest thing I see is you only have 4GB of RAM, which will definitely slow things down, and I'm sure your hard drive was pretty full since it's only a 500GB drive. Truth be told, laptops...even fancy MacBook Pros only last about 4-5 years and the main symptom is they become "Too Slow" during this time period. It's just not Apple; ALL manufacturers seem to do this. Heck, laptops that cost $500 or less only last about 18-24 months. If you want something to last a bit longer, say around 7-8 years, skip the MBP and buy a 27" iMac. Honestly, the next thing I would do to this MBP is to reformat the HD and re-install a fresh OS, since you have a new one to edit on. If your MBP can be upgraded to 8GB or even 16GB, that would really speed things up. Bear in mind that you don't want to go over 75-80% Full on any HD when it comes to a Mac. This includes both the internal drive and any externals. As soon as you hit 90% full, you are in dangerous territory and once you hit 95% full, things can start to corrupt. I feel that this would have been the correct course of action, nuking the drive and starting all over, but there is still no guarantee that it would be as fast as it was new. It's still a old laptop. The other thing one can do to keep their Macs running well, is to not store files on the Mac Desktop!! The more files and crap you have on your Mac Desktop, the slower it runs. The reason is the Mac OS treats those files and folders as "Open Windows" for lack of a better term. So if you have 2000 photos from the Smith-Jones Wedding and a 300 from the Davidson family photo session, that's 2302 "open" windows. (You have to figure in the folders themselves in this count.) To give you an idea of what your Mac Desktop should look like, here is a screenshot of mine: All that is on it is hard drives, memory cards (when inserted) and the occasional screen shot file. I will put stuff on the desktop to make uploading a bit easier, but once I'm done, those files are deleted. What you CAN do, is right click on files and folders within your HD that you normally open and choose "Make Alias." Then drag the Alias File to the Desktop. Alias files are meant for the desktop. What are they? It's Mac-Speak for Shortcut.
-
You are looking to purchase a Thunderbolt 3 Dock to get the best performance if you are going to buy something new. Then connect your card reader into one of the USB ports on the Dock. Even though Thunderbolt 3 is supposed to be compatible with Thunderbolt 2, if you are dealing with a 3rd party dock, things may not be 100% future-proof.
-
Yep. CPQ adds a bit more "punch." That's normal. That's why I say don't push your colors in post. (Saturate, Vibrance, use Color Boost Actions, etc.) This is due to the ink that they use on the printers and how they are calibrated. I will say CPQ is pretty consistent, so once you figure out how to edit photos to be printed by them, there aren't surprises.
-
The one on Amazon isn’t the exact same model, but it should work fine. Buy the kit for $114 from Amazon. There are plenty of YouTube videos demonstrating the installation method. Just make sure your iMac is unplugged and you touch something close by that is metallic to ground yourself before handling the RAM. I noticed that my RAM cage in my iMac had a tendency to flop back into the computer. So be prepared for this, especially if you install it with the screen face down.
-
Need new PC, Need recommendations running CC2018
Brian replied to snapmomma76's topic in The Windows & PC Hardware Forum
Oh, I recommend SSD Drives. Just not small capacity SSD drives. That's why I linked to 1TB SSD drives. m.2 drives are all the rage now, you just need a motherboard to support it. Where folks run into problems is their computers come with a 128GB SSD Drive and then they dump all their files to that drive, which results in problems. I don't care how fast a SSD Drive is, it won't do you a damn bit of good if it's full. If you go with a traditional hard drive, make sure they are 7200RPM and not 5400RPM and it's at least 1TB.