
Damien Symonds
-
Posts
207,161 -
Joined
-
Last visited
-
Days Won
3,261
Posts posted by Damien Symonds
-
-
Yes, you sure can. Before setting up the action, resize one of your photos to 1500 pixels wide, then put your logo on it, and take the measurements, blah blah blah, exactly as I've instructed.
The only peculiar thing you have to do is this: When you get to the Fit Image step, enter 1500 for the width and something outrageously big for the height:
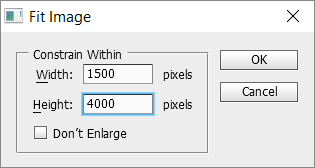
This will ensure that every photo is 1500 wide, regardless of shape or orientation.
-
How did it go?
-
Sorry

This is just modern life. We all have to get used to smaller and smaller stuff on our screens.
-
6 minutes ago, Cynthia said:
They do seem a bit off...
The old prints, do you mean? Off how, exactly? How do they differ from your screen?
-
Good.
In the example photo, they have some light coming in at the top right corner. I think you should do the same. So mask your vignette off that area.
Also, I encourage you to add some midtone contrast to the entire background. The easiest way to do that is add a Brightness/Contrast layer and increase the Contrast slider.
-
No, you DON'T carefully mask. You use a big soft brush.
-
Well, it would be best to have a background that was as similar as possible to the one you intended to transpose.
-
Oh yeah, it looks wonderful!
-
No, don't calibrate again until you get those new prints. We've done all we can do for now.
-
No
But I don't think it's possible to do any better.
-
What? Paint white on those areas of the mask, of course, to fill them in with yellow.
I'm not sure what you don't understand, exactly?
-
No, just inside the hair. You MUST let some yellow bleed into the hair.
But you have to mask with a nice big soft brush. To make it subtle and gradual and plausible.
-
5 minutes ago, Chantel Allen said:
did you see the pic i sent of the chat and how far off my line is? my prints are warmer than my monitor shots...
PLEASE stop overthinking this. Yes, I saw that pic, and no, it's COMPLETELY IRRELEVANT.
Just get some new prints, darn it!
-
Oh, you will. The files will be nice and tiny.
-
THIS is what you need to mask:
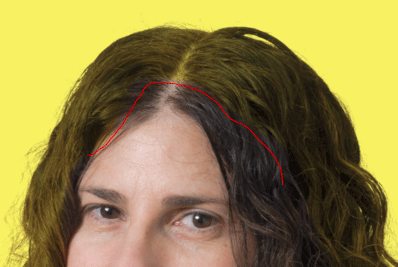
The very distinct obvious line.
-
No, its quite ok for some of the hair to be yellow. That's how it would be if you really had shot her in front of a bright yellow wall.
-
Ok, so the ProDPI prints match the Bay ones pretty well?
-
6 minutes ago, Chantel Allen said:
when i look at photos that i posted on fb, they look horrible. really washed out.
-
Yes, that's right! The Image Processor method does them all at once, it's the work of seconds.
-
Great! So select all the images in Bridge, then go to Tools>Photoshop>Image Processor. In there, choose 1024x1024 for the size, and run it.
-
I think you've gone the wrong way with this. You seem to have lightened your photo, but surely the other photo is characterised by darkening? It's quite a heavy dark vignette around the edges.
-
 1
1
-
-
Do you use Bridge?
-
Great. Now go ahead and order some new prints, to be sure.
-

Not even CLOSE to 1024.
Banding in the sky :(
in Help with editing
Posted
Yes, a whole class full. Please don't wait any longer.