Damien Symonds
-
Posts
210,703 -
Joined
-
Last visited
-
Days Won
3,424
Everything posted by Damien Symonds
-

Removing noise while maintaining sharpness
Damien Symonds replied to MeribethFields's topic in Help with editing
No, still not right, sorry. Maybe you're using the Crop Tool instead of the Marquee Tool? -
Lights in my editing area
Damien Symonds replied to Maryann's topic in Monitor calibration questions or problems
Yep, if in doubt, definitely err on the high side. -
Hi Pat, I can definitely help with this. First, though, I need to know if you shot raw?
-
Removing noise while maintaining sharpness
Damien Symonds replied to MeribethFields's topic in Help with editing
No, something went awry here. Can you read the 100% crop instructions again? -
Would you be willing to allow me to use this photo to write a proper tutorial about freckle enhancement on my site? If so, could you send me the full-sized SOOR file? (saved as a jpeg). If not, that's ok.
-
Sorry, I can only give feedback in the classes.
-
Removing noise while maintaining sharpness
Damien Symonds replied to MeribethFields's topic in Help with editing
You need to resize it first, the same way you would for any other web image. Go to the Image Size dialog and make sure the "Resample" checkbox is checked, then make it 1500pixels on the longest dimension. Then it will save well under the limit. -
I see the problem on the TIFF file in Windows Viewer. This isn't actually a real problem. It's simply the result of a "dumb" program not being able to properly understand the layers created in a "smart" one. As long as you do all your browsing in Bridge, and of course never send TIFF files to clients, all is well.
-
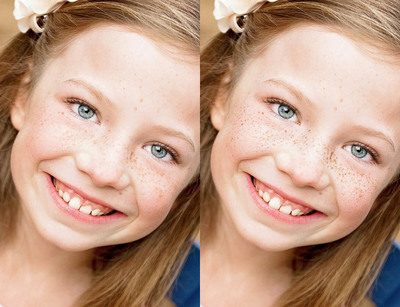
There are several methods. Here's one I'm fond of: Duplicate the Background layer Go to Filter>Other>High Pass. Begin with the Radius at 0, and slowly take it up and find the sweet spot where the freckles are being exaggerated the most (the whole image will be grey at this point). As you play with the slider, you'll see that if you go too low, the freckles won't be getting their maximum punch, but if you go too high, the freckles won't be getting any additional punch, all you'll be doing is exaggerating other things. Find that sweet spot. After pressing OK to perform the High Pass filter, change the layer's blend mode to "Hard Light". Finally, add a mask to the layer and mask it to the freckled part of the face only. By the way, if you want an even stronger result, you can duplicate that High Pass layer. Heck, I suppose you could duplicate it as many times as you want, but it would start to look a bit weird. Oh, also by the way, you can use "Overlay" blend mode for a slightly gentler result than Hard Light gives. Here's my play with the above method:
- 9 replies
-
- 21
-

-
Photoshop panorama
Damien Symonds replied to k12pfc's topic in Photoshop / Elements / Bridge / ACR questions or problems
I agree with Samantha. -
Terrific! Now you can go to the folder of files, and move them to wherever you want them. Then browse them in Bridge, and edit.
-
Removing noise while maintaining sharpness
Damien Symonds replied to MeribethFields's topic in Help with editing
The leap of faith -
Everything looks absolutely fine at my end. Viewing in both Photoshop and Bridge, the PSD looks the same as the jpeg. Just downloading the Tiff now ...
-
Calibration question
Damien Symonds replied to Suzette's topic in Monitor calibration questions or problems
How did it go? -
Rich Black & White
Damien Symonds replied to JulieHunt's topic in How to achieve a certain look or effect
I'm so sorry Julie, clean black-and-white processing is all covered in my Levels Class, so I can't share the methods here. I hope you understand. I hope you like this, though:
-
Can you explain what you mean by a "gradient filter"?
-
Next, make sure you do this so you can rescue the files trapped in Lightroom.
-
Smoothing backdrop for black and white image
Damien Symonds replied to JessicaSalazar's topic in Help with editing
Oh gee, are you sure about this? It's unflatteringly dark. Is your calibration up to date? -
Do you mind sending me that weird TIFF file so I can see how it looks on my computer?
-
No, no, not at all. There's just a little setting in the Preferences of some calibrators that can affect how images appear in non-Photoshop programs; however I don't think it applies to you or your Smile.
-
Smoothing backdrop for black and white image
Damien Symonds replied to JessicaSalazar's topic in Help with editing
Gosh, good question. One of those things that's more obvious afterwards than at the time of shooting, I guess. I'm confident I can help with this. Go ahead and do your raw processing (don't forget noise removal) and post again for me. -
Interesting. What about if you flatten the layers and save as a jpeg? I assume that's fine?
-
Hi Amity, what file format are you saving? Also, which other programs are you viewing in? Also, which X-Rite calibrator do you have?
-
Great! The first step to a better workflow is knowing how terrible Lightroom is. Usually it takes more effort on my part to convince people of that. So I'm glad you've already done the work for me. Your first step is to download and install Adobe Bridge, if you haven't already. It's among the programs you have with your CC subscription. Then, start by watching this video, and this one.
-
Color problems
Damien Symonds replied to Magnoliadana's topic in Monitor calibration questions or problems
The very first FAQ