-
Posts
211,013 -
Joined
-
Last visited
-
Days Won
3,445
Everything posted by Damien Symonds
-
Hmmm ... extend it how far, exactly? Are you aiming for a landscape crop? That's going to be insanely hard.
-

Best way to combine a new sky with a pic of a dog in foreground?
Damien Symonds replied to Paige's topic in Help with editing
Download the PSD file Sorry it's so big. Usually I try to make them smaller and easier to download, but it wasn't possible with this one. -

Best way to combine a new sky with a pic of a dog in foreground?
Damien Symonds replied to Paige's topic in Help with editing
Gah! I just had an internet outage. Of all the times ... I'll try and upload the file again ... -

Best way to combine a new sky with a pic of a dog in foreground?
Damien Symonds replied to Paige's topic in Help with editing
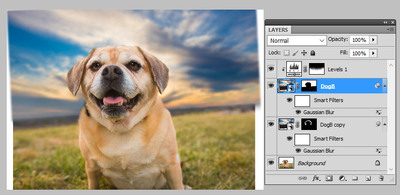
Well, it was a variation of this method. I opened the sky photo, and (on a new layer) cloned out the pole and stuff. I saved that sky photo as a PSD file, and closed it. I opened the dog photo, and File>Place to insert the sky photo onto the dog photo. I lined up the horizon as accurately as possible. I applied a sufficient amount of blur to the sky to be plausible. Then I duplicated that sky layer. I turned the top one off, and returned to the bottom one for the time being. I changed its blend mode to "Multiply", and masked it around the head of the dog. In some areas, where the sky was quite light, the masking was very easy, I could let the sky encroach onto the fur naturally. In other areas, where the sky was darker, I had to zoom in and patiently and carefully mask until it looked good. Then I returned to the top copy, which was still on "Normal" blend mode, and masked it in everywhere else. Finally, I added a Levels layer to make the bottom of the sky a bit lighter, so it plausibly matched the existing horizon. If you can allow me a few minutes, I'll upload the PSD file so you can follow along. -
Not at all. The lighting is lovely.
-

Bridge acting weird
Damien Symonds replied to ishootfor3's topic in Photoshop / Elements / Bridge / ACR questions or problems
Can you tell us the solution? -
You're worrying about nothing, I promise. It's just how the lighting is. In the two "sample" photos, your lighting is way too dark. I've adjusted one of them so that the rug is the same as your photo. See how the background becomes light?
-
Hi Deinna, do you have another photo that shows what the backdrop should look like?
-

Best way to combine a new sky with a pic of a dog in foreground?
Damien Symonds replied to Paige's topic in Help with editing
-

Bridge acting weird
Damien Symonds replied to ishootfor3's topic in Photoshop / Elements / Bridge / ACR questions or problems
As hard drive space isn't your primary concern presently, I reckon don't worry about it. -

Bridge acting weird
Damien Symonds replied to ishootfor3's topic in Photoshop / Elements / Bridge / ACR questions or problems
Safe as a bank, yes. Very well regarded. -

Bridge acting weird
Damien Symonds replied to ishootfor3's topic in Photoshop / Elements / Bridge / ACR questions or problems
Next, run CleanMyMac. -

Control L shortcut
Damien Symonds replied to 32flavors's topic in Photoshop / Elements / Bridge / ACR questions or problems
You have to set that up manually, via Edit>Keyboard Shortcuts. Have you done so? By default, Ctrl L simply opens the Levels dialog, which is much different, and of course destructive. -

Bridge acting weird
Damien Symonds replied to ishootfor3's topic in Photoshop / Elements / Bridge / ACR questions or problems
Sure it will, just press Cmd - (minus), the same way you'd zoom out in Photoshop itself. -
Oh yes, for sure. It will be easier to replace the entire thing, rather than trying to line up that squiggly pattern.
-

Removing noise while maintaining sharpness
Damien Symonds replied to MeribethFields's topic in Help with editing
No, that's great!!! Perfect. -

Help -how to edit backlit photo in studio
Damien Symonds replied to jodie84's topic in Help with editing
Hi Jodie, simply add a "Solid Color" adjustment layer, white in colour, and mask it on to the background. It should only be the work of minutes. -
Oh gosh, this is such a tricky question. The face-value answer is: They'd need to be the same number of megapixels as your own camera (I assume you're combining them with some of your own photos?) so that their quality is a good match, if you know what I mean. However, it isn't always so. If you're using a stock image for a background, well, backgrounds tend to be blurrier than a subject, so you might get away with a smaller file. In fact, sometimes I've successfully used very small phone photos as backgrounds (artistically blurred, of course) for composites. I guess what I'm trying to say is, get them as close in size to your own photos as possible. If you can't get them that big, pay very close attention to how you use them, to make sure your composite doesn't end up with glaring disparities of focus.
-

Fast Stone Image Browser
Damien Symonds replied to DonnaJames's topic in Miscellaneous questions or problems
Hi Donna, is this a new problem? I mean, has it been working ok in the past?


