

Brian
-
Posts
4,131 -
Joined
-
Last visited
-
Days Won
54
Everything posted by Brian
-
I would hold for now. Apple has been pre-occupied with getting its iPad line stable and manufactures like Intel haven't given Apple the latest and greatest stuff. iMacs have been flat technology-wise these last few years, and the only #amazeballz update is the new MBP with the touch bar thingy. Apple usually does upgrades to their iMac line in the spring, around April-ish. Waiting a few more months won't kill you. As for the beach balls... How full are your HDs? How much crap do you have on the desktop. Do you own and use CleanMyMac from MacPaw to keep things from getting gunned up? What MacOS are you running?
-

Question about your laptop recommendation
Brian replied to Mariann Wilson's topic in The Windows & PC Hardware Forum
For those wondering, in order for an i7 Processor to be truly faster than a i5, the software needs to be programed to take advantage of the architecture of the i7 that makes it so fast. Photoshop is not programmed to take advantage of these features. In fact, there is only about a 5-7% performance boost with a i7 over a i5 when it comes to PS. That said, if you do anything with video editing, or play video games, then the i7 is the better choice between the two, hands down. Photoshop? No-so-much. In fact, it's better to have 16GB - 32GB of RAM, and a beefy video card with 2-4GB of Video RAM to make PS run fast. -
Question about your laptop recommendation
Brian replied to Mariann Wilson's topic in The Windows & PC Hardware Forum
Are they impossible to calibrate? Impossible is relative. It may not be truly impossible, but is extremely difficult to calibrate, at least on the first 10-20 tries. The real question you should be asking is... "How much money do I have set aside for Vodka or Tequila? Is there enough left over for the aspirin for the hangover after trying to calibrate the damn thing?" Truth be told, I DO NOT RECOMMEND LAPTOPS FOR PHOTO EDITING. PERIOD. I just don't. But I got tired of arguing, because so many members have love-affairs with laptops. SMDH Personally, I'd get this one: https://www.bhphotovideo.com/c/product/1183450-REG/asus_gl552vw_dh71_i7_6700hq_16gb_1tb_windows_10_64_960m_15_6.html See these specs? This is what you look for: That's what I keep stating to look for over-and-over-and-over again. Thread after thread after thread. I just don't understand why people are so afraid. i5 or i7 CPU 1TB 7200 RPM Hard Drive at a Minimum 8GB RAM, 16GB RAM Preferred A Video Card that has separate and dedicated Video Memory A Display that is IPS Based. Windows 10 Home, but I prefer Windows 10 Pro cause I'm a techno-weenie like that and need the "Pro" features. In reality for the average user, either is fine. If you don't find a unit that meets those 5 hardware requirements, then I'm not going to recommend it for photo editing. Windows 10 is the standard thing you get these days. Don't make it harder than it is. It's just 5 things to look for. LOL!!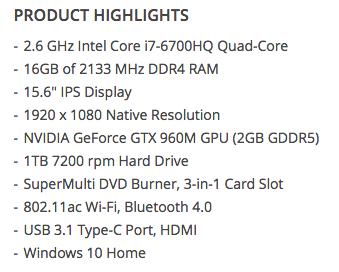
-
Question about your laptop recommendation
Brian replied to Mariann Wilson's topic in The Windows & PC Hardware Forum
Yes.
-
Yes. And Yes. So Yes to both.
-
Under $700 is going to be tough. Sure you could purchase a low-end laptop for $700 or so, but the screen won't be IPS-Based, which is what you want if you are editing photos. If you could save up just $300 more, there is A LOT more options for you. Of course, you could hookup an external IPS monitor and they run about $300 and go up from there.
-
I would also purchase this reader: https://www.bhphotovideo.com/c/product/810152-REG/SanDisk_SDDR_289_A20_ImageMate_All_in_One_USB_3_0.html Just as long as you have a USB 3.0 port on your computer. To really take advantage of the faster speeds, it needs to be in a USB 3.0 port. Traditionally, computers and laptops have a mix of USB 2.0 ports and USB 3.0 ports. So make sure you plug it into a port marked "SS" (SuperSpeed.) Typically, these ports are blue instead of black.
-
OK, first... AVOID USING THE SD SLOT IN THE 5D MARK III!! In fact, I'd skip using it altogether!! Why? Because when you do, it slows down the write speeds in both slots to 30 mb/s, even though you have a super-fancy and super-expensive fast card in the slot. This does not happen when you use the CF Slot. The reason is Canon likes to cut corners and I'm pretty sure it boils down to money. Manufacturers have to pay royalties to various companies if they use their technology and I'm sure using a SDHC Slot with higher speeds cost more money to their bottom line. Same thing happened with the 5D Mark II, Canon used the focusing system from the 5D Mark I, which dated to 2005. This is the reason that only the center AF point was they only reliable one. Canon cut corners to save money by using an older focusing system. Anyway... The Sandisk Extreme Pro for $49.99 that you linked to, I'd use that. The CF slot doesn't suffer from the speed issues that I'm talking about. Now, I'm sure there are some members who question why I recommend skipping the SD slot, and that they have used it with no problems. Of course they would be correct. It really doesn't matter if you do not rely on write times. If you normally photograph something static, like head-shots or your standard portrait, then you are only taking one or two photos at a time, so it's not an issue. That said, if you photograph sports, moving subjects, like running two year olds, or photograph something like a Wedding, chances are you are gonna lay on the shutter and go clickclickclickclickclick every few seconds or so. THAT'S where you see the difference.
-
Weird stuff happening when sliders are used
Brian replied to Karen LeJeune's topic in The Windows & PC Hardware Forum
Sometimes, "rolling back" to a older driver fixes your problem. In your case, the "current" driver seemed to have problems playing with Adobe's software and the older one works better. You did exactly what I would have done!! NOW BACKUP THAT DRIVER YOU DOWNLOADED!! YOU NEVER KNOW WHEN YOU'LL NEED IT AGAIN. -
Weird stuff happening when sliders are used
Brian replied to Karen LeJeune's topic in The Windows & PC Hardware Forum
It's a video driver problem. I'd head to the computer manufacture's website and see if they have any updates for you. Also, make sure your Windows 10 is up to date. If you have trouble finding the drivers, what exact Make & Model Computer do you have? Unfortunately, I see this problem often, mostly on Macs and now it seems Windows units are suffering from similar problems. Adobe is using the video card for a performance boost these days and it seems that the coding done by Adobe doesn't always work. That's why you get these weird artifacts / black boxes, the Adobe software just isn't 100% compatible with your Video Drivers, so they onl course of action you have is to see if there is a update. Otherwise, you are stuck with this problem. Have you tried using a older version of PS CC? Not the PS CC 2015 point whatever, just "PS CC." Does the problem go away? -
Apple is making things extremely difficult. I think they pulled the updates. The only way to "update" is to upgrade to Sierra. This is like Microsoft really pushing (and upgrading) Windows 7 computers to Windows 10. So either wait or upgrade. It's a roll of the dice. What I would do is if you do anything professionally, get those sessions / project edited and completed first, THEN upgrade!! I've had members here in the past upgrade in the middle of sessions only to have a computer end-up on its back. Time is money. Happy Customers generate good word-of-mouth. Don't ever upgrade your OS when you have work to complete. SMDH!! LOL!! You upgrade when it's completely dead. Like January or Feb. in the northern hemisphere. Or you have a "Production" unit and a "Test Unit," which is two computers. You upgrade the "Test Unit," make sure things are hunky-dory THEN that unit becomes the "Production" unit. In which case, the current production unit gets retired or becomes the test unit. Unfortunately, most people don't have two identical computers to do this.
-
PS CC (and its various incarnations) will have the best chance of updates happening. CS6 users (and CS5, CS4, etc) are SOL. Adobe has abandoned support for those programs. Well, at least as far as updates go. CS6 might still have some sort of phone support, though its days are numbered at this point. I would definitely upgrade to the latest version of Yosemite, that's the safest bet. Mac OS Sierra looks interesting, but you really need a new Mac to take full advantage of the new features. Also, there is no "Take-Backsies" when it comes to OS Sierra. Even if you have a Time Machine Backup. If something goes horribly wrong, you will need to reformat the internal HD and re-install Yosemite before using the Time Machine Backup to restore your HD!! Fun? Eh? Most people don't ever create a bootable OS Thumbdrive and think their TM backup is all they need. It is in a sense, but you need to be able to get to the TM backup first. Edit: Some of the newer Macs have a hidden partition that allow you to reformat the HD from a diagnostic partition. I'm not exactly sure when they started this. Since you have a 2011 Mac, I'm going to bank on a "No" for having this feature. I know my 2009 iMac doesn't have that recovery partition. It seems to be a new-mac thing. So if you do upgrade, it's still a one-way thing.
-
Spec-wise looks fine. How are the LG models when it comes to calibration @Damien Symonds?
-
Might as well replace the battery while you have it apart. There are YouTube videos demonstrating the take apart process. Tech Tip: Make note of what screws come out from where they are removed. Apple has a habit of using different sized screws, so it's best to reinstall the screw from where it came out.
-
Since you are using PS CC, and are on Yosemite, you could update to Sierra. But ask yourself, "why?" since things are running well for the most part. Are you upgrading to upgrade because you think you are missing out? Or is there a feature that you are wanting that's only available on the new OS?
-
You don't always need a "Command Center," a good 27" will also work well.
-
Which 85mm for Nikon, NOT the 85mm 1.8G
Brian replied to mistyprochaska's topic in Photo Gear & Equipment
Another thought, if you have a larger Nikon Body that has a AF motor built in, then you might want to consider a used AF 85mm f/1.4D? They should be less than $1000 in good shape. -
External Harddrive? Are they pretty much all the same?
Brian replied to Elisa's topic in The Windows & PC Hardware Forum
I'd LOVE to have this unit, configured in a RAID 1: https://www.bhphotovideo.com/c/product/1148574-REG/wd_wdbdtb0080jsl_nesn_my_book_pro_8tb.html -
External Harddrive? Are they pretty much all the same?
Brian replied to Elisa's topic in The Windows & PC Hardware Forum
Hard Drives are Hard Drives. The Operating System doesn't care, just as long as it's formatted / partitioned to a filesystem that it can read. To really answer your question, I need your budget. I personally like G-Drives, though they are a bit pricey. I would avoid the el-cheapo Black Friday drives, unless it's a really good deal on a high-quality one. All too often the big-box stores will have a $69 special on BF, which has a huge profit margin for the re-seller, and a low-grade crappy drive for the consumer. I would avoid anything that is labeled "Eco Friendly," or "Green." Why? Because it's gonna die on you sooner than later and end up in a landfill anyway. So that isn't very "Green." I would also recommend that you avoid 3TB Drives and either go for a 2TB or 4TB and larger. (At this point, I'd look at 4TB drives and larger.) I might create a Black Friday Thread with links to stuff that catches my eye, though I am working so I might create the thread in the "Land of Misfits" for folks to chime in. -
You can even get a fancy dual monitor stand from Dell! This one fits two 24" models just fine: https://www.amazon.com/Dell-MDS14-Monitor-Stand-5TPP7/dp/B00DXYRKLW/ref=sr_1_1?ie=UTF8&qid=1479767250&sr=8-1&keywords=Dell+MDS14+Dual+Monitor+Stand+(5TPP7)
-
The worst that could happen is it doesn't recognize the extra 8GB or it locks up, but I've never come across that happening from the end-users that have upgraded to 16GB on that model. That said, I've heard of successful upgrades to 16GB, though it might drain the battery a little faster. This is the reason that the new MBP aren't 32GB and max out at 16GB. So it's a trade off. If you leave your laptop plugged in, then it's a non-issue. If you are a road warrior, then it might.
-
Which 85mm for Nikon, NOT the 85mm 1.8G
Brian replied to mistyprochaska's topic in Photo Gear & Equipment
I'm a Nikon OEM snob and I was going to tell you the Nikon 85mm f/1.8G. LOL!! I haven't experienced the same issues that you are having. Have you considered the new Nikon 105mm f/1.4G? As far as Sigma vs Tamron, I'd choose a Sigma ART. In either case, quality control has gotten better with both brands, but you can still have issues. Test them thoroughly if you go that route. -
YES!! There is a BIG difference between 4GB and 8GB of RAM. Max that sucker out! Crucial.com has a scanning tool that will take you to a page with your options. If you can create a Mavericks Thumbdrive, and you want to start from scratch, then it might be worth it. Honestly, stick with Mavericks if you can. Since you upgraded, the Mavericks OS should be in your App Store List. Head to the Apple Menu and select App Store... and look for it there. Now, Apple has changed things, so you may not be able to re-download it. You might have to go back to Lion and try upgrading to Mavericks but at this point and time, Apple is making things difficult, they really want you to upgrade to MacOS Sierra. For now, let's try upgrading the RAM before Nuking the HD.
-
A Nit is a unit of measurement, usually referring to Luminance. The more Nits, the brighter the screen appears. So a model with 300 Nits will appear brighter than one that is 200 Nits. Most smartphones these days are around 400 Nits. So which one? Doesn't matter really. 200-300 nits is average for a display and you'll want to get calibrated anyway, so your prints match the screen. If you have a nice and fancy bright screen, then it's very possible that your prints will come out dark. So why all the fuss? It's because you are looking at gaming laptops, where those typical end-users want the best. So if you are using it to play first-person shooters and want things to be brighter, you'll probably will go for the 300-400 Nit model. For photos, anything between 200-300 is fine. I wouldn't put that much emphasis on it. RAM, HD, CPU, Video Card and Video Memory, IPS Display...that's what you pay attention to.
-
It has to do more with your video card being able to support a larger display (or multiple displays) than with the OS. Most of the time, people don't load the monitor drivers and use the Microsoft Generic one that is built in with Windows. For your Mac Laptop, you need to have the correct cable to hook up to it, plus have enough horsepower to drive a second monitor. Windows XP is no longer supported at all. So it doesn't surprise me that you aren't finding any mention of it. Believe it or not, Windows 7's days are numbered! It's being put out to pasture now, slowly. On Jan 14, 2020, Windows 7 will be taken behind the proverbial barn and shot dead!! LOL!! Here is a monitor that I recommend, especially since you have older devices: https://www.bhphotovideo.com/c/product/829236-REG/Dell_469_1137_U2412M_UltraSharp_24_LED.html

