Brian
-
Posts
4,137 -
Joined
-
Last visited
-
Days Won
55
Everything posted by Brian
-
Hold Up!!! Before buying anything, are you sure you using the latest version of the NVIDIA Studio Drivers for Windows 11? It seems that version 576.80 now supports the 5000 Series of NVIDIA's products. I also found this: Adobe Lightroom | Panning lags at 100% (1:1) zoom level | Windows 11 I also saw this: How can I override the default graphics processor for a program? Let's exhaust everything before you fork out money. I hate-hate-hate wasting money on this shit.
-
Check out "Part 2 / This Goes to 11" for what I would buy when it comes to a Mac Studio. Macintosh Recommendations - Early 2025 Version Alternatively, if you wait a few weeks and Apple comes out with a new Studio Display, you might want to pick one up and purchase a Tricked-Out Mac Mini M5 Pro, which should be released in a few weeks. You will have the benefit of having a M5 chip, and not spending as much money as you would a M4 Mac Studio. It is worth waiting a few more weeks.
-
Hmm...checking out the latest NVIDIA Studio Drivers, it doesn't list the 5000 Series of cards and were last updated a year ago. It's these drivers that are designed for Adobe's Products; I feel the drivers you are using, that are meant for video games / general computing, is the source of your issues. Plus Windows 11 is problem all by itself. (Microsoft is keeping with tradition of every-other-operating-system to be "Good." Windows XP --> Windows Vista (Sucked) --> Windows 7 -- Windows 8/8.1 (Sucked) --> Windows 10 --> Windows 11 (Sucks so far...) See a pattern? At this point, I'd wait a few weeks. Apple is about to make M5 announcements for new products. I will say, start saving, and you will be forced to purchase the stupidly over-priced Apple Studio Display if you want the full "Macintosh Experience." Yes, Apple does this on purpose, as they changed the signal coming out of the HDMI port. With the new Studio Display, you are using the Thunderbolt Port for Video. Anyway, I don't think we will see a M5 Mac Studio in November, likely it will be April / May of 2026 with the M5 chip. Apple tends to release MacBook Pros with the newest chips in the latter part of the given year. So if you can hold out until early next year, I would. No sense in blowing around $5000 not to get the latest-and-greatest. That said, I do see rumors that Apple might be updating their Displays, and the Studio Display might be refreshed. Hold off on buying anything until around Veteran's Day on the 11th. As far as feedback from others, there is A LOT of Macintosh hate, and practically everyone will tell you that it's a waste of time and money. I'm not one of those people. Buy whatever you like. One of the things that Adobe takes advantage of, is that there are only a certain number of Video Cards / Hardware that Apple uses, so it's easier to make things compatible when all you have to worry about is around 7-10 different Video Cards, vs the hundreds for the Windows side. Of course, Adobe Photoshop is Adobe Photoshop and LR is LR. As time goes on, it's becoming more and more bloated with all of this AI Crap that I'm not 100% sure you will eliminate lag entirely; I've seen Photoshop act stupid on both sides of the fence.
-

Robocopy attributes, timestamps and NTFS ACLs
Brian replied to Tereza's topic in The Windows & PC Hardware Forum
Yeah...that's not gonna work, well not the way you are thinking. It's the NTFS and ACL Permission stuff that you are wanting, it's gonna be a bit of a PITA. SharePoint online mapping isn't automatic and you will likely have to deal with users/groups permissions. Your best bet is to use the Microsoft SharePoint Migration Tool. Or try GS RichCopy 360. It's been awhile since I messed with this sort of thing. I think you should search out some FB Computer Networking Groups to see if someone has already done this as my current knowledge is limited. -
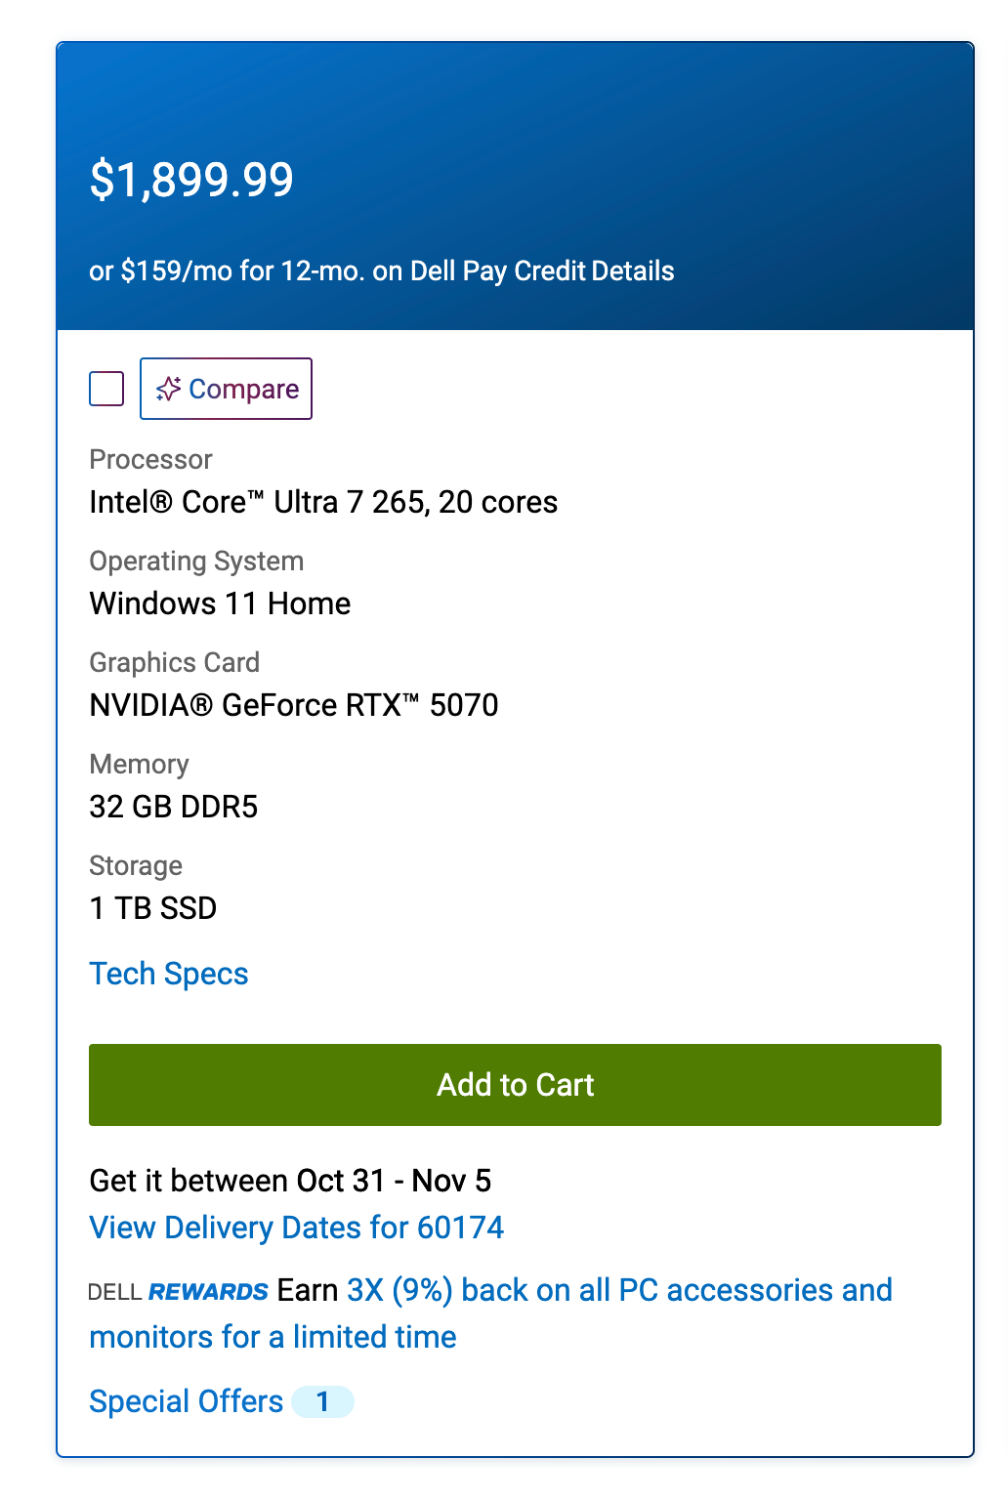
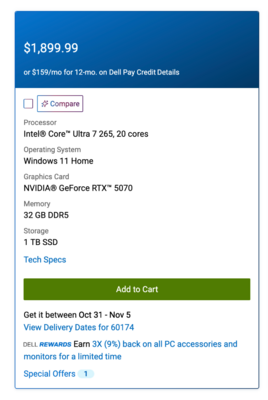
That looks like the adhesive is failing and air is getting into your display in that corner. But you are correct, it does look like water. It's only going to get worse as time goes on. This one looks decent: Dell Tower Plus Desktop What the most important thing in that configuration is the choice of Video Card. You want a NVIDIA 5070 or 5080 these days. Monitor, this one looks decent as well: Dell UltraSharp 27 Monitor - U2724D Basically, when it comes to a Display meant for photo editing, you want a IPS Display, and for resolution, 1920 x 1080 only goes up to 24". If you are interested in a 27" Display, you want 2560 x 1440. To be blunt, 1920x1080 looks like ass on a display that's larger than 24", so please avoid that resolution and don't be tempted to buy one. Just don't. Trust me. Even 24" is pushing it. I did write an article earlier this year that will be updated, Buying a Windows Computer in 2025, and I go into specifics on why I pick the things that I do. For the current versions of Adobe CC products, the choice of video card is MORE IMPORTANT THAN THE CHOICE OF CPU!!! I'd rather have a person spend less on a CPU and take those savings and put them towards a better Video Card with its own dedicated video memory. Why? Because all of the stupid AI Crap and fancy tools that Adobe keeps putting into PS utilize the Video GPU than the Computer's CPU!! Now, do I want to recommend a NVIDIA 5070? No, because a 4070 will still work fine. Unfortunately, they have been discontinued. I also do not like the "50" or "60" versions of those cards, NVIDIA likes rebranding rejects to save some money. (Just like Intel CPU chips! They ALL start out as i9 Chips, but if they fail QC and are "Good Enough," they become i7 or i5 CPUs.) That's why you can have two i7 CPUs side by side on the same desktop and one will be a little bit faster, this is due to that particular chip having just a bit more umph than the other one, but both are within specs. It's all about money.
-
Yes. Remember, there is no upgrading after the fact with current Apple products. Fortunately, Apple's price-point remains pretty steady and consistent from year-to-year. Keep in mind, you aren't buying the computer for the current version of Photoshop, but the version a year or two from now. I'd rather have you buy a current M5 if you are buying a MacBook Pro at this point. NOPE. Apple does this on purpose. If you want the "Apple Experience" that you are used to, unfortunately...you are forced in purchasing the stupidly over-priced Apple Studio Display for $1600. Yes, other members here have tried other displays, only forced to buy a Apple Studio Display to be truly satisfied. In addition, you'll need a current Calibration Device to be on the safe side, so budget for that as well.
-
You will be fine. Oh! Make sure your "Clean My Mac X" is up-to-date as well. Software Utility Programs like that need to be current to match the OS.
-
I’ve been traveling. Sorry for the delay. Yep, you have answered your own question and at this point I’d upgrade to Sequoia. If you have a M1-M4 Mac, your issues, if any, will be minor at this point with Sequoia. The toughest part of this whole deal is if you have an Intel Based Mac; if so…you will find out just how “old” your 2017/2020 Mac is and you will be in the market sooner rather than later. That said, I’m right there with you and things are getting harder to avoid forking out thousands for a new Mac. Id upgrade to Sequoia and give it a shot.
-
I apologize for thr delay in my reaponse, I've been traveling. I’ve gotten into the practice of not deleting in-camera, and prefer to cull / delete on the computer. Sometimes the SD Card’s controller will “smoosh” a current photo into a slot from a previous shoot, and can be corrupted. Bit this doesn't spind like your situation. It is very odd. What Camera body and make/model of cards? How old are these cards? I’ve had the most issues and failures from SD cards out of all the types, so it might be time to replace this set.
-
This is a 4th defective panel. I would return it and choose a different Make/Model. Monitors that are too blue, will make things look too cool, which then makes you overcompensate warming things up. Don’t live with this problem. Find another IPS Display.
- 1 reply
-
- 2
-

-
That is going to have an issue with the current version of Adobe Photoshop. That card is just too old. Even cards like a RTX-3070, which I loved, now have issues with PS & LR. The 3070 cards are 5+ years old now!! Video cards today are "Computers within Computers" and Adobe just doesn't use them to create a image on the screen. That was like 15 years ago, when CS6 was new. Today, Adobe uses the GPU for things like ACR and the other fancy tools to work, and if it doesn't like the drivers, you are going to have issues. In fact, NVIDIA has put out the "NVIDIA Studio Drivers" which are meant to work with Adobe's products, as the default drivers are meant for General Computing & Video Games; the default NVIDIA Drivers have issues. Now it looks like you have upgraded the Video Card? The same issue could be happening...that Photoshop doesn't like the driver that you installed. So you really have two options: Upgrade your Video Driver or look for ones that are meant for Photoshop Downgrade your Photoshop to an older version that plays well with your video card and stay on that version for a long as possible. So did you purchase a new Video Card?
-
Thinking about Mac Studio with a different monitor
Brian replied to StudioPopJess's topic in The Macintosh User Group
NO. Apple does this on purpose. The only monitor that gives you the "Macintosh Experience" that you are used to, is the Apple Studio Display. There is an LG model, that's around $1200 or so...but everyone who has bought one has basically stated the phrase, or something like this, "...it's OK, I guess. I should have just spent the extra $400." Now, you can go ahead and buy that Asus, since Macs really-really-really want a 5K screen, but Apple did something sneaky...they changed the video signal coming out of the HDMI port. With the Intel Based Macs, this wasn't an issue but starting with the M1 Line, and now the M4 Macs, things like colors and grading might be a bit off. In fact, awhile back Eizo (who make really-really-really high end displays) put out a Tech Bulletin. Even fancy Eizo Displays had problems with the M-Line of Apple Silicon Macs. Now, I'm sure they have adapted, but I'm thinking you are really going to roll the dice on this one. So, feel free to purchase that Asus and report back, I'd love to be proven wrong since it drives me nuts recommending a $1600 Display. That said, make sure you really pixel-peep so you can return it in the 14-Day Window (or whatever) and buy the Apple Studio Display. Because that's what's going to happen... Again, Apple does this on purpose. As far as buying a Mac Studio off the shelf, I wouldn't. I'd configure one from Apple. Here is my article giving you step-by-step instructions on what I'd do to configure one. -
I believe that Goodsync is free for personal use, but if you are backing up Servers and such, you need to pay for it. See here for more info. Richcopy 360 looks to be about $50 for personal use. Unfortunately, I haven't really touched a Server since before COVID, and haven't used either programs. I'd try Goodsync since it's free, and I think you can try Richcopy for a period of time, but $50 for a utility program that works is not that bad.
-
Chances are, you will likely have to upgrade to Tahoe and then upgrade your PS CC subscription, because you are already at the latest version of Sonoma. That said, you might want to try fixing your Creative Cloud Mothership App first. Have you seen this help page from Adobe: Fix connection errors when signing in or activating Adobe apps. The tough part is, upgrading isn't always the best thing to do. I know Adobe is pushing out updates faster than they ever have, and the FOMO is strong; the downside is, if you have sessions to edit and files to deliver, you might want to hold off. Upgrade when things are dead and you don't have anything going on, like in January / February if you are in the Northern Hemisphere. Fall / Autumn in the Northern Hemisphere is usually "Busy Time" with all of the "Fall Minis!!! Love-Love-Love my Clients!!" "Take photos sitting on a Hay Bale or on a Tractor!!!" "Reserve for spot today, slots are going FAST!" Contact Giggles & Cutey Pumpkins Photography for more info!! Upgrading the OS especially from version 14.xx to version 15.xx can be risky, especially if you have other problems going on that need attention. For example, WHY is the Adobe Mothership App not connecting? How full are ALL of your Hard Drives, internal AND external? How much CRAP do you have on your Mac Desktop? Are you running stupid Anti-Virus or Firewall software that might be getting in the way? Have you purchased / installed CleanMyMac from MacPaw and cleaned stuff out? Do you have a Time Machine Backup or Backups at all? Can you withstand having to do a full recovery because the OS Upgrade went sideways because your Mac was messed up to begin with, and now you have to start from scratch all over again. Do you have a record of all the License Keys for various software Apps & Plug-ins? Photoshop Actions & Brushes Backed Up? I'm pretty conservative about updating blindly. You want to stay current enough, but notsomuch be a company's "Guinea Pig." I let the early adopters dork around with things and will often wait until the "xx.1" version comes out. Just think, Apple just released iOS 26 for the new iPhone 17 phones, and guess what? They had to pull the update and then fix a few things, then release iOS 26 again. In fact, iOS 26.0.1 should be out this week!! So as you can see, it's not just a simple yes-or-no answer. I would personally hold off and figure out why your Mothership App isn't working, and you might have to contact Adobe on this one. It could be as simple as removing the Mothership App and re-installing it. Or granting Permissions to the program that aren't turned on, preventing access.
-
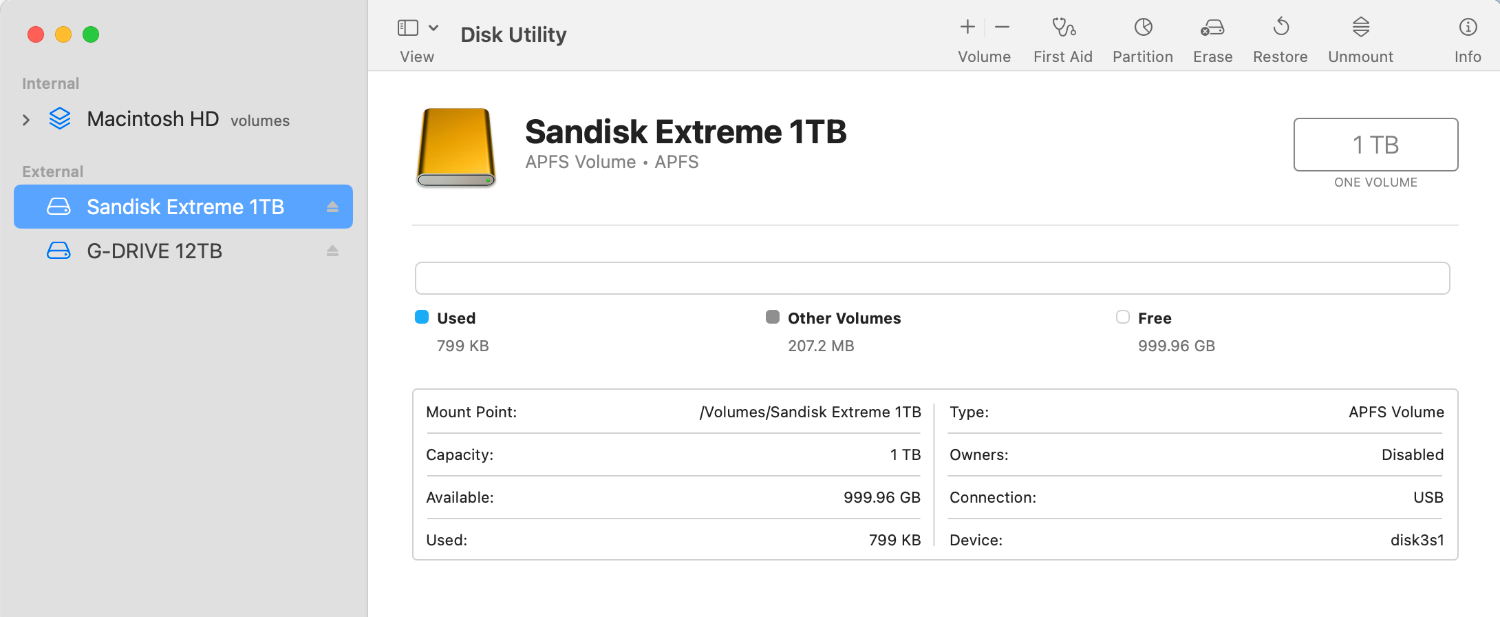
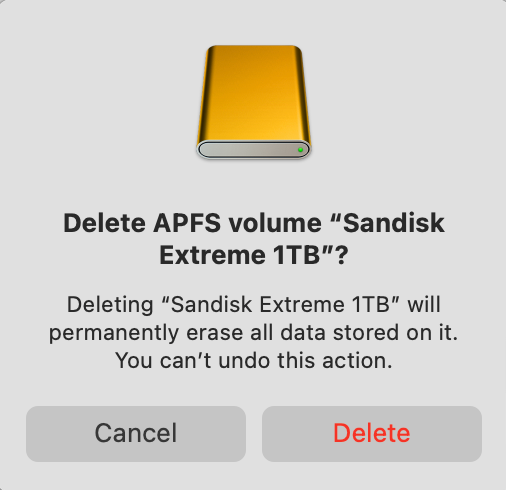
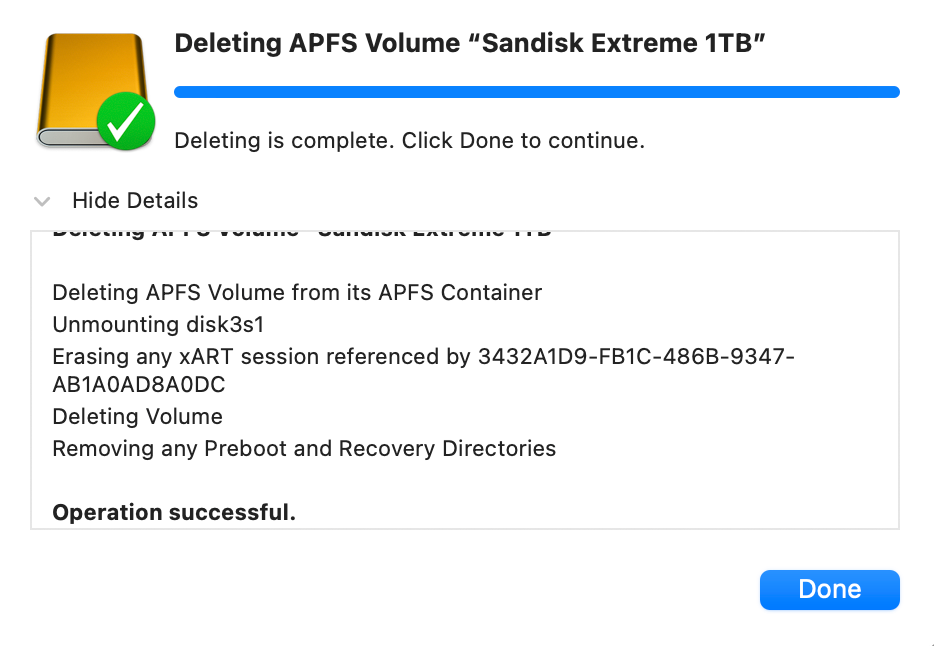
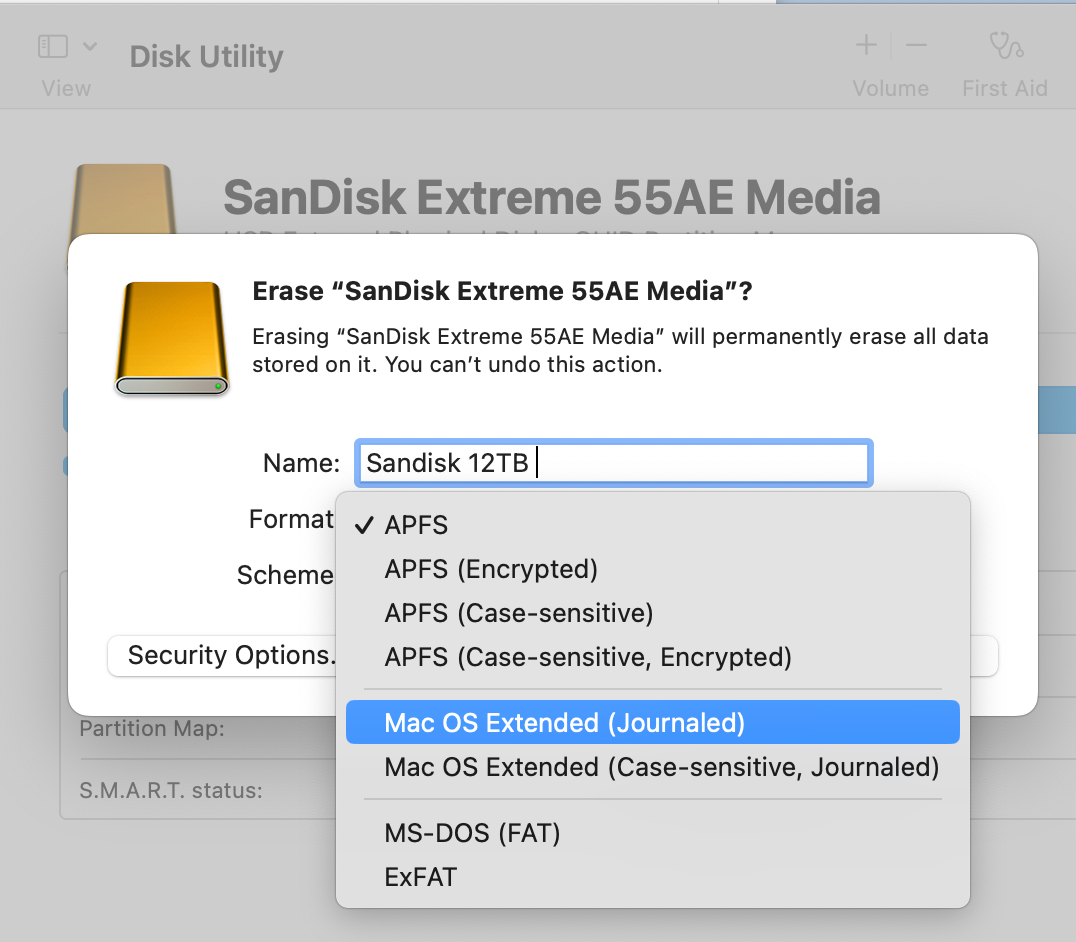
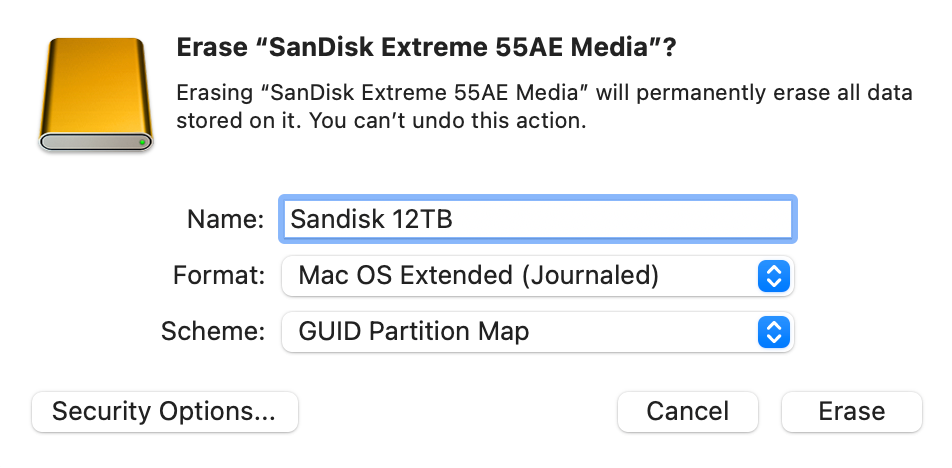
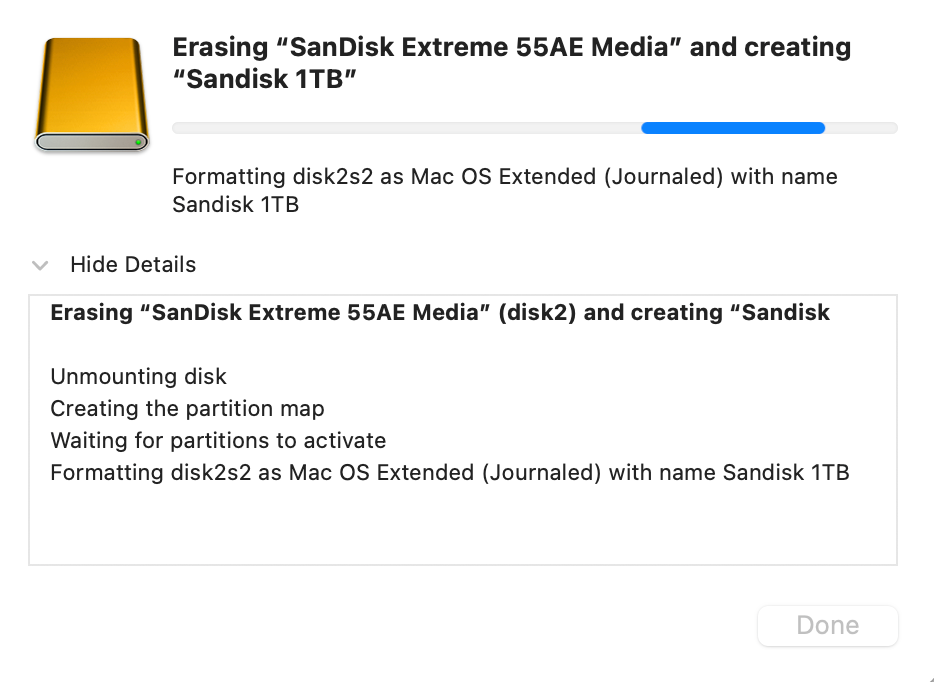
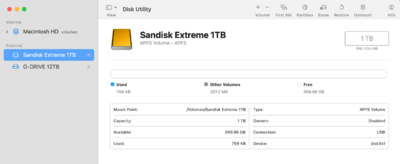
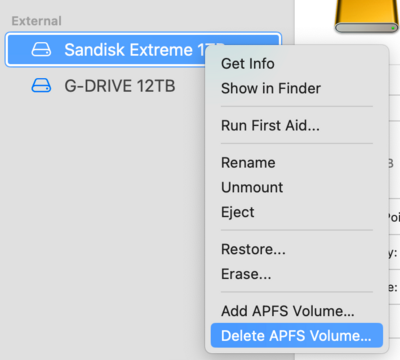
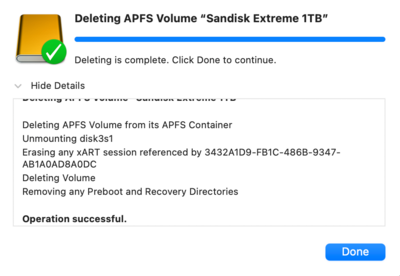
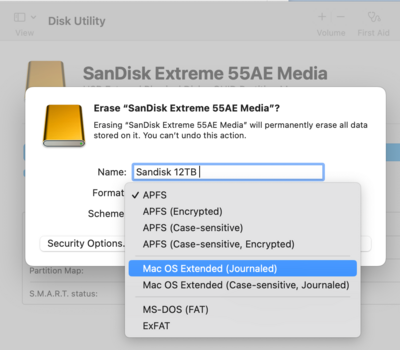
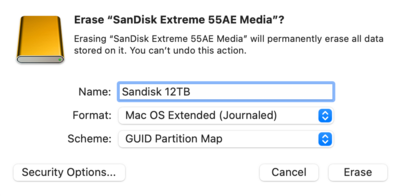
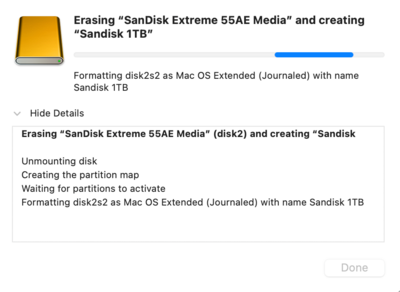
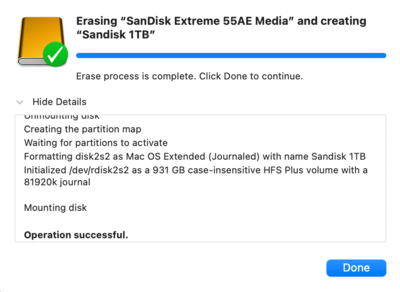
That's an old marketing trick to get people to spend more money. The are banking on the "Apple Tax" which is the amount of people that are willing to pay extra, just because they spent a lot of by buying a Macintosh to begin with. This practice was a HUGE thing back in the 1990's. People would pay $30-$50 more for the same exact damn Hardware, except one was labeled "For Macintosh," or some similar verbiage, and the other stated "Windows." What's the difference? Hardware-wise: Absolutely nothing. Software-wise: The Manufacture just partitioned and formatted the HD for you. So if the price was exactly the same between what you saw on Amazon vs B&H, you are fine. If the drive on Amazon was $399.99 and the one on B&H that was "For Macintosh" and retailed for $449.99...you wasted $50. Why? Because you could do the same exact thing that the Manufacture did with the "Windows" Drive (to turn it into a Macintosh Drive) yourself...FOR FREE. Takes like 5min your 1st time with Utility Tools already built into the macOS. Fortunately, this is not the case, as the prices are the same on both Amazon & B&H. *Phew!!* Anyways...back to your new HD. Yes, we will need to delete the existing Partition and create a new one. Why? Because the APFS is really for SSD Drives / Flash Media Based Drives and NOT a traditional spinning HD Platter Drive, which is what you have. Mac OS Extended (Journaled) is what you want for a 7200 RPM Traditional HD. It's not a huge deal that you will kill your data, but from a performance perspective, it's not ideal. So here is what we are gonna do: Copy over any utility software that's currently on the Sandisk 12TB EHD and just put it somewhere temporarily, like on your Mac Desktop. Will we need this software? Probably not. Do you want the fancy HD Icon that Sandisk gives you? Absolutely. Head to your Applications Folder >> Utilities >> Disk Utillity. It should look something like this, or something very similar: From there, MAKE SURE YOU HAVE SELECTED THE NEW SANDISK 12TB DRIVE THAT'S FORMATTED TO APFS. I can not stress this enough, you do NOT want to be working on the wrong drive!!! In fact, I recommend that you disconnect any other external drive, temporarily, until we finish this. Once you are ready to delete the existing partition, and have selected the correct HD, right-click and select: Delete APFS Volume. A Warning Message will appear. Click Delete: Another pop-up box with the results should appear, with the words "Operation successful." Click Done. Now select the Drive once again. It might have a weird name at this point, that's perfectly fine. Click the Erase Button at the top: Give the HD a name, like Sandisk 12TB (Or something obvious.) Choose MacOS Extended (Journaled) from the drop-down list next to the word Format: Another Pop-up Box will appear, confirming your choices: You want: Name: Your Choice Format: Mac OS Extended (Journaled) GUID Partition Map Click the Erase Button, another pop-up box will appear, let it do its thing. There should be another box that says, "Operation Successful." Click Done. The Drive should appear on your Mac Desktop. Then right-click on the drive, select "Get Info."Drag the fancy Sandisk Icon from your Desktop to the little HD Icon in the "Get Info" Box, in the upper left corner. The default Icon should disappear and the Sandisk Icon should be visible. Start copying files over to it. You are done! Edit: Just think!!! Manufactures would charge about another $40 or so do to this exact thing that you can do for free!!


-
You need to get calibrated. Seriously. Mac screens are "cool" out of the box, which makes you edit photos a bit too warm to compensate. Also, do you have a physical set of test prints to hold while you look at your display(s)? Because it's important. Even though you might be a "Digital Files Only" Photographer, there is no way to fully check things unless you have several test prints, from different printing companies; yes, even if you calibrate. When you Calibrate, the Calibration Software will create its own profile (for both displays) and you ignore what Apple gives you by default. That being said, I'd try setting both to "Photography (P3-D65): Designed for typical digital photography workflows using the P3 color space with a D65 white point" and compare your test prints. Hopefully you will be close enough to get you through the time you are saving for a Calibrite Display Pro HL (CCDIS3HL) Calibration Tool. In reality, you are going to have to fiddle and figure out which one to use. D65 may work for you...or not. I'm at D55 which goes against everything Damien teaches, but it makes my screen match my prints, albums AND what I see on screen. See how the test prints come in handy? I like CPQ Professional Imaging. Color Inc Pro Lab & UnitPrints are also decent. Here are some reviews given by our members: Print Lab Reviews. I'd recommend getting test prints from at least 3 labs, just to see who matches the best. I would also AVOID MILLERS. Yes, I know their customer service is amazing...but the truth it, they are DAMN NEAR IMPOSSIBLE to get matching with the current Mac Displays!! Here is a quote from Damien about Millers: Source (opens Facebook.) You also have to take into consideration of things like the paint color on your walls, fabrics around your computer and what color temperature you edit in. My favorite Light to work in is between 4000K-4200K. 3000K is too warm for me and 6500K light bulbs are too blue to my eyes. I think Damien also edits around the 4000K-4200K bulbs as well. See The Light around your Computer for more information. I've also gone as far as to paint my walls a Neutral Gray to kill color casts. In fact, my paint color of choice is: Sherwin-Williams Color #7071 | Gray Screen Now, painting your walls and going to great lengths at this point is a bit overkill. Right now you should be saving for a Calibrator, and getting Test Prints to compare your screen against. For now, try the Photography D65 (if it's available for both screens) and fiddle.
-
Yep, doesn't surprise me.
-
That's the current version of the HD that I own, though I have heard mixed reviews about the current G-Drives since Sandisk bought them. Regardless, I'd still buy one. Give it a shot. Let me know when you get one, I want to make sure the partition is setup correctly.
-
Yeah, Windows 11 does suck, and we are stuck with it. As far as PS, going from 14.5 to 14.6 usually isn't THAT big of a deal, it's when it goes from 14.xx to 15.0 is where the biggest problems occur. From what Adobe has released about the changes to Lightroom 14.5 from 14.4...the one you are most affected is "Generate Previews using GPU." It seems with each and every update Adobe does, relies more and more on having a current (and beefy) Video Card; in fact, I feel it's more important now than the choice of CPU! Which is why you were having such grief with LR. A 3070 can still hold its own with many video games...but Adobe's products? Notsomuch... *Sigh* It's only money, right?
-
You aren't gonna like the price of switching over to a Mac, keep that in mind. Looks like you got the latest and greatest with NVIDIA. That's what I would have gotten if I were in your shoes. Keep in mind, Adobe pushes out crap now that often is buggy. So it might take an update or two for things to settle down. That's why I recommend to turn off any auto-updates from the Adobe Mothership App; this way you can wait a little to see if any issues are reported or patches (update to the update) are released. While I feel it's important to be conservative, you also don't want to get so far out of date that it causes you problems. It's all a balancing act, IMHO. Keep me posted.
-
So what did you end up getting? I'm curious. If it is a NVIDIA Card, definitely use the NVIDIA Studio Drivers that I linked to above and NOT the default ones that come with the Card; those are meant for Video Games and General Computing. The Studio Drivers were created for Adobe's Products like Photoshop & Lightroom.
-
Yeah, firmware updates are done with the Lenovo Update Software. Microsoft’s updates for stuff like that is questionable at best.
-
There is software that's Linux-based, and free, that will write to all the sectors on a HD, which zeros out the data. I have used a program called DBAN. The trick is that you need access to the HD for it to work. WD External Drives are notorious for having the worst cases/USB interface. The Drive itself might be fine; you just can't get to it and it will require you removing the HD, hooking up a USB to SATA Cable (or installing it into another computer,) booting off the DBAN CD and telling it to Nuke the drive. It's a process, and is fairly "Geeky." If you are looking for easy / wizard based, you are likely gonna have to pay for that software.
-
I HATE FUCKING HP LAPTOPS!!! Once upon a time, like 20 years ago, they used to be really good. Then HP switched to Eco-Friendly Solder, meaning it's not Lead Based. Which causes so many weird electrical issues, like the power connector developing cold solder joints so the damn thing won't charge. In today's world, I'd never use one. My clients always seem to complain about them and the built-in trackpads just sporadically cause the cursor to jump. It's such a PITA. Personally...I've had the best luck with Lenovo Laptops consistently, that's why I'm telling you to wait. Trust me - I hate wasting money on this shit.
-
If you have an access panel, and can get to the HD, you can pull the HD and smack it with a hammer. Or get a USB to SATA Cable (They run about $20 or so) and Nuke the HD. Other than that, you will likely need to take it to a place that does electronic recycling.