Damien Symonds
-
Posts
207,002 -
Joined
-
Last visited
-
Days Won
3,251
Everything posted by Damien Symonds
-
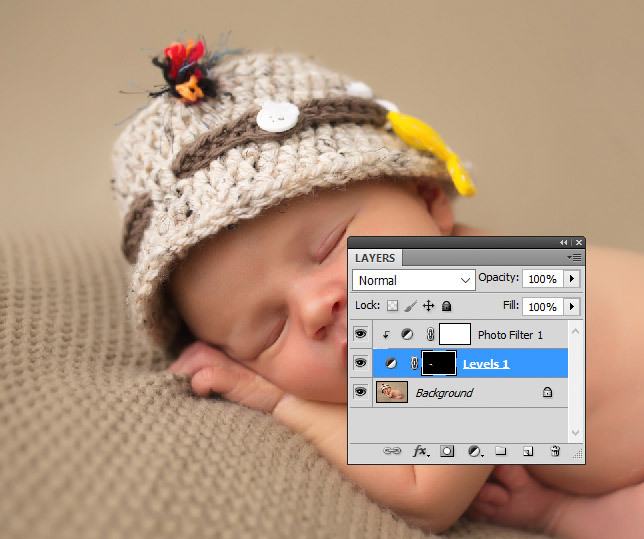
There are various ways to do this. I prefer to teach a two-step method (even though there are some one-step methods available) because it is easiest to replicate in various situations. First, a layer to lighten the hand. I used Levels, but Curves or Brightness/Contrast would work too. Then clip a Photo Filter layer to it, and experiment with each of the Warming filters, and the Yellow filter. I used Yellow for this job. Play with the Density slider to taste.

-
 Oh, wow! Ok, thanks for letting me know!
 -
What did? What did you do?
-
Proofing Setup
Damien Symonds replied to Phyllis's topic in Photoshop / Elements / Bridge / ACR questions or problems
F**k indeed ... -
Proofing Setup
Damien Symonds replied to Phyllis's topic in Photoshop / Elements / Bridge / ACR questions or problems
Ok, may I see a screenshot of one of those? -
Proofing Setup
Damien Symonds replied to Phyllis's topic in Photoshop / Elements / Bridge / ACR questions or problems
Can you explain this further? -
Proofing Setup
Damien Symonds replied to Phyllis's topic in Photoshop / Elements / Bridge / ACR questions or problems
Also, it looks like you added the text to the photo before you added the photo to the template? That's very bad. Assemble all the items in the template. http://www.damiensymonds.net/2010/05/making-pdfs-from-photoshop.html Did the printer give you specific advice about text? Its colour, I mean? It's a tricky matter. -
Proofing Setup
Damien Symonds replied to Phyllis's topic in Photoshop / Elements / Bridge / ACR questions or problems
Do not take another step until you've read these: http://www.damiensymonds.net/tut_collage.html -
Proofing Setup
Damien Symonds replied to Phyllis's topic in Photoshop / Elements / Bridge / ACR questions or problems
No, I mean the actual photo! You did the screenshot just fine. I'm talking about how you put the photo of the lady into the template. -
Proofing Setup
Damien Symonds replied to Phyllis's topic in Photoshop / Elements / Bridge / ACR questions or problems
No, something isn't right here at all. It looks like you copied/pasted the photo, rather than File>Place? -
Proofing Setup
Damien Symonds replied to Phyllis's topic in Photoshop / Elements / Bridge / ACR questions or problems
Fabulous! May I see a screenshot? Of the template with an image (or images) placed in it? Include the whole screen - panels and everything. -
Hi Linda, is this SOOR? Have you done any Photoshop work to it yet?
-
Proofing Setup
Damien Symonds replied to Phyllis's topic in Photoshop / Elements / Bridge / ACR questions or problems
Great. And is that the profile your template is in? -
Using Cable vs. Card Reader
Damien Symonds replied to OlgaR's topic in Questions about tutorials and articles
Speed. And other reasons I forget. But mainly speed. You see people have issues with cables too. -
Sounds like you're trying to resize it, instead of cropping it. You MUST crop to those dimensions. Did they tell you which CMYK profile to use?
-
External monitor for a Toshiba Satellite L50-B
Damien Symonds replied to Alice_M's topic in The Windows & PC Hardware Forum
Well, if you were thinking of buying one of the excellent Dell Ultrasharp screens, you could go to their AU website. And this mob seem to have a good range. -
Let's not go to the extend of re-installing just yet. First, try resetting its preferences. Sometimes that works. And I beg you to watch this.
-
Pastel Painting Effect
Damien Symonds replied to Valentina's topic in How to achieve a certain look or effect
Download the PSD -
Pastel Painting Effect
Damien Symonds replied to Valentina's topic in How to achieve a certain look or effect
I'm struggling. Is this anywhere close?
-
Thanks, I got the file, and checked it. It's absolutely fine. Please please PLEASE take the class and let me change your life.
-
External monitor for a Toshiba Satellite L50-B
Damien Symonds replied to Alice_M's topic in The Windows & PC Hardware Forum
Good screens are getting cheaper and cheaper, it's great. You can find IPS screens very affordably now. http://www.damiensymonds.net/art_monitor.html -
https://www.hightail.com/u/BellePhotography
-
Pastel Painting Effect
Damien Symonds replied to Valentina's topic in How to achieve a certain look or effect
To my eye, the reason the style is so effective is because of those areas of very vivid colour (red swimsuits). Do you have any photos with a bolder area of colour like that? -
Hi Leslie, did you shoot raw?
-
Maybe this? http://www.damiensymonds.net/desktop-monitor-brightness