Brian
-
Posts
4,137 -
Joined
-
Last visited
-
Days Won
55
Everything posted by Brian
-

Operating system update to support Bridge
Brian replied to RebeccaWaldock's topic in The Macintosh User Group
Yes, a NAS, or Network Attached Storage, is something to consider. Especially if you want to access your files remotely. The downside is, and your assumption is correct, is your bottleneck with the Wi-Fi. So you might want to upgrade that to a Mesh System with Multiple Access Points so that your whole house is draped in Wi-Fi. Otherwise, for the absolute best performance, a hardware Ethernet connection is the way to go. Now setting up a NAS will take a little effort, especially knowledge of tweaking your Router's Settings, particularly in opening up "Ports" so that your Data can be accessed remotely. It's not a plug-and-play kind of thing. This is Geek/Nerd Territory. Fortunately, there are plenty of YouTube Videos out there demonstrating the process. Well, they give you the overall theory, it's up to you to figure out how to program your Router. In any case, your NAS will be directly attached to your Router via Category 6 Ethernet Cables. In terms of lag, if everything is Wi-Fi based, yes, there will be lag if you use your NAS to Stream Video (your own personal Netflix, as it were with your home DVD Collection,) or if your .PSD files are large. (You have a high MP Camera and large Raw Files.) -
Yep, screenshots won't help. Cell Phone photo in this case would be better, but I understand what is happening. I've seen people complain about this before and there is two possibilities that come to mind: Video Cable between the Motherboard & Display has become weak. More than likely, there is a problem with the Chips on the Motherboard which relate to Video have bad solder joints. Basically, it's a known hardware issue with MacBooks and it's not a Software / Calibration issue. I'd recommend to send it to Louis' Repair Shop, they do component level swap-out / repair: Rossmann Repair Group - NYC
-
Nope, you are in the right place. The problem with your image with the "Lines" is caused by, drumroll please... LED LIGHTS!! This is happening more frequently as people upgrade to Mirrorless. The LED Lighting and shutter speed are syncing up too well and you are getting lines like this. I've even seen this phenomena happen with my Cell Phone and a LED Flashlight. What Make/Model is your camera body?
-
Operating system update to support Bridge
Brian replied to RebeccaWaldock's topic in The Macintosh User Group
Time Machine is Awesome for what it is. Apple has perfected in backing up the internal Macintosh HD with Time Machine and that's what I use. I wish Windows was as good. One thing too keep in mind is you want your Time Machine Drive all by itself, meaning you don't treat it as a regular external drive. That's what your fancy Thunderbolt 3 12TB EHD is for. I have a 4TB External Drive being used as my TM drive and a 12TB TB3 Drive as my primary external storage for my photos. The TM Drive can be a USB 2.0 or 3.0, either...I just like it to be at least 1.5 or twice the size of my internal Macintosh HD. Of course you could go bigger like me, but if you have a 1TB internal Drive, then I'd recommend a 2TB External TM Drive. You want your TM Drive to have a little "wiggle room" with your backups. Make sense? You can use a blank HD, that's smart, because if you want to go back to where you are now, your existing TM drive can not be touched by Catalina! So if you do a final TM backup, Eject that drive and set it aside. Or use a blank EHD format it and tell the MacOS to use the drive as a TM drive, then do a full backup and set it aside. Your choice. Basically you want the ability to go back in time if needed and that takes source material that is stopped in time. As soon as you let a new MacOS touch your TM drive, it's over and you are stuck. -
Dell. https://www.dell.com/support/home/en-us Put your Service Tag or Serial Number in the search box and it should take you to a page with driver updates. Dell also has a utility that you can download and it scans your system and installs the updates.
-
What Make/Model is your computer? The reason that I ask, is that if it's a Dell or HP or whatever, you will need to get the driver update from the Computer Manufacturer's support website. While Windows Update can offer some driver updates to hardware, it's almost ALWAYS better to get drivers from either the Video Card Manufacturer or the Computer Manufacture. Using Windows Update should be a last resort when it comes to drivers for hardware.
-
Operating system update to support Bridge
Brian replied to RebeccaWaldock's topic in The Macintosh User Group
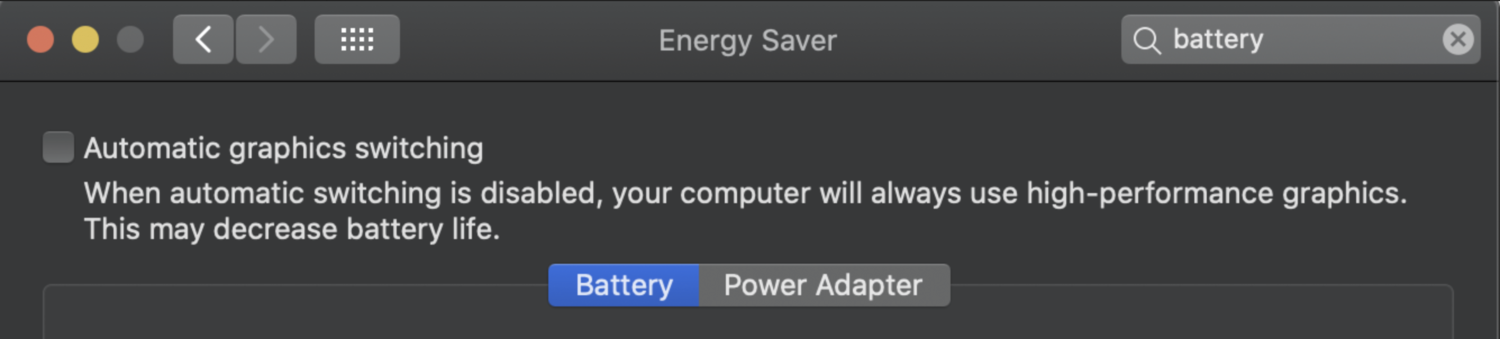
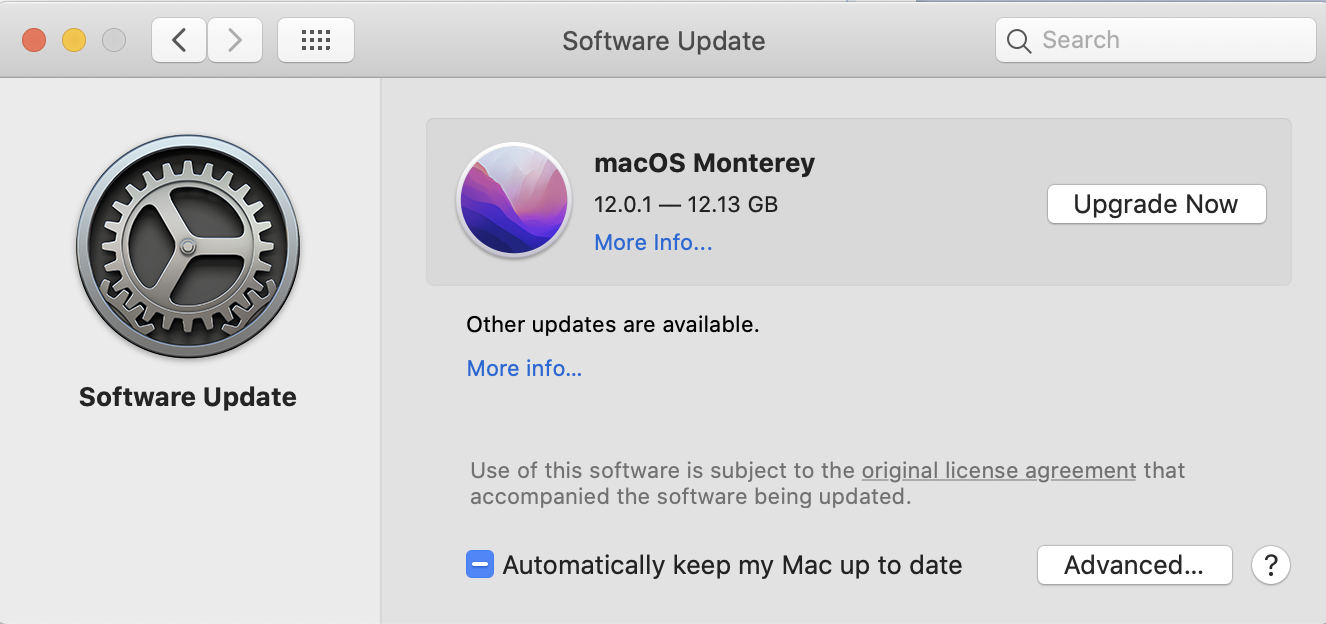
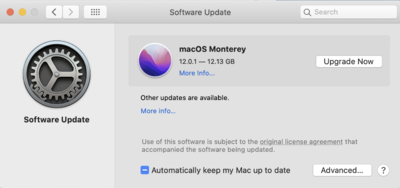
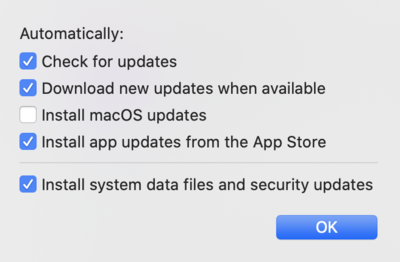
NO!! Too many bugs for my liking at this point. In fact, some MacBooks have been "Bricked" due to Monterey. Apple seems to have fixed the issue, but if it happens to you, the only way to fix it is a trip to the Apple Store and to have it Nuked (formatted) and a Older OS installed. I think you should update to Catalina first. Yes...you can still do this, here is how: First, you need to use the Safari Web Browser and ONLY Safari. This will not work with Chrome or Firefox. Click this Link and it will take you to a Apple Web Page with the older Operating Systems. The top half has links to check your compatibility, which case you are fine, and the bottom half has the links to the actual macOS. (so just scroll down.) When you use Safari to open macOS Catalina 10.15, it will take you to the App Store that has the download link. If everything works correctly, the App Store should open and you will see this: Click on the Blue "Get" and it will download the OS. It's about 4GB in file-size, so I'd plan on doing nothing else on your computer for this process. Go watch a movie or something on your TV. You want the update to not get interrupted or have the chance of data corruption. After it downloads the install routine should begin. Then follow the prompts and Catalina should install. Then, if you don't own it already, purchase CleanMyMac X from MacPaw.com. The "X" version is required for Catalina and beyond, older CleanMyMacs (like version 2 or 3) will screw up a modern operating system. (Catalina - Present.) So let's not do that, as it would be bad. I've been using CMM since 2009 weekly. It helps keep the gunk to a minimum. The other gotcha that I see, is you have a stupid MacBook Pro, with two graphics cards. Photoshop might have an issue with the two cards, so I would head to the "Energy Saver" in Settings after you update to Catalina, and turn off "Automated Graphics Switching," then close the Window and reboot. You want Photoshop to use the more powerful Graphics Card (The Radeon Pro) and not the wimpy Intel UHD. I would turn this off before attempting an install of the current PS CC software. While having a conservative stance is a good thing, meaning you avoid the issues that early adopters face, it can come back to haunt you, such as the situation you are in. It's very easy to get so far out of date that current software won't install. Here is how I have my Software Update set to on my Mac, and I'm running Catalina: If you click on the "Advanced" button, it looks like this: As you can see, I have everything checked but don't allow the macOS upgrade to the latest OS. Normal security patches and the like, that's fine...I want those. I just want to be in control of when the macOS is updated. When it comes to Adobe Updates, I usually wait a few days after they are released, since Adobe always seems to make their software more bloated and incompatible with each update. Especially with the very latest versions, such as PS CC 2022. So by holding off for a few days, allows me to avoid problems with Adobe's updates, but I never go more than a week or so, unless I hear about major problems. Major meaning that Adobe admits it screwed up and pulls the update. That's when I really wait a long time to upgrade. Now, I just had a member upgrade to Catalina and she seems to be having a Lag-Problem with the new Photoshop. Hopefully everything will go smoothly and you won't have any problems. Because upgrading the macOS is a one-way proposition. Meaning there is no "Un-Install" or roll-back feature. This is Catalina or bust!! Keep me posted on your progress and let me know if you have any problems. Good Luck!!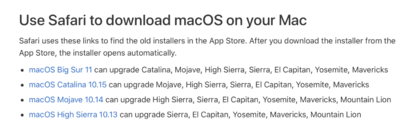


-
XQD card and External Hard Drive recommendations
Brian replied to ChristyB's topic in Photo Gear & Equipment
I’m closer to 100mb. Each. -
XQD card and External Hard Drive recommendations
Brian replied to ChristyB's topic in Photo Gear & Equipment
Oh, one more thing...14-bit RAW, uncompressed. There is a reason I use 120GB XQD cards in my D850 with my Landscapes. -
XQD card and External Hard Drive recommendations
Brian replied to ChristyB's topic in Photo Gear & Equipment
You might want to check out my Instagram. I have a lot of Pseudo-HDR photos. Here is another. Notice the contrast swing between the two areas and I was even able to capture the moon. -
XQD card and External Hard Drive recommendations
Brian replied to ChristyB's topic in Photo Gear & Equipment
Here is a demonstration of the process. LR also has similar steps. Now, I open things in sRGB and don't bother with 32-bit editing, like the Video goes into. I just wanted to show you the basic idea of merging multiple photos in ACR. -
As long as the specs are the same, you should be good. You just need matching pairs. Since you have a 2020 iMac, your max is 128GB, so in your case, you'd want two 32GB sticks. What I would do is move the existing RAM that is installed in your iMac, and put the 32GB stick in place of those. THEN take the two existing Apple RAM Sticks and put them in the blank spots. You should end up with 72GB of RAM in the end. Which should last you quite some time. I don't have any recommendations for OZ suppliers. Like I said, any reputable brand should work, just as long as it's a DDR4-2666 SODIMM RAM stick. Again, in your case, you want a pair of 32GB Sticks for a total of 64GB for the kit. When you figure in the existing 8GB of RAM (or whatever) moved into the blank slots, you should have 72GB in the end. Crucial is good. OWC is also a good brand. If you can find either in OZ, those are the ones to get. Oh, here is a YouTube Video demonstrating the install process. The RAM modules are keyed, meaning they can only be installed one way, and this whole process should take you less than 10 min to accomplish. One tip I'd recommend is to touch something metal to ground any possible static-electricity before handling the RAM. Computer Components do not like getting zapped by static electricity. Now, don't go across the room, discharge yourself and then walk back, you could build up a charge by walking back to your Mac. So just have something metal nearby when you are installing the RAM. It's not that big of a deal, just something to be aware of.
-
XQD card and External Hard Drive recommendations
Brian replied to ChristyB's topic in Photo Gear & Equipment
Well, here is my EHD. It's a little cheaper than $700 @ $630. Tip: When you buy new cards, write the Month-Year when they were first used. This makes it easier to rotate things out when it comes time. Otherwise, it's a guessing game when you start acquiring lots of cards. I have a SB-910 and a SB-5000. Of course, I shoot weddings so I need flashes like those. I can say the Nikon SB-700 is the flash you are looking at. It's way easier to use than a SB-600. That would be the one to get for your situation. Also, I use these AA batteries, Panasonic Eneloop with Charger. Of course, I have a fancy charger that does 8 batteries at a time, but that will get you started. Eneloop Batteries are awesome. They hold their charge for a year if they are unused, and I have complete confidence in them. So much that everything in my house, like remotes and such have Eneloop Batteries. You have a Nikon D850. Let me introduce you to the wonderful land of Bracketing. I usually hold down my BKT button on the left side, rotate the rear dial once so I see +1.0 and 3 Frames on the top LCD. That is a 1-stop difference and three photos with every shutter click. So I pick my Aperture and it will take a shot that is metered, then one under-exposed, and then one over-exposed by one stop via the Shutter Speed. (1/250 --> 1/500 --> 1/125) The trick is to use AF-C (Continuous Focusing) and have the camera fire at the fastest rate, 7fps. (So CH on the dial). You could bump it up to 5 exposures at 1 stop each. Normally, I take 2 out of the three to make a pseudo-HDR; basically cheating since I don't have my ND filters with me. Well, that's not true. I do have them with me, but for the last couple of years, my Wife and I have been taking Bus Trips to various National Parks. Just a few weeks ago, we hit all 5 National Parks in Utah within a week. The truth is, I'm always using my Circular Polarizer, but just don't have the time to sit and fiddle with my Tripod and ND Grad Filters and such. The waiting around for an hour or so for that cloud to move, me tweaking the filters and then "CLICK!!" just doesn't happen. My Wife will tell me, we have 18 minutes here and we need to be on the Bus at 18 Minutes. So get shooting. So I'm forced to Bracket since I just don't have the time, nor have the opportunity to return to that location easily. Again, I'm in Full Manual with my D850 in CH mode (7FPS). ISO sometimes floats with Auto-ISO, but I usually keep that the same. I pick the Aperture and Set the Bracketing to do three or five exposures, at 1-Stop Difference each. (3F - 1.0 on the top display.) Metered-Under-Over in the menus. I can't remember which menu but it should be labeled "Bracketing Order," or something like that. Set it to MTR > Under > Over. I brace my elbows against my chest and exhale before hitting the shutter release. Again, Continuous Focusing Mode. AF-C in the viewfinder, Single Point AF. Click...OneTwoThree...OneTwoThree. I will often take 2-3 brackets to help cut-down on camera shake. The Middle set is often the one that makes the cut. You really need to be steady with this technique and VR really helps. Just by moving an inch or so, especially wide focal lengths, can throw off your images and LR / ACR won't create the HDR. It will come back with an error saying it can't combine the photos. Here is a photo that has a 6-stop difference between the lights and darks. I took 5 bracketed shots and then combined them in ACR. I then tweaked the image. That photo probably won't make it to Social Media, but it shows you how much detail in the shadows I was able to recover and highlights. The only filter I had mounted at the time was my Circular Polarizer Filter. Some of the photos I lost a chunk of detail. Oh! One more thing, you lose about 2/3rd of a stop of light when using the Nikon CP. I just bump up my ISO a little to compensate. No big deal. OK, now to answer your question, I own this Circular Polarizer II Filter (Slim) and own and like B+W ND Filters. I have 2-Stop and 3-Stop, and a B+W Graduated ND filter. I also bought a Filter Wrench Set to sometimes get things unstuck. I hate when my 70-200 holds onto filters. I have toyed around with the idea to get a set of Lee Square Filters and all the mounting hardware, but like I said...lately I just don't have the time to lug around all of my toys. I have 15 minutes to get the shot, then three minutes walking to get back on the bus and seated by the 18 minute mark. The Z9 is interesting. Chances are I will get the Z9 Mark II or Z9s, or whatever they are going to call it. Honestly? I just don't feel like blowing another $15,000+ in gear. The Z9, another 14-24, 24-70 and 70-200. Sure, I know there is the adapter, but in reality, if you want to take FULL ADVANTAGE of what the Z9 has to offer, you are using the Mirrorless Lenses that are designed for it. I have other shit to buy / save-up for at this point. My D4s & D850 work fine for my needs and have a lot of life in them.
-
XQD card and External Hard Drive recommendations
Brian replied to ChristyB's topic in Photo Gear & Equipment
I'm very happy with my Sony XQD G-Series Cards and they are rock-solid. I have both 64GB and 128/120GB versions for my "Wedding Kit" and "Landscape Travel Kit." Right now, as I type this, the 64GB cards are $98, which is cheap. The 120GB version is $168, which isn't bad as they are closer to $200 or so. For me the Sony XQD G Series Cards are the Gold Standard and the ones other companies try to emulate / beat. So the next XQD cards I'm buying will be Sony. Those are the ones on my Amazon Wish List. I also like Sandisk Extreme Pro Line of cards, for my CF and SD media. My Nikon D850 has a SD slot and my D4s has a CF Slot. So I use a Sony XQD / Sandisk Extreme Pro combos in all of my cameras. If I were to upgrade to a newer body in the future, it's probably be a Nikon D6 or Z9, in which case I would probably go ahead and get more Sony XQD cards. (Unless I switch to CFExpress Type B, who knows...I will jump off that bridge when I get to it. I have other stuff to buy / save-up for.) I also don't F*ck around when it comes to my data drives. My externals are Enterprise Grade G-Drives, which are on the expensive side. I'm not one to recommend a $99 special from a big-box store. Since you only have a 1TB External, I'm thinking your next purchase might be a little larger, but not too crazy. I'd recommend getting this External 4TB G-Drive. Of course, you could always go larger, like a 12TB model, but that boils down to your budget. Since you are on a Windows machine, you really don't need a Thunderbolt 3 option and can live with a USB 3.0 port, which saves money. (My EHDs are closer to the $700 price-point, due to Thunderbolt 3). -
Macbook Pro 2021 - what specs do I need?
Brian replied to siobhankelly's topic in Photo Gear & Equipment
Yep. I have the same thing happen with my Nikon D850 and it's stupid 45.7MP. 64GB is your reality. -
Damn. Call Adobe and if you find something that fixes it, post it here for others to learn.
-
Was it checked? If it was and things are now better with PS. Turn back on all those checkboxes in the Advanced section in the Graphics Performance area.
-
Great. Close that Window. Restart your laptop and hopefully things will be better. If not, I’m out of ideas. You might have to call Adobe on this one.
-
I would also head to Apple’s website and buy/configure your iMac there. Store-bought iMacs almost never have the good components to make them last.
-
I just answered this question today on FB AD. Here are my thoughts… OK, Apple is eventually going to replace all of their computers with the new M1 or M1x CPU Chip. Macs with Intel are on their way out. That said, there is still life in a Intel-based Mac. In fact, I'm typing this comment on a 2017 iMac. 🙂 The main issue with the new M1 Macs, is that there is NO UPGRADING ANYTHING, AND I MEAN ANYTHING, AFTER THE FACT!!! The reason is, the RAM, CPU, Storage, and Video is all built into ONE big chip. So if you are looking to buy a iMac now, wait a few months to upgrade the RAM, etc. then an Intel iMac is in your future. Also, software and applications need to be encoded so that they will run natively on a M1 Mac. Photoshop CC 2021 & Photoshop CC 2022 work with the M1 chips, I believe the very latest versions of LR and Bridge also have native support. If you are an Elements user, chances are you are buying / upgrading to the very latest version. Not all software works with M1 chips, especially software like plug-ins at least as of this point. So there is that; even though your M1 iMac will have the newest technology, you are going to be in the "Early Adopter" Group and the hassles that comes with it. Now back to the hardware. Like I said above, there is no upgrading after the fact. So you are forced to pay Apple's Over-Priced Hardware upgrades, in which you are getting at least 32GB of RAM (64GB if you can swing it) 1TB for Storage Capacity, Upgrading the CPU Cores so that the GPU portion is more robust (Photoshop uses the GPU for certain components to work in addition to a performance boost.) Basically, in my humble option, you are selecting ALL the upgrades at the highest price-point to get your new M1 iMac to last 7-8 years. So what would I do? Like I said, the Intel-based iMacs still have some life in them and are proven technology that is matured. Here are some configurations worth considering, and if it were me and I needed a new iMac today, I'd get the Intel one. My next Mac in a few years will be a M1 or I'm sure it will be a M2 chip at that point and then all the software will be optimized to work, etc. https://ask.damiensymonds.net/topic/35515-quick-and-dirty-desktop-imac-configurations/ My iMac is the Middle Configuration in that article. I have 64GB of RAM that I upgraded myself for less than $200. If that was Apple RAM, that upgrade for the same damn chips would be closer to $1000. Like I said, over-priced.
-
Try turning off Use Open CL and 30 Bit Display. Then restart Photoshop. Any better or worse? If worse, you can always turn them back on. Also, lower your History States from 95 to 50. If you edit properly, you don't "Need" any more than 50 undo items. One more thing, I told you the wrong spot to change a setting. We need to disable "Automated Graphics Switching." HERE are the instructions. It seems this is a Setting with the MacOS and NOT a Photoshop setting. My bad. I have a iMac, not a Mac Laptop, so I don't always see the ALL the options/settings because I have a desktop.
-
I'm going to answer your question anyway, so that others who come across this thread can learn. THIS IS NOT A GOOD THING TO HAVE and probably the source of your woes. I wish you would have asked me if it was OK for you to upgrade. Honestly? You aren't the only one. Monterey has been bricking some Mac Laptops and Apple just released some sort of patch. I've also seen reports of other weird things with Monterey and I would avoid upgrading, even though Apple is bugging you to upgrade. If you have an older Mac, like one before 2017, it's probably not a good idea to upgrade to Monterey, as you have found out the hard way. Believe it or not, you could have upgraded to Catalina, but with the way your situation is, lack of RAM and Storage, you'd probably be in the same situation. You can't go back to a previous OS at this point. In order to accomplish this, you are formatting your internal Macintosh HD, formatting your Time Machine Drive, creating a Bootable Thumb-drive with a OS like Catalina...it's going to be a real huge pain in the ass. In a nutshell, you are nuking everything and starting all over. Same thing as you would with buying a new Mac. If your Mac was a 2017 model, then I'd be more prone to you trying to fix things. If it's any older than that, it's time for a new iMac. Quick & Dirty iMac Configurations
-
Macbook Pro 2021 - what specs do I need?
Brian replied to siobhankelly's topic in Photo Gear & Equipment
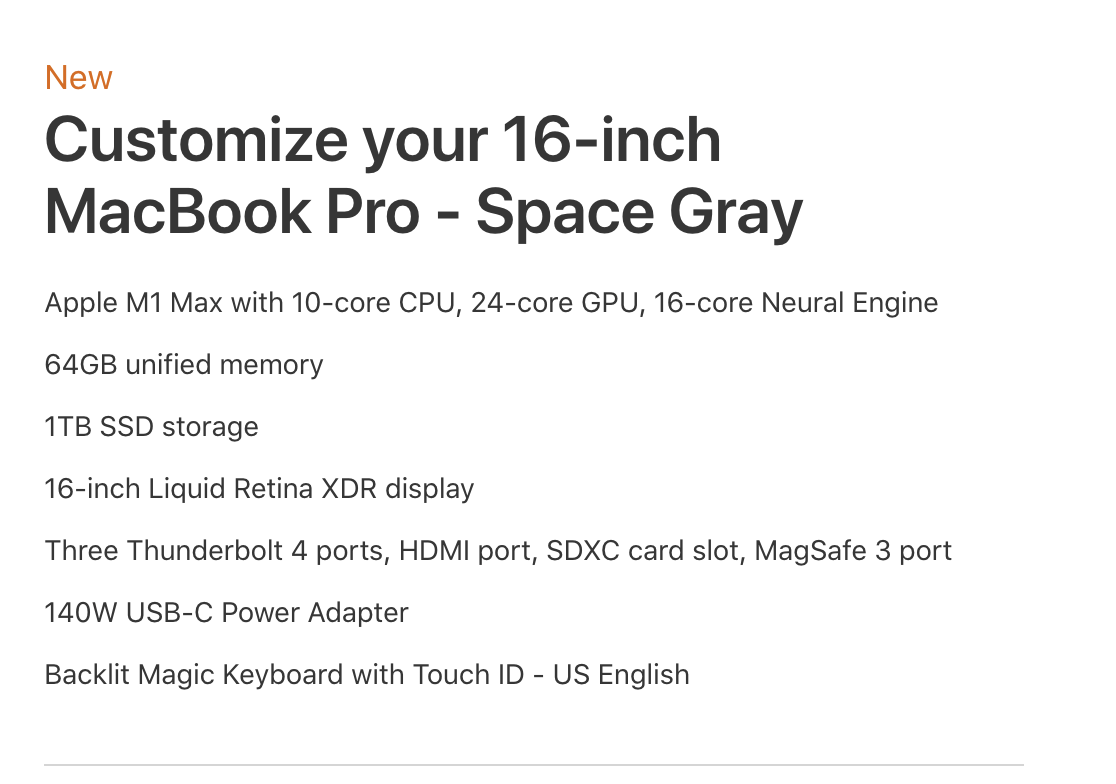
The Max is really over-kill for still photo editing, but you will have that one the longest in terms of life-span & usage. If you are doing things with Video and Recording Music, that's where the M1 Max Shines. But again, you are buying the top of the line in terms of a 2021/2022 MBP. Whichever you choose, realize you need to buy the extra things at the time of purchase, because there is no upgrade path or upgrading after the fact. If you want more, you are buying a new laptop. So make your choice a good one. In any case, are looking at spending at least $3000+ before shipping and tax, no matter how you configure things. Apple wants you to "Go Big or Go Home." Any M1 Based MBP will require PS CC 2021 or PS CC 2022. Period. So make sure you have a subscription to PS CC. Today's Photoshop requires a beefy video card in order to run well. There are certain tools built within Photoshop that use the GPU and dedicated Video RAM in order to function. So it's not about RAM, HD space and CPU speed. the GPU is more important than the CPU in 2021/2022 when it comes to Photoshop. Again, since everything is built into one chip, I'd get at least 32GB of RAM, hell...I'd bump it up to 64GB AND increase the Graphics Cores at least to the next level. (But then we are in a M1 Max Configuration.) Especially if you are thinking about getting a camera that is 45MP or more. The more MegaPixels that you have, the more RAM you will need. And Storage, and CPU... So there is never "too much." It boils down to your budget. Here is one I configured, the price is $3699 before AppleCare, Tax and possible shipping. You could configure a lower-end model, but then we are looking at $3299 or $3099. Big whoop. Since you are above $3000 in all scenarios, might as well go for broke and spend the extra $400 or so. If you are looking to save a little cash, you could pick the middle MBP and configure it with 32GB of RAM. But honestly, I have 64GB of RAM in my current iMac and shoot with a Nikon D850. I couldn't imagine going back to 32GB.
-
Yep. The video drivers are part of the MacOS. They aren't available separately, at least to my knowledge. You'd have to call Apple on that one. If you want to change the graphics card, you are buying a whole new Mac. This isn't a Windows Computer. It's a Mac. Under the "Use Graphics Processor" checkbox, there is "Advanced Settings." Click on that and post a screenshot.
-
You mean the one that's pinned to the top of the forum? Quick & Dirty iMac Configurations.