Brian
-
Posts
4,137 -
Joined
-
Last visited
-
Days Won
55
Everything posted by Brian
-
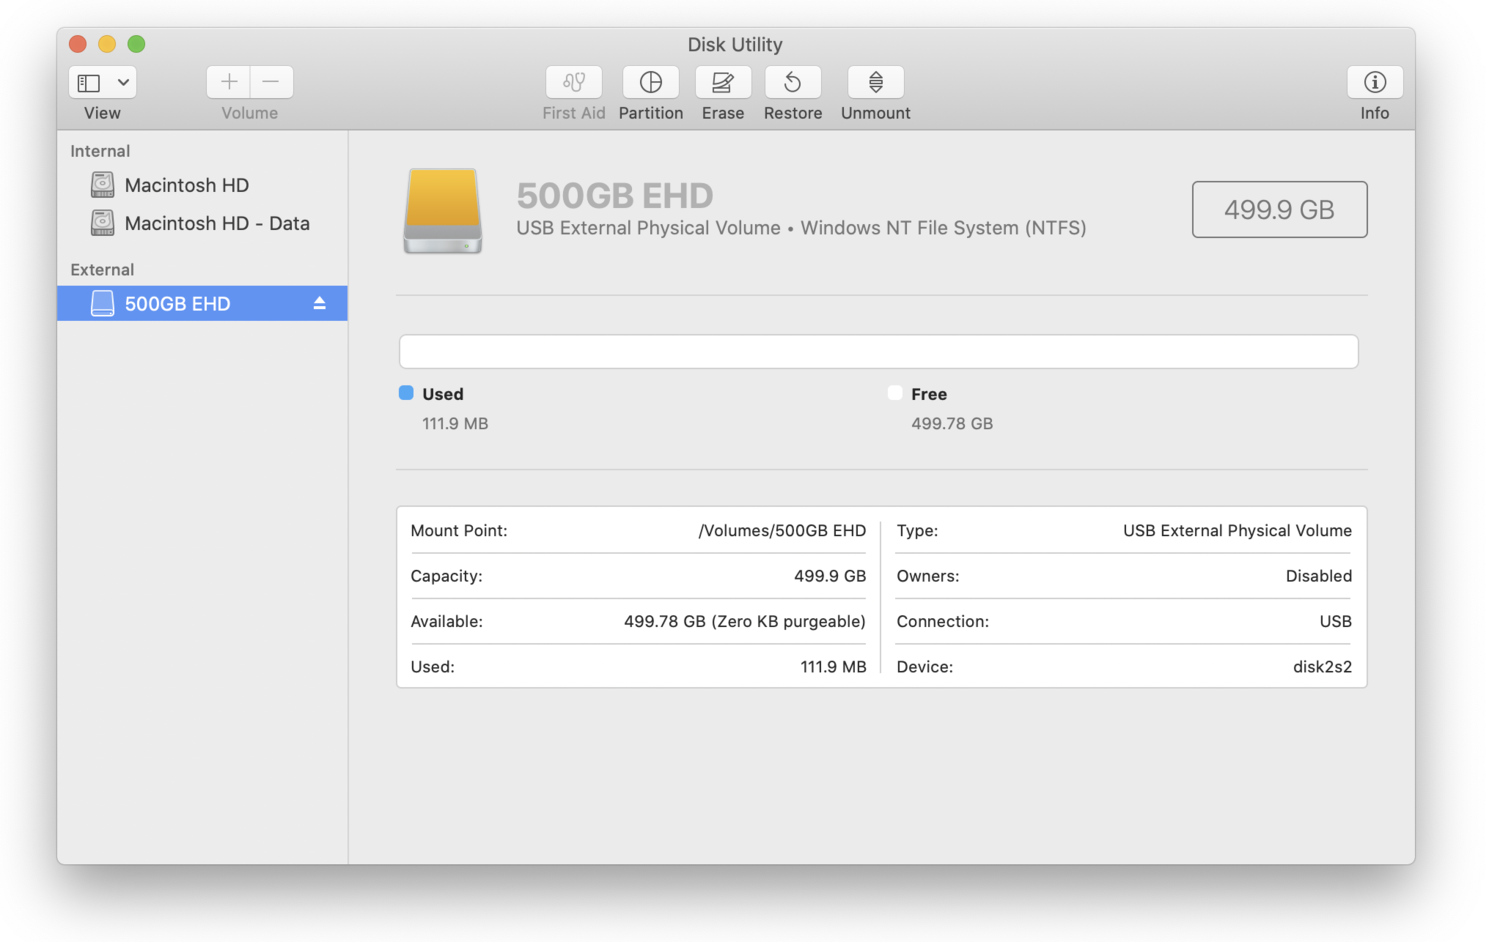
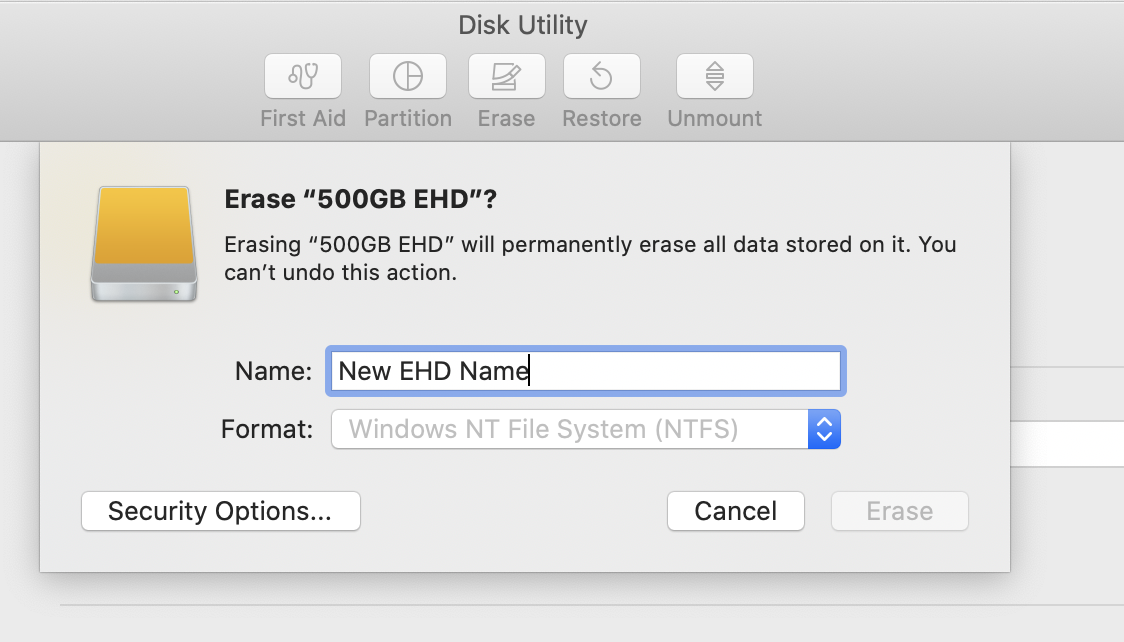
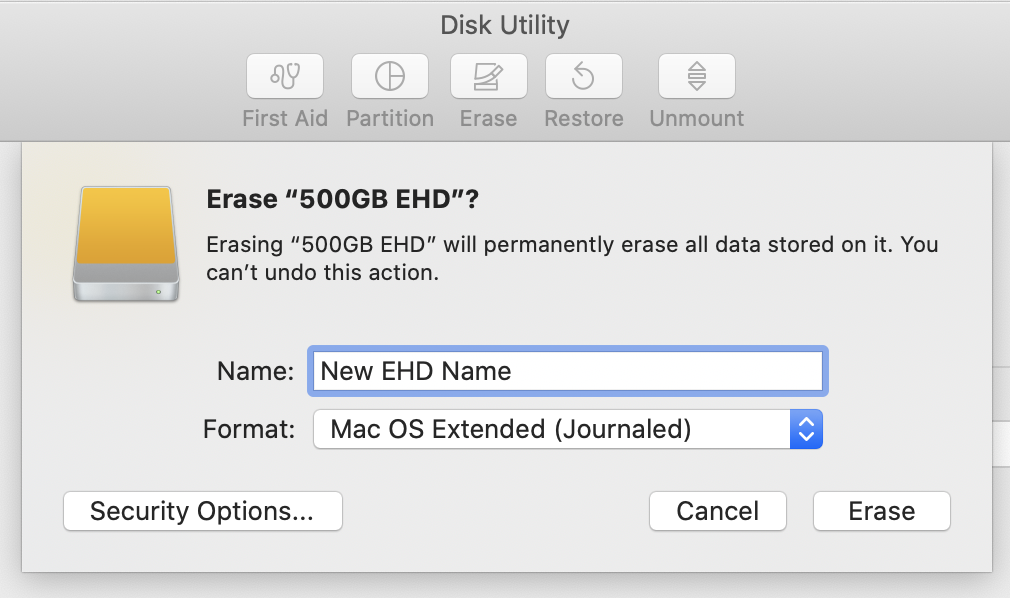
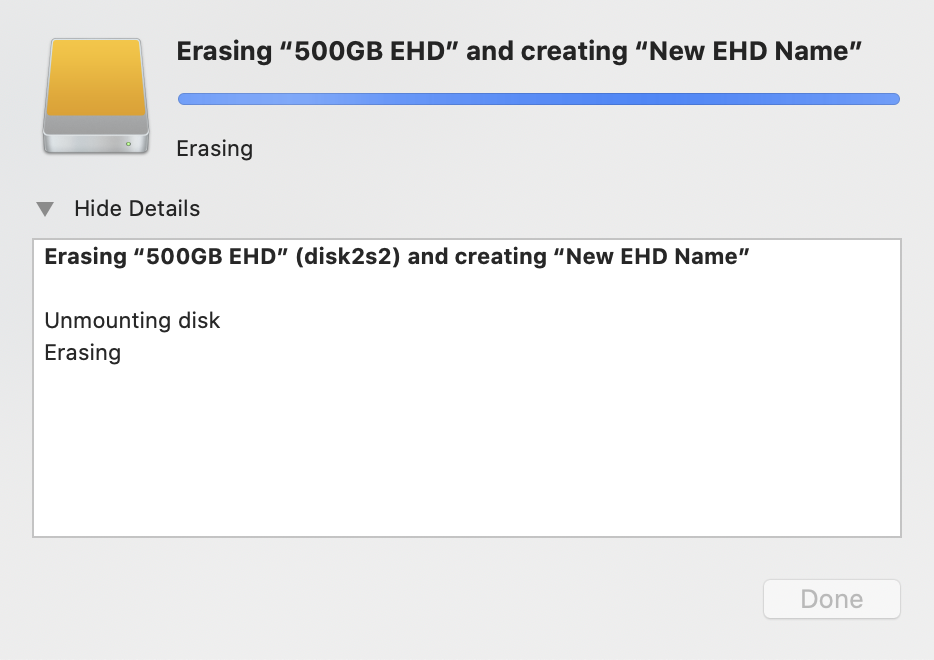
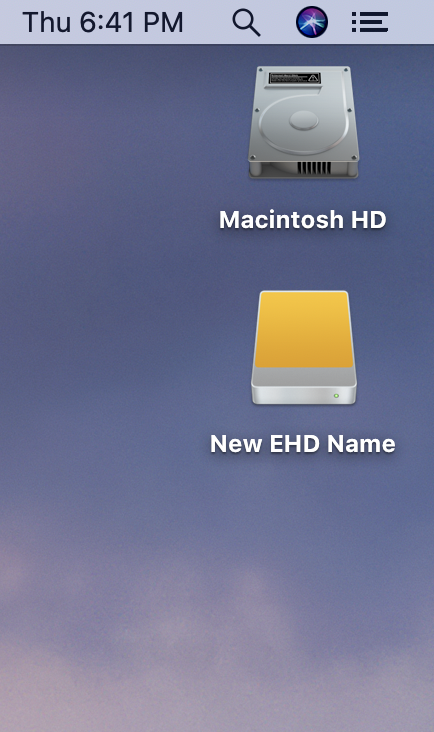
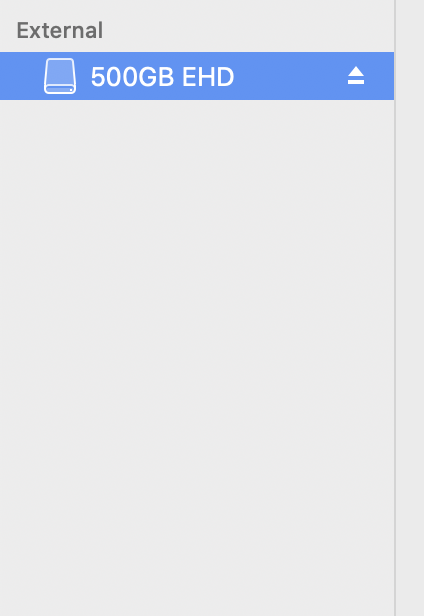
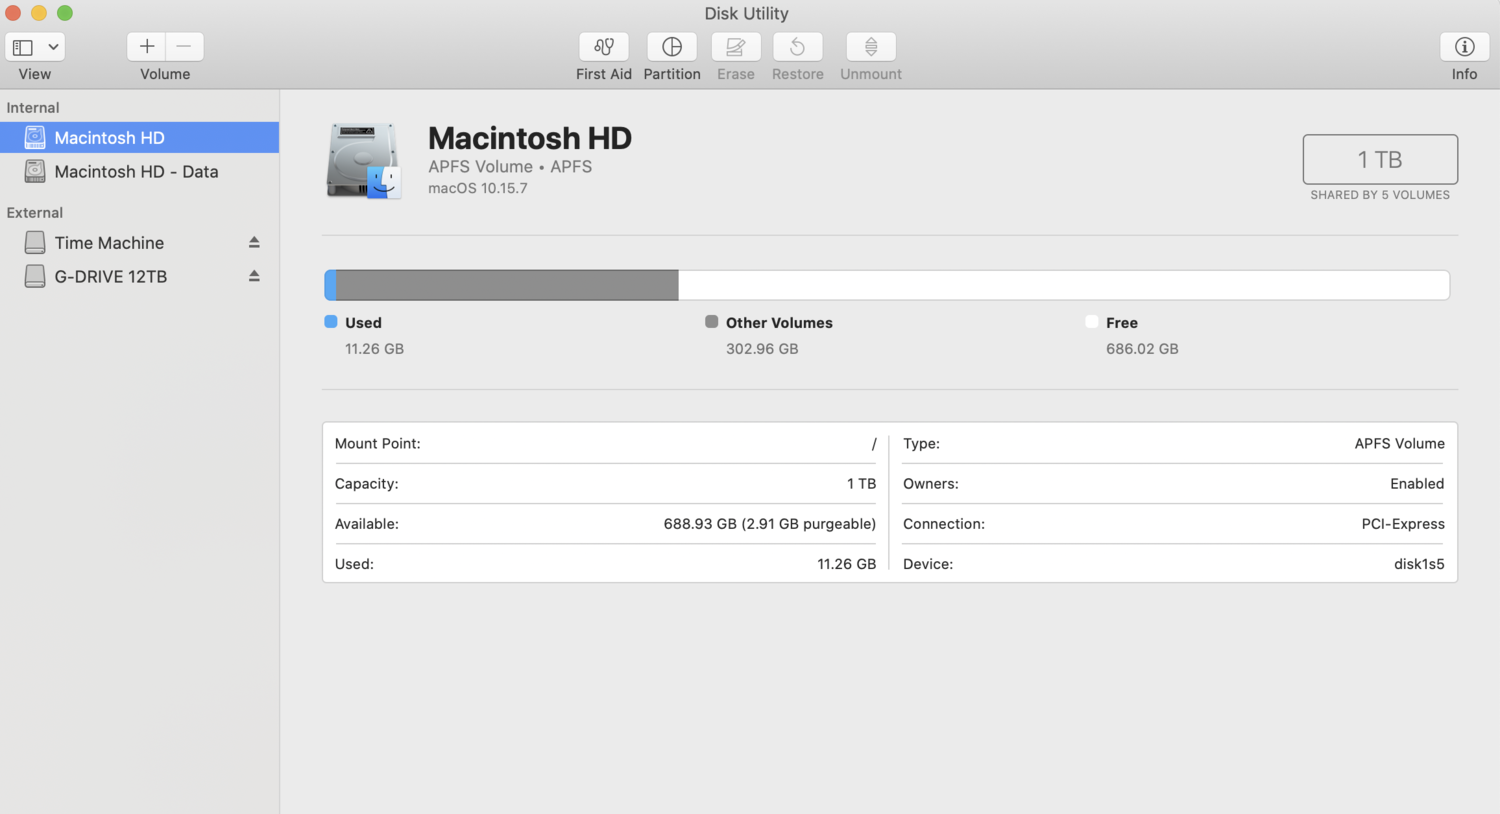
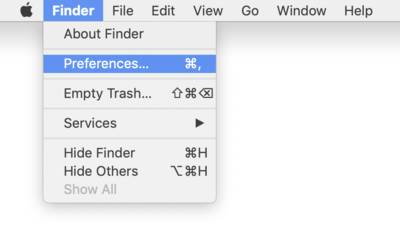
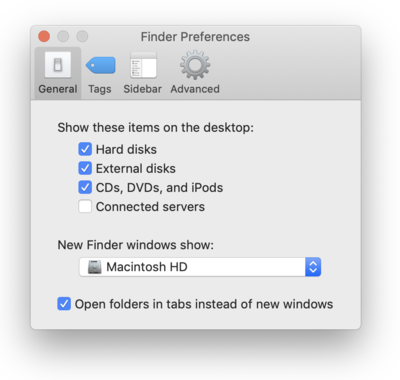
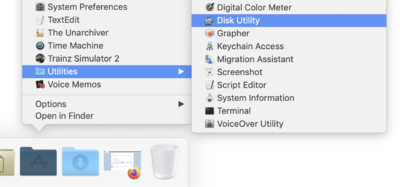
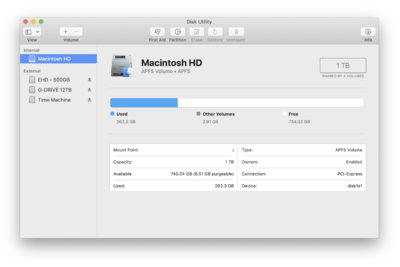
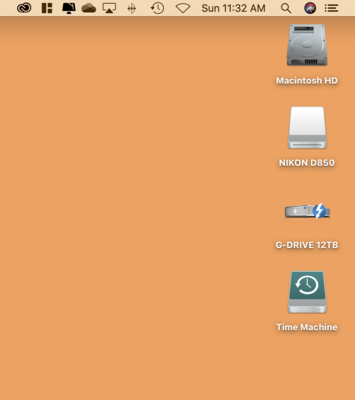
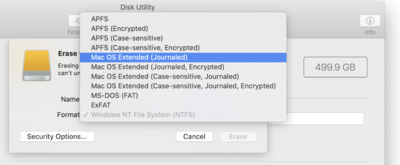
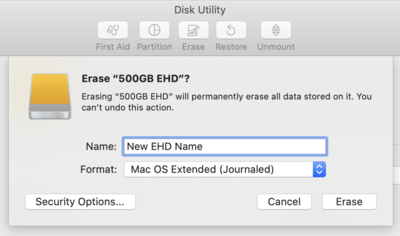
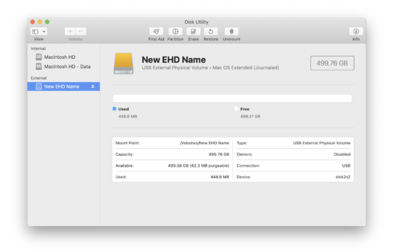
OK, great! I want to try these instructions that I wrote out awhile ago, and you are the perfect candidate to test drive them. Let me know if you don't understand something or an item needs clarification. The first thing I want you to do, if you haven't already, is turn on the feature that allows you to see HDs and other "Mounted Devices" on your Mac Desktop. Open the Finder. The easiest way is to click the Smiley Face on your DockBar: Then head to the Finder Menu and select Preferences: Once there put checks next to these items and change the bottom to "Macintosh HD" if you want: From there, just click the Red Circle in the upper left corner to apply the changes. After you make this change, things like the Macintosh HD, any External Drives, Memory Cards from Cameras that are in a Card Reader and even portable DVD Disks will all appear on the Mac Desktop. This makes accessing them a breeze and is one of the things that has always puzzled me on why this feature isn't turned on by default. For example: First, as you saw in my example above, your new EHD should appear on the desktop, though it may not. Here is an example of currently Mounted Devices on my iMac. You should see something similar if you followed my steps above: Now the fun begins! Let's get that new Hard Drive prepped for use on the Macintosh!! Click your Applications Folder, then open Disk Utilities. Head to Applications Menu >> Utilities >> Disk Utilities. This is where your Disk Utilities might look slightly different. Anyway, here is mine: While in your Disk Utilities Module, please make note of any additional Hard Drives listed in the left column. Pay special attention to the Hard Drives listed under the "External" Section. For this process, it is much safer to only have one EHD Mounted / Listed! It is imperative that you Eject and Remove ANY EXTERNAL HARD DRIVES THAT YOU DO NOT WANT TO ERASE!!! Your Disk Utilities Window should appear as follows, with only ONE External HD listed: You can Eject the EHD from Disk Utilities, just click the little up-arrow/line next to the drive you want to remove. First select the EHD that you want to Format for use on the Mac in the left column: Then click the Erase Button at the top: Your Window should appear similar to this. At this point, give your new EHD its official name. Make it something Obvious, like WD 3TB or Client File EHD 3TB. Something recognizable and simple. You can only have so many characters for the name, so keep it short and simple: Then click the UP/DOWN arrows on the right, in the Format Section. If this was originally a Windows EHD, it will more than likely say, Windows NT File System (NTFS), or be listed as ExFAT: A list will appear as follows: For a Traditional Spinning Hard Drive, ONLY SELECT THE MacOS Extended (Journaled.) DO NOT SELECT the "Encrypted / Case Sensitive" Options! For a Flash Based Hard Drive (i.e. SSD, m.2, etc.) choose APFS. DO NOT use APFS for a Traditional Spinning Hard Drive! DO NOT SELECT the "Encrypted / Case Sensitive" Options! Again, it's either the "Mac OS Extended (Journaled)" or the plain "APFS." Do not use any other option. For the people that do use those options, have reasons to do so. For the 99.9999% of us out there, including myself, we want to keep our Partition Types as simple as possible. For the majority of users doing this, your new External HD will most likely be the "Traditional / Spinning" type/kind, as SSD/m.2 Drives tend to be extremely expensive for capacities over 1TB. As time goes on, this will definitely change, but for now your Disk Utility Window should look something like this: Simply Click the Erase Button and let the MacOS do its thing: When finished, you might get a message from the MacOS asking if you want to use the EHD for Time Machine or not. If this is a Data Drive, tell it NO! Of course, if this EHD is meant for Time Machine, tell it Yes. If everything goes as expected, and followed all of my instructions, you should see your new EHD mounted on the Mac Desktop: You will also see it as follows in the Disk Utility Module of the MacOS: That's it! That is all it takes to make your Windows Hard Drive and convert it for use on your Mac. Keep in mind that with the MacOS and the way its designed, is it treats both Internal and External Drives the same. So don't go over 75% - 80% capacity on either drive, Internal or External. The more full your hard drive is, the slower your Macintosh runs.


-
Yeah, we can go over this tomorrow. Honestly, it’s not that difficult to accomplish, we just need to approach things logically and one-at-a-time. I’m on New York Time. Sounds like you are about 6hrs ahead of me. I’m assuming that the Photos 2 is the new EHD? If so let me know and I will write up a set of instructions. Warning! We will be nuking the contents of this drive. So if there is anything important on it, be sure to back it up to another drive.
-
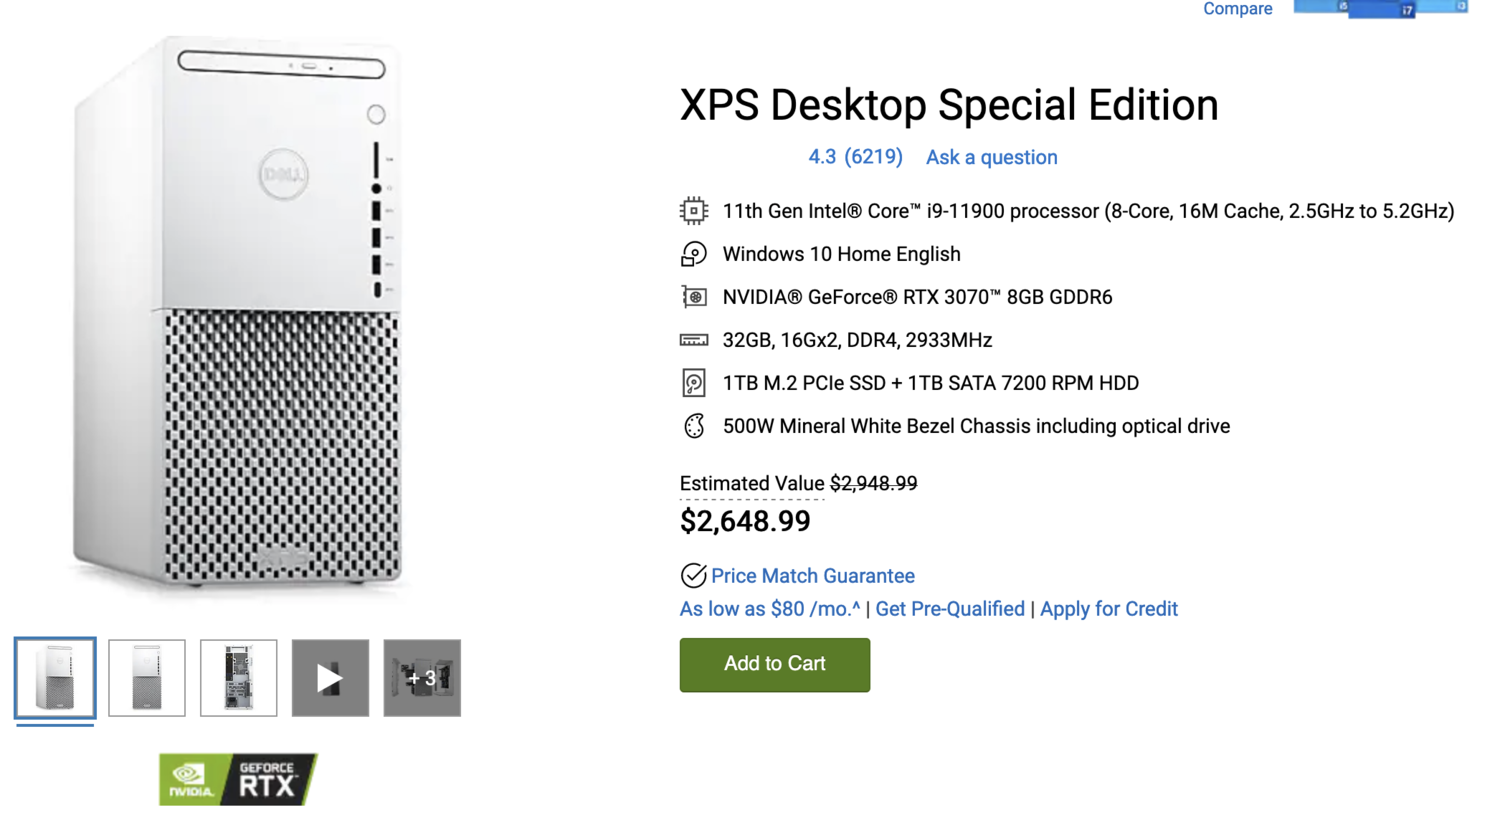
From what I can tell, they are two completely different systems. One has Liquid Cooling and the other one doesn't. Different CPUs, different motherboards, etc. The Liquid Cooled one probably has a fancy LED Lighting System and better case as well. Those fancy cases have much more labor involved because routing all those wires / lights and mounting a Liquid Cooling System to the CPU is tedious. It's a PITA. I'm sure the $3000+ model also has higher-end / better components.
-
As far as your pre-built system. It's "Fine." I still would try and get a NVIDIA RTX 3070 Video/Graphics Card. See if you can upgrade that.
-
Yes, those are Microsoft's Specs...as usual. There is a difference between what they require and what is reality. Their specs are what it takes for Windows 11 to install and load, not to run anything. It's more along the lines of this: Intel i9 CPU (Some i7 CPUs will be supported, but it seems to be the latest and greatest from 2020-2021, not a i7 from 5 years ago.) 16GB RAM / 32GB Preferred. Actually, I'd go for 64GB if you have a high Megapixel Camera 1 TB Main HD / 2 TB Main HD wouldn't be a bad idea. TPM Version 2.0, UEFI Firmware, Secure Boot capable. (THIS is the most important part.) Graphics Card, one that has a dedicated GPU and its own dedicated Video Memory, 8GB - 16GB. DirectX 12 or later is a standard thing with today's cards. Display: 1920x1080 at the minimum. For editing photos, needs to be a IPS Screen. As for your links, I'm not a fan of Acer; they just don't last. Of course, I'm used to dealing with their laptops here in the States, and those suckers just break. Honestly, I really want your graphics card to be a NVIDIA RTX 3070 with 8GB of Video RAM. That card Photoshop has a love-affair with. Too bad it's so expensive right now, even in US-Prices. I really like this one: Astral RTX 3070. Why that recommendation? Adobe Photoshop seems to like NVIDIA cards a bit better, well especially their drivers, but that model or the one just below it, the Malestrom RX 6700 should be fine. For a $200 difference, I'd get the Astral.
-
OK, I'm back. So what is ExFAT and why do the manufactures use it? Honestly? It's a half-assed way for them to save money. Around 20-30 years ago, HD Manufacturers would have a "Macintosh Formatted" and a "Windows Formatted" version. Often, the "Mac Version" was about $30 more than their Windows Counterpart. Why is this such a big deal? BECAUSE IT WAS THE SAME DAMN HD IN THE BOX. The manufactures knew that people usually paid more for a Macintosh computer, as opposed to a Windows-Clone computer, so they would charge a premium for Mac users. Unethical? Absolutely. All a consumer would have to do is buy the "Windows" version of the HD, delete the existing partition, create a Macintosh one and format it. Took a total of 5 minutes or so, even today. So why ExFAT now? It's because Apple really came on the scene with their iMac line, especially when they switched to Intel-Based Macs. Apple made it so easy to switch that HD manufactures took notice for when users needed to go back-and-forth between a Windows Computer and a Macintosh Computer. People didn't want to use special translator software, they wanted their HDs to work in both worlds, without having to format the HD. Well, since Microsoft made it "Public Domain," for lack of a better term, HD manufactures jumped on partitioning their drives with it. This way they could sell to both Mac and Windows users, and the HD Manufactures didn't suffer from the extra support calls for why a HD was working on one computer platform vs another. The problem with ExFAT is that it's not 100% bulletproof. For me personally, and by my recommendations...it's risky to use. In my humble opinion, it's almost like a "Pet Project" that Microsoft came out with and other Manufactures adopted, but it's not mainstream. Personally, I would never put my data on a ExFAT HD. But that's just me. Anyway, hopefully this solves the mystery. Now we are ready to fix things and get you straightened out. Let me know when you want to begin, and we are going to start with your new HD, probably the one labeled, "Photos 2."
-
Buy it Right - Buy it Once. I know, it's a lot of money. It just sucks to be in the market for a new computer right now. Plus with the whole Windows 11 thing...it's such a racket. It's a way to make money. In fact, just a few years ago, people were forced to upgrade to Windows 10 from Windows 7 and before that it was XP. It never ends. That's why I have people spend a little bit more in the beginning, this way it lasts and they don't have to buy a new computer every 24-36 months.
-
The good news is, it's "IPS Level." Meaning that it's almost like a IPS Display Panel, but the bad news is that it isn't a true display panel. Basically it's better than nothing. Make sure you budget a Calibration Device and have a set of Test Prints in your hands when you calibrate. Enjoy your purchase.
-
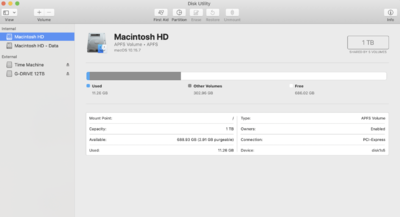
See this right here? Where it says, ExFAT? That's why!!! Your hard drives are partitioned with ExFAT. We will need to Nuke the new HD, re-partition it and format it with Journaled HFS+. Then we will manually need to copy all of the contents from the Photos 1 Drive to the freshly created Journaled HFS+ Partition on Photos 2. Then we will need to Nuke the Photos 1 Drive, then copy all of the stuff back. After which, you will be able to use the program. I will explain later. Gotta go start dinner.

-
Specs-wise, it seems OK. Now here comes the BUT! But what is the Display Panel Type? This is the part that is THE most difficult to find on a Laptop "That's Good for Photo Editing." It needs-needs-needs to be an IPS-based Display Panel. Can you provide a link to this laptop?
-
I'm going to move this to the Windows Hardware Forum.
-
Could you post a screenshot of what you changed in this thread? It might help someone else out.
-
Give this article a read: Buying a Computer in 2021 Scroll down to the section that starts with, "I need it to run my business..." That should get you a starting point. In fact, I just went to Dell's XPS Special Edition Website, picked the model in the right column and tweaked a few things. Prices have gone down slightly, which is good news. Here is a computer "That will last, and is good for Photo Editing." Now all we have to do is add a IPS Monitor, and I'd budget around $350 for that. Here is a Dell 27" Ultrasharp IPS 2021 Model that is "Good for Photo Editing." Sure, you can find cheaper monitors, and I would have at least $250-ish set aside for the display, for models that are a few years old, but still viable. Now, don't forget about calibration!! You need a Calibrator, and I'd have $175 set for that. So let's call it, $2650 for the Computer, $350 for the Monitor and $175 for the Calibrator. That's $3175 before taxes and shipping. Right around the $3000 mark. A few years ago, this same setup would be around $1800 or so. Keep Saving.

-
No. I wouldn't recommend going down that path. You are going to have to save up money. Even if you used a current computer and got a copy of Photoshop Elements, even an older version, would be better than getting a Tablet to edit on. Well, if all you want to do is take photos, slap a filter on them and load them to IG and the like...it doesn't matter what you use. Because you aren't "Editing;" not in the real sense, it's just minor adjustments that just scratch the surface of what people call "Editing." Plus, Photography calls many...but selects few. I'm almost certain you and your sister will soon have a Photography Business between the two of you. Trust me, the "Oh no!! We are just in it for a hobby!!" Uh-huh, it's inevitable. Both of you might as well start things with good habits and a solid foundation. Photography has never been cheap, not since its creation in the middle 1800's. Trust me, I've spent LOTS-AND-LOTS of money on this shit over the years. The other problem is, we now have Windows 11 that is on the horizon. Unless you want to buy a computer now, and then another one in 2025, you will need to invest in hardware that is going to last the next 7 years or so, and unfortunately with today's prices...that's around the $3000 mark. The real reason is the video / graphics card. Those suckers are going for $1500 all by themselves. Why is this important? Because as Adobe updates Photoshop, they are using the Graphics Card more and more for a performance boost. If your Graphics/Video Card doesn't have enough "horsepower," the latest versions of Photoshop slow to a crawl performance-wise.
-
Absolutely. Post some screen shots here in this thread. Here's another Monkey-Wrench...WINDOWS 11. It's coming and I think is just released, so we have to make sure PCs today are Windows 11 compatible. Otherwise you will be buying another computer in 2025, that's when Windows 10 will be put out to pasture and no longer supported by Microsoft / Updated.
-
First, I'd rename the "My Passport for Mac" and call it "Time Machine." This helps eliminate confusion. Second, click on "Photos 1" and "Photos 2" in Disk Utility. I want to see what partition type those two drives are. Your main one is APFS, which is what you want for SSD Drives, not traditional spinning hard drives. Post those screen shots please.
-
@Damien Symonds - Can you help Gretchen out with this one? I've never used a Wacom Tablet.
-
Ditch the crop bodies. Unless you like to shoot wildlife and need that extra reach, you'd be better served by a 5D Mark IV and have your Mark II as a backup. As for your K2 Film camera...hold off for now. You might want to invest in a Mirrorless System to replace that one. Since Canon & Nikon are now getting up to speed, it's interesting on what they come out with. Personally, I'm holding off buying Mirrorless system for the moment, but it's tempting. For right now, and with the lenses you have...getting a Canon 5D Mark IV is the next logical step.
-
Have you read this? Buying a Computer in 2021 As far as budget? You want the bad news? Especially for something "...that will last." Your budget needs to be around $3000 in 2021. That's just for the computer. Monitor, add another $350 or so unless you have one you can re-use. Why? Because Adobe's products, especially Photoshop is using the Video Card for a performance boost. Video Cards are a hot commodity and their prices are insane. A Video Card in 2018/2019 would go for around $600...and that was for a high-performance card. Now that same card is going for $1800. Now the next question / statement will be... "But I don't need something that fast, I just want to edit photos! Is there something cheaper?" It's 2021. COVID has created all sorts of Chip Shortages. So manufacturers can't get the individual building blocks that build components which make up computers. Now everyone is "Working from Home" and the demand is so high for computers (ESPECIALLY LAPTOPS) that the prices have gone up. That $500 computer from a Big-Box Store is probably going for around $1200 right now, and no...it doesn't have the Horsepower to run Photoshop well. So start saving. Also, remember the Christmas Holiday Season will be here before you know it. I have no idea what that will do to the demand.
-
Let's take SuperDuper out of the equation. First, I want you to hook up your main photos drive to your Mac directly (not a USB hub) and the new drive. Can you see both of them on the Mac Desktop? Also what does your Disk Management Utility look like. Application Folder >> Utilities >> Disk Utility. Here is a snapshot of mine currently: What does yours look like? I need to see the left column clearly.
-
You only have probably 100Mbps down I'm guessing? Or somewhere around there? That's probably why the Comcast Rep didn't recommend replacing it. At $15-$16 a month, plus tax, it adds up over time. That $140 Cable Modem that I recommended will go up to 1 Gig Internet, so if you ever wanted to bump up your speed to say, 300Mbps, it will handle it with room to spare. Just think, in about 9-10 months, that Cable Modem will have paid for itself.
-
Buy this: Motorola - 32 x 8 DOCSIS 3.1 Cable Modem Buy this: Ubiquiti - AmpliFi Dual-Band Mesh Wi-Fi System - White Both items are from Best Buy and are in stock, so you could have them shipped to you. What I would do, is get the new modem working FIRST, with your existing router. THEN setup the new Ubiquiti Mesh Router System. Take one thing at a time.
-
You mean not pay Comcast the $15+ Ransom (*Ahem* I meant Rental Fee) each month? Of course I recommend owning your own modem! All you have to do is buy one, call Comcast to get it "Permissioned" (Which is a fancy way of saying "Activated.") and then returning the Comcast Modem. There are a few different models, one for just Comcast Internet, and they other kind that is meant for the "Triple Play" (Phone-Internet-Cable TV). So what type of Comcast do you subscribe to now? If you really want the best and fastest connection, nothing beats a hard-wired Ethernet Connection and ditching WiFi. But the majority of people aren't fancy like me and run Ethernet Cable throughout their house. In terms of connection, if you can stretch your budget to 300Mbps Down, that will help things a lot with streaming multiple screens at once. Also, I'm surprised Comcast hasn't bugged you to update your modem. As technology improves, the requirements of the Modems increase as well. If you do go this route, JUST BE SURE TO RETURN THE MODEM TO A XFINITY STORE AND GET A RECEIPT STATING THAT YOU RETURNED IT!!! You'd be surprised on how much a PITA Comcast / XFinity can be, especially if they think you still have the equipment. Lots of horror stories. In fact, I'd take a video or at least a picture of you returning your modem at the Xfinity Store. The Ubiquiti Router Mesh System is VERY easy to setup. In fact, you do it using your Smart Phone and Ubiquiti App. I have a friend who always gets stressed out with setting up technology and he bought one. He said it was a piece of cake. He then bought one for his parents and set it up.
-
That's a major problem right there. Closed Doors, heating ducts in walls, stainless steel appliances all cut WiFi Signal. Especially the 5GHz Band. The 2.4GHz goes further than 5GHz, but is not as fast. That's why your computer is 64.9 Mbps Down, which isn't very fast at all in 2021. In fact, I had my WiFi Access Point next to my TV in my Living Room, which was the most centralized portion of my house. I got connectivity all over the house, but once my Wife started working from home permanently, she complained that the WiFi was a bit "Sluggish" when working up in her office on our 2nd level as compared to working in the Dining Room on the main floor. Well, it turns out my fancy Stainless Steel Fridge was really blocking the signal and the main trunk for the heating system (metal heating/cooling duct) also was getting in the way. So I moved the Access Point a total of 5 feet and placed it into the Dining Room on our Buffet cabinet, and her download speed jumped from 60 down to around 160-170 down. Big difference. So for your case, getting that Wifi Router out of your bedroom and in a more centralized location will be a huge benefit to you. As far as your Garage, Concrete Blocks are not great for WiFi signal either but I do have a recommendation for your situation: Ubiquiti - AmpliFi Dual-Band Mesh Wi-Fi System - White. What a Mesh WiFi System does, is you have the main WiFi Router, but then two satellite nodes that help boost the signal across your house. You don't have to worry about connecting from one to the other, the main controller cube will automatically move your device to the closest / strongest access point. So your whole house is "Covered in WiFi." So areas like your Garage and back Bedrooms will get a better signal. Your Ring Doorbell will finally have a stable connection. You don't even have to use all of the Satellite Access Points, you might just need one. Oh, it's one SSID Name and your devices can move around at will without dropping connection. That's the benefit to a "Mesh System." The reason I asked about download speed, is most routers these days have no issues connecting to a Cable Modem that is 300Mbps or less, it's when you get to the 600 Mbps or Gigabit (Which in reality is 940 Mbps Down and 40 Mbps Up...but it's cooler and more Marketable to say "Gig Speed." But I digress...) do you need a Router that supports 1GB or 2GB Internet. If you have no plans on going up that high, you are fine. If you do, we will need to figure out a different system. Honestly? I have Gig Internet. Yes, it is faster, but truth be told, I got it for my Wife and the Upload Speeds than anything, since she hooks up to her office via a VPN. I would still be perfectly happy having 300 Mbps down and 12 Mbps Up. Of course, I don't have multiple Teenagers streaming 4K video to their devices along with stuff I want to do. I'm going on assumption you are also in the same boat, you don't want to spend the $$$ on a faster Internet Connection and your usage doesn't warrant spending that much money. But I will say, 300Mbps down is a nice thing to have, conversationally speaking.
-
Well, that depends on a few things. First, how fast is your internet connection? How big is the area you are looking for Wifi? Do you have problems with connectivity in parts of your home? Where is the current Wifi Access Point located?