Brian
-
Posts
4,137 -
Joined
-
Last visited
-
Days Won
55
Everything posted by Brian
-
Either the Dell or Acer is fine. I wouldn't go with a Curved Display for photo editing. Traditionally, we've had decent luck calibrating Dell displays. Any particular reason that you are going with a older Dell Display? Oh, make sure you use a HDMI or DisplayPort Cable. (even a DVI if you have to.) Just don't use the standard 15-pin D-Sub VGA Port that has been around since 1989. That port type was meant for Tube Displays, not today's fancy flat-screens. This isn't a big deal on current displays, as they don't typically put those ports on them, but for these older ones, you might have it as an option. If it was my money, I'd get the Dell. Heck, I'd spend $50 more and get the current model: Dell Ultrasharp 24 inch Infinity Edge Monitor - U2417H. In reality, there isn't much size difference between a 23" or 24" display. Remember, measurements are taken with the Display's Diagonal not the "Width" you might be thinking.
-
More info and my thoughts on a Mac Mini:
-
Don't. If you are editing photos that is. The current Mac Minis only look good on Apple Displays, and there aren't any affordable Apple Displays on the market currently. Unless you want to spend around $6000 for just the display. No, I'm not kidding. The current Mac Minis need 4K Displays, but things like graphics might be ok, but stuff like Text won't be as clear and nowhere near what you are used to seeing. Mac Minis sound great...you have a display and peripherals, heck...you can get a new Mac for less money!! Whoo-Hoo!!! Except that expectations and reality are two different things. if you still are determined on buying a new Mac Mini, especially one of the new M1 models, make sure you upgrade EVERYTHING AT THE TIME OF PURCHASE. The CPU, RAM and HD are all built in on one chip, so it's a new type of architecture than whats been around practically forever. Lord help you if you have any type of data crash; so factor in a monthly fee for a iCloud account. Macs are different from Windows, formatting the HD doesn't make them "faster" like their Windows Counterparts. Of course having a clean iMac will make it actmore efficient, but you'd be better served by maxing out the RAM to 32GB (if you haven't already) than you would by formatting it. Oh, not having 1000+ files and folders on a Mac Desktop will also make them run faster. So you might want to do some housekeeping in the short term. What would I do? Start saving for a new 27" iMac. I'd still get the Intel version in 2021. What options would I choose for a "Computer that's good for photo-editing?" I'm so glad you asked!! Quick & Dirty iMac Configurations Personally, I'd get the Photoshop & Light Video Configuration. This model / configuration has the best chance of lasting you 7-8 years or so. Which is the same time period of where your existing Mac is now. Funny how that works...
-
Yes, the "3-2-1 Backup Strategy" is an industry standard. 3 Copies of your files at all times On 2 Separate Devices 1 located off-site. The only way this works if if you are hyper-anal and have the time to stay on top of things. As you can see, 3 copies of EVERY image and on 2 different drives can get out of hand, really quick. If you have crap all over the place, it will become a road paved with "Good Intentions" and nothing will get done. Trust me. I speak from experience. Having a rock-solid directory structure makes this happen. What I want you to do now, even if you have to take out a piece of paper and write this down manually, is to map out how your folders are going to be. Separate things by year? Image Type? Event Type? Stuff like that. Create a roadmap of how you want your data to be stored. Otherwise, you will just have a mess on your hands and be right back to where you are at now, albeit on a single drive instead of multiple drives. It does you no good to have three copies of things and not have a clue where they reside. Follow me? Also, I was trying to keep the costs low and pick a HD that is in stock. In reality, I wanted to recommend a 14TB HD, but I don't think you wanted to spend $600+ on one. Especially if you are looking to purchase two. Really right now, before you get fancy is to get all the images centrally located and culled. Let's start there. Trust me, you do not need 75 photos of your lunch from 5 years ago or that completely out of focus and underexposed photos that will never see the light of day? KILL THEM. So if you think 6TB is big enough, and this is a complete guess on my part...as you will know how much stuff is on all of your multiple external drives, go ahead and purchase one. If you have say 10 EHDs all completely filled, than a single 6TB Drive isn't going to do much for you, you need something much larger. Truth is, you can't have "enough" hard drive space, you will always need more. So if you can find a 10TB G-Drive that is in stock, feel free to pick up one if you can afford it. If you are planning on having a duplicate of this drive, purchase two. That said, Sandisk (who is now owned by Western Digital who also now owns G-Drive) are releasing new versions of the drives that I like, but since we are in a chip shortage, no telling when things will be in stock. Here is the drive that I'm talking about: SanDisk Professional 18TB G-DRIVE Enterprise-Class External Hard Drive
-
If you are looking to keep one off-site, yes. Then you are busy dumping the HD from one to the other. Or are you looking for a RAID-1 setup? How fancy do you want to get? Or...to put it another way, how geeky are you willing to go? Meaning, how technical-savvy are you? You said you wanted to consolidate your HDs, but you never mentioned how many HDs you have, and how much data is on each. I can go way bigger, more complicated and much more expensive if you want a hot-rod HD setup.
-

ASUS ProArt Display PA278QV 27" 16:9 Adaptive-Sync IPS Monitor
Brian replied to JKG's topic in Photo Gear & Equipment
Specs look good. Just be sure to use either a HDMI Cable or DisplayPort Cable to ensure the best quality picture.- 1 reply
-
- 1
-

-
Brian: Question RE: Your PC recommendation(s)
Brian replied to LauraA's topic in The Windows & PC Hardware Forum
Depends on what you consider "Video Editing." If you are editing video from a Smart Phone or GoPro, it should be fine. If you are doing 4K video at 60fps with multiple cameras, then no, you need a lot more horsepower. Not only is it the editing of the video, it's the time that things take when exporting / converting said video so that the rest of the world can view it. That could take a few hours for one video if your computer isn't up to par. Or if it is, 20-30 minutes. Time is money and if you can edit 4 videos in one day will make you more money than just editing one video a day. So that $10,000 investment will help pay for the computer pretty quickly. That said, my experience with video is quite limited, so I might not be the best one to talk to. That said, having a Mac to edit video on might actually be better. -
Well it seems my beloved G-Drives are being re-branded and they haven't hit the shelves yet. However there are still a few of the original HDs out there and are quite affordable. What I would do in your case, is buy this hard drive: G-Technology 6TB G-DRIVE. For $199, it won't break the bank and you can use it on your current Mac along with your future Mac. The cool part is, it's already Mac-Formatted and includes all necessary cables to hook it up to your Mac.
-
2K? That's way more than you will need. Even for the fancy stuff. "I'm just a hobbyist" is such a Misnomer. In reality, the only difference between a "Professional" and a "Amateur" is one charges for services, and their images are consistent from shot to shot, regardless of situation. Sure, "Professionals" still blow it from time-to-time, but this is the minority. Honestly, I've seen some really good images, that are at a "Professional" Grade Level, from "Hobbyists." The truth is, you are looking for a few things: Consolidation A File Organization Structure. Possibly some sort of redundancy. Me recommending a larger HD is only part of the equation. Before you buy anything, you need to think about File Management of your images, which are important to you, Hobbyist or not. The trick is getting you a larger HD that has decent build quality. Do you have a Mac or a PC?
-
Yeah, the distance between your flash and subjects, and what modifier that you use, can produce flat-looking images. Also, if you are using a stupid pop-up flash, those type of flashes don't make things look good at all, period. The reason is, the smaller the light source, or the further back you are, the more "Flat" and "Flashy / Contrasty" your images will be. Nothing beats a huge modifier that's close to your subjects. But that's a whole other thread.
-
It sounds like you are using some sort of Auto ISO Setting and as you stop down, the camera is bumping up the ISO to compensate to keep the Aperture and Shutter Speed. Every camera has a "Falling Apart" stage. This is when the images, regardless on how expensive the body is, start to get too noisy or just plain "fall apart" quality-wise. I don't care what Chart or what a Measurebator on a website claims, ISO 6400 is still kinda tough for a lot of camera bodies, especially in tricky lighting situations. Even more-so the more Megapixels you have on the camera's sensor. I can not stand my Nikon D850 at ISO 6400 or above. Those 45.1MP all crammed together help create noise / sensor grain which is such a PITA to deal with. Damien is correct, if you are zooming in at 200% or more in Photoshop, you aren't going to be happy. DSLRs are good up to about 100%. If you want something good at 300% or 400%, then we are talking about you getting into Medium Format, and taking out a Second Mortgage to pay for it. Seriously, Medium Format STARTS around $25,000 for the camera body itself. LOL!! But I'm digressing. Without seeing the images you are talking about, Damien and I can only guess at what you are experiencing. So please post SOMETHING. I promise, only Damien or Myself (or one of the Admins) can chime in this thread. My Ask Brian section is set up that way on purpose. To upload a file, make sure it's a JPEG and click the "Choose files..." link just below the comment box. Then after the image loads, hover the mouse cursor over it and click the "+ in the Circle" and it should add it to the comment.

-
External light source or new camera body?
Brian replied to laurenrdenson's topic in Photo Gear & Equipment
I have a feeling I know what type of photographs you are looking for. The trick is to meter for the Sky, then bring up your flash to use as fill. Yes, you keep your ISO reasonable and pay attention to where the Sun is in the sky. Chances are, you will be working in some sort of Manual Mode on the Flash, not a TTL or "Auto" Mode, so you can keep your skies. That's just something you learn how to do over time as each scene / situation is different. Really what you are trying to learn is "Lighting Ratios." You want your subjects about 1-2 Stops darker than your skies, then you bring up your flash to compensate for the dark subjects. Remember, the camera's built-in meter is completely worthless when it comes to flash. Well, when you are not in a TTL Mode. What is TTL? It stands for "Through The Lens" Metering. Basically the camera makes a best educated guess on what is a "Proper Exposure" based on a computer algorithm. Think of it like "Aperture Priority" or something similar. Sometimes it works, most of the times it doesn't. Usually when you use TTL, it just washes out the skies and tries to make everything evenly lit. Honestly? If you can learn Full Manual Flash you will have better results, regardless of camera body. What I would do is this. Before you start blowing thousands on gear, start with something straight-forward: Canon Speedlite 600EX II-RT 8-Pack of Panasonic Eneloop Pro AA Batteries Powerex MH-C801D 8-Cell Battery Charger Dot-Line AA Battery Case MagMod Starter Flash Kit Start there! Use the body that you have, you aren't going to buy your way out of this one. I shoot Weddings with a Nikon D4s, which in 2014 was Nikon's Flagship Camera Body. All you will do is produce crappy photos with a expensive camera body. Granted, a Canon 6D is a "Entry Level Full Frame" camera body, and I'd invest in a used 5D Mark III or pick up a Canon 5D Mark 4 and get a Canon 24-70 f/2.8L Version II Lens, but I'd still get the Canon 600EX II-RT Flash first. I have the Nikon equivalent (SB-5000/SB-910) and it has served me well. In addition, having a 5-in-1 or 6-in-1 reflector is handy, but you will need an assistant to use that effectively. Oh, if you are really interested in Off-Camera Flash that is portable, you might want to take a look at the Godox AD200Pro and a lightweight sand, with some sand-bags. Maybe throw in a 36" Umbrella or even go all out and get a Westcott Rapid Box Kit. Of course, you will need 2 600EX II-RT Flashes and a couple of transmitters/receivers. As you can see...this sh*t can get really expensive quickly. Just think, we haven't even talked about the EXPENSIVE stuff. I could recommend Profoto Lights at $2000 each, plus all the other accessories! Honestly? That can come later. Nothing beats having a good flash at your disposal. It's one of those things that everyone starts out with. Why a $500 flash? Portability and how it integrates with a Canon System. That flash is a good "Spring-Board" because in reality...the "Best Flash" is the one you are about to buy. When it comes to Flash Photography, it's like Camera Bags...you are always hunting for the "Best" one. Personally, I'm thinking about getting the MagMod Starter Flash Kit next. I've been shooting Weddings consistently for the last 7 years and I'm still on the hunt to be satisfied with reception shots. Remember, the more gear you have, the more you will get sucked into it and this will cause you not to pay attention to your clients/subjects. You can really Geek-out on this stuff and blow LOTS of money; seriously, I could blow $6500 on a set of Profoto Lights and a few stands, complete with Octas and transmitters, AND STILL NOT BE DONE. Hell, I could blow $10,000 and still not be happy. Flash Photography is a slippery slope. Wear your seat belt and keep your hands and feet in the car at all times. PS: The Golden Rule of Flash: Aperture Relates to DoF and Flash Power Used Shutter Speed (and ISO) relate to Ambient Light. You lose about 75% of the power each time you double the distance between your subject and flash. For example, 1 Foot >> 2 Foot, you lose about 75%-ish of the "umph" from the flash, then 4 Feet >> 8 Feet, 8 Feet >> 16 Feet, etc. This is the "Inverse Square Law" at play and the reason you have your flash from 4 Feet to 8 Feet away from your subjects. Think of when you are using a flash you are putting your subjects on the Bullseye of a really big Dart Board. Each Ring is so many feet away. As long as you keep your flash at the same distance, regardless of what side you put it from your subjects, the flash power does not change. Understand? Oh, WATCH THIS VIDEO, multiple times if you have to!! -
Brian: Question RE: Your PC recommendation(s)
Brian replied to LauraA's topic in The Windows & PC Hardware Forum
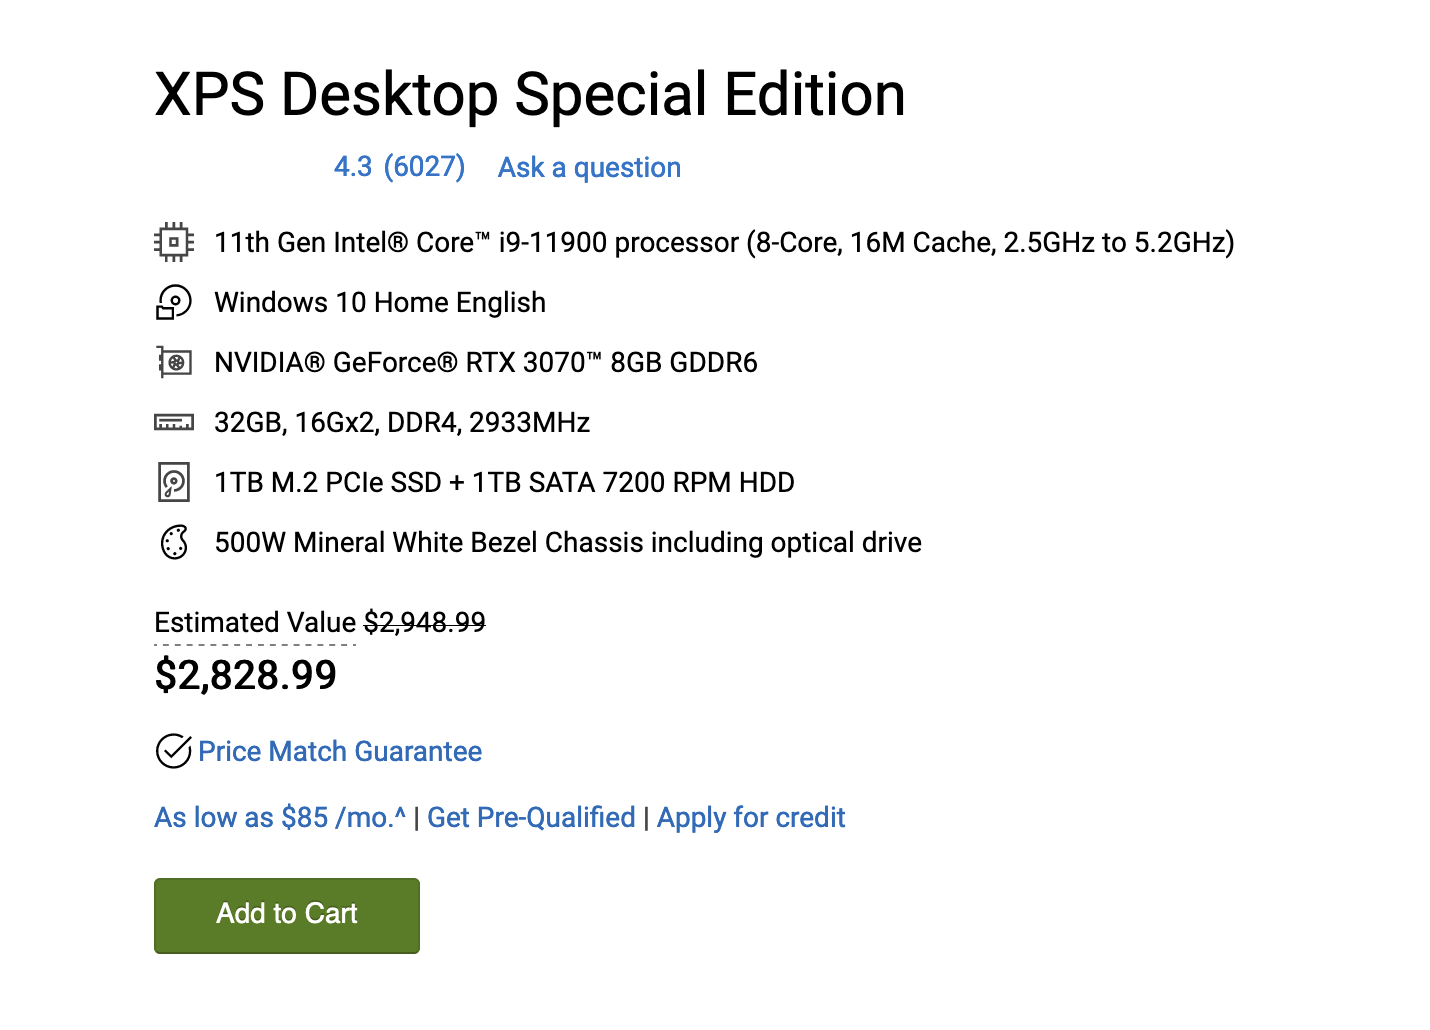
*SIGH* I hate laptops for Photo-Editing as much as Damien hates Adobe Lightroom. "Portability" my arse...inconsistent colors is what you are getting. Editing by the Pool, in the Living Room, at the Airport...SMDH. "But I LOVE THE PORTABILITY!!" BAH! HUMBUG!! Now that's out of the way, nothing has really changed. The prices are still high, well they are slightly less, but stuff is still hard to find and it remains the worst time to be in the market for a new computer. But I did configure a Dell XPS Special Edition and here is what it looks like: That configuration would have been $3000 a few months ago and about $1600-ish 2 years ago. The biggest thing about that whole configuration, the Video Card (aka the Graphics Card.) The NVIDIA GeForce RTX 3070 8GB is the one to get when it comes to Adobe Photoshop. Here is the link, not sure it will work for you: https://www.dell.com/en-us/shop/desktop-computers/xps-desktop-special-edition/spd/xps-8940-se-desktop/xd8940ser40h?view=configurations&configurationid=0bd84246-962a-453e-85b5-ef2418f95603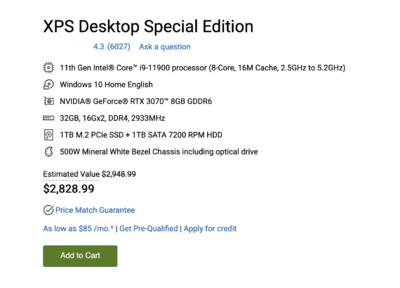
-
Cannot stop Bridge from automatically uploading
Brian replied to dptolemy's topic in The Macintosh User Group
Go to Bridge >> Preferences >> General Section and uncheck the box that says "When Camera Is Connected, Launch Adobe Photo Downloader." -
What kind of budget are we talking? How much space do you need? How large are your files typically? Or what camera body are you using?
-
External light source or new camera body?
Brian replied to laurenrdenson's topic in Photo Gear & Equipment
Can you show me some examples of what you are talking about? I have a few assumptions, but before I start recommending stuff, I'd like to know what you would like to over-come. No sense in me recommending thousands in gear when it won't solve your problem. Also, how mobile do you need to be? Are you frequently "Running & Gunning" or are in a more controlled situation? -
Back Button Focus is kinda like "Frequency Separation" with Photoshop. It is not the end-all-be-all technique that it's made out to be. Sometimes the situation calls for it, others it does not. I did let a co-worker of mine use my Nikon 70-200 who was using a Tamron lens. He was impressed on how the Nikon lens quickly locked on Focus and didn't "hunt." It focused every time. He agreed that "...there was a difference," but he couldn't afford spending $2000+ right now. Though the lens is now on his "Short-List," LOL!! I'm very good at spending other peoples money. That is also part of your problem. Camera focus systems use a "Contrast Swing" between lights and darks to lock on focus. So the less of this contrast swing, the harder it is for a camera to focus. Combine that with your Tamron lens, and you will have more issues like this. Also, set your camera to "Rear Curtain Sync" (or whatever it's called.) What this does is let more ambient light in and then fires the flash just before the shutter closes. This helps with movement and freezes things with your flash. Not all focus points are created equal. Especially when it comes to Canon Bodies. You want to read your manual, or look online for "Cross Point Sensors." Actually, skip that. I can answer that question for you...there is only ONE of these Focus Points with your 6D, and that's the center AF Point. All other AF points can be hit or miss and ONLY the Center AF Point will be the most consistent. Want more Cross Point Focus Points? Buy a better camera body. Remember, the 6D is a "Entry Level" full frame. If you are shooting professionally and find yourself in this situation often, start saving money and get a better camera body. Even a used 5D Mark III would be better than a 6D. You also need to learn Depth of Field and not use "f/2.8 all the things." I know you probably weren't at f/2.8 but I think you get what I mean. With Groups, f/4 would be the widest aperture that I go, but would probably recommend f/8 or even f/11. Of course, you'll need a better flash on top of your camera that has enough power to illuminate things .With groups, I tend to find a spot between the 1st and second row, stop down to f/5.6 or f/8 and take a few test shots. I zoom in on the eyes to see who is in focus and then adjust my Aperture from there. Chances are I will also be increasing my ISO as I stop down. Oh if you are using a TTL method with your flash, no matter what Shutter Speed and Aperture that you use, the Flash will automatically compensate. So if you want more Ambient Light in, you will need to slow down your shutter speed, set your flash to manual and adjust the power that you need to illuminate your subjects. Shutter Speed (and ISO) = Control Ambient Light Aperture Value = DoF and Flash Power Used. Sometimes you need to be on a "Continuous" Focus Method, especially if you have shaky hands. I'd learn ALL of the focus modes with your camera and know which one to use for a particular situation. #knowyourgear
-
Great! You have Catalina!! Stay there. This program that I'm going to recommend DOES NOT WORK WITH BIG SUR and you will have to pay the $27.95 to get the scheduler running. SuperDuper! for Mac. That program will do what you are asking, dump one HD to another at a specific time. If you are looking for more of a hardware based solution, then we can talk about a RAID1 setup, which automatically syncs two hard drives together. If one HD fails, you can use the other, replace the failed drive and rebuild it and you have two mirrored hds again. Keep in mind, you have to pay a premium for this type of hardware.
-
Before I start recommending stuff, what version of the MacOS are you running?
-
Without an example to see, couldn't tell you what happened. Sometimes, Tamron Lenses just do this. They will be fine and all of a sudden, boom! they don't focus on anything. Then magically start working 10 minutes or so later. It's no secret that I'm a Nikon OEM Snob, and in your case (if it was me,) I'd be a Canon OEM Snob. I don't like Tamron lenses. Or Sigma. Chances are, your Tamron lens might need to be adjusted by Tamron. Not sure how much that will cost and how COVID-19 would come into play for repairs. Since it's f/5.6, you might have needed to be at f/8 or f/11, depending on how close you were to the subjects, and how "deep" they were to you. Again if it didn't focus on anything, this isn't a DoF problem, but a lens problem. The only other thing I can think of is that somehow your camera got switched to manual focus, but I'm not thinking this is the case. Of course, you'd be the one to know this. What would I buy if it was me? One of these lenses: Canon EF 24-70mm f/2.8L II USM Lens or even this lens: Canon EF 24-105mm f/4L IS II USM Lens. Yes, there is a difference between a Canon OEM and a Tamron. I know people will flat-out refuse to hear my opinion, and that's fine. Yes, I know the OEM stuff is way more expensive. I have the receipts to prove it. Unfortunately, it's 2021 and there is a chip shortage, amongst other things and we are still dealing with COVID-19. To complicate matters, both Nikon and Canon are Mirrorless Happy and are phasing out their DSLR camera bodies and lens line-ups. Everything seems to be out of stock or on back-order, at least as far as buying new is concerned. They have been bleeding money the last few years as DSLR sales have slowed and the interest in Mirrorless has changed their focus on what they are releasing next. I guess at this point, keep an eye on the lens. If you are shooting professionally, as in charging people money for your services and you NEED to ensure you gear works every time, start saving or look to purchase used gear, just in case. If you do get a Canon 24-70, make sure it's the Version II of the lens. DO NOT BUY THE VERSION I of the Canon 24-70 f/2.8!! That lens was junk and very unpredictable. Canon decided to rebuild the lens from the ground up with the Version II and that lens has been a clear winner all this time.
-
Since I shoot with a D850 and D4s, my Photo Shooting Menu is a little different than yours. So I found this list and will make tweaks to it, those will be in bold: Storage folder: default, don’t change File naming: DSC (default), don’t change Role played by card in Slot 2: Overflow (Or this could be set to Backup, if you are photographing something important.) Image quality: NEF (RAW) (I also set this to JPEG, and then change it to "JPEG Fine." Then I set it back to RAW. This way if something gets bumped and I'm shooting in JPEG accidentally, I still have the best quality JPEG that the camera can provide.) Image size: grayed out Image area Choose image area: FX Auto DX crop: ON JPEG compression: Optimal quality NEF (RAW) recording: Type: Lossless compressed NEF (RAW) bit depth: 12-bit (I use 14 bit where I know I'm going to be in weird lighting conditions in where I'm seriously going to be recovering stuff in ACR. For the other 99% of my images, 12-bit Uncompressed is what I use. Unfortunately, that's not an option on your camera.) White balance: AUTO (AUTO1 Normal) Set Picture Control: Neutral, I also set my Sharpening to +5. (I don't know why, it doesn't make sense, but I picked up this tip from Moose Peterson, who picked up the tip from Nikon's Engineers. Not only does it make your JPEG images sharper on the LCD, it somehow helps the Raw files. Of course, this isn't dramatic, but I will take any extra sharpness I can squeeze out. ) Manage Picture Control: — Color space: sRGB Active D-Lighting: OFF HDR (high dynamic range): OFF (grayed out) Vignette control: OFF Auto distortion control: OFF Long Exposure NR: OFF High ISO NR: OFF ISO sensitivity settings ISO sensitivity: 100 Auto ISO sensitivity control: ON Maximum sensitivity: 3200 (You can set this to 6400, this is a personal choice.) Minimum shutter speed: Auto -> Middle of the scale Remote control mode: 2s Multiple exposure: OFF Interval timer shooting: OFF You probably set it to portrait because on the surface, it looks like a setting you should use if you primarily photograph portraits. Honestly? It needs to be set to Neutral if you shoot Raw. Again, as my note states above, I adjust the "Sharpening to +5," no more, no less and then save this as a "Custom" Preset. I usually name it Neutral +5, or something along those lines. To figure out how to do this, look at Page 170 in the Nikon D750 User's Manual. In case you are wondering under the Custom Setting Menu, I set both AF-C Priority Selection and AF-S Priority Selection both to FOCUS Priority. For my style of shooting, I'm usually in AF-C, Continuous Focus 99.9999% of the time. I want the camera to lock on the image and ensure it's sharp. Even if I miss a shot, in which this is rare, it won't do me a damn bit of good if I get the shot and it's out of focus. Understand? Here is the Custom Setting Menu: Autofocus AF-C priority selection: FOCUS AF-S priority selection: FOCUS Focus tracking with lock-on: AF 3 (Normal) Focus point illumination Manual focus mode: ON Dynamic-area AF display: ON Group-area AF illumination: First option AF point illumination: Auto Focus point wrap-around: ON Number of focus points: AF51 Store points by orientation: ON Built-in AF-assist illuminator: OFF (This setting only works if you are in AF-S. It turns on the little LED if it's too dark for the camera to focus. It does not work in AF-C Mode, so you might want to leave this on if you use AF-S a lot. Again, it's a personal thing.) Metering/exposure ISO sensitivity step value: 1/3 EV steps for exposure cntrl: 1/3 Ex./flash comp. step value: 1/3 Easy exposure compensation: OFF Matrix metering: Face detection on Center-weighted area: 10mm Fine-tune optimal exposure: — Timers/AE lock Shutter-release button AE-L: OFF Standby timer: 6s Self-timer Self-timer delay: 5s Number of shots: 1 Interval between shots: 0.5s Monitor off delay: 10s, 1m, 10s, 4s, 10m Remote on duration (ML-L3): 1m Shooting/display Beep Volume: OFF Pitch: Low Continuous low-speed: 4 fps Max. continuous release: 100 Exposure delay mode: OFF Flash warning: OFF File number sequence: ON Viewfinder grid display: OFF Easy ISO: ON Information display: AUTO LCD illumination: OFF MB-D16 battery type: LR6 Battery order: MB-D16 Bracketing/flash Flash sync speed: 1/250 (Non FP / 1/250th with No Asterisk) Flash shutter speed: 1/60 Flash cntrl for built-in flash: TTL Exposure comp. for flash: Entire frame Modeling flash: ON Auto bracketing set: AE & flash Bracketing order: MTR > Under > over Controls OK button Shooting mode: RESET Playback mode: Zoom on/off -> 1:1 (100%) Live view: RESET Assign Fn button: Access top item in MY MENU (Then I would add ISO under "My Menu" and make it the top item. This way you can change your ISO easily without digging in the menus. Man, I'm so used to shooting with Pro-Gear, not having an external ISO button really bugs me.) Assign preview button: Preview Assign AE-L/AF-L button: AE-L / AF-L button press: AE/AF lock Customize command dials: All default Release button to use dial: OFF Slot empty release lock: LOCK Reverse indicators: – 0 + Assign movie record button: ISO sensitivity Assign MB-D16 AE-L/AF-L button: AE/AF lock Assign remote (WR) Fn button: OFF Movie Assign Fn button: OFF Assign preview button: Index marking Assign AE-L/AF-L button: AE/AF lock Assign shutter button: Take photos
-
For these 8 people, what Aperture were you set to? Let’s start there. Can you post some examples?
-
In a few years, probably sometime in 2025 or so...my tune will probably change. Software will support the new chip better and there is less chance with incompatibility issues. I don't like being an early adopter, even though it is temping. Things are starting to get a little better, I just saw that Parallels now supports the M1 chip and is Windows 11 compatible, though I'm sure there are still bugs to work out. For me, it's just not worth the hassle with being the one with the brand-new hardware. Let others be the Guinea Pigs. Photoshop CC 2021 still has weird quirks and isn't 100% stable. We still get posts from members who are having weird issues; then they load up an older version of Photoshop and things work just fine.
-
The Graphics Card / Video Card. Believe it or not, that is more important than the CPU speed with the current versions of Photoshop. You want to have a NVIDIA Card with 8GB or 16GB of dedicated Video Memory. The NVIDIA GeForce RTX 3070 with 8GB of Video Memory is one of the cards that Photoshop loves to work with. Good luck finding one. Even more luck finding one that is less than $1500. COVID19 / Chip Shortage had really drove up prices. The reason that Photoshop needs to have a beefy video card is due to the fancy tools that are in today's Photoshop. Things like Content Aware, Liquefy, Lens Corrections, things like that...all of them primarily use the GPU and Video Memory. Which is why you want at least 8GB going forward. Also, things like Topaz Software also can be told to use the Video GPU and there is a noticeable difference in terms of performance with those software packages. For today's PC: i7 or i9 CPU 32GB RAM (Minimum) 64GB (Preferred) - This is especially true if you have or are thinking about getting a High Mega-Pixel Camera, such as a Nikon D850. 100MB Raw files can be a bit of a hassle with 32GB or less RAM. 1TB Main HD / Boot HD. If it's m.2 or SSD, doesn't matter, you want at least 1TB. Of course, you could get a 2TB model, but that drives up the cost. Power Supply to support not only the components / motherboard, but the video card. If you do get a NVIDIA 3070 or something faster, you will need a P/S to power it. 850 Watts is a good number to shoot for, though you may get away with a little less, like 700 Watts.
-
Regardless if it's a Mini or not. A M1 or M2 chip is still a M1 or M2. It's your money, if you have your heart set on the 24" M1 or whatever, so be it. Personally I wouldn't buy one right now. Again, if you do...MAX OUT THAT SUCKER. I personally would purchase a tricked out 27" Intel-based iMac if I had the money (and need) to buy a new Mac right now.