Brian
-
Posts
4,137 -
Joined
-
Last visited
-
Days Won
55
Everything posted by Brian
-
Let's visit this when you come back. Drop me a note when you do. This problem does not have a single answer and might take a few attempts to push it along.
-
"Quick and Dirty" things to look for: IPS Display Panel Type sRGB Coverage in the 90% Range (anything 95% or above is perfect) Matte Display or Anti-Glare Coatings HDMI or DisplayPort Connections 24" or 27" (Non-4K) is fine for Photo-Editing Just look in the technical specifications. IPS Display Panels ensure that colors, contrast, sharpness are consistent from edge-to-edge. They also have a better viewing angle, usually around 170º. The IPS Display Panels cost the manufacturers more money, so they will mention it in either the description or tech specs. If it doesn't have a IPS Display Panel, move onto the next screen.
-
Like with anything technology rated in 2021-2022, things are usually out of stock rather quickly. Just a short week ago, these displays were cheaper and in stock. Now there's only 1 left and it's $400-$500. So you will have to keep an eye out for a deal. Monitors that should be $300-ish (US Dollars) are now going for around $500+.
-
Here is a comment I recently made in another thread: A single Dell Ultrasharp IPS monitor is fine. You don't need a 4K fancy Display. A simple single 27" IPS Display with 2560x1440 resolution is perfect for photo editing. There are many different models out there, just make sure the display is IPS (In-Plane Switching) based. Here are some from a quick search. As with any technological-based product in 2021, the prices are a bit higher than they were a year or so ago. But you should be able to find something for $500 or less. https://www.amazon.com/Dell-U2717D-UltraSharp-InfinityEdge-Widescreen/dp/B01D402Z28/ref=sr_1_4?dchild=1&keywords=dell+ultrasharp+ips+27"&qid=1633031182&sr=8-4 https://www.amazon.com/Dell-Ultra-Thin-FreeSync-DisplayPorts-Certified/dp/B091955LC7/ref=dp_fod_1?pd_rd_i=B091955LC7&th=1 But whatever you do, AVOID THE CURVED DISPLAYS.
-
That one should work just fine. It's IPS and anti-glare. Just be sure to use the HDMI port on the display! DO NOT USE THE VGA PORT! Enjoy your purchase.
- 1 reply
-
- 1
-

-
It seems that Adobe Bridge does not like the current MacOS Big Sur update, version 11.6. This isn't Windows; unfortunately you can't just get a video driver, it's part of the entire MacOS. You are stuck until Adobe fixes this or Apple releases Big Sur 11.7. You might want to call Adobe on this one.
- 1 reply
-
- 1
-

-
Need more info. What size? Budget? I'm also going to move this into the Windows Hardware Forum.
-

MacbookPro - Nuisance Side Pop-up
Brian replied to Taniaharrisxx's topic in The Macintosh User Group
What was the fix? -
Issues downloading from Nikon bridge camera
Brian replied to LAND's topic in The Macintosh User Group
I'd stay with Catalina if you can. That's what I use and have no desire to upgrade. -
Issues downloading from Nikon bridge camera
Brian replied to LAND's topic in The Macintosh User Group
Yes. It also could be a "Fancier" SD Card that your 2015 iMac can't handle is what is really causing the issue. Is the OS older on the 2015 iMac? Also, SD readers do wear out and getting an external card reader is A LOT cheaper than spending $1000 or more to replace the Motherboard. Of course, if the internal SD reader is truly bad. A current card reader should be about $35 or so, give or take a few bucks. -
Issues downloading from Nikon bridge camera
Brian replied to LAND's topic in The Macintosh User Group
No. The MacOS will not read those files natively. NRW files are the ones CoolPix Cameras create, and I think ACR does support / read them, but only the latest versions. So if you are using Photoshop CS6, you will need to use the DNG Converter. Or you should be able to open them in Bridge / LR. It's just if you want to view them in the MacOS' Finder...that's not going to happen. Best case scenario is to use Nikon's Free Viewer Program, ViewNX-i. I did find this program, NRW Viewer for Mac and it looks like the program is around $25 or so (US Dollars.) I also found this program, File Viewer Plus 4, which seems to be $49.99. The NRW format is kinda rare, and limited to a small line of Nikon Bodies. Even mainstream programs like RawRightAway and Photo Mechanic 6 do not support .NRW files. Please note, I have NEVER used any of these programs except Nikon's ViewNX-i. So I have no idea if these programs are legit or not. Edit: Since you are viewing them in Bridge, I'd save your money, copy the files using a card reader to a folder on your HD. Then view them in Bridge to organize them. Basically, keep doing what you are doing. -
I’ve never used the G-Utilities and have always opted to use the default utilities built into the Mac OS. I’d move them to your G-Drive or if they are a program that is installed, remove it from your Applications folder. Sorry I’m drawing a blank here, it’s been so long since I’ve thought about the G Utilities Folder. Aliases, since they aren’t doing anything, can you move them to the Trash and delete them?
-
I’m moving this post to the Macintosh User Group. Which iMac do you currently own?
-
Yeah, the MP thing is just a way to get people to buy new gear. Honestly, 20-24MP is fine for really anybody, and that gives you enough wiggle-room to crop. At 12MP, you could print a 4 foot by 6 foot print with no problems. It just has to be sharpened correctly. (See Damien’s Sharpening Class). As much as I would like a 180-400 f/4, I can’t say I would be using it that much. I’m doing more traveling these last few years and honestly? My 24-70 is used the most. Even my 70-200 sits most days.
-
NO! UV Filters were meant for B&W FILM!!! Honestly? They are a huge profit-maker for the reseller, a pure up-sell. "Protection" my ass. If you drop a lens or smack into something, you wanna know what breaks? It isn't the front lens element. Oh no...it is the damn auto-focusing system / vibration reduction module built into the lens...THAT is what breaks! Now of course, if you are shooting with a consumer-grade 18-55 kit lens, you could bend the screw thread mounting ring if you smack into something hard, but we are talking about cheap plastic lenses. Chances are the font lens element will be fine, even on a 18-55 lens. (Watch until the end). Oh, watch this Video: Steve Perry does an excellent job of really torturing a filter. I have personally dropped a 70-300VR lens, that I owned for a total of 3 days onto concrete...it just fell out of my bag because I didn't zip it all the way. After freaking out, I then mounted the lens, and the front lens element was perfectly fine, but the VR Motor was completely shot and it wouldn't focus properly. $450 later it was "fixed" but not with new components. So my brand-new $600 lens turned into a used $1050 lens. I was not happy. UV Filters are flimsy and are easily broken. So it's very easy to show people how valiantly the UV Filter sacrificed itself for the benefit of your $3000 lens. Bullshit. If you want to "Protect" your lens...use your Lens Hood! I could go on ranting, and I can say this, if you are shooting in an environment that is throwing mud and stone at you and hitting your lens, I'd say a UV filter will help you in the sense that you can pop off one, put on a fresh one and keep shooting while your assistant cleans the dirty filter. Other than that, the IQ hit and the weird flares you get, along with potential focusing issues...leave the damn UV filters off. Again, use your Lens Hood. Both indoors and outdoors. Yep. I'm holding off for now with going Mirrorless. In reality, you need the true Mirrorless Lenses to go with the Mirrorless bodies to take full advantage of the Mirrorless System's features. Don't think for a second by using the FTZ Adapter that you will get awesome results. It just makes the lens compatible or just usable in a sense. For the most part, the FTZ adapter works fine for the majority. Sometimes it doesn't, especially for the situations that you are shooting in. I'm very curious about the new Z9 body, that is supposed to be the combination of a D6 and D850. Once the Pro-Grade stuff comes out, eventually it works its way down to the consumer products, just like it always has. Just think, a D3500 probably shoots circles around a old Nikon D1 or D2H. That is the way of technology; right now Mirrorless is for the Measurebators to foam / drool over or get into flaming wars on the internet. I'm done chasing gear. I have all the fancy lenses. I shoot with a D4s and D850. Have the Nikon Trinity, blah-blah-blah...plus a bunch of other crap that I don't need. You know what? I still take crappy photos from time to time...only with really expensive gear. The most important part of a camera is the area that occupies the 12" of cubed space behind the viewfinder!!! Now I will say, the pro-grade stuff does make things A LOT easier to obtain the shot and not be forced to dig into the menus, and I will never go back to the consumer-grade stuff; it feels like a Cheap Plastic Toy when I do. Back in the film days, the rule-of-thumb was your Shutter Speed needed to match your focal length, or somewhere close to it. For example, 50mm was at least 1/60th of a second or faster. 200mm was 1/250th, 300mm was 1/320th, etc. etc. The more MP you go, the higher the SS needs to be, especially on a D850. It's almost 4 over the focal length. Birds in flight? 1/1600th at least, maybe 1/1000th in good light. That's easy. Just set the record button on top to toggle between FX / DX. Limit it to just FX & DX and don't bother with the 5:4 mode, or 1.2 mode. When you press and hold the record button and rotate the rear command dial, it goes back and forth between FX & DX Modes. That's how I have my D850 setup. Steve Perry is a great resource and has a whole article for this very subject. Now he assigned is DoF Preview Button to toggle FX / DX Modes, I set my record button, (bottom left of the screen) since I don't do a lot of video. Explore the Controls Menu F1 Section. You must be using Lossless Compressed mode and a "Medium" Resolution. My files are uncompressed and are around 99MB or so. In reality...you wanna know how many MP do you truly need? Anywhere between 10MP - 12MP. THAT'S IT!! In that range, you can print ANY size your heart desires. So if you do some serious cropping, try not to go below 12MP to be on the safe side. Seriously, the rest is just Marketing trying to get you to buy new equipment. Just think, a Nikon D6 camera, the current Flagship Body is only 20.8 MP!!! Any higher is just bragging rights for people to get into arguments with each other online. Thanks for the Follow! I won't judge. You are just looking at my Vacation Photos and the ones that go into my Wife's Annual Photo Album for Christmas each year.
-
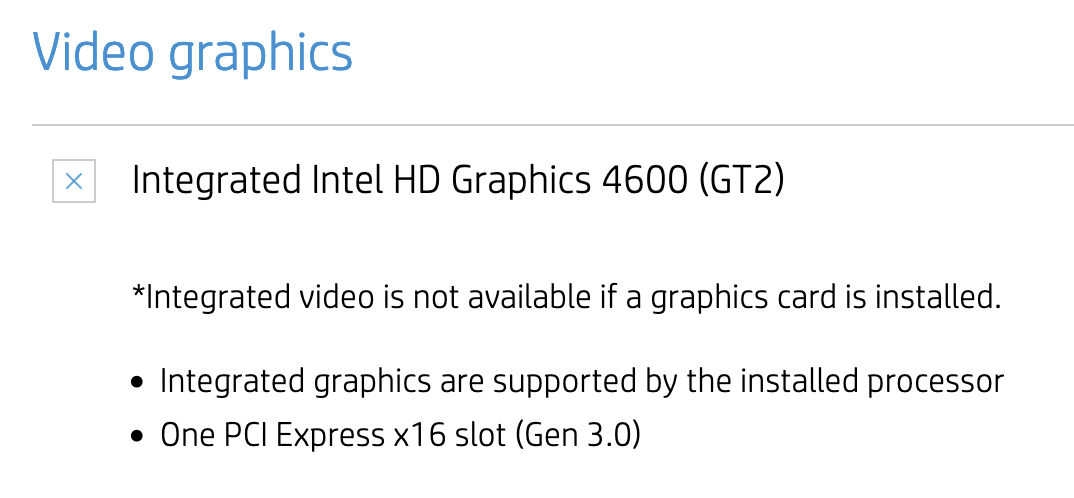
OK. It looks like your computer has two slots and you will have to replace the 4GB. Will that give you a huge performance boost? No. BUT! It will help and for $42...that's a lot cheaper than forking out the money for a new computer right now. As I mentioned above, you can upgrade the main HD to a 2TB SSD Drive and have a computer shop transfer the data for you. That should cost about $100-$150. I found your computer specifications. Take a look. Remember how I said the current versions of Photoshop CC are utilizing a video card that has it's own dedicated GPU and dedicated Video Memory, and to NOT get a computer that has "Integrated Video?" Here is a screen shot: See where it says, "Integrated graphics are supported by the installed processor." That means your computer's CPU (the Intel i5) is doing the Video Processing in addition to all of the other things, and the video card is using a portion of the RAM in order to work. So you really don't have the full 12GB of RAM to play with. When it comes to the current versions of Photoshop, your computer can't simply keep up. Understand? This is why I'm recommending you purchase a new computer and besides the RAM upgrade and SSD replacement, there isn't a whole lot you can do. I know, it sucks. But I really don't want you throwing money into a machine that's 10 years old. Sure, $42 bucks for a RAM upgrade is reasonable. Hell, that's Dinner out at some places. The SSD Drive...you can uninstall that and put it into a new computer so you aren't throwing your money away. But if you did upgrade the video card, you would have to upgrade the power supply, and those HPs take custom made power-supplies, so if you went out and bought one, chances are it won't fit inside the case. Now do you see what I'm recommending a new computer? LOL!! I'm trying to save you aggravation and headaches. Life is too short. It just sucks to be in the market right now.

-
A single Dell Ultrasharp IPS monitor is fine. You don't need a 4K fancy Display. A simple single 27" IPS Display with 2560x1440 resolution is perfect for photo editing. There are many different models out there, just make sure the display is IPS (In-Plane Switching) based. Here are some from a quick search. As with any technological-based product in 2021, the prices are a bit higher than they were a year or so ago. But you should be able to find something for $500 or less. https://www.amazon.com/Dell-U2717D-UltraSharp-InfinityEdge-Widescreen/dp/B01D402Z28/ref=sr_1_4?dchild=1&keywords=dell+ultrasharp+ips+27"&qid=1633031182&sr=8-4 https://www.amazon.com/Dell-Ultra-Thin-FreeSync-DisplayPorts-Certified/dp/B091955LC7/ref=dp_fod_1?pd_rd_i=B091955LC7&th=1 But whatever you do, AVOID THE CURVED DISPLAYS.
-
The simple answer is this: No. The long answer is: I've seen people try to upload all of their data into iCloud Folders and then try to create aliases from these folders. Often, they will try to put these Aliases on the Desktop, but the problem is, it will not sync the way you think it does. Aliases have been around since 1984, and in reality if you want to setup Aliases, you need to create them from the local iCloud Folders stored on your HD. That's right, you can not treat / think your iCloud as an External HD, it's a "Cloud" Service. When you upload images to iCloud, it also stores a file locally on your computer and keeps tabs on that folder. Any changes that happen and it will sync. So this is probably why iCloud is freaking out and asking you if you want to delete photos off of iCloud, since those same files are also stored on your computer and are being moved. Make sense? iCloud is just a "Save Game" feature in case if something goes horribly wrong. It isn't "Storage," not in the traditional sense. You might have to turn off Syncing with these folders first, before you start moving things. If you haven't already, get an External Hard Drive and MOVE ALL OF THAT CRAP OFF OF YOUR DESKTOP. I see "Weddings" and Soccer Photos, Headshots and the like. Remember, as far as the MacOS is concerned, EACH OF THOSE FILES YOU ARE STORING ON THE DESKTOP ARE CONSIDERED TO BE "OPEN WINDOWS." (For lack of a better term.) So if you have 1000 photos and .psd files from the Smith-Jones Wedding and 3000 photos from the Soccer Tournament, all of those images are being treated as being "Open," even if you aren't using them and they are just sitting on the desktop. This is why your Mac seems so "Slow." I'd forget about Aliases now. That's the last step. Let's get your data in its new home first and tell iCloud to shut up. (Disable Automatic Syncing.)
-
One more thing: Try to close Lightroom and just use Photoshop. With 12GB of RAM, that's not enough for both programs to run at once in 2021. You might also want to try and create a new Catalog file or dump LR altogether and use Bridge / ACR. Of course, doing this will kill all of your edits and organizational things in LR, but it will make it faster. But first, let's see if we can increase the RAM. What Make/Model is your computer exactly?
-
Chances are you have multiple things going on here. First off, you are correct, 12GB RAM isn't enough by today's standards. 16GB is the bare minimum and in reality, I'd recommend something along the lines of 32GB. Also, your choice of camera body plays a role in your computer's performance. How so? The more MegaPixels you have, the larger the Raw files. So if you have upgraded your camera withing the last 10 years, the resources that are required for said camera have also increased and you are using the same computer. This is the same reason that I have 64GB in my fancy iMac computer; when I purchased my D850 and it's 45.1MP, my Raw images went from 27MB to around 100MB each. So if I wanted to load more than one image at a time to edit, my computer came to a screening halt. So my point is, you need to look at your entire Eco-system as a whole to pick the right computer for your needs. Oh, one more thing, each time you duplicate a pixel layer in Photoshop, like the background layer, YOUR FILE SIZE DOUBLES. This is especially true if you are using store-bought PS Actions that Duplicate and Flatten A LOT. It's very possible your editing habits are killing your computer's performance. The next thing that we need to look at, is your choice of Video Card. With today's Photoshop, it relies on the Graphics Processing Unit and Dedicated Video Memory for a performance boost. If you have an integrated video card that utilizes the RAM for it to work, chances are Photoshop will start to complain that it doesn't like your card, or will flat-out not work at all. Especially if you are using the current versions of Photoshop CC. If you do not have a beefy video card, both Lightroom and Photoshop will slow to a crawl, and some tools like liquify may not work at all. Third, your Hard Drive has a few things going on. Sure, it's great that you have freed up some space, but Windows tends to get bloated over time and slows down. Also if you are one of those folks who never runs Windows Update and installs patches because, "...each time I run Windows Update, it screws my computer up, so I never update." If your Windows gets too out of date it will also come to a screeching halt in terms of performance until you run Windows updates. I have no idea of the reason why, it's just something that I've discovered over the years and is the first thing I check with a customer's PC that is working "Too Slow." Now, we still aren't done with the Hard Drive. I'd also turn off Windows Search. Even though those instructions were meant for Windows 7, the steps are nearly identical and you should be able to muddle through. That should help with the speed a little, but we aren't out of the woods yet... Unfortunately, you have your answer right here: There is no way around it. If you are looking for performance, you need a new computer. It's just too old by today's standards and the software is out-performing the hardware. Honestly, you are right on schedule. Every 3 years the latest-and-greatest thing hits the shelves. Phrases like "Game Changer" and "Ultimate" get thrown around a lot, along with other BS Marketing Terms. Every 5 years something like a HD, RAM or even a Video Card is upgraded (along with a power supply to support the new video card). This gives the Computer a temporary performance boost. Every 7-8 years, Software overtakes the Hardware and the computers become "Too Slow." Then the process begins shopping for a new computer. The Cycle Repeats. So at 10 years...yep, you are due for a new computer. The sucky part is...it's 2021 and now is THE WORST TIME TO BE IN THE MARKET FOR A NEW COMPUTER. Prices are triple and quadruple to what they should be and you are looking at spending around $3000 for a computer "That's good for Photo Editing." (...and that's for a Stinkin' Dell Computer!! Not a Custom-Built Gaming Rig. A Stinkin' Dell!! Three Grand!! SMDH.) Why? it goes back to the video card. With the chip shortage and people using fast video cards to mine Bitcoin, prices are skyrocketing. A $500 Super Fast Card is now selling between $1500 - $2000 all by itself. It's insane. What does Photoshop CC need to work well? A fancy Video Card. Now we have Windows 11 on the horizon, which will require even more resources than you think you will need. Windows 10 is being "Put out to Pasture" in 2025. Well, in 2025 it's going to be taken behind the Proverbial Barn and shot dead. Just like Windows XP. Just like Windows 7. So unless you buy a current super-fast i7 or an overpriced i9 CPU, you will more than likely be purchasing a new computer in the next 4-5 years. Now even more bad news. You can't take the RAM out of your existing Computer and put it in another one. It won't work. You could try and find how much RAM your computer can be maxed out to and we can see if we can get you to 32GB of RAM, that would help, but in the end, you still need a new computer. Clearing out files and such, that only works for a computer that is just a few years old, not one that is 10+ years old. Another possibility is to upgrade the HD to a SSD Model from a traditional spinning platter HD, which is what you have. We also have to figure out who to take your computer to that will clone the HD (transfer the data on the HD from the old to the new.) Even though you have 369GB free...no you don't. You see, both Windows and Photoshop have their "Scratch Disks." Windows calls their cache area the "Windows Swap File" or "Pagefile.sys." Photoshop has the Scratch Disk that gets full at the worst possible time. Each of these areas are competing for resources, usually at the same time. So you think you have 369GB free, but in reality...it's much less. Try clearing out even more files and maybe even un-install programs that are just sitting your HD taking up room. I'd shoot to have 600GB free if it were my computer.
-
Speaking of filters... Here is one photo with both my Circular Polarizer, ND filter and Graduated ND Filters Mounted. It's also about 6 or so shots combined because I had a huge dynamic range swing (about a 6 stop difference) between the Darks and the Lights. Of course, I was mounted on a Tripod: https://www.instagram.com/p/BpNyb0_guOf/?utm_source=ig_web_copy_link (This is a screen shot, do not judge color/quality. Just visit my IG for the original photo.)
-
Oh, I totally get the whole, "36 tries to get it right." I started with film as well, back in the 1980's. Hell, I shot my 1st Wedding at 19 with film, and a split prism (manual focus.) It was a Minolta X-370. Still have that camera. It's a very valid question. Out of all the filters in use today, there is only one that Photoshop can not duplicate: The Circular Polarizer. Everything else can be mimicked. That said, getting things right in camera is still the best way. Especially if you want to have a really slow shutter speed; you can take a 30 second exposure, or spend 30 or more minutes in Photoshop dorking around with a photo, only to have mixed results. I have a love-affair with my CP and chances are if you see water or if I'm shooting landscapes in crappy light, I'm probably using my CP. Which one do I use? I'm so glad you were about to ask... Nikon Circular Polarizer II Filter - 77mm Of course, like with everything else, it's out of stock currently. I also like B+W Filters. I do have a Neutral Density Filter, both a Negative 2 Stop and Negative 3 Stop Filter. I've also toyed around with the idea of getting a Variable ND filter, but have yet to pull the trigger. I'm still thinking about ND filters and maybe get into a Cokin Square Filter System, especially since I have a 14-24mm f/2.8. (No screw-in mounts with that lens.) But I have other things to buy first. I have really stopped chasing gear, the next level for me are $10,000+ lenses. I really would like a 180-400mm f/4. Well, hit me up for more Gear Talk at any time, I welcome it since "Crickets Chirp" here in Ask Brian on most days.
-
So let's start with this: Where are the original folders? Can you post a screenshot of your desktop? Are these folders on the Cloud? I'm wondering if iCloud is complaining because you moved stuff. I'm thinking the answer is "Move" in this case. You might want to post a screenshot of your iCloud folder here in this thread.
-
Hey, when I read this: All I can think of is this: Yes, Eizos are nice displays, but honestly? Complete over-kill. Damien has written a few articles on this subject. Take a look at Buying a Wide Gamut Screen. If you do go the Eizo route, I'd get it with the Eizo Calibration Tool and calibrate it weekly. Honestly if it were me, I'd buy the Dual Dell Displays and a Spyder X Elite Calibration Tool for around the same cost as the Eizo. Now, keep in mind, you will never get two monitors, even the same make/model, to match 100%. The best you can hope for is something close. So even if you get two monitors, get one of the displays matching your set of physical test prints to edit off of, and use the other display for everything else.
-
Here's a dirty little secret with Crop Bodies using FX lenses...since the DX Sensor is physically smaller than a Full Frame (FX), the sensor only utilizes the center-most portion of the lens, which is the BEST part of the lens. This is why Crop Shooters can get a DX Body and a 50mm f/1.8 lens and become a "Professional Photographer" in less than a weekend. FX bodies are less forgiving since they use the entire lens and you will see flaws in your lenses, usually around the sides / corners. It's not. Try it. Also, explore DX Mode with your D850. The reason I mention this, is the D850 uses the same focusing system as the D5, though the D5 "thinks" faster. Try both; it's digital, you can afford to experiment. There is a reason that a Nikon D500 is a great camera for what you shoot with and the D7200 isn't that much different in the grand scheme of things. (Minus build quality, focusing systems, etc.) That reason is the MPs around the center of the sensor, it just produces better results. Honesty? I'd flip to Crop Mode which is a 1.5 multiplier, similar to your 1.4TC AND you don't suffer the 1-stop of light loss. The only downside is you will see the edges in the viewfinder darken, so it throws you a little when looking in the viewfinder. Yes, Damien and I are brutally honest. It's not that we are Big Meanies, it's that there is so much Bullshit advice out on the internet, we don't want to waste time, yours or ours. We want you to succeed and have simplified workflows. Honestly, we are like those teachers in High School that everyone hated; the ones who make their students sweat a little and WORK for their grade. They may not like us, but dammit...you will learn something. Truth be told, I'd love to have a 180-400 f/4, but I don't have that kinda cash. I've never heard of the Nikon 300-500 lens, do you mean the 200-500? Yes, definitely experiment with D9 and VR off. Especially in good light and fast shutter speeds, 1/1000th or faster. Yes, Professional Grade f/2.8 Glass is f/2.8 Glass. There is a difference. Not only in build quality, but image quality as well. The downside is, people won't believe you and argue that their 3rd party lens is "Just as good as..." No, it's not. It just isn't...but what can you do? There is only one way to accomplish this: YOU NEED TO LEARN YOUR GEAR. Eat. Sleep. Breathe. with one lens and one lens only. Shoot everything and everything. Learn what the lens will do and won't do. Then mount a 1.4TC, rinse and repeat. Canon produced a funny advertisement some years ago, but this illustrates what I'm talking about: You want to get to the point of creating an image in your mind, then automatically reaching into your bag, WITHOUT THINKING, in what lens/TC Combo (or just lens) to produce that photograph. Sorry, there is no easy way or quick YouTube Video. You must practice, you NEED to fiddle. Then pixel-peep. It's very much like ear-training and learning to play a musical instrument. Photography deals with light photons instead of sound waves, but they are very similar in the Grand Scheme of Things.