Brian
-
Posts
4,137 -
Joined
-
Last visited
-
Days Won
55
Everything posted by Brian
-
Correct. Because you have this, you are basically stuck with a 24" Display 1920 x 1080. Just make sure it's IPS based and has a HDMI port. Remember, technology-wise, it's 2012 for you. 4K was just beginning in that era. In reality, you need a new computer.
-
Yep. Let me know when it arrives. Partitioning and Formatting takes about 5 minutes and is very easy to do.
-

Hear question concerning megapixels
Brian replied to Michelle Gifford's topic in Photo Gear & Equipment
That's smart. No sense in forking out $4500+ without being 100% sure. Of course, gear that is rented is usually beaten to hell, so keep that in mind. You actually answered your own question. The 60D is a "Pro-sumer" body, just enough features to make you feel important, or "...that's a NICE camera! You must be a Professional Photographer!!!" and they purposely leave enough out to get you to upgrade. See? It's supposed to be that way. The 6D, is a nice sensor mounted in a crap body. Like the Nikon D600/D610 Counter-part, it's a "Bridge" Camera, meaning it's a entry-level full frame. Again, the whole intent is to get you to buy the bigger camera bodies. But forking out $6000+ for the Camera Body that has ALL the features turned on is out of the price-point for the average user. So you end up spending the same amount of money over a period of time with multiple bodies and upgrades vs. if you just bought the Flagship Model to begin with. Either way...you have spent $6000-$7000 over a period of about 5-6 years, right? Not to mention the huge profit with batteries and such; well, if you bought OEM Batteries, etc. That's another reason that I recommend OEM glass. It will last you 20 years if taken care of properly. Well, it used to. Now everything is crap with planned obsolescence built in. New Sensor Technology trumps old. It doesn't have to do with Mirrorless, you are just seeing photos taken with a modern camera sensor and modern processor/ camera body software, that's all. If Mirrorless didn't exist, you'd probably see similar results with a "Canon 5D Mark V." (Or whatever.) -
Is this computer 'good enough'
Brian replied to Lauren emjay's topic in The Windows & PC Hardware Forum
Yes. Any price I list is in US Dollars as we have members from all over the world and it's just easier for me. That, and I'm too lazy to Google to do the currency translation. NOPE. You are editing Photos, not editing Video. As long as it's a 27" iMac from 2017 or newer, and has a Video Card with at least 8GB of Video Memory, that other Mac should be fine. If it's used, MAKE SURE IT'S NOT LISTED WITH THAT PERSON'S ICLOUD ACCOUNT!! -
Hear question concerning megapixels
Brian replied to Michelle Gifford's topic in Photo Gear & Equipment
OK. You have very valid points in upgrading. I wasn't trying to be a meanie or a Jerk, But you'd be surprised how many people try to buy their way out of things. Now that I know the situation, it gives me more to work with. Yes you do. This time, I want you to buy a Canon Canon RF 70-200 f/2.8L lens. With OEM Glass, there is a difference and I'm a Nikon OEM Snob. You don't realize the difference until you shoot with one on a normal basis. "...But! But! Sigma! Tamron! These MTF Charts are better and this blog-post or YouTube Personality says..." blah-blah-blah!!" Save it. There is a difference in build quality and the consistency of images that OEM Glass produces. Plus the whole resale thing if that ever were to happen. People buy that $1400 Sigma lens, then they go to sell it and only get offered $200 at most. "But I spent $1400!! Can you do any better?" Shop-owner, "...well it's a Sigma, so no. $200 it is. Take it or leave it." Since you make money with your gear, it's important to have things you can count on working and produce better results. It's not a good thing to shoot 300+ images to get 44 "Keepers," and if they are mostly mediocre, it's not worth your time. Time is money. Wasting it to polish "Meh" photos isn't going to work long term. You know this. The big question is, Budget?. How big is it? Because honestly? You need just about everything replaced. Now that you've told me what you are shooting, I can honestly say the R6 is definitely worth buying. Personally, I have a love/hate relationship with my D850. People rave about the D850 but for me, I'd rather have spent the money on something else, or better yet, saved that money. Here is the thing, you are going to need RF glass with a Mirrorless Body. I'd recommend getting a Canon RF 24-70 f/2.8L lens in addition to the R6. Hold off on buying a computer for right now. Prices are insanely high for what you get, and if you can shoot less and yield better results, you can make the most of that right now. Plus, as I've mentioned before, you are going to need RF Glass with a R6, (Man, I sound so repetitive, please bear with me. LOL!) If you think it's better with your current lenses, you haven't seen anything yet. For example, in order to take advantage of the "Sensor-Shift 5-Axis Image Stabilization," you need to use the RF Glass. Otherwise, it's just the 3-Axis Stabilization. The problem is...availability. Stuff is sitting on ships off the cost of California. Many items are on back-order and you need a R6 and new RF 70-200 2.8. I totally get what you mean about the compression. The 70-200 is what you use to create those shots for the Portfolio. I need to use mine more. I'm always using my 24-70 f/2.8, but I shoot Weddings Professionally and it just works better "Running & Gunning." I also have a friend that was forced to purchase a Nikon Z6 body due to a hand issue (She shot with a D4.) She wasn't 100% Happy until she replaced her 24-70 f/2.8 with the 24-70 2.8 Mirrorless version. For now, keep using the 24-105 f/4L for the short term, but budget for the RF 24-70 f/2.8 and sell the 24-105. I'm dead serious. Even though you might not use f/2.8 all the time, it's nice to be able to open up to f/3.2, which is a lot more forgiving than 2.8. Oh, one more thing...give yourself time to fiddle with your new gear. The way you capture images and focus on things is going to be different with a Mirrorless body. So take a solid Weekend or two to fiddle with your new gear. Shoot everything. After a month or so, you will get better. When it comes to editing, you are going to have to change the way you edit. Sigma Glass tends to add a bit of yellow with a lot of their lenses, and Tamrons add red. But you might be used to this by now since you shoot with both Canon and Sigma Glass. But again, you still need to fiddle. In the end, I'm thinking you need to cull your images on your drives with RUTHLESS INTENTION. Meaning you do not need 75 photos of your lunch from 5 years ago. Any photos that will never see the light of day, DELETE-DELETE-DELETE. That should save on storage to get your through. Since the R6 only has 20MP, you can make due with what you have. I know this isn't as fun as buying a new computer, but you need a new camera and 70-200. This will make you money so you can afford to buy a better computer because honestly? It's going to be a year or two before prices stabilize. Inflation is here to stay and the "New Normal" will probably hit in 2023; prices will eventually lower, but won't go back to the ranges we had in year's past. (Translation: a $999 computer won't probably cut it that is "Good for Photo Editing." That price will be in the ballpark of starting at $1500 or so. Furthermore, if you do go to the R5, you are going to be replacing just about everything. Including ALL of your lenses. I have such "Buyer's Remorse" with my D850. I had no idea of what I was getting myself into with 45.7MP. I should have taken the $4200 or so on a SECOND 24-70 & 70-200 on top of the D850, plus larger media cards, and put it towards a Nikon D6. Speaking of D6, I also have a D4s body. I can tell you that if you ever upgrade to the level of a R3, or any other Professional Body for that matter, anything else that is lower end will feel like a shooting with a toy camera. You have been warned. Bottom Line: This Shit can get real expensive really quick, and you are at the point I was 5 years ago. I can tell you from personal experience that it's going to be expensive for the next few years. It's not fun. At all. You need to approach things logically that will yield the most revenue and that starts with a new Camera Body and Lenses. Hold off on a new computer, at least for the short term. If you buy things now, and are a legit-on-the-books Photographer, this will be a Tax Write-Off for this year's taxes. Which hopefully will soften the blow so you can afford to buy more gear next year. Keep me posted on what you decide. An inquiring mind wants to know! -
Is this computer 'good enough'
Brian replied to Lauren emjay's topic in The Windows & PC Hardware Forum
Now I'm going to configure a iMac that I would purchase today. We are starting with the 27" Model and the most expensive one. (Believe me, this is the cheaper route as you are penalized for choosing a lower-priced Mac; meaning the upgrades for things like storage/video cards and such, you pay more since you picked a lower-priced Mac. Sneaky, huh?) Here is the config: Basically, I upgraded the CPU, chose the middle option for the video card and upgraded the internal Mac HD to a 1TB SSD. I also upgraded the keyboard to the one that has the built in number pad, it's totally worth the extra $30. So we are now at $3229, plus AppleCare, Tax & Shipping. Now, I'm sure you are wondering about the RAM and why I didn't bump it up. Because I refuse to give Apple $1000 to upgrade to 64GB. THIS IS COMPLETELY STUPID. I can get the same amount of RAM, made by the same manufacturer for about $300. Yep, a $700 savings!! What you will need to do is purchase TWO 32GB KITS from Crucial.com. Then what you will do is remove the existing Apple RAM, and then install the Four 16GB Crucial Sticks. It's easy. Yes, you can do it yourself. No, really. There are LOTS of YouTube Videos demonstrating the process. In the end, whatever you buy, the prices are pretty much equal with each other. You are paying around $3600 or so when it's all said and done. Personally, I think you should SKIP that computer build. For $2800-ish...it's a "Meh" system. I'm not spending close to $3000 for "Meh."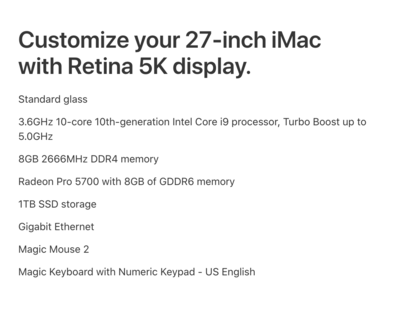
-
Is this computer 'good enough'
Brian replied to Lauren emjay's topic in The Windows & PC Hardware Forum
OK, so I lied. I still went conservative because paying $4000 for a computer to run Photoshop is just plain silly. I also know we can get a WD Back Drive with a higher capacity, for less money if we just buy it and have you install it. Seriously, it's easy. Here is the build for the faster model: $3611 for a faster system. Save 4 year warranty.


-
Is this computer 'good enough'
Brian replied to Lauren emjay's topic in The Windows & PC Hardware Forum
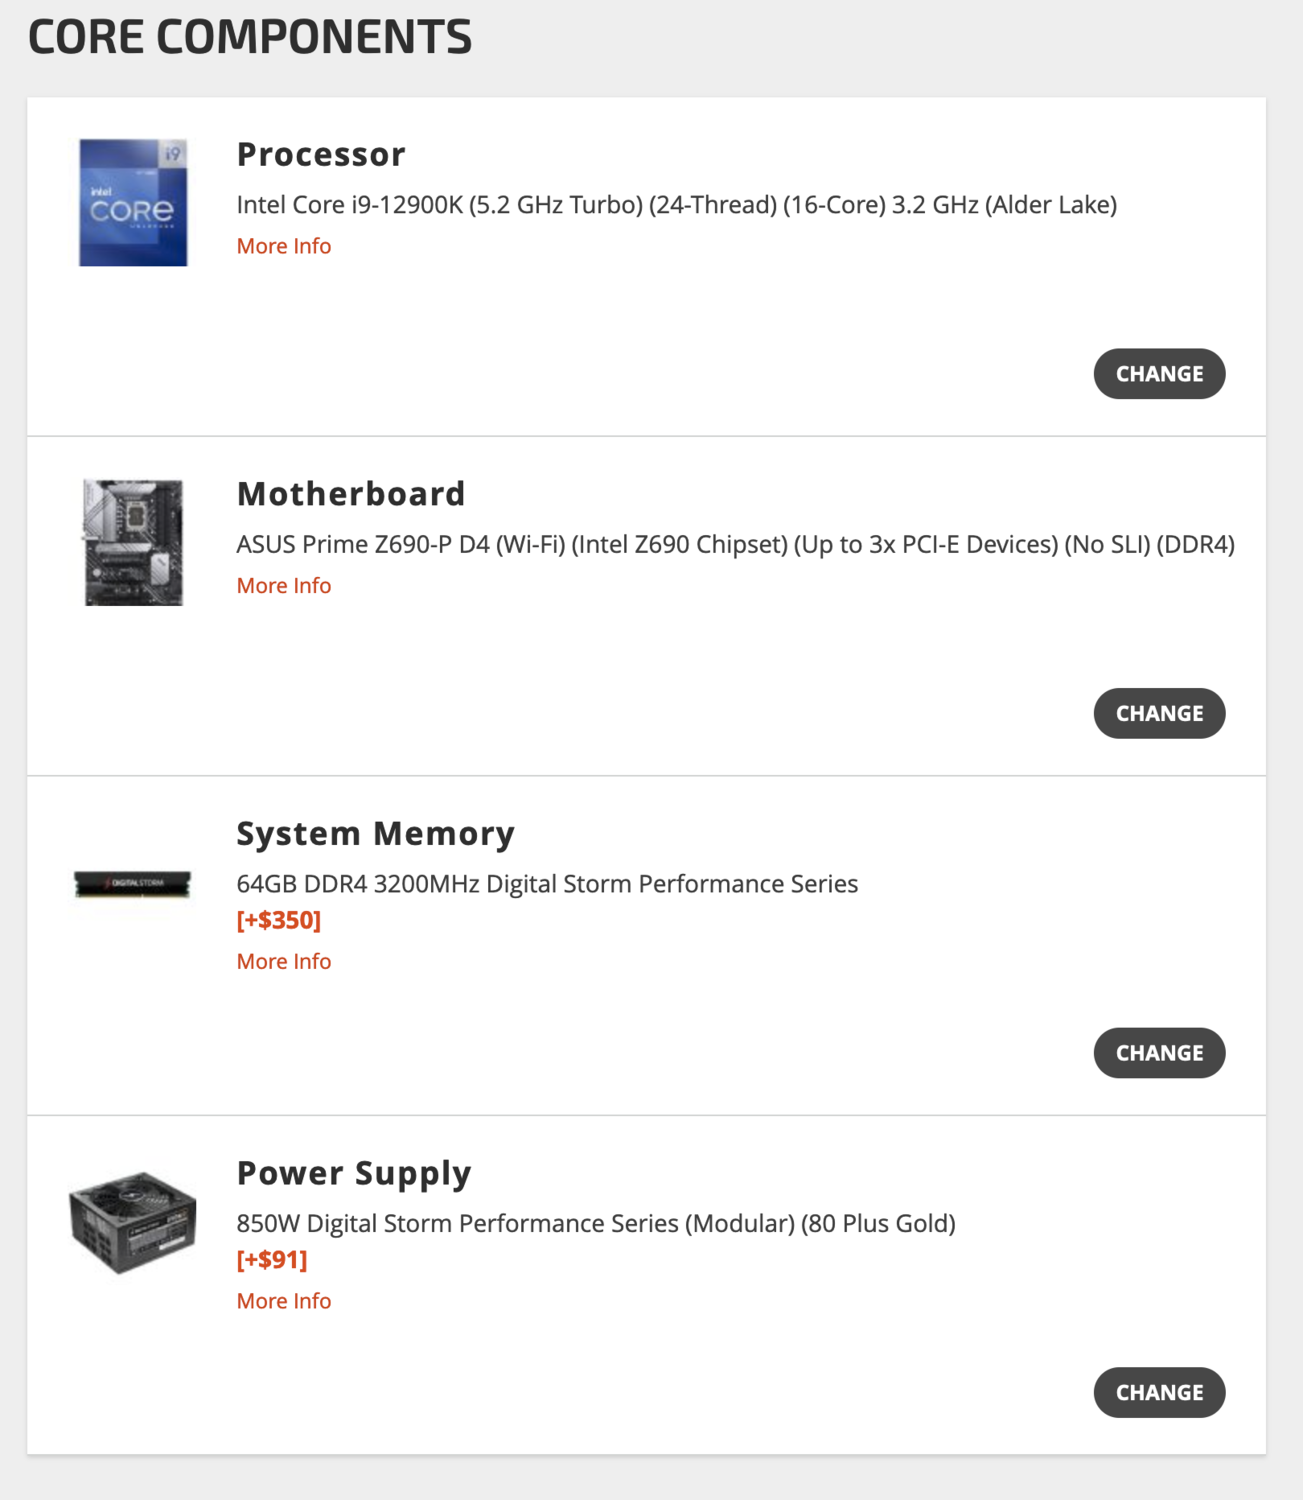
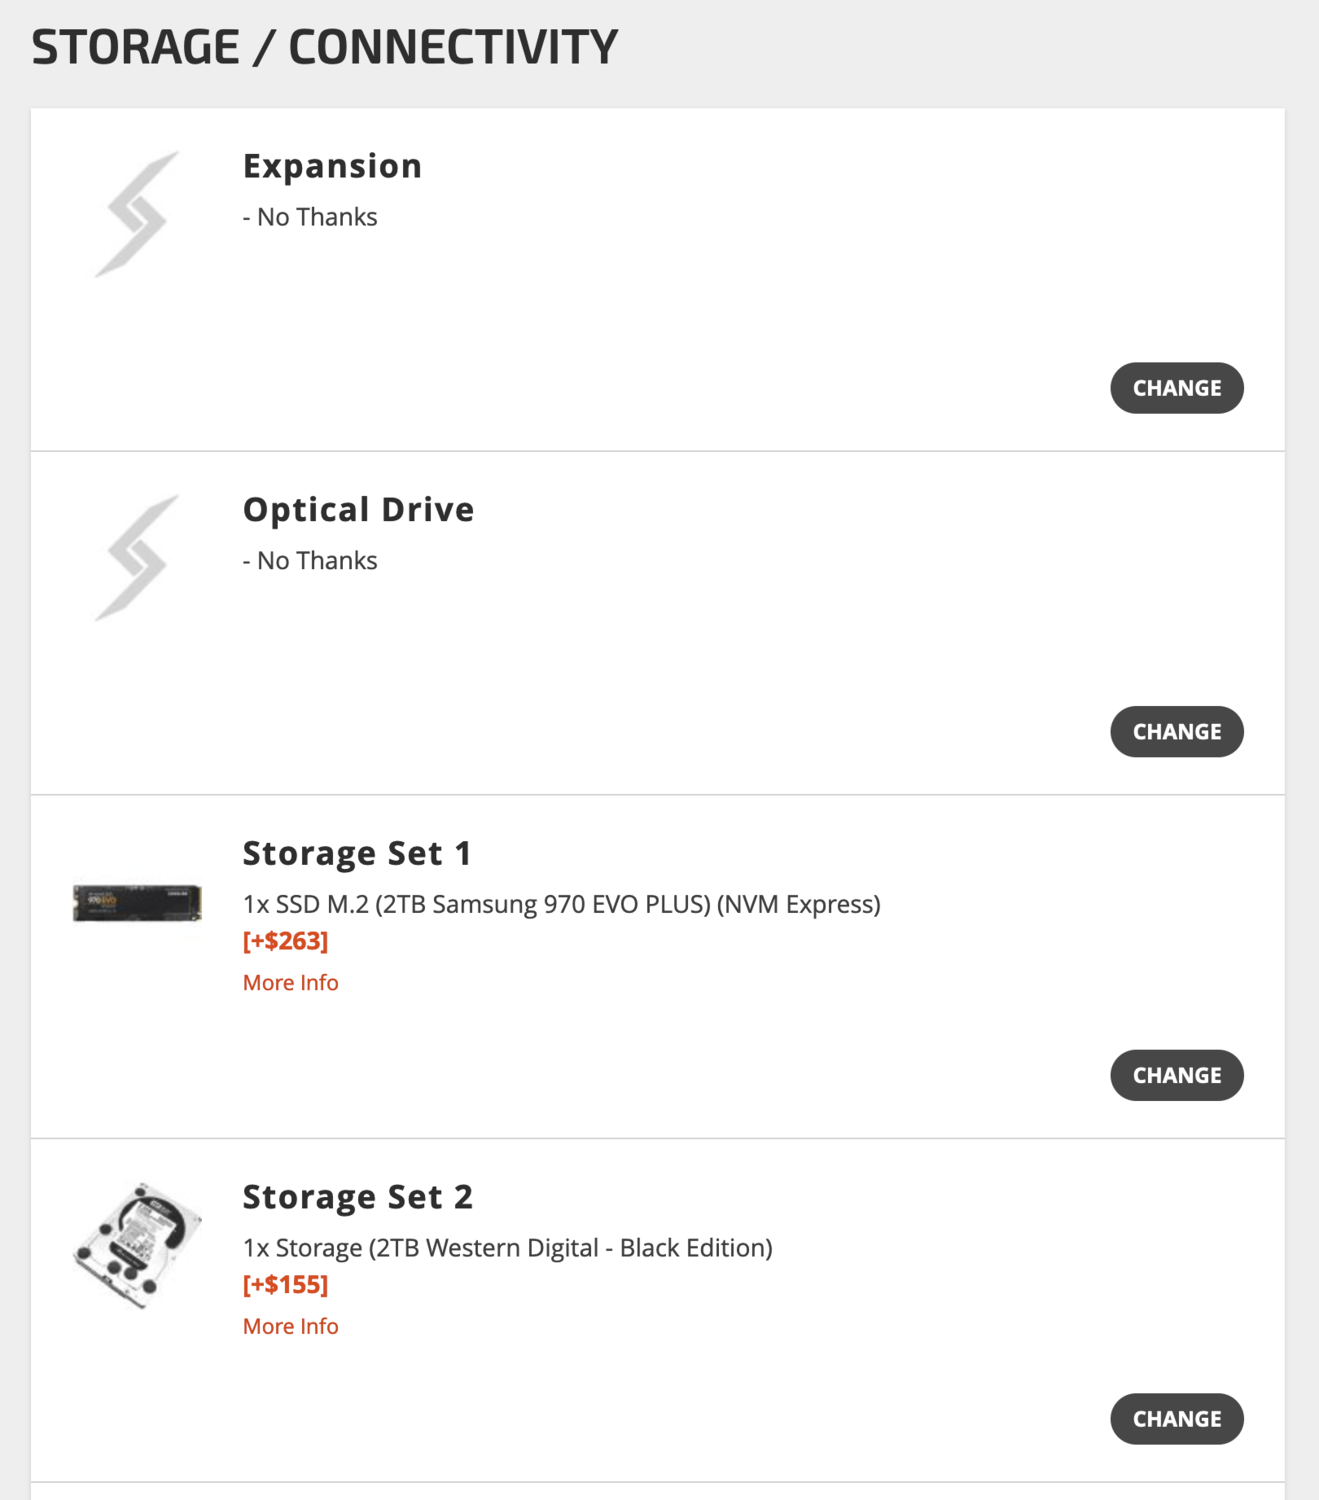
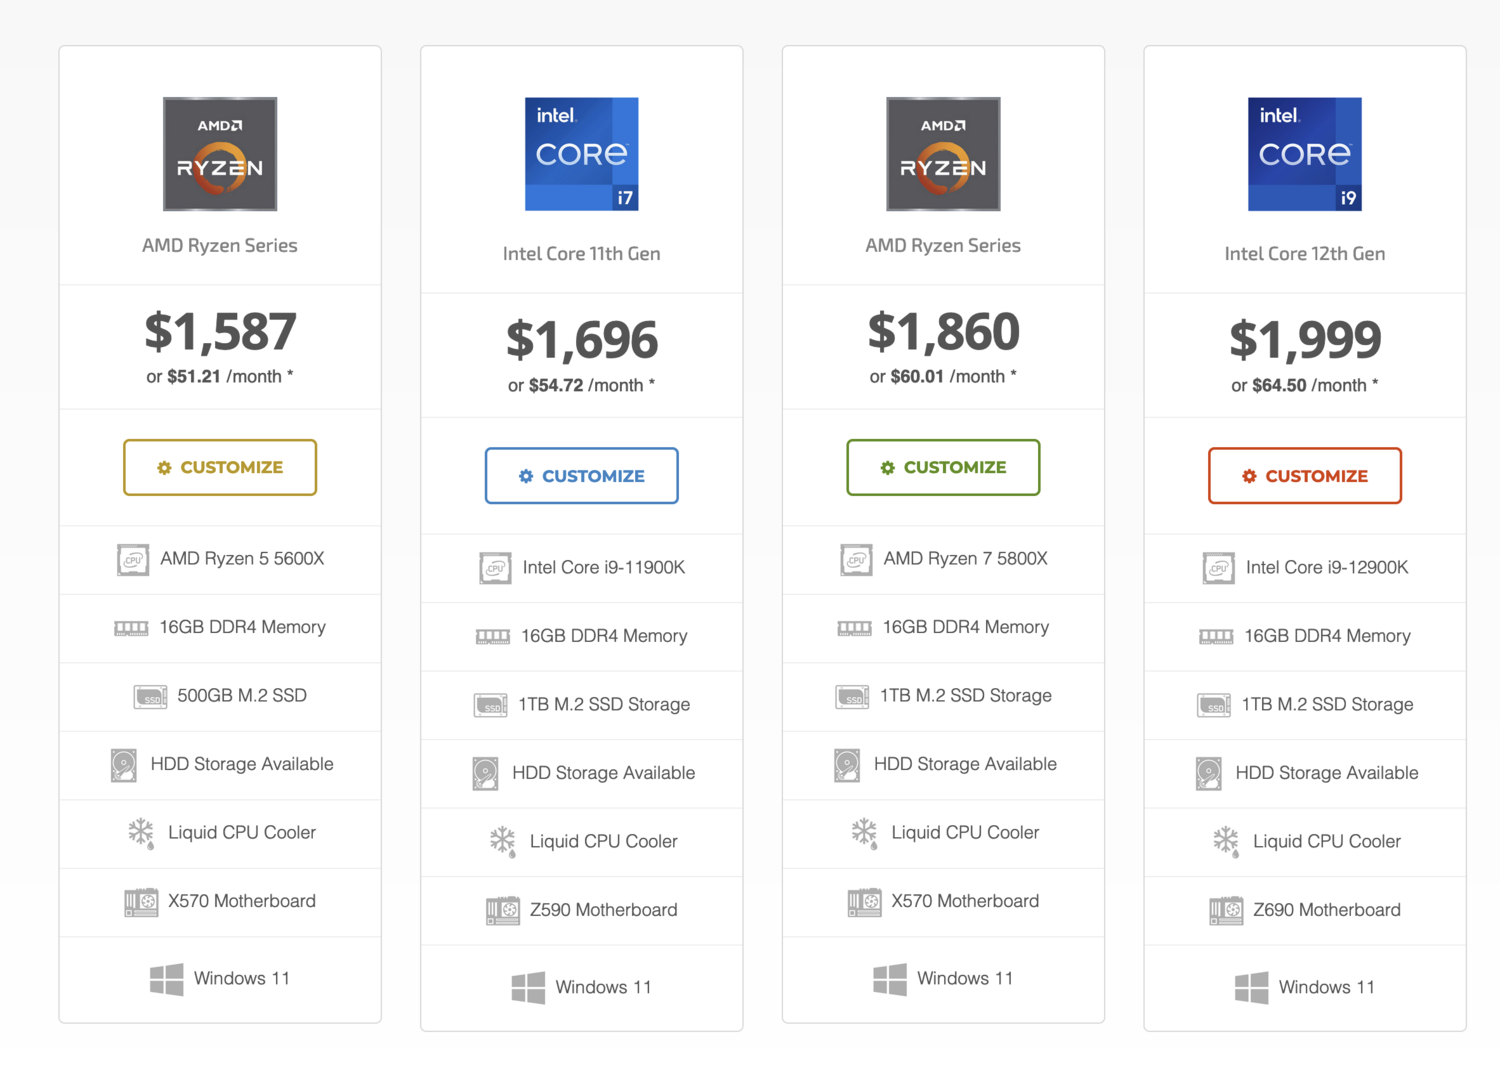
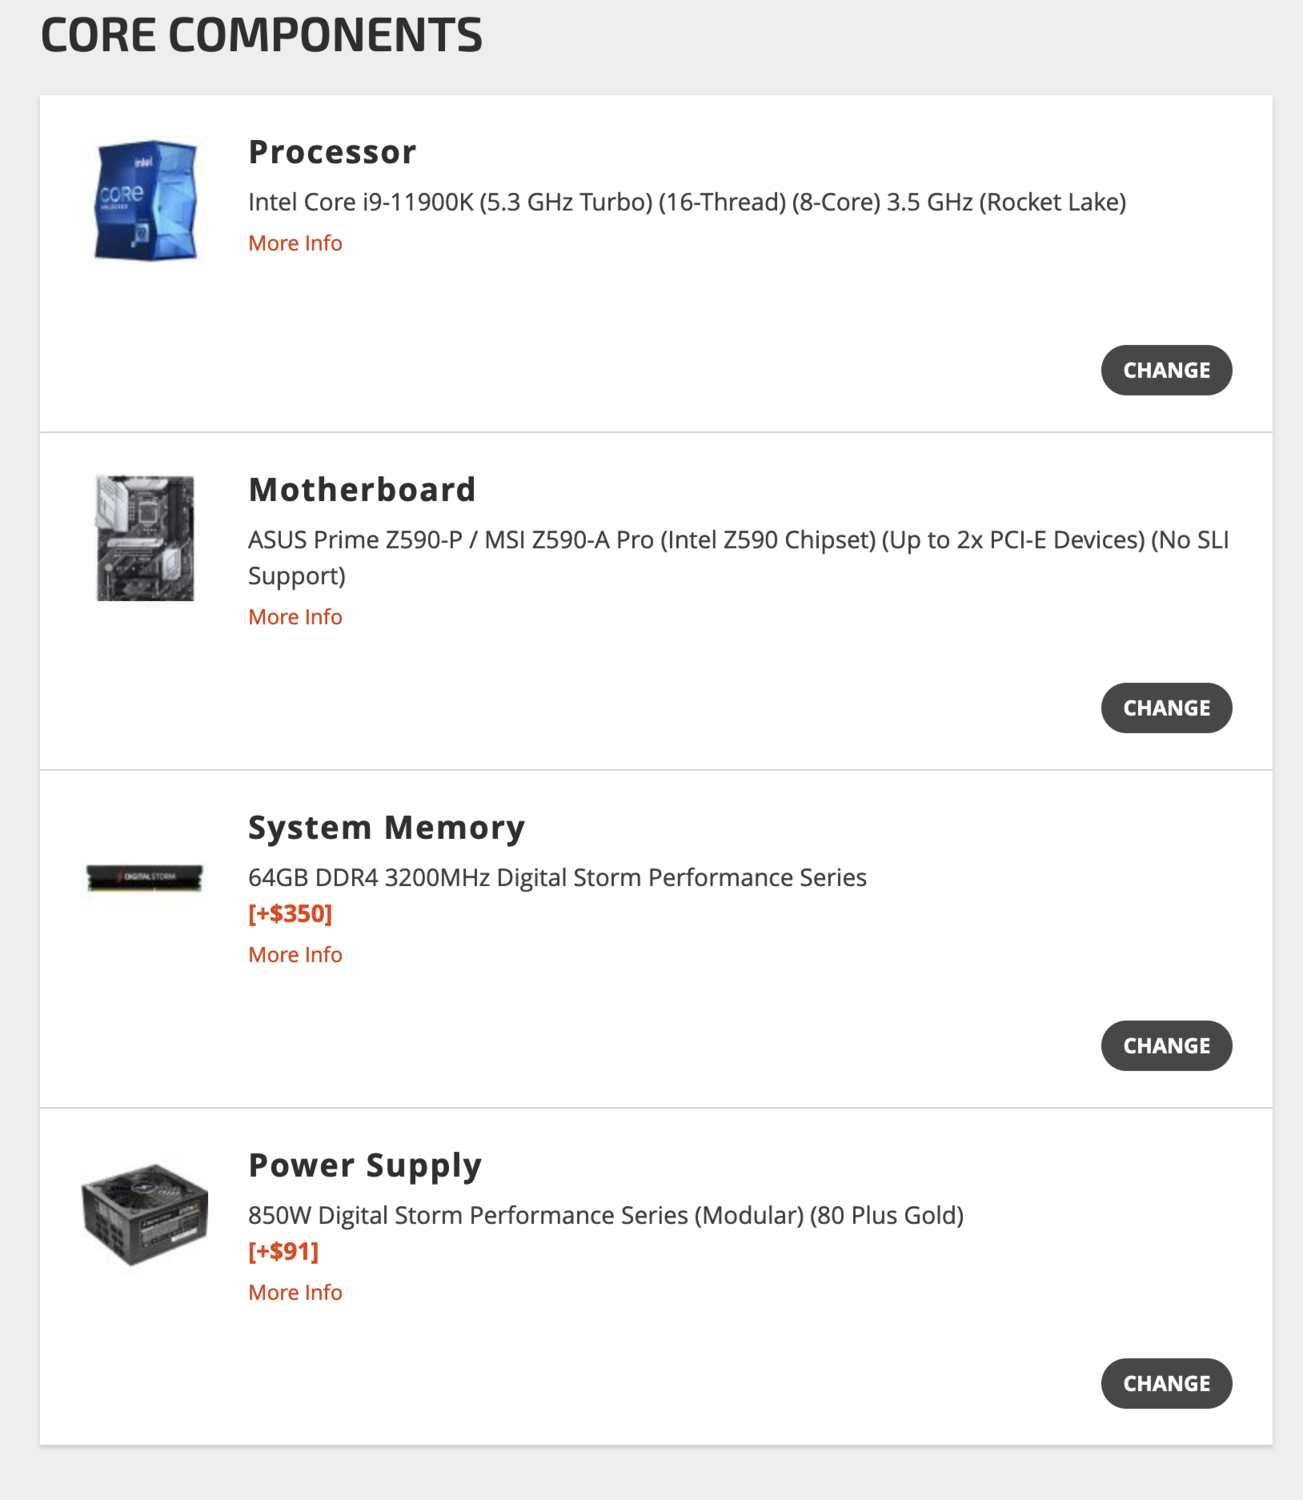
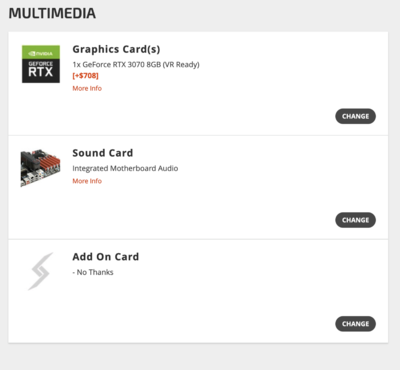
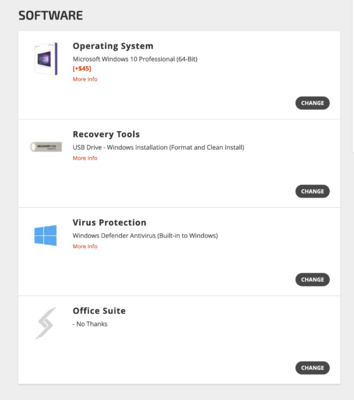
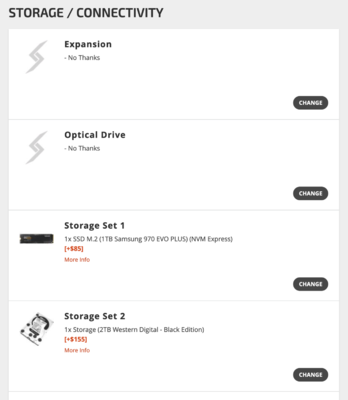
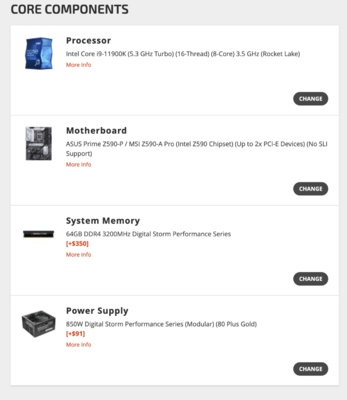
A Big Fat "Meh" to both of these. I'd skip the WD Blue drive and purchase a WD Caviar Black 2TB Drive. I'm also a fan of Samsung SSD / NVME Drives. Kingston is cheap, low COGS which makes computers that are built cheaper for the person selling the computer. It's more profitable. I like the good shit that lasts. Even if I have to save up for another month. Buy-It-Right...Buy-It-Once. Of course this person will need to purchase the model of Drive Media that works best with your potential Motherboard, so the price might vary a little. Western Digital Drives have different classes: Green - Think Nikon D3100 - Entry Level / Consumer Grade. Pieces of shit the WD Drives are. High failure rates. I hate these damn drives. So. Many. Failures. Blue - Prosumer Model. Think Nikon D7100. A little better than the basic entry-level model, but not as good as something like a D850 or whatever. That's the next level. Black - These are the drives that I myself purchase. Then run fast, run cool and last a long time. Think Nikon D850 of Canon 5D Mark IV. I'm always recommending the Black Drives. There are others like Red, Gold, Purple, but my brain is tired and I don't feel like typing more than I need to. So let's keep things simple: While a Blue Drive I'd use in a pinch, if I was building a computer with a 7 year lifespan in mind, I'd be installing a WD Caviar Black Drive. At least a 4TB model. Junk. Cheap Chinese Power Supply. They have started creeping in local computer stores. But hey...they are available. The Steampunk line from 1STPlayer seems to do well with reviews, but chances are this may be a low-end P/S model. Also with a 3070 Graphics Card, you are looking at 850 Watts of Power Supply. My Gawd, for $2880...this is such a let-down. How about this, what would Brian buy? He'd probably start off with a Digital Storm Lynx Computer and configure it, so we start with the $1587 model on the right. (Of course we would, this is me we are talking about...but there is a method to my madness.) To start off, I'm going to pick the $1696 model and tweak a few things. Then I will do the same with the $1999 model and tweak a few things. This way I can see a two computers to compare side-by-side with different price-points. I'm sticking with the "Basics" with this model and we already have a MUCH better system for almost the same price. Sure, the cost is a bit more, but you do get a 4 year warranty in the process. Now we are going to have a little fun starting with the $1999 model. THEN we are going to configure a 27" iMac, that's configured correctly, just for a comparison. Since you are already on a Mac, it makes transitioning to a new computer much easier. Going from Mac to Windows is a Pain in the Ass. Onward!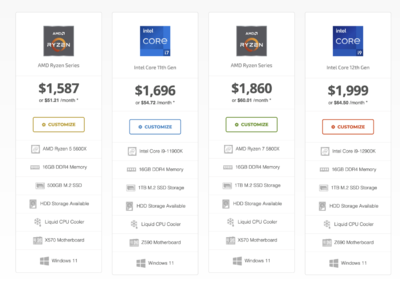

-
Hear question concerning megapixels
Brian replied to Michelle Gifford's topic in Photo Gear & Equipment
Oh, this thread needs to be in "Gear Talk" and I'm moving it now. -
Hear question concerning megapixels
Brian replied to Michelle Gifford's topic in Photo Gear & Equipment
The more MP, the larger the Raw files. Period. Each time you duplicate a pixel layer, such as the background layer, your .psd file size DOUBLES. So if you have poor editing habits or duplicate pixel layers / flatten a lot, then you are going to have issues. Entry-level cameras tend to be around 24MP. The R6 has 20. The R5, which is a VERY nice camera with oodles of features, is around 45MP. It's the nature of the beast. As time goes on, MPs are just going to increase, they just are. My opinion, I think you probably will have buyers remorse going with a R6. Sure it will fit your computer now, but what happens in a 18 months when you think your camera body is lacking? Then you will have wasted the money on a R6 and buying the R5 like you should have originally. Why not consider something like a Canon 5D Mark IV? That's still a decent body. I know everyone is Mirrorless Happy, as there is a constant barrage from all of the magazines, blogs, websites, YouTube Personalities...Mirrorless-Mirrorless-Mirrorless!!! You MUST BUY!!! It's the Future!!!!!! Mirrorless or you are a loser!! You are using outdated technology if you don't switch!!! Please...spare me. Before you take the plunge, I hope you realize in order to take full advantage of a Mirrorless Body and it's features, you need Mirrorless Lenses to go with that body, even if you purchase the R6. Sure, you can use existing glass with an adapter, but you aren't going to get 100% performance out of that R6 or R5 until you upgrade your glass. Same thing with the Nikon Mirrorless Bodies. I think you should hold off and do a little mental inventory. I'd recommend reading Thom Hogan, who is a Tech Guy that I follow. He has posted a few recent articles lately about people wanting to switch from a DSLR to Mirrorless and he makes very good points, he usually does, and one of his latest blog posts are based off of Mike Johnston's recent post, which is also worth a read. Here are some highlights from Thom's Article: and My thoughts exactly! What do you hope to gain with switching to Mirrorless? In my humble opinion, if you buy a R6, you are buying just another 6D Mark II that you will want to replace in 12-18 months. Why waste that money? The problem is the R5 is a very nice camera and is one that I would purchase. But you need the computer infrastructure to support all of those MP. Plus the Glass to feed those 45MP. The problem with most folks, is they think that the gear makes them a better photographer. They have no problem forking out a few thousand dollars but never take that money and invest it in themselves. So Riddle Me This... Why are you upgrading? Have you actually taken the time and read your camera's manual and mastered ALL of it's features? Do you know how each one of the focus modes work and when to use them? While I'm all for buying a new toy, I HATE-HATE-HATE wasting money on this shit. -
Most? Nope. You have two choices, IMHO: Send it to Apple for Repair / Take it to a Genius Bar in a Apple Store. Or, contact Louis Rossmann's Team in NYC. They specialize in Apple laptops. Rossman Repair Group - NYC - Macbook Repair Seriously, Louis' team will go into component level swap out, rather than replacing the whole motherboard. Apple is going to charge you at least $1000, if not more. Why do I keep recommending Louis? Because he is good at what he does AND Apple doesn't sell parts to 3rd Party Repair shops. You'd have to find a Authorized Apple Repair Center, and they are like Unicorns these days; which are even more rare than Apple Stores. Good luck finding one. Louis salvages parts and chips off of other boards, which saves everyone money.
-
I hate-hate-hate laptops. SMDH. People have such a love-affair with them, but in a nutshell...you are screwed. It's like you have a Honda Civic 4-cyl Hatchback and now you want to go off-roading in the Rocky Mountains, crossing raging rivers. It's not meant for that type of abuse. You only have 8GB RAM. You need 16GB at a MINIMUM with 32GB preferred. (If your camera body is 45MP or more, you are looking at least 64GB of RAM.) Your main HD is Microscopic by today's standards. There is only 36GB Free out of 103GB. Which is like saying you have 36MB free out of 100MB back in the 1990's. YOU NEED AT LEAST A 1TB Capacity FOR YOUR MAIN DRIVE. You probably do not have a dedicated Video Card with it's own GPU and it's own dedicated Video Memory. So your video card is drawing from the RAM in order to work. Regular RAM is A LOT SLOWER than your typical RAM. Since it also uses the CPU to work, that will also slow it down. Not to mention, Photoshop will get Grumpy. Lightroom is it's own beast. Your computer would probably work "fine" with CS6, not the current versions of LR or PS/ACR. There is gonna be lag because you need a new laptop. I'd budget $2500 - $3000 for a laptop that "...is good for photo-editing." The problem is, the laptops aren't up-gradeable. It's not like it was 20-30 years ago. Back then, you could have the mentality of, "...I will buy this laptop now, and then upgrade _______ in a few months / years." It's not that way anymore. Now you need to purchase all of the extra upgrades when you get the laptop, at a higher price-point, because the laptops are going the way of "Sealed Units." Why? To get you back in the market sooner rather than later. Why bother giving the ability to upgrade your computer so that it lasts 5-7 years? They want you buying a new laptop 24-36 Months AT MOST. That's why after 4 years, they become unbearably slow. Planned obsolescence and all that. Just look at how Smart Phones really don't last more than 2-3 years. Sure they "work," but battery performance sucks after a few years and they start getting glitchy. Same thing. It's only money, right? This is why I tell people to budget much more money for a laptop than they are used to. The truth is, you need a gaming laptop with a IPS display, and with the specs I recommend, those suckers aren't cheap. Especially in 2021, with 2022 not looking much better.
-
Hear question concerning megapixels
Brian replied to Michelle Gifford's topic in Photo Gear & Equipment
I'm so glad you asked because... EVERYTHING WILL NEED TO BE UPGRADED. I did a dumb thing and purchased a Nikon D850. Had to replace two f/2.8 zoom lenses, buy a new computer THEN upgrade the RAM to 64GB, upgrade my EHD to 12TB...all because of that stupid 45.7MP Sensor. That blasted camera costed me thousands to support it!! Jumping up that high in the MP dept. will cause the whole infrastructure to be upgraded. I hope your wallet and bank account are prepared for the hit. Have fun with your new camera. PS: My next computer will have 128GB of RAM. As the years go on, Photoshop gets more bloated and doesn't perform well with ever major update combine that with more MP on the camera bodies, is a recipe for financial hurt if you aren't prepared. -
You are really going to like this! All you need to do is remove the two existing 4GB Sticks and install these two stick in their place: Crucial 16GB Kit for Late 2015 27" iMac - $96!! (Talk about cheap AND it's in stock. Buy It-Buy It-Buy It!!!!) According to Apple, the Maximum amount of RAM is 32GB for that machine. I have heard rumors you can push it to 64GB, but at your own risk. (I can't guarantee stability, but it should work.) Installing the RAM is pretty straightforward. Several YouTube Videos out there demonstrating the process. You can totally do this, takes about 10 Min start-to-finish. All I recommend doing is touching something metallic before handling the RAM. Computer components do not like being zapped by static discharge. Just give that video I linked to a watch and you will see how easy it is to upgrade the RAM.
-
On the surface they look OK, but I 100% agree with Damien, a 27" screen that's 1920 x 1080 resolution isn't very good on that size screen. Up to about 24" is the "Sweet Spot" for 1920 x 1080, and even then it's pushing it a little. You are looking for something like this: https://www.amazon.com/Dell-Ultrasharp-U2719DX-2560x1440-Resolution/dp/B07KGR784M/ref=sr_1_4?crid=2F57TIL7LBDKB&keywords=dell+ultrasharp+27+ips&qid=1638235610&sprefix=dell+ultra%2Caps%2C196&sr=8-4 Or something like this: https://www.amazon.com/Dell-U2722D-UltraSharp-Comfortview-Platinum/dp/B0954Q2B9N/ref=sr_1_3?crid=2F57TIL7LBDKB&keywords=dell+ultrasharp+27+ips&qid=1638235842&refinements=p_n_feature_seventeen_browse-bin%3A17726604011%2Cp_n_size_browse-bin%3A3547807011%2Cp_n_feature_three_browse-bin%3A2232445011&rnid=724226011&s=pc&sprefix=dell+ultra%2Caps%2C196&sr=1-3 Basically, with a 27" Display, if you have a Resolution of 1920 x 1080, that works out to around 81PPI (Pixels Per Inch), and if you increase that to 2560 x 1440 Resolution, that puts you in the ballpark of 108PPI (Pixels Per Inch.) So, what does that mean? With a 1920 x 1080P 27" display, you will have fuzzy text, pixelated images and blurry details. How bad? "It depends..." No seriously, some Displays are better than others. If you purchase a 27" Display with a 2560 x 1440 Resolution, your end-user experience will be MUCH better as that resolution is meant for a 27" Display. In fact, 2560 x 1440 is what I consider to be a "Native" resolution on a Non-4K Display @ 27" . I know, I'm being a Big-Meanie, but resist the urge to buy. In fact, I'd SKIP all of the Displays that you linked to.
-
Nope. I do encourage purchasing decent recovery software though. Such as RescuePro Deluxe for Flash Based Media (SD, & CF Cards, etc.) and File Recovery Standard Edition for HD Recovery. I have also used EaseUS Data Recovery in the past. If you are looking for a free option, Recuva is the software that seems to be recommended most. Honesty? All those Service Plans are Pure Profit. That's how Service Companies make money; you give them the money in case if something happens, but often nothing does. If you don't ever place a service call with them or file a claim, they still have your money. $14 times hundreds and thousands of people is a lot of money. Honestly? The ONLY plan that I willingly purchase is AppleCare for my Mac Products. Why? Because Apple is really the only one who fixes their items.
-
XQD card and External Hard Drive recommendations
Brian replied to ChristyB's topic in Photo Gear & Equipment
DO NOT RUN DOWN TO GEEK SQUAD!!! Please, have a little faith in me, this isn't my first Rodeo. It will take you a total of 5 minutes to accomplish. Seriously. If you want to throw money away, I take Donations. I will put the money to good use. Anyway, to answer your question, it is done via the Disk Management Tool in Windows and I can walk you through it. Hard Drives do not care what platform that you use, it just has to be in a format/partition that they recognize. Macs have "Disk Utilities," Windows Computers have "Disk Management." It's all the same. Here are the basic steps: Buy the EHD Attach it to your Windows Computer Open Disk Management (Right-click on the Start Button and you will see it in the list) Delete the existing Partition on the G-Drive. Convert the Drive to a GPT Disk (This part is critical, as MBR Disks only go up to 2TB. Anything larger requires GPT. I will cover this, no worries.) Create a new single NTFS Partition via the Wizard. (Lot's of Next-Next-Give it a Name-Next Next will be going on in this step.) Quick Format it. Create a Folder Structure that makes sense Move your Data Files / Images to the appropriate folder. Seriously, that's the gist of things. I can go into more specifics when you get the drive. Just let me know. -
Of course, you can still find Synctoy 2.1 64-bit. SyncToy 2.1 64-bit
-
Here is one worth considering, and one I would get: https://www.bestbuy.com/site/asus-rog-zephyrus-m15-15-6-4k-ultra-hd-gaming-laptop-intel-core-i7-16gb-memory-nvidia-geforce-rtx-2060-1tb-ssd-prism-black/6403817.p?skuId=6403817 I'm not seeing much on Best Buy's Website in your budget range. With the way 2021 is going, if you see something that looks good, BUY IT. Because in a few days that laptop will be gone forever.
-
The specs with the Gigabyte Laptop are fine, that being said, their Technical Support Center leaves much to be desired. So it will be fine when it works, but if you have problems...good-luck, and it was this way before COVID. I'd hate to see what it's like now. But the specs...yep. Other than the HD, I see no issues.
-
FreeFileSync is a good one. I've also heard of Syncthing being well regarded too. The difference between the two is FreeFileSync uses your network to transfer files, Syncthing uses the Internet/Cloud. For me, FreeFileSync gets my vote.
-
This is a problem with buying a computer in 2021...manufactures are skimping on what they offer. While it might seem OK, you don't have 512GB HD to play with. After formatting, Windows and the crappy bloat-ware software, you are left with around 300GB or so. Maybe a little more. Basically, what games does he play? If they are Gigabytes and Gigabytes huge, he might be able to install 3-5 games. Which is fine if he plays one-at-a-time. If he wants to drop a bunch of games and flip-flop between them, you need more storage. At least 1TB. In reality, you are looking at spending $2500 for a Gaming Laptop that is "Good."
-
That one checks all of my boxes!! Enjoy your purchase. Buy it.
- 1 reply
-
- 1
-

-
When it comes to a hard drive, "Nice" and "below $100" can not be in the same sentence. I will NEVER recommend a EHD that is a $99 Special from a Big-Box Store. I like my HDs beefy and stable, and that comes with a cost. As of right now, I really would have you save up more money and Buy-it-Right than to screw around with your data on a cheap drive. In this case, you really do get what you pay for. Western Digital Drives: You have to be careful with them and the ones that you purchase. The worst kind of drives, either from Seagate or WD, are the "Eco-Friendly" or "Green" HDs. The difference between a working Green Drive and a Dead one is about 3-4 weeks. Those suckers are junk. Pure Garbage. They are also cheap (Those $99 Drives,) so a lot of people have them. It's true that I have owned and recommended WD drives in the past, but they are usually the WD "Black" line that has 7200RPM drives in them. The 5400RPM drives tend to be the lower-quality drives and it's very difficult to figure out what drive is installed in the external enclosure. WD isn't always that good in telling you what is installed. Example: Here are 5 Dead External Western Digital "Green" Drives out of 7 for an old customer of mine. The are all the same Western Digital External "My Book" Drives. All of them were doing the "Click-Click--Ka-Thump--Click-Click..." situation. (Click of the Angry HD. ) Fortunately, I had two other HDs that had the data, so we just disposed of these bad drives. Now when I mean, "Black," I'm not talking about the color of the enclosure. WD has different "Lines" of drives, from the Green / Eco-Friendly, to the more Prosumer "Blue" line, to the Caviar "Black" Line and then they have the "Red" & "Gold" meant for Servers and NAS Units. Finally, there is the "Purple" line that is meant for to record Video. Most consumers won't ever purchase the "Purple" line, those are meant for Security Systems and DVRs and such. So it's really hard for me to recommend an External HD from Western Digital. Here is a WD 12TB Easystore EHD at around $300. The Easystore Drives seem to be the 7200RPM models, and the Passport line tends to be 5400RPM. At that price-point, you are in the territory of a G-Drive in terms of cost. G-Drives: These are the drives that have my data. They are Enterprise Grade (Business / Commercial), are "Beefy," "Fast," and have the high quality components inside. They also cost A LOT more than the $99 Drives. But I don't worry about them. I know my data is safe. Personally, I'd rather spend $500 or so on a high quality drive, that lasts for years, then purchase a $99 Drive which has to have data recovered by a Data Recovery Service for $1500 because the HD is "Clicking" and requires major surgery to get your data back. Bottom Line: When it's all said and done, you just need to save up another $84 or so to get a 4TB Enterprise Grade G-Drive. At that point, you might as well spend $210 and get an extra 2TB with the 6TB G-Drive Model, which I feel is "The Best Bang for your Buck" model. You can never have "Too Much" HD space. The other G-Drives you probably have seen me recommending tend to be for Mac Users that have Thunderbolt 3 Ports. THOSE drives are really expensive, usually around $700 expensive. You don't need one of those.

-
Yep. Just plug in the External HD, and save directly to it. You just have to navigate to the drive. Most EHDs will have a letter like D:\ or G:\ you just have to figure out drive letter is assigned to it. Or if you want to save to the main drive while you are working on something, then copy it to the external, all you would need to do is select the file(s) and right-click-choose-copy. Then open your EHD to the appropriate folder that you want to save and right-click-paste. It will then copy the files leaving the originals intact on your HD. When you are satisfied that everything is copied over correctly, you can then delete the files on the main HD. By using copy/paste and NOT cut/paste, you are keeping the original files in-tact so that in the event that something goes wrong, or you screw up, you can try again. Believe me, I've screwed up. I lost photos from 2007-2010 and still haven't gotten all of them back. Always Copy/Paste your files. If you do purchase that G-Drive, create a new thread. I want to make sure it's setup and partitioned correctly before you use it.