

Damien Symonds
-
Posts
212,221 -
Joined
-
Last visited
-
Days Won
3,497
Everything posted by Damien Symonds
-

Mac Color Display Profile
Damien Symonds replied to KatieDalgleish's topic in Monitor calibration questions or problems
It doesn't matter a bit, don't worry. Your calibrated profile will override it anyway. -
Christmas Silhouette
Damien Symonds replied to Robin Radzik's topic in How to achieve a certain look or effect
Just you wait. In the Levels Class you'll learn amazing stuff with gradients and masks. -
Christmas Silhouette
Damien Symonds replied to Robin Radzik's topic in How to achieve a certain look or effect
Yes, using the gradient tool. -
Christmas Silhouette
Damien Symonds replied to Robin Radzik's topic in How to achieve a certain look or effect
That's wonderful. You won't regret it. -
Christmas Silhouette
Damien Symonds replied to Robin Radzik's topic in How to achieve a certain look or effect
You're welcome. It's great fun, isn't it? -
Christmas Silhouette
Damien Symonds replied to Robin Radzik's topic in How to achieve a certain look or effect
Download PSD I experimented with lots of blend modes before deciding that Linear Light looked best. https://www.damiensymonds.net/2011/06/sometimes-you-get-lucky.html The "Levels 1" layer isn't part of the edit, it's just the layer I used to check that I'd completely blackened the silhouette. The Pattern Fill Layer is some noise to prevent banding: https://www.damiensymonds.net/tut_noise.html -
Christmas Silhouette
Damien Symonds replied to Robin Radzik's topic in How to achieve a certain look or effect
No, on the mask. Hold on, I'll upload the file. -
Christmas Silhouette
Damien Symonds replied to Robin Radzik's topic in How to achieve a certain look or effect
How about this?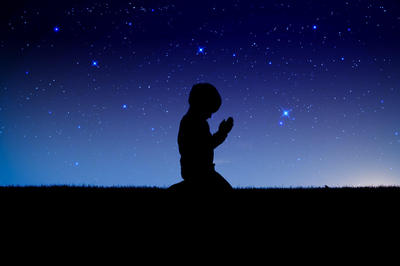
-
Christmas Silhouette
Damien Symonds replied to Robin Radzik's topic in How to achieve a certain look or effect
Can you post this file by itself, so I can see what the best approach might be? -
Christmas Silhouette
Damien Symonds replied to Robin Radzik's topic in How to achieve a certain look or effect
Gee, that's unnecessarily dark, isn't it? Your son is pretty much lost from view because the sky is so dark. May I see the overlay file you used? -
Great.
-
Christmas Silhouette
Damien Symonds replied to Robin Radzik's topic in How to achieve a certain look or effect
Well, you're welcome to look for free ones, but they're always risky. For this low price, yes, I'd buy it. -
Christmas Silhouette
Damien Symonds replied to Robin Radzik's topic in How to achieve a certain look or effect
Yeah, I reckon the second one looks very promising! -
No, it doesn't matter a damn. It's a completely meaningless number. https://www.damiensymonds.net/2011/11/why-ppi-doesnt-matter-yet-another.html https://www.damiensymonds.net/art_resolution.html 4944x3296 is sixteen megapixels. That's plenty big enough to print as big as a truck, as long as your focus is good.
-
Christmas Silhouette
Damien Symonds replied to Robin Radzik's topic in How to achieve a certain look or effect
I see that you found those links on istockphoto. Did you actually search there for some starry night sky photos that you could buy and use for this? -
The photo looks all kinds of bad to me, not just his skin tone.
-
If it looks ok to you, then that's super, because if you know that your prints will turn out exactly the same as the screen, you know you will be happy with the prints. Conversely, if it DOESN'T look ok to you, and you know what your prints will turn out exactly the same as your screen, you can adjust it until you like it, and then you know you will be happy with the prints.
-
It doesn't matter whether it looks ok to me or not. Thankfully, personal taste doesn't play any role here.
-
If your screen matches your prints, everything is right in the world Once you take the Skin Class, you won't have any worries.
-
Yes.
-
They do match after adding magenta? In that case, they must also match without adding it?
-
Great. So have you talked to them about the collage?
-
Gosh, adding magenta in editing is REALLY bad. You've gotta get your calibration right. Are these the instructions you're following? https://www.damiensymonds.net/cal_CMD_pc.html Also, can you confirm you're working in the right colour space? https://www.damiensymonds.net/art_tscs000.html
-
That article references the X-Rite i1Display Pro, which is the big brother of your ColorMunki. Yes, it's better, but there's no reason why your Munki can't do a good job. Put that article out of your mind. Can you clarify this? It's critically important. Are you saying that your calibrated screen matches all your prints, except for the ones that you edit using the new techniques?
-
White Balance
Damien Symonds replied to fotographer.nz's topic in Photoshop / Elements / Bridge / ACR questions or problems
No, of course not. In this case, you would drag across the white and first two grey bars all together.
