Damien Symonds
-
Posts
212,007 -
Joined
-
Last visited
-
Days Won
3,483
Everything posted by Damien Symonds
-
Did that help, @Leslie Vu?
-
@Melissa Harris Photography?
-
Either Cmd Delete or Option Delete, depending on which colour is the foreground colour in your toolbar.
-
Hi Emma, don't try to fix it, just replace it. https://www.damiensymonds.net/preventing-banding-in-backdrops/ Eg this: Download the PSD file

-

Topaz Clarity plugin
Damien Symonds replied to EmmaBrett's topic in Photoshop / Elements / Bridge / ACR questions or problems
Oh, it's absolutely not worth $4.99, let alone $49.99. It's only for people who don't know how to use Levels. -
Screen is disgustingly contrasty
Damien Symonds replied to Meetmow's topic in Monitor calibration questions or problems
https://www.damiensymonds.net/2011/08/buying-wide-gamut-screen.html -
Measuring screen resolution
Damien Symonds replied to Lynne's topic in Questions about tutorials and articles
Yes. -
Measuring screen resolution
Damien Symonds replied to Lynne's topic in Questions about tutorials and articles
No, something is going badly wrong here. Are you measuring it with a ruler? -
Measuring screen resolution
Damien Symonds replied to Lynne's topic in Questions about tutorials and articles
You can't leave the resolution field blank, nor do you need to. It doesn't matter what you put in there, it's completely meaningless, I promise. 300, 200, 100, whatever. -
Measuring screen resolution
Damien Symonds replied to Lynne's topic in Questions about tutorials and articles
Is this the article you're following? -
Screen is disgustingly contrasty
Damien Symonds replied to Meetmow's topic in Monitor calibration questions or problems
Oh, hooray!!!!!! -
Screen is disgustingly contrasty
Damien Symonds replied to Meetmow's topic in Monitor calibration questions or problems
Crap. Then ok, yes, calibrate your old laptop to check. That way, you've got it to edit on this weekend if needed. -
Screen is disgustingly contrasty
Damien Symonds replied to Meetmow's topic in Monitor calibration questions or problems
Well, the absolute best option would be to plug a desktop screen into your new laptop and calibrate that. Is that option available to you? -
Screen is disgustingly contrasty
Damien Symonds replied to Meetmow's topic in Monitor calibration questions or problems
Ok, let's get the big things out of the way first. Have you checked that the calibrator isn't faulty? By calibrating another computer in the house with it? -
Screen is disgustingly contrasty
Damien Symonds replied to Meetmow's topic in Monitor calibration questions or problems
Hi Sarah, may I have a link to details about your laptop? Also, remind me which calibrator you have? -
This is the best I can manage for the second one. I realise it's not very good. Download the PSD file
-
Darn, I was afraid of that. The first one you posted should be fairly straightforward, because she's looking directly at the camera, and none of the flare is obscuring similar parts of both eyes. Therefore, it should be easy enough to copy and flip one eye to the other. Have you done that before? Let me know if you need guidance. But the second one is tricky, because she's at an angle, so copying/flipping isn't an option. I'll have a play with that one and see what's possible.
-
Hi Joyce, do you have many of these to fix? Just this one, or others as well?
-
Black Background
Damien Symonds replied to cmonstur's topic in How to achieve a certain look or effect
I'm pretty sure it's just this: Download the PSD -
Black Background
Damien Symonds replied to cmonstur's topic in How to achieve a certain look or effect
Ok, first things first: https://www.damiensymonds.net/png-file-format -
Hi Melissa, could you post both the files here?
-
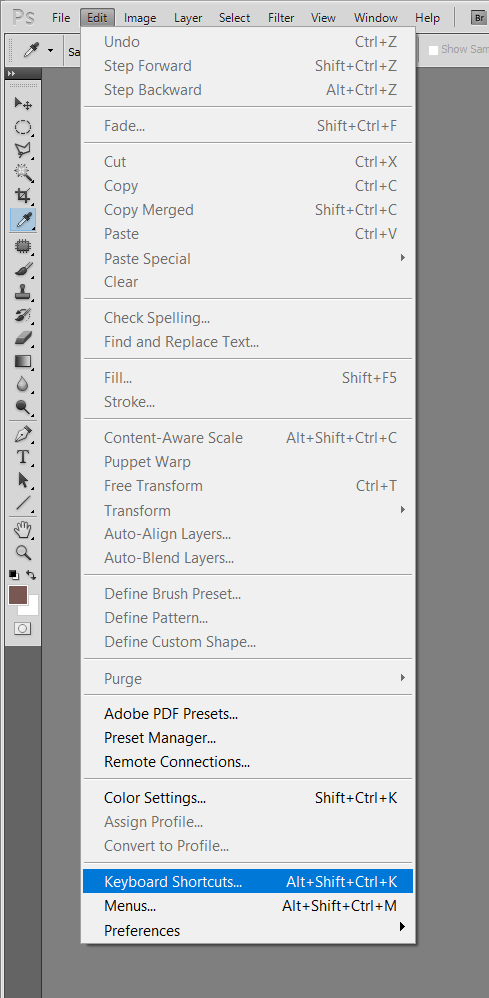
On my PC, it's "Keyboard Shortcuts" in the Edit menu. It might be the same on your Mac, or it might be in the Photoshop menu.
-
I agree that it's not perfect, but it'll sharpen up ok, don't worry.
-
No trouble! I enjoy this kind of question. If you try it on other photos, can you show us? Needless to say, if you fiddle with the sliders on the top layer, you'll get different colour effects. The possibilities are endless.
-
Download my PSD First, I duplicated the Background layer twice, and ran High Pass filter on both of them - first broad, and second narrow. This brings out the detail a bit. It also creates halos, but since those were in the example photo you linked too, I figured it was ok - part of the style. Then a Levels layer for an aggressive vignette. And finally another Levels layer for the hazy look. Make sure you look at all of the channels in this layer.