

Damien Symonds
-
Posts
212,208 -
Joined
-
Last visited
-
Days Won
3,496
Everything posted by Damien Symonds
-
 Forgive me if you're already told us this, I couldn't see it - what screen do you have, exactly?
 -
Can you show me a screenshot of which page in the troubleshooter you're up to?
-
But if I were to ask you the same question at night time, you'd put "colder" in that blank space? (Just making sure I've got all this straight in my head)
-
On screen, you mean? We need to simplify this as much as possible. Complete this sentence: "The lighter tones of the photos are _____________ (warmer/colder) on screen than the prints"
-
I know they are. This is really really bad. Follow the troubleshooter all the way to its conclusion.
-
Actions
Damien Symonds replied to Amelissa1's topic in Photoshop / Elements / Bridge / ACR questions or problems
This. Brian says you should always aim for 1/3rd free space. And this. Run CleanMyMac pronto. -
The monitor sounds fine. It should serve you well into the future.
-
No, I can't in good conscience recommend an out-of-date device. Go for the Spyder5.
-
NEVER have I said to use Adobe RGB. And no, your camera setting is completely irrelevant when you shoot raw. You DO shoot raw, I trust?
-
Are you aware that these are rather dark, especially the third one? And in daylight? How do the prints and screen compare?
-
You are right - you won't. http://www.damiensymonds.net/art_tscs000.html
-
No, this is a big fat myth. This HAS to be your priority now. http://www.damiensymonds.net/what2buy_cal.html
-
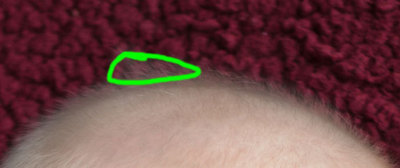
This area. This is where the blacks aren't black enough.
-
Can't you just whistle?
-
Yes, it's still not black around the hair, especially that tallest part. If you move your mouse around while watching the Info Panel, you'll see the numbers are about 25/25/25 instead of 0/0/0 where they should be. Keep painting on the mask of the Levels layer.
-
I don't think your blacks are black yet. May I see that same closeup area without the new blanket layer turned on?
-
These two statements seem to contradict each other. If the screen is too yellow, then shouldn't viewing prints in yellow light make the prints closer to the screen, not further away?
-
May I see it close up again, at better quality?
-
Well, it essentially makes the entire photo black-and-white (the way it would if you left Colorize turned off but moved the Saturation slider all the way to -100) then adds a bit of colour tint to it. It's a feature which seems, at a glance, to be very handy, but actually I find I hardly ever use it. It worked nicely here, though. However, I fear it only worked nicely here because your white balance was so appalling. I beg you to take the Raw Class as soon as you can.
-
Yes, that's right.
-
A Hue/Saturation layer, with "Colorize" checked, at +220/+8/0. Painted on to the areas. See what you think.
-
That's a slightly different photo, I assume? Lol @ the file name!!!
-
Oh gosh. Maaaaaaybe .... It looks pretty darn difficult, doesn't it? The only thing we have going for us is that mum's legs and arm are in roughly the same position. That's probably where you'd have to try.
-
Yeah, see the awful banding in your new background?
-
http://s2.quickmeme.com/img/c5/c5f0d947e06737cf448ab355cd385f063cfd9d2cf4da081b7a5b53bc9fce95fb.jpg

