-
Posts
210,559 -
Joined
-
Last visited
-
Days Won
3,417
Everything posted by Damien Symonds
-
PLEASE consider a refresher. The class is completely new, much better, and you get a significant discount as a former participant.
-
Don't forget to fix the backdrop between their heads.
-
May I have the backstory? What was behind them before?
-
Yay, I'm glad you like it! The fix isn't technically complex, but will take a lot of time and patience. Don't expect to achieve it quickly. Download the PSD file First, a dodge and burn layer to even out the wrinkles in front a bit. Then a radial gradient layer. Mask it completely around the child. At this point, the child will seem like it's "floating", exactly as you said. After that, use a very low opacity black brush on the mask to gently reveal a bit of the blanket texture in front, as I did. Finally, the noise layer to prevent banding. If any of the above is unfamiliar to you, I beg you to consider my little Layers & Masks Class. It's very cheap, but will open up worlds of skills to you.
-
Well, this is all I do ... Add a new blank layer Click on the foreground swatch at the bottom of the toolbar and choose red as the colour Press M to choose the Marquee Tool, then click and hold on it to choose the oval one Check the options bar to make sure it has 0 for the feather setting Draw the circle Edit>Stroke and give it a few pixels of stroke.
-
-
The only time I ever use it is for really really noisy photos when I want to apply more noise reduction to the shadows than the highlights.
-
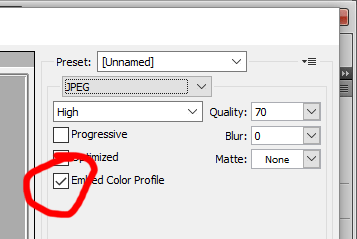
This is not related to your question, but is troubling ... your file is "untagged". When saving jpegs (either for web, or any other purpose) ALWAYS make sure the "embed profile" checkbox is checked.
-
Yeah, no, that's just a demonstration of bad raw processing. There's absolutely no need for luminosity selections in that example.
-

Fine Art Portrait
Damien Symonds replied to Dasha's topic in How to achieve a certain look or effect
-

Fine Art Portrait
Damien Symonds replied to Dasha's topic in How to achieve a certain look or effect
Well, for a quickie, first add a Levels layer and move the middle slider to about 1.25. Then add a Channel Mixer layer, check the "Monochrome" box, and enter +100/0/0/0 for the values. Change that layer's blend mode to "Overlay" then lower its opacity to your taste. -
Only the background? I would have thought the foreground needs help too?
-
Oh, good. I was afraid it was some of that hair nonsense again. Yes, that might be plausible, although generally such methods aren't necessary when proper single raw processing is employed. Can you provide a link to the video?


