

Damien Symonds
-
Posts
212,212 -
Joined
-
Last visited
-
Days Won
3,497
Everything posted by Damien Symonds
-
 Great. Follow all the troubleshooting steps in my tute.
 -
Which calibrator do you have?
-
No, sorry, I'm not taking on editing work at the moment. Does this help? http://www.damiensymonds.net/preventing-banding-in-backdrops/
-
Yes, essentially it's a laptop screen.
-
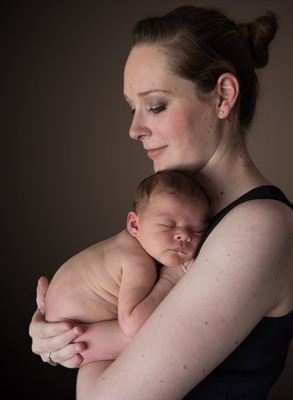
Download the PSD It's the same gradient layer twice. The bottom one is on "Multiply" mode, and I kept it hidden until I'd almost completely masked the top one. Then I painted on its mask at low opacity to darken the background around the hair just enough to match the new background. And the top layer is the noise layer.
-
It's not difficult, per se, but it's definitely not quick.
-
Would this be passable?
-
Not as such. I'm happy to help, but I'll need you to post the actual photo, rather than a screenshot.
-
Looks fabulous, well done. Just to check, you haven't cropped your PSD, have you?
-
Photoshop, Lightroom - everything slow
Damien Symonds replied to Brandicm's topic in The Macintosh User Group
What Brian means is that a Lightroom catalogue with no photos in it is best -
Spyder 3 Pro
Damien Symonds replied to Katie Belmont's topic in Monitor calibration questions or problems
I was a latecomer to Spyders. I only started at 4. -
Spyder 3 Pro
Damien Symonds replied to Katie Belmont's topic in Monitor calibration questions or problems
I never had Spyder 3 instructions, sorry. -
No, sorry, black is not feasible. Very dark brown, or very dark grey, would be the best we could manage. Would she settle for that?
-
Spyder 3 Pro
Damien Symonds replied to Katie Belmont's topic in Monitor calibration questions or problems
You won't know until you try, I guess ... -
Darker moody look
Damien Symonds replied to hearmyvoice's topic in How to achieve a certain look or effect
As long as you nail the shallow depth of field, the editing is easy enough. -
Darker moody look
Damien Symonds replied to hearmyvoice's topic in How to achieve a certain look or effect
Download the PSD -
Darker moody look
Damien Symonds replied to hearmyvoice's topic in How to achieve a certain look or effect
Notwithstanding all of that, how does this look?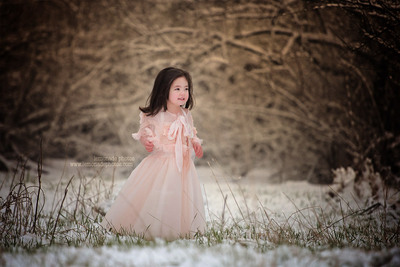
-
Darker moody look
Damien Symonds replied to hearmyvoice's topic in How to achieve a certain look or effect
Before we start, I need to know that you are aware of the two differences that will make a significant difference between your photo and hers: Hers has leading lines going towards a logical area of light in the background. Yours does not. Yours has lots of light area (snow) at the bottom of the photo, which hers does not. As such, your photo can never have the same "feel" as hers. -
May we see the outcome?
-
Velvety / Painterly effect v2
Damien Symonds replied to Charliepw's topic in How to achieve a certain look or effect
No it's not, look at the how the light is falling on her face. In particular, look at the camera-left side of the mouth in Lisa's photo and in yours. I would say that Lisa is using a much bigger light source that you are, but you would need to seek advice from a photographer about that. All I know is that the angle of your light is too far around to the side. -
Great, then that's the one I'd use for the working files.
-
Velvety / Painterly effect v2
Damien Symonds replied to Charliepw's topic in How to achieve a certain look or effect
Take your photos again. Lighting lighting lighting. This is primarily not an editing matter. -
Is the Seagate internal?
-
Backdrop extension and trying to save the hair
Damien Symonds replied to Betbet02's topic in Help with editing
No, Bethany is in the Standard class. -
No, you're doing too much! You're pushing it too far.


