Damien Symonds
-
Posts
210,849 -
Joined
-
Last visited
-
Days Won
3,436
Everything posted by Damien Symonds
-
Great. Now warm bub's right arm and both hands a bit. See how the skintone is a bit different?
-
I think this: http://www.damiensymonds.net/2015/04/the-handyman-method.html
-
 Oh, that's great news!
 -
Great! I made you something ... Hope it helps.
-
Let me know how it goes.
-
Sorry Sandra, you know this is legally questionable. I'm not touching it.
-
Is it a scan of a print? There's a weird lightness down one edge.
-
Yes, keep painting on that D&B layer, with a 5% opacity brush. Patience is the key.
-
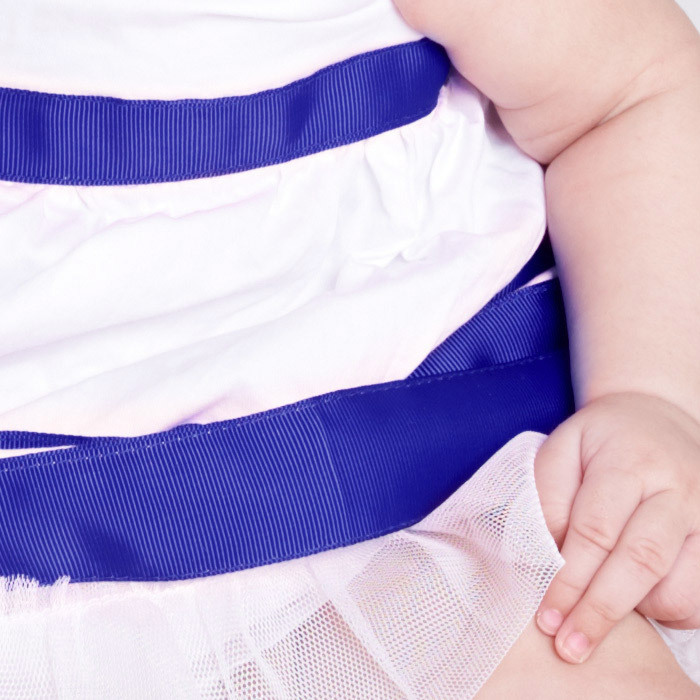
The solution is so simple you'll fall off your chair. Just add a Channel Mixer adjustment layer and swap the Red and Blue channels ... Red 0, 0, +100 Blue +100, 0, 0 Then mask on to the ribbons. You won't even have to mask particularly precisely in most areas. Then, clip a Hue/Saturation layer to the Channel Mixer layer and manipulate Blues a little more if needed (eg darkening or whatever)
-
Download the PSD file
-
Do you have it in raw format?
-
Your skin work is lovely. Really lovely. But your blanket work is dodgy as sin. It's really obvious where you've tried to clone pattern and it doesn't line up. What do you think of this for the blanket?

-
A calibrator has to be your priority.
-
Sure, I can help you with this. Go ahead and do your full normal clean edit on your photo (including skin work), then post again. We'll talk about changing the fabric colours, and adding that warm effect to the overall image.
-
"drawing" on an image
Damien Symonds replied to Molly B's topic in How to achieve a certain look or effect
I agree. You don't want to be rushed with this part. As long as you can work in quite even lighting, it will be fine to be in different locations. -
Cropping
Damien Symonds replied to Falon's topic in Output - print, websites, Facebook, email, client disk, etc
Before you press Return to commit the crop, glance up at the Info Panel - see the H and W values there? Multiply them to make sure they're more than 6 million, then you're good to go. -
Cropping
Damien Symonds replied to Falon's topic in Output - print, websites, Facebook, email, client disk, etc
Perfect. -
Cropping
Damien Symonds replied to Falon's topic in Output - print, websites, Facebook, email, client disk, etc
Correct. When you crop to 11:15, make sure that no resolution is being imposed. When you crop, the image shouldn't change size on screen (apart from the removal of the cropped parts, of course). -
"drawing" on an image
Damien Symonds replied to Molly B's topic in How to achieve a certain look or effect
Not necessarily a blackboard. Any black surface would do. As long as it was quite flat and evenly lit, and nice and dark. A wrinkled black blanket would be a bad idea, if you know what I mean. The way I see it, there are two options: Start with the photo of the baby on a black background, and Place the picture of the drawing, and set it to "Screen" blend mode to merge it. This way should be the easiest, if we can pull it off. Start with the photo of the drawing, and Place the baby onto it, and mask it. Either method should give great results. I can't wait to work with you on this project! -
"drawing" on an image
Damien Symonds replied to Molly B's topic in How to achieve a certain look or effect
Well yes, but nothing beats actually drawing it for real, with chalk on a blackboard, then photographing that and merging the two. -
Oh, no, this just gets worse Fix the noise thusly.
-
To be honest, your first one was better. We could see their legs in that one.
-
This is not a coincidence:
-
Please PLEASE tell me you're on the list?