-
Posts
4,110 -
Joined
-
Last visited
-
Days Won
52
Everything posted by Brian
-
Same area, just during Sunrise:
-
One last shot, probably similar to what you are going to photograph. This is the Grand Canyon at Sunset taken with my 24-70 f/2.8:
-
Another shot taken with my 24-70 and CP, this is a huge crop as I snapped this from a moving Tour Bus. There are heads to the left and right of this photo: Speaking of heads, I need to tweak this photo. I have some cloning to do on the right side. Ooops.
-
Same place, but taken with my 24-70 while I was walking up to the Double Arch. That thing is HUGE. You can see the people in this photo and I was a good distance away when I snapped this:
-
Here is one of my favorite photos from Arches National Park. I highly recommend visiting Arches NP and the city of Moab, UT. Just be sure to get to the park early, like be in line at 6:30 AM. They only let so many cars in at one time. Taken with my 14-24: See the distortion and how the rocks lean towards the center? That's 14mm. That's what I'm talking about if you shoot 16mm with the 16-35 L.
-
What a coincidence! I just returned from a trip out west. I visited Canyonlands, The Grand Canyon and Arches National Park, and visited the Navajo Nation. Anyway, I will tell you the story of what I went through and what lens I used the most. Being this was the first time I was out to this part of the country, and was doing it via a Bus Tour, I wanted to bring ALL my gear. Bought a fancy Back Pack, brought my 70-200, 24-70, 14-24 filters, batteries, a Platypod (Flat Tripod) with Ball Head. I was one of those photographers. All that was missing was the dorky vest, socks while wearing sandals, and hand-held light meter. I had the floppy hat and sunglasses. I was determined to make sure I was prepared for everything. This was a once-in-a-lifetime trip!! Ummm...yeah. So what happened? I ended up using my camera and 24-70 with a Circular Polarizer 99.99999999% of the time. The other 40lbs of gear in my backpack? It sat on the bus, locked up. I think I used my 14-24 for a handful of shots, but my 24-70 with Circular Polarizer mounted almost constantly. When it comes to hard sun and places out in the Desert, a CP is the filter that you must have. Now for the lenses. The Canon 16-35 f/2.8L is decent. I have seen great things come out of that lens. That said, 16mm takes a bit to get used to, due to the distortion along the sides. Moving an inch or two in one direction or the other WILL affect the overall look of your photo. That said... ...I would seriously rent a Canon 24-70 f/2.8L VERSION II and a 82mm Circular Polarizer to go with it. You will have your "Wide" at 24mm, and then be able to zoom in on people with 70mm. Hands down this is the lens I used the most on my trip. Oh, whatever you do, make sure you rent the Version 2 of the Canon 24-70. The Version one of that lens is a complete piece of garbage and you are better off using your 24-105 f/4 L. If you are "Running and Gunning" while playing tourist, do yourself a favor and keep it light and simple. One camera, One Lens, and a CP. Bring plenty of batteries and Cards and leave the gear at home. Now, if you are going by yourself and will be standing in a single spot all day trying to capture __________ at Sunrise / Sunset, then by all means bring everything. Since you mentioned two kids, and they require food and water and some form of attention, I'm thinking you aren't going to be sitting somewhere for 10 hours waiting for the "Perfect Light" and that cloud to move just a little bit to the right. LOL!!
-

Issues with Adobe Bridge CC downloader
Brian replied to AlyssaAlbers's topic in The Macintosh User Group
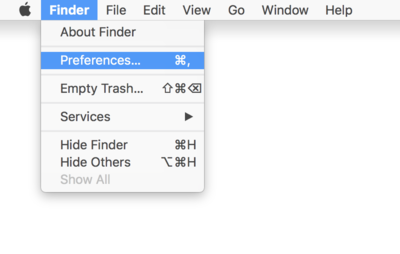
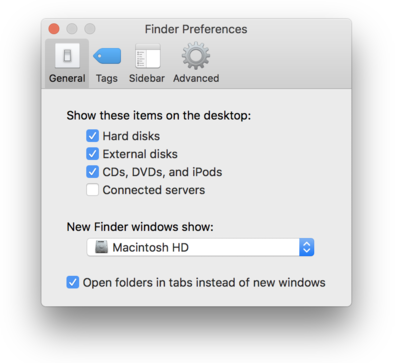
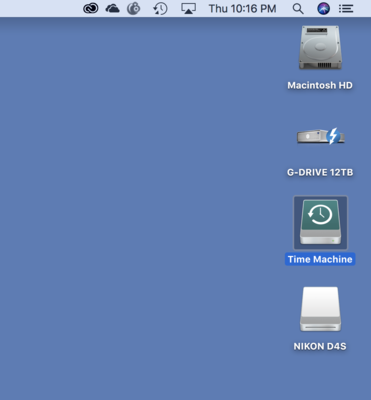
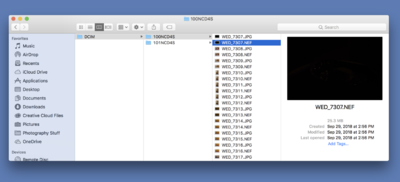
Alright!! I'm actually reading this post on my computer. First things first, YES...you do need to update. I can understand wanting to wait on Mojave, but please update to the latest version of High Sierra. It's up to 10.13.6 as I type this and is very stable. When Apple gets to xx.xx.6 (or even .5) the OS has most of the bugs worked out and is worth upgrading to. So let's get that done before we start dorking around with things. Oh, after the OS is updated, make sure you are on the latest versions of your software, including Adobe's products. Second, I'm going to copy and past my above comment and then delete it. I like keeping thing simple and when it comes to dealing with images on cards and transferring them onto a Macintosh Computer, it's always better to download via a card reader. Again, NEVER download from a camera via a USB cable when it comes to a Mac! Life is too short to deal with the unpredictability of trying to download one's images via a camera/usb connection on a Mac. There are too many variables of the camera being detected properly, having access to the images in a consistent manner, *SIGH," just don't. If you do not own a card reader, please purchase one. Life is so much easier with a card reader when it comes to Macs. Yes, even if you have been doing it this way for years, get a card reader and skip using your camera. The one I linked to is $32.50. I promise it will make your life simpler and take the guesswork out of the equation. Your images will transfer to the EHD a bit faster too. Third, I never use a program like bridge or whatever to download files to my Mac. As the common theme to this thread plays out...I ALWAYS use a card reader and manually copy the files from my card to my external HD. Once I have all the raw files moved over, then Bridge / LR / Photo Mechanic come into play. Now there is a bit of minor setup that you need to do to get this to work properly, and I will post screen shots demonstrating what needs to be turned on. This will take 30 seconds. Open the Finder Menu and head to the Finder's Preferences Section Head to the General Tab and make sure Hard Disks, External Disks, and CDs, DVD,s and iPods is checked. This will allow your Camera's Cards to appear on the Desktop, just like a Thumbdrive or External Hard Drive. After these items are checked, click the Red Circle in the upper left corner to save the changes. Now things like EHDs and other media like Thumbdrives & your camera's cards will appear on the desktop. This way all you have to do is double click on the card, go through a few folders, do a Select All (Command + A) on your Raw files, right-click on them and choose copy. Never "Cut" and paste important files, always use copy and then paste. This way if something screws up during the data transfer, you can go back and try it again. If you "Cut" files, you are moving (deleting) the source file and that is a bad thing to happen when something goes wrong during the data transfer. I speak from personal experience. I used to be a "Cut and Paste" person for years, like since Windows 3.0, and then one time did something go horribly wrong. I lost files for a client that were not recoverable or could be recreated easily. I learned my lesson on that one. Anyway, here is what you can expect to see on your Mac's desktop with those items checked: Here is a shot of my card a few folders down: As you can see, by using a Card Reader, you turn your Camera's Cards into an External Hard Drive, for lack of a better term. After you transfer your images, simply right click on the Card Reader and hit "Eject" to un-mount the CF / SD media. Easy-Peasy. -
Alright, I watched the video. It's still very fast, but I think that demonstration is what your camera is doing. It's trying to lock on the eye of the subject, where you probably put the AF point, but they move or turn their heads slightly and the camera goes hunting for a better target. You are really going to have to figure out all the AF modes on your camera. AF-C is a starting point, I'm just not sure about the other settings. We want you to make all the decisions and not the camera.
-
You could try a new cable first but I'd say you are in the market for a new display. Heck, even if you had the blue VGA cable laying around to just check things. You aren't editing, just looking at a white screen.
-

Backup!! Best software to do it? Win 10 Pro
Brian replied to Shawn Taylor's topic in The Windows & PC Hardware Forum
This is much easier to do on my computer than my phone. Found this: https://www.tenforums.com/tutorials/75607-manage-space-windows-backup-windows-10-a.html and this: https://www.backup-utility.com/windows-7/backup-and-restore-automatically-delete-old-backups-windows7-3889.html -
Oh good it still could be a cable issue, but most flaky cables are the older VGA style cables I can tell you I’ve replaced a dozen or so over the last few years If you are going to go 4K, do yourself a favor and go straight to DisplayPort instead of HDMI. Oh, if you get a beefy video card, make sure your power supply has enough watts to support it. Also, I’d look for a video card that has 8GB of dedicated video memory. As for which one, I’m in the market myself. LOL. Whatever display you get, make sure it has a IPS Display panel and try to get one that has a Matte Coating or isn’t Glossy. To 4K or not to 4K, that is the question. I’d look to a larger display of around 27” or more; I’ve found that cramming more resolution in a smaller physical area just makes things like icons, a bit small. BenQ displays, they are decent monitors for what they are, but have a history of difficult to calibrate. The ones I’ve come across in the field, tend to fail a bit more than other displays. Though this is more of a personal experience than a hard-and-fast rule. I approach things from a repair perspective; computer equipment is awesome and can have amazing reviews...but what happens when it breaks? How easy is it to get repaired? That’s why I usually suggest starting with Dell Monitors, sure there are better models / brands, l...but I recommend things for the masses and like to keep things simple. The main problem I have is that there are so many choices today!
-
That video goes really fast, but yes, this is the right direction. I saw a AF-C which is for moving subjects. I just need to figure out how to lock in the AF point. The problem is that there wasn’t enough contrast swing for the camera to lock on. Eyeballs from 20 feet away in crappy light is tough for any camera. I’m sure you are not on a single-point AF mode and on some auto mode, meaning you select the AF point, but the camera will pick something better if it can’t lock on. Personally, I’ve never touched a Sony camera. I might move this thread to the Land of Misfits after reading some manuals about the focus modes and still can’t figure things out.
-

Backup!! Best software to do it? Win 10 Pro
Brian replied to Shawn Taylor's topic in The Windows & PC Hardware Forum
Yeah, Windows 10 uses the Windows Backup from Win 7. I personally have only used it a handful of times, but you can configure it to overwrite each backup, so it won’t balloon in file size. Typically, when it comes to my customers, the most common backup software is Veritas Backup Exec. I think the latest is version 20. That said, backup exec is a professional backup software package and might be overkill for what you want. I think it would be best to use Windows Backup and do a weekly full backup (or monthly) and do an incremental daily backup. I’m going to have to think about this one. Personally, I just worry about data files being stored on an external drive and if my main drive craps out, oh well. I just do a re-install. Speaking of which, restoring can be a real pain with backup software. Have you thought about using a HD cloning program like Acronis True Image Backup? -
First, what video cable are you using? The traditional 15-pin / Blue VGA cable or something better, like DVI, HDMI or DisplayPort?
-
@Damien Symonds, could you answer this? This isn't a hardware question.
-
There lies the dilemma. If making the icons bigger doesn’t work, then all you have left to do is decrease the resolution.
-
The only way I can think of to do what you want to do, is choose a lower screen resolution that has the same aspect ratio of your monitor. So instead of 1920 x 1080, go for a size or two smaller. You can always put it back.
-
Do yourself a favor, hit the start button type "This PC" and it will appear at the top of the search Window. Right-Click on it and choose "Pin to Start" You will now have your "Computer" / "My Computer" back. You will need to delete the existing partition, create a new one, and reformat the G-Drive. It should take about 5 minutes. The process is the same as it was with Windows 7 and Windows XP. Microsoft keeps changing where things are located with each new version of Windows 10. You used to be able to right click on the start button and choose "Disk Management" but I'm not sure if they have taken it away. Anyway, that's where you need to be. You could try clicking the start button and type "Disk Management" or even "Format" and it should take you to the Disk Management program. Then you right click on the G-Drive and select "Delete Volume" and then then the whole drive will have a black stripe across it. Right Click again (on the black stripe / G-Drive Area) and select "New Simple Volume" and follow the prompts with the wizard. Give it a name like G-Drive 2TB and do a quick format. If prompted, since it's a 2TB drive, choose MBR for the partition type. GPT Partitions are for 3TB and larger Drives. Windows 10 is nothing like the nightmare of Vista or Windows 8. Trust Me. Have you tried right clicking on the taskbar, going into its settings and making sure that "Use Small Icons" isn't toggled on or checked? Oh, Windows 7 is going to be taken behind the barn and shot dead on January 7, 2020. So yes, we will all be forced to Windows 10 on that date if you want updates/security fixes.
-
Yeah, I can see the noise, though it's not THAT BAD. I agree with Damien, these photos are not Tack-Sharp. The Bass player photo is slightly salvageable, but with A LOT of help from PS and only to be viewed small on social media. It's not going to end up in your portfolio and I'd personally keep is small if posting on Social Media. Let's start with the Bass Player photo. From what I can tell, the camera locked focus on the word "Ride," since it seems to be a tad sharper than the rest of the photo. Or your lens is back-focusing slightly. There isn't enough of contrast swing on the eye and the light on his face is making the camera struggle. I would check your settings and make sure your camera is set to "Focus Priority" (or equivalent) instead of "Release." (or equivalent) Meaning, you will only be able to take the photo when the camera thinks things are in focus. Of course, you will end up on fighting your camera when it doesn't want to engage the shutter because it thinks things aren't in focus and that will result in missed shots. Which then folks will want it set to the other way, but that results in blurry, unusable photos. I'd rather have a noisy tack-sharp photo than a blurry one. The noise is typical for ISO 6400, and no matter what forum or review site or DxO score talks about your camera ISO 6400 is still 6400 and you aren't going to get the same results as if you shot at ISO 200 or whatever. Of course, sensors who capture at ISO 6400 are getting better, these photos remind me of shots taken with my D300s at around ISO 1600-2000. Now let's talk about f/2.8. The f/2.8 aperture will bite you, resulting in a DoF problem rather than a focus problem. f/3.2 is a lot more forgiving, so is f/4, and I know you didn't want to go above ISO 6400, but dropping your Shutter Speed isn't practical either. Especially if you are getting bumped while shooting in the Pit. Which takes us to the group photo... From what I can tell, your lens is back-focusing again. The only thing I can see that's sharp are the edges of the lights above the drummer; specifically, the gold/yellow light above the woman's head. That's in focus. Even the Microphone Stand over the drummer is more in focus than the people out front. At this point, I'd review your camera's settings, make sure that it doesn't try to use another auto-focus point if it can't lock focus. YOU want 100% control in situations like this. The camera will always take the easy way out. I'm wondering if there is some setting that needs to be changed. The other thing is to try using a different lens and see if you get better results. Especially in low-light situations like this. Your lens might need to be tweaked and hopefully your camera has a Auto Focus Fine-Tune. Anyway before we get ahead of ourselves, read your camera's manual and go over your autofocus settings. Try a different lens. Use f/2.8, f/3.2, f/5.6, etc. Learn your gear. You might find out that your lens is crap at 1.8, 2.8 and works best at f/4 or f/5.6. Or it's crap when people are more than 15 feet away and works perfectly if they are 5-10 feet away. I've had lenses like this. When I shot with a Crop Body and used my 17-55 f/2.8, photos were Tack-Sharp when the subject was 5-12 feet away and was "Ok" at 13-15 feet. As soon as they were 16-20 feet away, focus was soft and then I was reaching for my 70-200. I know you are going to be wanting to shoot at f/2.8 due to the light during musical performances. Which at that point you have two options: Send it in for repair and have it adjusted or buy a new (and better) lens.
-
Candy Crush: I found this: https://www.thewindowsclub.com/remove-candy-crush-saga-windows-10 Now, it is very important to right click on the Powershell tile and choose RUN AS ADMINISTRATOR before doing any Powershell commands. Yes, even if you are logged in as a Administrator, you need to elevate your Admin profile privileges. Taskbar: Do you want the Taskbar bigger or the Icons on the Taskbar to be larger? That's two different things. Screen Resolution also plays a role in how things, including the Taskbar, appear. That's why on Surface Tablets with 4K screens that things look so tiny. So it might be a resolution issue, or you have to adjust your icon size and not try to tweak the Taskbar Settings. Let's try changing the size of the icons, we can always set them back to where they were. Right Click on a empty space on the desktop Choose Display Settings at the bottom of the menu Move the slider below where it says "Change the size of text, apps, and other items..." to something larger, like 150% or 175%. Click Apply. You may have to log-out and back in for the changes to take affect, but probably not. If you problem still persists, you might have to physically make the Taskbar bigger. I found a decent instructions here.
-
Can I see the original photos before noise reduction? Because there seems to be multiple things going on. Same photos are fine, I want to see no noise reduction and no sharpening.
-
Yep, need examples, gear/lens info and what shutter speed / aperture / ISO used on the example photos Also, were you in the pit or further back?
-
Try it. You can always undo things. Let us know how it works.


