-
Posts
4,110 -
Joined
-
Last visited
-
Days Won
52
Everything posted by Brian
-
NTFS! NTFS! NTFS! NTFS! NTFS! NTFS! exFAT is over-rated since both the Mac OS and Windows OS will read and write to it. Manufactures love this because people think it's so convenient to go in between both worlds. BUT! It's not bullet-proof and can be as glitchy as hell. I personally think it's one of those "Tinkering with something in the Garage" that Microsoft did a few years back, and really haven't updated it much. In fact, I would NEVER-EVER-EVER use exFAT on ANY of my HDs. Especially ones with important data. If you want to go that route, that's fine, you are on your own...no help from me when it corrupts.
-
Yeah, Windows 11 has its own issues. I have yet to install it and play around with it. Windows 10 is a Mature OS, and I'm going to keep using it until I can't. The good news is, upgrading to Windows 11 Home when the time comes *should* be free. Microsoft is taking a cue from Apple.
-
Here is what makes a Mac Sluggish: Not enough RAM. You want at least 32GB in 2023. Hell, 64GB is nice to have. 16GB no longer cuts it, and 8GB...forget it. Full Hard Drives, internal or external, does not matter. You never want to go above 75% - 80% full on ANY HD. Once you go over 80%, performance takes a hit. If you are 95% or more full on ANY HD, you are in danger of data-corruption. Crap on your Desktop. I know it's convenient to store everything on your Mac Desktop, but the truth is, the more crap you have on your Desktop, the slower the damn thing runs. The reason is the macOS treats ANY file / folder that is stored on the Mac Desktop as an "Open Window," for lack of a better term. Got 1000 Photos from the Smith-Jones Wedding or the Sullivan Family Session of the park that is a few hundred shots? Well, the Mac considers all of those 1000+ images to be open Windows, whether you are doing anything with them or not. PS can also be glitchy by not having an updated macOS, I've seen outdated copies of Catalina causing issues with the modern versions of Photoshop. In fact, I had to update to Big Sur in order to stop Photoshop from Crashing. Lack of Video Card Power. Most folks are concerned about the CPU Speed, HD Storage and RAM when it comes to buying a computer. Well, now there is a 4th thing you need to be worried about: Purchasing a computer that has a Beefy Video Card with lots of Cores and dedicated Video Memory. In fact, I wrote a whole article based on this very subject, give it a read. Could you fill this out for me and post the results here in this thread? Details about your computer's health As far as a Clean-Up Program for your Mac, I highly recommend CleanMyMac X from Macpaw.com. You can download and scan your computer for free, just to see how much space it will free up for you, but if you want it to do anything, you'll need to pony up the $40 or so and purchase the program. (There are coupon codes to be found on a normal basis, be on the look-out for them.)
-
Final Thoughts... This error message is a Warning as of now, and eventually...this will not always be the case! Even though Photoshop, Bridge, and Lightroom appear to work, they will have performance issues or will occasionally freeze / lock-up on occasion due to a Video Card that isn't fully compatible; you can still run the program and edit your images just as you always have, warning messages and all...they will run in "Limp Mode" if usage of the Graphics Processor is disabled in the Preferences. If you do not have a compatible Video Card, Advanced Tools in Photoshop, like Liquify, and ACR will physically not work at some point! Meaning you are "Dead in the Water..." when this happens. I have no idea when this will occur, or even if it will, but Adobe keeps updating Photoshop and ACR on a regular basis, so this issue will only get worse as time goes on. Combine that with the FOMO that people often have, which forces them to blindly update to the latest version, and that leads to problems. Your first line of defense it to turn off Auto-Updating. That doesn't mean you can't install updates...it just means you are in control of when the update happens. If your computer is a few years old, by turning off Auto-Updates will save you HOURS or possibly DAYS of aggravation if something were to go wrong! That said, please keep this in mind... Being Conservative & Skeptical when it comes to updating software is a good thing, but it's important to not let your software get so far out of date, that when you are forced to update, for whatever reason, that it doesn't cause more problems than if you just updated in the first place. This not only applies to software like Adobe Photoshop, but other software as well, especially the Operating System and Web Browsers. Speaking of Computers that are a few years old, with Windows 10 being "Taken behind the Barn and shot dead," just like Windows XP, Windows 7, and all the rest. With Windows 11 being put into prime-time, purchasing new computers will be inevitable over the next few years as newer hardware will just perform better with a new Operating System. It's just a fact when it comes to computers, no matter what the Software Developers say. Now is the time to make better choices and seek out the Hardware that meets the present requirements for not only Today's Modern Photoshop, but for versions in the near future. Take this Warning to Heart and pay attention to the details on your next Hardware Purchase or run them by me before you click "Buy."
-
I'm afraid so. This is where the refresh of "Buying a Computer in 2023" comes into play. There are more things to worry about in 2023 (and beyond) when choosing a Computer for Photo-Editing and it's something we are all going to have to get used to. Here are the current specs I would look for when looking for a Windows Computer: Latest Intel i7 or i9 CPU (or AMD Equivalent) 32GB of RAM at a minimum. 64GB is preferred. Main Hard Drive of 1TB. Do NOT buy a Computer / Laptop that only has a 250GB or 500GB Main HD. A Dedicated High-end Video Card, such as a NVIDIA RTX 3070Ti or NVIDIA RTX 3080 with at least 8GB Dedicated Video Memory, or better. If the card comes with 12GB of VRAM, even better. No, a NVIDIA 3060 model isn't "good enough" heading into 2024, and I will die on this hill with this statement. A IPS-Based Display Panel with 95% or greater sRGB Coverage. Regardless if this is a Desktop Display or Laptop. I will warn you, finding a IPS Display in a Laptop is really difficult, so if you do find one, be ready to click "Buy" at a moments notice. Power Supply that has enough Wattage to support the more robust Hardware. I like Power Supplies that are around 850 watts. An APC Uninterruptible Power Supply or UPS to keep your computer running in the event of a power failure, so you can have a graceful shutdown. At least a 1500VA model with a 850 Watt Power Supply. If you are planning on doing Astro Photography that requires lots of stacking of images, or are into large Panoramas, I'd have a second, dedicated HD for the Photoshop Scratch Disk, 1TB-2TB, and even more RAM than 64GB if your motherboard supports it. 128GB of RAM isn't a bad thing. Neither is something like 96GB. Remember, you can NEVER have too much RAM or Hard Drive space, but the cost needs to be balanced to what your requirements are. But again, "Bigger-Better-Faster-More" is always preferred when working with many large image files at once. Again, when buying a new computer, the choice of Video Card is more important than the choice of CPU going forward!!! I'd rather have a member here save money with a high-end Intel i7 CPU and take those savings to put towards a better Video Card. If Photoshop isn't coded to take advantage of all the performance coming out of a CPU, it won't use it, no matter how much money you spend. Since Photoshop and ACR will primarily use the GPU in order to function, we need to pay special attention on what Video Card we choose when buying a new computer. I really recommend the NVIDIA 3070TI or 3080 using the NVIDIA Studio Drivers, but the 4000 Series is starting to look more appealing. The downside to the NVIDIA 4000 Series, is they seem to not have a Studio Driver Version of their software, which is meant for use with Photoshop and other similar products.
-
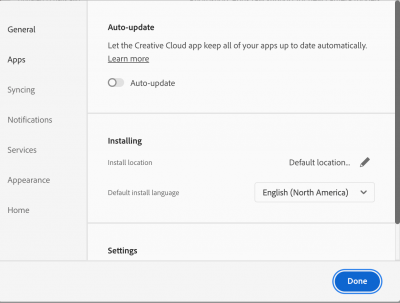
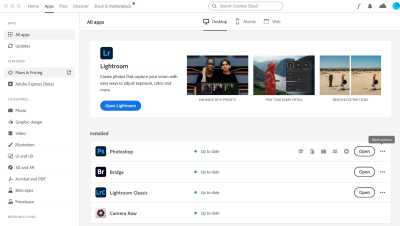
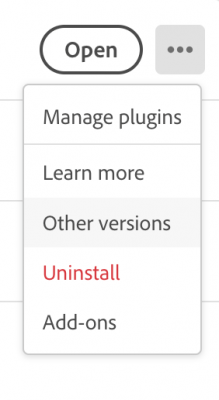
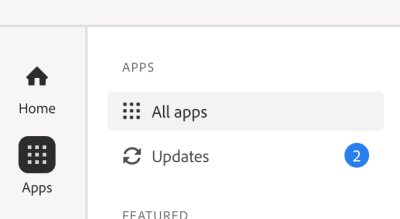
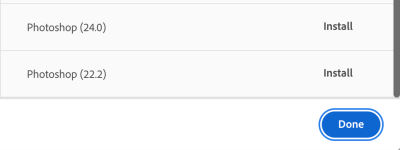
Actually yes. Adobe has created a Document with suggestions that I'd be willing to try. At this point you will need to Downgrade your version of Photoshop CC, but also your version of the ACR Plug-in and Lightroom to the last version that worked with your computer and you will need to stay at that version! Upgrading to the latest version of the Creative Cloud's Products no longer applies to you. Yep, you read that correctly. Suck-it-up-Buttercup! No upgrading for you!! Not yours!! All kidding aside, the first step you need to do is to turn off Auto Updating in the Adobe Creative Cloud Mothership App. Here is what it looks like on my Mac. The Windows version might have it next to the Clock: Then it's just a matter of finding the setting in the Apps' Preferences: Turn Off the Switch next to 'Auto Update' Of course, I'm on a Mac, but if you are on a Windows Computer, it's the same procedure and you just need to figure out where the Preferences are and flip that Auto Update Switch. It also might be a check-box, but it's the same concept. At this point, I would seriously back-up your PS Actions, Brushes, etc. and be ready to re-install things! Also, find the License Keys and Login Info (usually an e-mail address) for whatever Plug-ins that are installed into Photoshop. You'd be surprised on just how quickly these things get lost and what a PITA it is to get them re-sent. Let's continue. Head back into the Adobe CC Mothership App and choose "All Apps" in the left Column. This step is VERY IMPORTANT!! A closer look: Again, make sure All apps is highlighted!! (If you have "Updates" selected, you won't see anything.) From there you should see the program, like Photoshop, or Lightroom, that you want to downgrade to, in the list. Towards the right side of the Window, on the same line as "Photoshop," there is a "Open" Button followed by THREE DOTS. Click the Three Dots and select "Other Versions." From there, you will see the list of the older versions of Adobe Photoshop and currently, Version 22.2 is the oldest you can go via the Mothership App: Simply click "Install" and let it download the installer and go through the process of installing an older copy of Photoshop. Keep in mind that it will install next to the current version, 25.xx, and may ask you if you want to uninstall that version. Or it may not. I've never personally done this. Bottom line, either it will prompt you to remove version 25 or not. If it doesn't, then removing the software is pretty straightforward via the "Adobe CC Mothership App." Head back into "All Apps" and then click the Three Dots on the right side of the Photoshop 25.0 in the list, then select Uninstall. If you are looking to go back to Adobe Photoshop CC 2020, you will need to contact Adobe Support and have them e-mail you the install file link. If your computer is 5+ years old at this point, chances are Version 22.2 isn't old enough and you will need to contact Adobe Support. Coincidentally, to uninstall the version of Photoshop that isn't working with your computer, it's the same process, just click Uninstall next to the software that you want to get rid of. TL;DR: Turn off Auto Updating in the Adobe CC App Backup your PS Actions, Brushes, and Plug-ins Install a version of Photoshop that last worked with your computer Remove the newer version of PS to reclaim HD space Reinstall Actions, etc. into the older version of PS, if needed Do not upgrade to any newer version of Photoshop, at least until you purchase a new computer
-
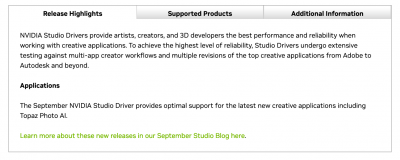
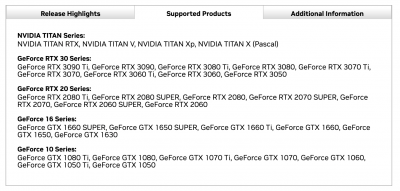
The truthful answer is, "...it depends." The first thing that I recommend is checking whether or not your computer is using the correct Video Card. Many Laptops have two Video Cards, one meant for General Computing and one meant for more Performance / Gaming. Why do the Manufacturers install two Video Cards? Battery Life. The Beefier / Faster the Video Card, the more Power they require, which drains Battery Life. People want their Laptops to last more than an hour when working away from a Power Source and you can't change the laws of Physics when it comes to batteries, so they are forced to install two video card GPUs. One meant for General Computing and Battery Life & the one for Performance. Unfortunately, most are not aware of this, and you can't force Photoshop to use one over the other one, since the Windows OS makes that decision. Adobe has created a Document with a few steps that you can take to address this issue. The short version is, you need to Disable the lower-end Video Card, make sure you are using the correct video port on your Desktop Computer if needed, reboot...try Photoshop again using the "Better" Video Card and hope for the best. If that doesn't work, then we 1st need to figure out what Video Card you are using and to see if there are any Video Driver Updates are available. Keep in mind, that the Windows Drivers DO. NOT. COUNT! So if all you have ever done is use Windows Update to keep things current, this is the most likely source of your problems; meaning a trip to the Manufacture's Website may be in order. OR! A visit to your Computer Manufacturer's Website, (e.g. Dell, etc.) to get the updated Drivers. Sometimes, the OEM Manufacture's Drivers and the 'Dell's Version of the Video Card' use their own Drivers and you could make things not work installing the wrong drivers. Your Mileage May Vary and there isn't a hard-and-fast-rule. Basically you try something and find out. Then you figure out how to un-do things, if you screw up, and try again. I've done this professionally for the last 30+ years. It's mostly dumb-luck when it comes to updating Drivers and to stop fixing things when they start working. Sometimes, people have the wrong Video Drivers installed. The default drivers can either be Microsoft-based Drivers or Graphics Card Drivers that are meant for playing Video Games. NVIDIA has a set of Drivers called "Studio Drivers" that are meant to be used with programs like Lightroom, Photoshop and even software from Topaz! From NVIDIA's website: For the Macintosh folks, the Video Drivers are part of the MacOS. Current Mac Computers can't be upgraded, so if you didn't opt for the more advanced Video Card at the time of purchase, you are buying a new Mac. Sometimes, you can update the MacOS and it works temporarily, but in reality...you are on borrowed time and I'd start saving for a new Mac. Like now.
-
This error message has been more frequent with the latest versions/updates of Adobe Photoshop CC & the Adobe Camera Raw Plug-in, or ACR, which has resulted in an up-tick with questions similar to these or variations of them: Eeek!!! The "Dreaded Graphics Processor Acceleration Error Message!" Sometimes an error message of "Your Graphics Processor is incompatible." will appear in its place. So what does this actually mean? Bad News, I'm afraid... What Photoshop is telling you, is that your Video Card or Video Card's Graphics Drivers no longer meet the minimum Hardware Requirements for use in Photoshop. The Drivers could also be incompatible and simply need to be upgraded/replaced. It is also very likely your Video Card itself needs to be replaced with a newer model due to lack of Processing Power and/or lack of Video Memory. If your editing computer is a Laptop, that means you are buying a new Laptop since the Video Card is integrated to the Motherboard and can't be replaced. See why I use the term, "Dreaded?" I've written an article, "Buying a Windows Computer in 2023," and the Macintosh equivalent, "Buying a Macintosh Computer in 2023," but I'm thinking a refresh for the Fall of 2023 might become a reality. What Adobe is doing, is adding A LOT of new features, including AI Modules to their software which requires a higher-end Video Processor called a GPU (Graphics Processing Unit) and having "enough" dedicated Video Memory, known as VRAM, in order to function. Which in 2023 and beyond is at least 8GB of Dedicated Video Memory at a minimum, more if you can swing-it, like 12GB+. If your computer is fairly new, the problem is you didn't buy the "wrong" one or a "bad" model, the main issue is you didn't buy "Enough." As in you purchased a 3 Door Hatchback, but need to go off-roading in the Mountains and drive through Rivers & Mud, which requires a Beefy Raised 4-Wheel Drive Vehicle of some sort. You can drive to the Grocery Store in either Vehicle, but the 4x4 Model is better suited to off-roading or driving through difficult Terrain. See where I'm coming from? Rather than buying what you could afford, your purchase should have been based on what you NEEDED, and those are two completely different things that usually require bigger budgets for the latter. A "Computer that's Good for Photo Editing" will set you back around $2000 -- $2500, depending on features in 2023. Windows Laptops, a bit more...and I'd budget for at least $2500+. Macs are over the $4000 price-point, either with a Desktop or Laptop Model. Of course, you can always find deals, and I encourage people to find them / prove me wrong, as I hate wasting money on this Sh*t. The thinking of having a "Fast CPU" was correct 20-30+ years ago. Hell, it even applied 7 years ago. Where you would purchase a 486DX-2 66MHz over a 486DX 33MHz because it was "Better" or "Faster." Graphics Cards weren't a big deal until CD Media came on the scene in the late 1980's / early 1990's. Then Games became much more robust so you needed a better Graphics Card in addition to a fast CPU. But when it came to Adobe Photoshop, it wasn't coded to take advantage of a fast Graphics Card, so you didn't have to worry about it. All you needed to be concerned with is having enough "Horsepower" from the CPU, having enough RAM to work with and Hard Drive space to store your images. Fast-forward to the 2020's. Video Games have become so advanced that the cut-scenes look like Movies, and the overall play-through tends to be immersive. Which requires a Video Card to support these games. Since a Video Card only has to worry about producing Video, and it has a different and more efficient architecture than a CPU, it becomes an ideal candidate to help boost a software's performance. The CPU on the other hand, has to worry about what the Motherboard is doing, what's stored in RAM, getting the data from the Hard Drives to the RAM, etc., etc. It has a lot on its proverbial 'plate' during normal operation. Video GPUs do not. They just have to worry about producing an image on a monitor. This is why Crypto-mining uses fancy video cards instead of CPUs to crunch data, same concept. OK, so let's get back to Photoshop and why it's giving you this error message. Adobe in 2023, and going forward, has opted to encode their software, like Photoshop CC and ACR, to use this untapped resource (the Video GPU) to make things more efficient and to make their new fancy AI Modules, along with the ACR Plug-in, to physically operate! You almost have to think of your Video Card as a "Computer within your Computer" and it needs to be powerful enough for not only the current versions of Photoshop, but for future versions going forward. This in turn, increases your minimum hardware requirements when you purchase a new computer, which then increases the cost...AND! put's you in the Market sooner, rather than later. To further illustrate just how much Video Cards have become their own computers, take a look at this YouTube Channel -- NorthWestRepair. This Person does component level repairs to the Video Cards that I'm talking about and in the video, you can see how physically large these new devices are when you hold them. Please keep in mind, the days of blindly updating to the latest version of Photoshop CC are OVER! For Mac Users that are reading this Article, upgrading your macOS could also cause you issues! Remember how I stated above that 20+ years ago Photoshop just used the CPU, RAM and HD? Well now you have to worry about getting a Big & Powerful Video Card to go along with it. In addition, fancy Video Cards require more Wattage to work, so if you have an older computer, you might be forced to upgrade your Power Supply in addition to the Video Card! Even then there is no guarantees that everything will be fine. Your Motherboard may not be powerful enough to fully support the new Video Card and-and-and... ...you can see how quickly and expensively things can get out of hand. Remember, at this point, I'm just talking about a Windows Desktop Computer, not a Laptop. Laptops have less choices than Desktops, they always have. So if you get this message and are running on a laptop, it's time for a new one. Yes...even if you just bought it 2 years ago! Again, the problem is that your Desktop Computer/Laptop wasn't a 'bad' choice, you just didn't buy "Enough."
-
To answer your question, the most important choice going forward when it comes to Adobe's Products is the Choice of Video Card!! Believe it or not, it is NOW MORE IMPORTANT THAN THE CHOICE OF CPU!! For heavy duty things like Panos or Image Stacking, the more RAM you have, the better, (at LEAST 64GB.) The higher-end the Video Card, the better. At least a NVIDIA RTX 3070 Ti with 8GB Dedicated Video RAM. Hell, the 4000 Series is looking better going into 2024. I'd have at least 1TB-2TB of space available for the Scratch Disk as well, so either your Main HD needs to increase in capacity, or I'd recommend having a dedicated drive just for Photoshop. Also, your power supply needs to be able to support the high-end video card, and I'd recommend around 850 Watts in 2023.
-
What Video Card do you have? 232GB Free is microscopic for resolutions of what you are trying to do. I'd honestly have at least a 1TB or larger HD that's dedicated for your Scratch Disk if you are going to be doing things like this. 64GB of RAM (or more) is also a good thing. I have dealt with file sizes in resolution like that with my Nikon D850. The solution is to upgrade your hardware, what you have is not enough. Hell, 64GB just barely keeps up with my Mac. My new computer will have more RAM! In the short term, try doing 1/3 of the images at a time, then combine the three main images. That's what I'm doing now with my large Panoramas. Trying to do everything at once makes my computer cry.
-
Yeah...it tears me up inside having to recommend a stupid $1600 Display! It really does. That sucker is overpriced for what it is. The up-side is you can purchase a Mac like a Mac Mini or Mac Studio a few times using that same Display. So it's more of an "investment," (and I use that term loosely,) meaning it's very much like buying a Pro-Grade Lens that you will use for 10-20 years and just replace bodies as needed. In addition, a new Mac Laptop that's "Good for Photo Editing" will set you back $4600. So $1600 doesn't seem so bad now, does it? Then when it comes time, you can replace that Mac Laptop with a tricked out Mac Mini that will not only be cheaper, but run MUCH FASTER than that Laptop.
-
Apple wants you to "Go Big or Go Home." Keep saving, otherwise you are WASTING money, no matter what you tell yourself.
-
Apple purposely designs their products that only Apple Computers will perform at their best with Apple Displays. Here is a comment from someone who had a "High-End" BenQ Display and finally broke down and bought the Apple Studio Display: Here is my response:
-
Nope.
-
No to Viewsonic.
-

Home printer recommendation?
Brian replied to Cathy Stark's topic in The Windows & PC Hardware Forum
For home use, I prefer a B&W Laser Printer, since the cost per page is so low. Toner does not dry out and you can get 1000-1500 pages (or more, depending on the Toner Cartridge Capacity.) In fact, I have replaced my Toner twice since 2005. I can give a recommendation AND instruct you on how to set it up so that everyone in your household can print, even from their Smart Phones if you did decide to go with a B&W Laser. To print photos at home? That's going to be either a Canon or Xerox Ink Jet type of printer. Just make sure whichever printer you choose, you do not want one that REQUIRES internet access in order to use it. Manufacturers like data-mining and having the ability to monitor when you need to replace your ink cartridges. Usually the cheaper ones from HP do this sort of thing, so be sure to read the fine-print or check with me 1st. Oh, you will also need to budget for a different type of calibrator, one that calibrates your printer and display to your personal printer. I can't stress enough that it's stupidly expensive to print your own photos. I'd rather have you buy cheap .37 cent 4x6 prints and wait a day or two instead of forking out $500 for a calibrator, then the money for the printer, then the money for the photo paper and finally, the $150 worth of Ink Cartridges you will need to buy. Even if you went with a inexpensive Color Laser Printer, the cost per page is stupidly insane, because there are four $150 Color Toner Cartridges, a Transfer Belt and Fuser that are all considered to be consumables. For me, if I absolutely needed a photo, I'd go to my local Camera Store and print it there. Or hit up Staples if I needed a color document. -
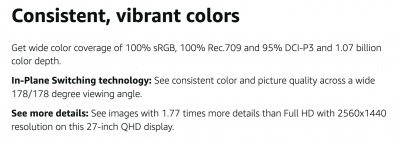
SKIP IT! It's not a IPS-Based Display Panel, which is a must if you are editing photos. Spend an extra $40 and buy this one instead: Dell UltraSharp U2722D 27" IPS Display Notice how the advertisement goes out of their way to tell you it's a IPS Display? (In-Plane Switching) For example:
-

Need Recommendation for External Blu-ray Drive
Brian replied to Apprentice's topic in The Windows & PC Hardware Forum
Yeah, since you are going for the M-Disc Media, definitely something like that drive. In fact, BUY IT! (OWC makes decent case stuff and they are using a LG Drive.) Plus, with a Drive like you just linked to, it's WAAAAAAY more sturdier than a flimsy external drive. You are going for Archival Grade, so you want "Beefy." -
NOPE. If you want to "Purchase" Photoshop, you are buying Photoshop Elements. You can thank the software pirates for that one. Photoshop was THE MOST PIRATED SOFTWARE IN THE WORLD AT SOME POINT. In fact, I took a look at the Torrents years ago and calculated that Adobe was losing about 2 Million Dollars just between three Photoshop Torrent Threads. I'm sure there was a lot more being lost. Believe it or not, Photoshop is CHEAPER today with the $9.99 Photography Plan vs if you purchased it outright. Back in the day, Photoshop ran you $699 or so and you were expected to purchase the upgrades every 2-3 years at $299. (Remember, Photoshop is a PROFESSIONAL PROGRAM, people often forget that.) So if you figure $700 and $300, plus Tax...puts it around $1060 at 6% Sales Tax. (Some places might be more, others less...so let's just go with $1060.) Let's figure you will use Photoshop for about 7 years, sticking with the current version that you purchased. Like CS5. (We aren't talking about all of the CS6 or any other updates, just CS5 or CS 5.1, 5.2, etc., just that version.) At $1060.00 divided over 7 years is $151.43. If you divide that payment by 12 months, you get $12.62. So that $9.99 plan plus local sales tax is CHEAPER than what you would have paid for that version of Photoshop for over 7 years! Plus!! With the Subscription Plan, you always get the latest version of Photoshop! If you were to upgrade your purchased copy of CS5 and got CS6, you'd be out another $1060-ish. See what I mean? The problem is people buy a copy of software, like Photoshop, and expect it to run for YEARS. Companies can't make money that way, they need you in the Market sooner, rather than later. Now figure in all the Pirates who stole Photoshop because they didn't want to pay the $700. So I'm sorry to say, the Subscription Model is here to stay. Be sure to get the "Photography Plan" for $9.99 and do not pay for the "Cloud" versions that cost $19.99. Hell, the Photoshop Only plan is even more expensive. Edit: I pay $10.59 each month for my Photoshop CC Subscription, after tax. So if we figure the above rate of $12.62 each month if I purchased PS outright, I pay $2.03 less each month by subscribing to Photoshop. So in the end, it's pretty much a wash if you think about it.
-

Need Recommendation for External Blu-ray Drive
Brian replied to Apprentice's topic in The Windows & PC Hardware Forum
You can buy practically any external USB Blu-Ray Drive these days. The cheaper ones should be around $60-ish, but they can be limited, especially when it comes to archiving stuff. (This is an attempt to cut down on Piracy.) Personally, I bought this Internal Blu-Ray Drive and this External Case to convert it to an external. The reason is I was able to Downgrade the Firmware so I can create my own "Netflix/Cloud" service and have all of my movies on a Plex Media Server, which will be run from a NAS, so archiving is what I had in mind. Of course, I haven't gotten around to building one, but will eventually. (Waiting for the SD Media to get a little larger in capacity for a NAS.) -

Need Recommendation for External Blu-ray Drive
Brian replied to Apprentice's topic in The Windows & PC Hardware Forum
It should be. That said, Digital Rot is a very real thing. Supposedly, they are rated to last around 1000 years, but the technology is new and that has yet to be proven outside a lab environment. -
I'd get the RTX 3080 or a 3070Ti with 8GB of Video RAM at a minimum at this point. The 3090 isn't worth it, not THAT much of a performance boost. Skip the 3060. Also, keep in mind you might have to upgrade the power supply to support this new video card. I usually recommend 850 Watt Power Supplies. OH!! Be sure to download and install the NVIDIA STUDIO DRIVERS!! The Studio Drivers are meant for Programs like Photoshop and Lightroom. The standard drivers are meant for General Computing and Video Games. You want the Studio Drivers. Why spend the extra $400? Because of the AI Crap and all the other Bloatware, I mean, "Features," that Adobe is adding to Photoshop CC. Even though a 3060 would probably work "fine" for right now, I can't guarantee that will be the case 3-6 months from now. KWIM? Saving $400 could be worse than blowing the money on a 3060, only to upgrade things in 6 months. Buy it Right - Buy it Once!!
-

BenQ PD2700U vrs BenQEW2780Q Premium
Brian replied to Robin Renee''s topic in The Windows & PC Hardware Forum
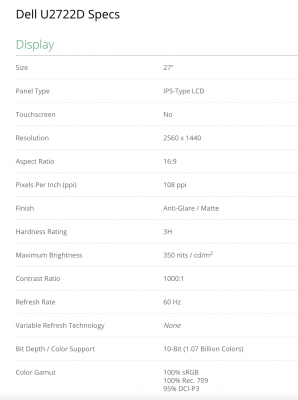
I've been recommending the Dell U2722D 27" IPS Display. I would recommend using DisplayPort for the connection if you have one on your computer. Otherwise, HDMI is fine. This display is just under $335, which is reasonable. I'd buy this one if it were me. Hell, I'd buy two of them and put them on Monitor Arms for a Dual-Monitor setup. Here are the specs, and what I look for when choosing a Monitor for Photo Editing: 27" IPS LCD 2560 x 1440 Resolution Anti-Glare / Matte Screen 95% or better sRGB. (100% sRGB is even better.) DisplayPort and/or HDMI. I'm not worried about bit rate and all that. Unless you are doing your own printing and have your personal printer calibrated to your screen, do things like that matter. If you are a digital-only photographer, it really doesn't matter when it comes to the advanced stuff because your images will either be displayed on a Phone or crappy un-calibrated display. Oh, and why only 95% (or better) instead of 100%? sRGB is 16.7 Million Colors. The average human eye only sees about 1 Million, give or take a few hundred thousand, depending on the person. So don't sweat the advanced stuff like 10-Bit vs 8-Bit. That's just Marketing trying to convince you to buy the more expensive model because it has "more" of something. -

BenQ PD2700U vrs BenQEW2780Q Premium
Brian replied to Robin Renee''s topic in The Windows & PC Hardware Forum
Damien and I have had good luck with Dell UltraSharps over the years and getting them calibrated. We have had more members just get frustrated with calibrating BenQ Displays, but some are pretty easy. It’s such a toss up and I can't give a straight answer. -

BenQ PD2700U vrs BenQEW2780Q Premium
Brian replied to Robin Renee''s topic in The Windows & PC Hardware Forum
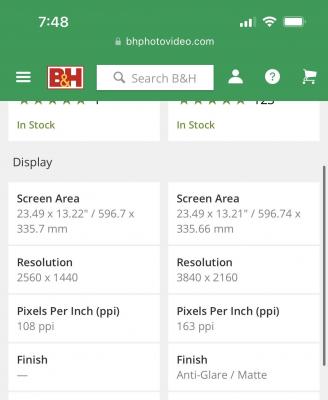
You are falling for Marketing. Bigger Faster Better More!! I’m not even worried about 8 bit or 10 bit. I’m worried about how difficult BenQ Monitors are typically to get calibrated correctly against a set of physical prints. It can go easy or be a complete nightmare. Generally, I don’t like BenQ Displays, but people keep buying them and wanting them and I’m tired of arguing. As for the anti-glare, I’m going by what I saw on B&H: See the “Finish?” If a reseller doesn’t list it, in my personal experience it doesn’t have it.

