Brian
-
Posts
4,137 -
Joined
-
Last visited
-
Days Won
55
Everything posted by Brian
-
Another thing that just came to my mind, you aren't using a STUPID UV FILTER TO "PROTECT" YOUR LENS? I hope you aren't. If so, take those suckers off and try things again.
-

Bridge 2022 and Photoshop 2022 causing my MAC to crash
Brian replied to Sancurtis's topic in The Macintosh User Group
Yeah, I have a few ideas, but I'm going to need more info. I've found that Catalina had issues with the latest versions of Photoshop, so I had to upgrade to Big Sur, which is mature at this stage and is perfectly fine to upgrade to if you have a 2017 iMac or newer. But before I explain how to upgrade, I'm going to need more info about your Mac. Post the results from the link that Damien gave you above. -
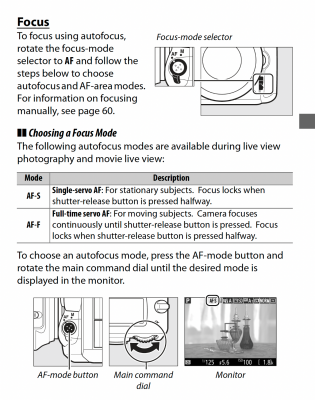
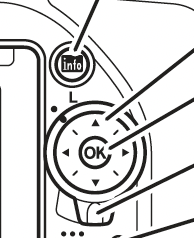
Page 57 in your manual: Make sure that switch below the release button for the lens mount is set to AF and not M. (Manual.) It's SO easy to bump this switch. Then press and hold the button in the middle of that switch and look into the viewfinder. Rotate the Rear Command Dial to see what mode you are on. I would check to make sure it's set to AF-F. Or, switch it to AF-S and see if that works better for you. Also, make sure your switch on the back of the camera is not set to L. It should be on the White Dot. The L means to "Lock" the Focus Point Selection. Now for your two new photos. At 2 & 10 Feet, they look fine in the Focus Dept.
-
You aren’t going to find much...if any, information about "Maximum Focusing Distance," because it’s a Brian-ism, made up by yours truly. It’s what I have found since I started shooting with SLR cameras in 1986. So it’s more of a personal experience of mine where my lenses started to get “soft” around 15 feet. I really noticed this with my 17-55 f/2.8 lens when I shot with my D300s. So I went testing with a tape measure and sure enough the lens was “fine” around 12-13 feet, “meh” at 14 feet and “soft” around 15-16 feet. You should be able to do the same, all you need is a tripod or something to put the camera on and a 25 foot tape measure. Then someone holding a Dry-Erase Board with the distance written on it. BBF, while a valid technique, is not the “Second Coming of Christ” that it’s made out to be. Yes, some people will swear by it, others like me can’t use it since I usually poke my eye when I do. I really think it’s a placebo effect as it makes people slow down and not jamming their finger when pressing the shutter button. You are supposed to exhale and squeeze the shutter button, almost like you are shooting a rifle. Unfortunately, people do the opposite, usually hold their breath and jam the shutter button. Now, I think you are looking for “Tack Sharp” as opposed to “Acceptable Sharp.” Virtually all Digital Photos need some sort of sharpening and sharpened to the appropriate size photograph for which they are intended. Damien has a whole “Print Sharpening Class” for this very subject, so I can’t get into too much specifics. Now, with your camera releasing without trying to focus seems to be that the little switch on the side of the camera is set to “M” or a switch on the lens is set to Manual. That’s not normal.
-
I'd also like to see something photographed with you standing like 5-10 feet away. Something like a coffee can with big letters. Then take a shot from 15 feet away, or where you would normally stand. Then as Damien mentioned, post 100% Crops and we can really judge things. Since you are having the same issue with multiple lenses, I want to first to verify your camera's settings and if those are fine, you might have to send your D750 to Nikon and have it looked at. Nikon D750 and focus problems are common.
-
Another thing about focusing systems, and why the "Maximum Focusing Distance" comes into play. In order for a camera to lock focus, it primarily relies on Contrast Swing. Which means it needs something obvious to lock onto that is bright/dark. Some AF Points are stronger than others, and these AF Points are known as "Cross Type." Not all AF points are these type, and those AF Points tend to be weaker. So by you standing 15+ feet away, using an AF Point that isn't a Cross-Type on someone's eyeball...that's a really-really-really tiny area for the camera to lock on, because you are 15 feet away...see where I'm going with this?
-
Yep. With that much distance between you and your subject, the DoF thing becomes less of an issue. Now the closer you get, the more you'd have to stop down for subjects on different focal planes. One thing I'd like to check is what Auto Focusing Mode are you primarily using? AF-A, AF-S or AF-C? (Page 121 on from your Camera's Manual) AF Area Mode, are you using Single Point AF or some other mode? (Page 123 from your Camera's Manual) Now, this is very important... I want you to hit your Menu Button and head to the Pencil Icon, which is the Custom Settings Menu. (Page 326 & Page 327 from your Camera's Menu.) A1 should be set to FOCUS PRIORITY - Your Camera's setting will either be "Release" or "Focus." YOU WANT FOCUS! A2 should be set to FOCUS PRIORITY - Your Camera's setting will either be "Release" or "Focus." YOU WANT FOCUS! I have owned several Nikon cameras over the years, from a Nikon D40 all the way up to a D4s & D850. With my shooting style, I tend to use AF-C AND set both A1 & A2 to Focus Priority. What that does is that it tells the camera to not take a photograph UNLESS it thinks things are in focus. Only if I'm really shooting sports and such, will I set things differently. Even with subjects standing still, I find that AF-C works better for me. That said, the person who I shoot Weddings with, she primarily uses AF-S, so your mileage may vary. Never-ever use AF-A. Honestly, it doesn't matter if you think your are going to "Miss a Shot" by not having it set to release. You can't deliver an image to the client that you have blown focus on. You are most likely not a Photojournalist of some kind that needs to produce a shot at the exact moment. Finally, lenses have a minimum focusing distance and believe it or not, a maximum focusing difference. I've found that 15-16 feet is the absolute maximum limit for lenses like the 50mm and 85mm. Even lenses like my 17-55 f/2.8 and 24-70 f/2.8. If the subjects are 15+ feet away, I'm reaching for my 70-200 f/2.8. So you might want to invest in a 70-200 Zoom if you are typically shooting 15+ feet away. Speaking of which, why are you shooting this far away? To leave room on the sides for possible prints? Walk us through your approach. Edit: PLEASE TELL ME YOU ARE NOT ONE OF THOSE PEOPLE WHO HAVE FALLEN FOR THE STUPID "BACK BUTTON FOCUS" BULLSHIT THAT IS SUPPOSED TO "TAKE YOUR PHOTOGRAPHY TO THE NEXT LEVEL! " Back Button Focus is a technique, just like everything else. Not everyone can use it effectively.
-
I like the NVIDIA RTX 3070 8GB Video Card using the NVIDIA Studio Drivers. Either the 3070, 3070 Ti or 3080 is fine. 3090...Photoshop won't take advantage of the GPU, you are wasting your money. Unless you are playing Video Games, then that's a different story. Speaking of Video Games, I mentioned the NVIDIA Studio Drivers. The drivers that are the default ones are meant for Video Games. The Studio Drivers are optimized for Lightroom and Photoshop usage.
-
Hardware specs look good for both. Enjoy your purchase. As to why sending it to an Apple Store? Porch Pirates. If you live in an area that suffers from that sort of thing, having a $4700 laptop sitting outside your door is a very easy target. But if you want it shipped to your house, that’s fine too. You are the judge when it comes to that.
-
Unfortunately, your video card was new around 2014, so we are around the 9 year mark technology-wise, which is ancient in computer terms. I’m glad you were able to get it going, but I say the days are numbered with compatibility with newer versions of PS. Adobe really changed things with video cards around 2021.
-
…and copy everything back! LOL! It’s a process…
-
Also, we need to see the Device Manager and know specifically what Make / Model your computer is. With 16GB RAM and it being 3 years old, I have a feeling you are one of the computers that I'm talking about that are around the 3 year mark; they don't have the Horsepower to run the current Versions of PS CC. Especially if the Video Card uses the computer's RAM and CPU in order to function.
-
I have seen people post about this issue before. Unfortunately, it's Photoshop not liking your Video Card and/or Video Card's Drivers. Today's Modern Photoshop CC relies heavily on the Graphics Processor and Dedicated Video Memory. If you do not have a "Beefy" Video Card or the Card / Drivers are "Orphaned" by the manufacturer, you are kinda SOL. People like the "Subscription Model" because they get access to the most recent versions of software, which is fine. But the problem is, their computer's hardware needs to keep pace with the software. As each version of Photoshop gets released, people will continue to have problems, especially if their computers are 5+ years old and some folks could have issues on low-powered computers that are only 3 years old! Gone are the days where you buy PS CS6 and run the software for 10+ years. Going from PS CC 23 from PS CC 22 is a whole new software package and before you upgrade, you really need to figure out what hardware you have and ask yourself will it support the new version of Photoshop. Now, what can you do? Try Damien's Tip. It may work. Other than that, see if there are any updated Video Card Drivers for your computer. If that doesn't work, you will need to downgrade to a version of PS that last worked with your computer and stay there...no upgrading for you! Other than that, if you want to run the latest version of PS, you are looking at a new computer. While it's true you could upgrade the Video Card, you'd more than likely have to upgrade the Power Supply as well. Depending on your Make / Model of computer, you may not be able to install a higher wattage Power Supply to support the new Video Card. I also can't recommend doing something like this to a 5+ year old computer. Take that $800 - $1000 you'd spend and put it towards a new computer.
-
Yeah, prices have increased. This is due to the Chip Shortage that's still ongoing, Import Tariffs on Electronics from China, and overall Inflation. My 12TB TB3 Drive was around $700 when I bought it, but there is a 18TB Available now for less than $1000. I'm starting to get a little low on space, and am thinking about going the NAS Route with 10gbps Ethernet, but I will do that with the next computer. Chances are I will build my own NAS Unit, or go with a Synology Model at some point. We shall see. I'm not shooting Professionally anymore so it's not like I'm going to eat up the remaining 5TB of data anytime soon. How's that data transfer going? You good?
-
The other thing that comes to mind, is to make sure you have the Manufacturer's Drivers for the Motherboard. I have seen OEM Chipset Drivers make a HUGE difference in performance vs the default MSFT Drivers. You really might want to look at the whole "Ecosystem" or Hardware Setup and chase down any bottlenecks; it might be very possible that I am wrong. This is the hardest thing with Hardware and building stuff, all the tweaking...it's trial-and-error and no one way to fix things. You have to fiddle. It sometimes takes HOURS. But...it's also how you learn.
-
I'm so used to Thunderbolt 3 Speeds, WHICH ARE WAAAAAAAAY FASTER THAN USB 3.0, that I forgotten how long it takes doing what you are doing over USB connections. Your 2 hours would be like 20-30 minutes if you had Thunderbolt Drives.
-
Go do something else, or sit there and watch paint dry. If it were me, I'd be watching paint drying or grass growing.
-
Sounds like you don't have a choice. Reading a drive is a lot less painful than when writing to a drive if it loses power. I'd do a Shutdown. I want that NTFS Software REMOVED. Deleted!! Kill-Kill-Kill!!! Not just closed.
-
Yes, you should be. I will bet that Translation Program is getting in the way. By default, you should be able to READ a NTFS Drive, just not write to it. You might have to reboot your computer then remove that blasted software. Then try my steps above. What you could also do is just try 1 or 2 files from the NTFS Drive to see if they copy over. I wish I got to you before your friend telling you to use that Translation Software. That was terrible advice. I'm not going to sugar-coat things, you are in a really fucked-up situation and could lose everything. The more I think about it, let's try just a few simple files that you can afford to lose.
-
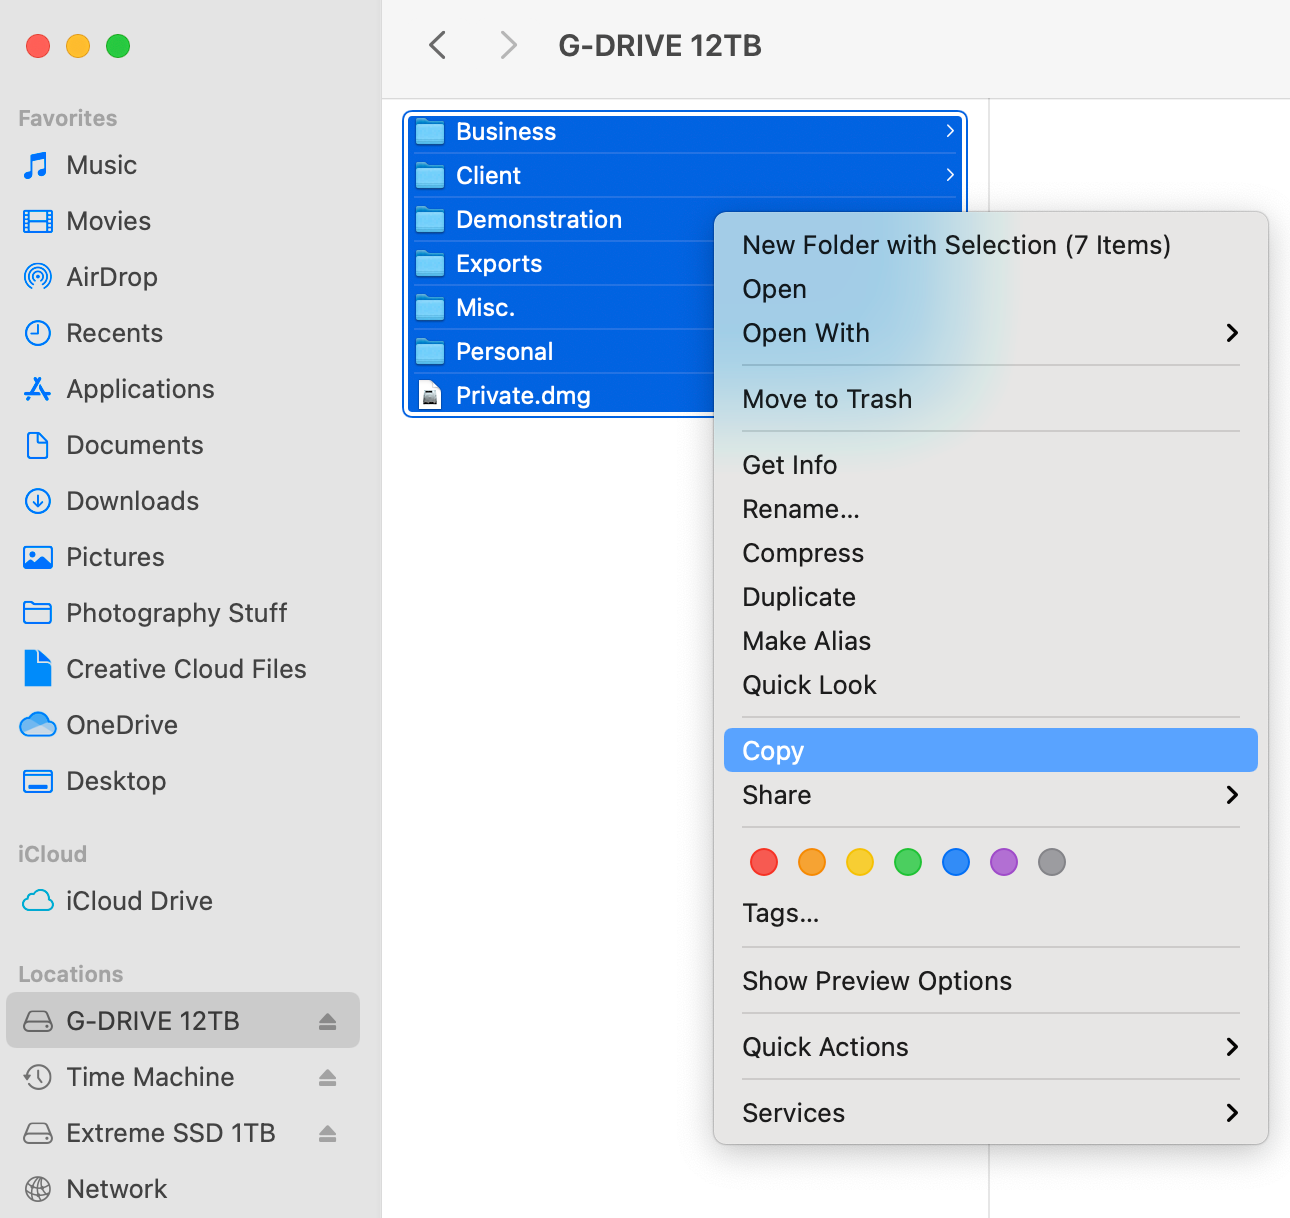
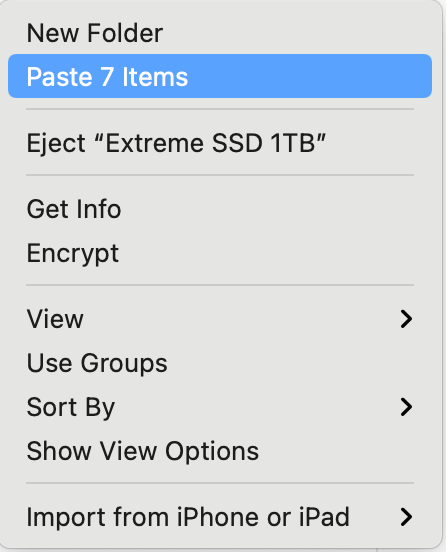
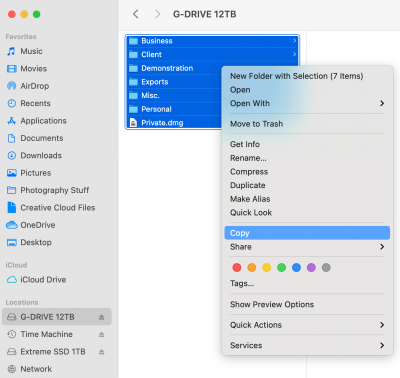
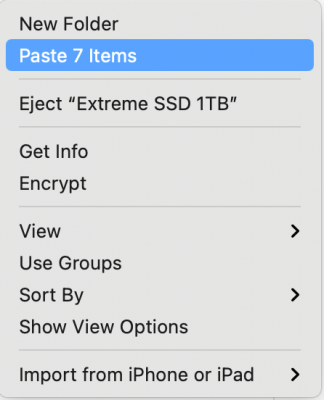
Now, the next step is the most critical one, and that is COPYING YOUR IMAGES FROM YOUR EHD THAT IS PARTITIONED AS NTFS!! The second most important part, is to leave the computer ALONE WHEN TRANSFERRING YOUR FILES! No e-mail, no Netflix, no Facebook, no Web Browsing, Pinterest, etc. I'd actually close out all programs and such and get your computer down to a basic level. We want 100% of your computer's attention being dedicated to this data transfer. If something were to happen and you get an error message, we can always cancel the data transfer and try again. This is why we COPY and not Click-and-Drag. Doing it that way is deleting the source file as it moves the file. There isn't an "Undo" in that case, which would be bad if that were to happen and you didn't have another backup source. I want you to open that NTFS Drive, and use the Keyboard Shortcut, Command Key + A. This should highlight all the files. Then Right-Click and select COPY. Open the New External HD and Right-Click and select Paste. There should be a number of files next to the word Paste. In my example, I have 7 main root folders on my External HD. After the data transfer is complete, verify access to the files on the new drive. Randomly spot check files. THEN after you are 110% sure you have everything, follow the same steps on the NTFS EHD and convert it to Mac OS Extended (Journaled).
-
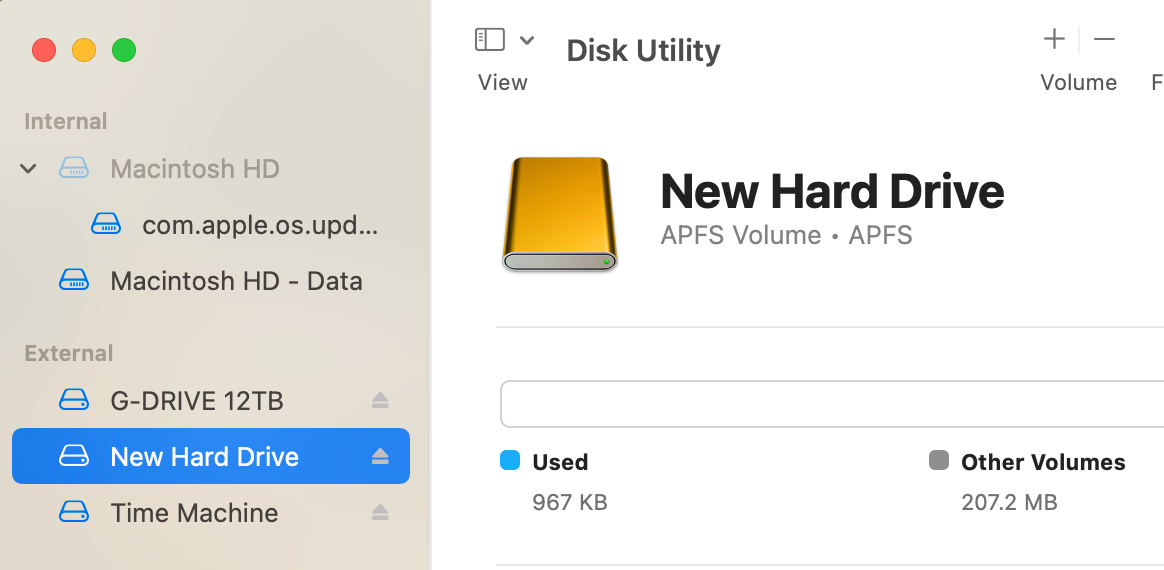
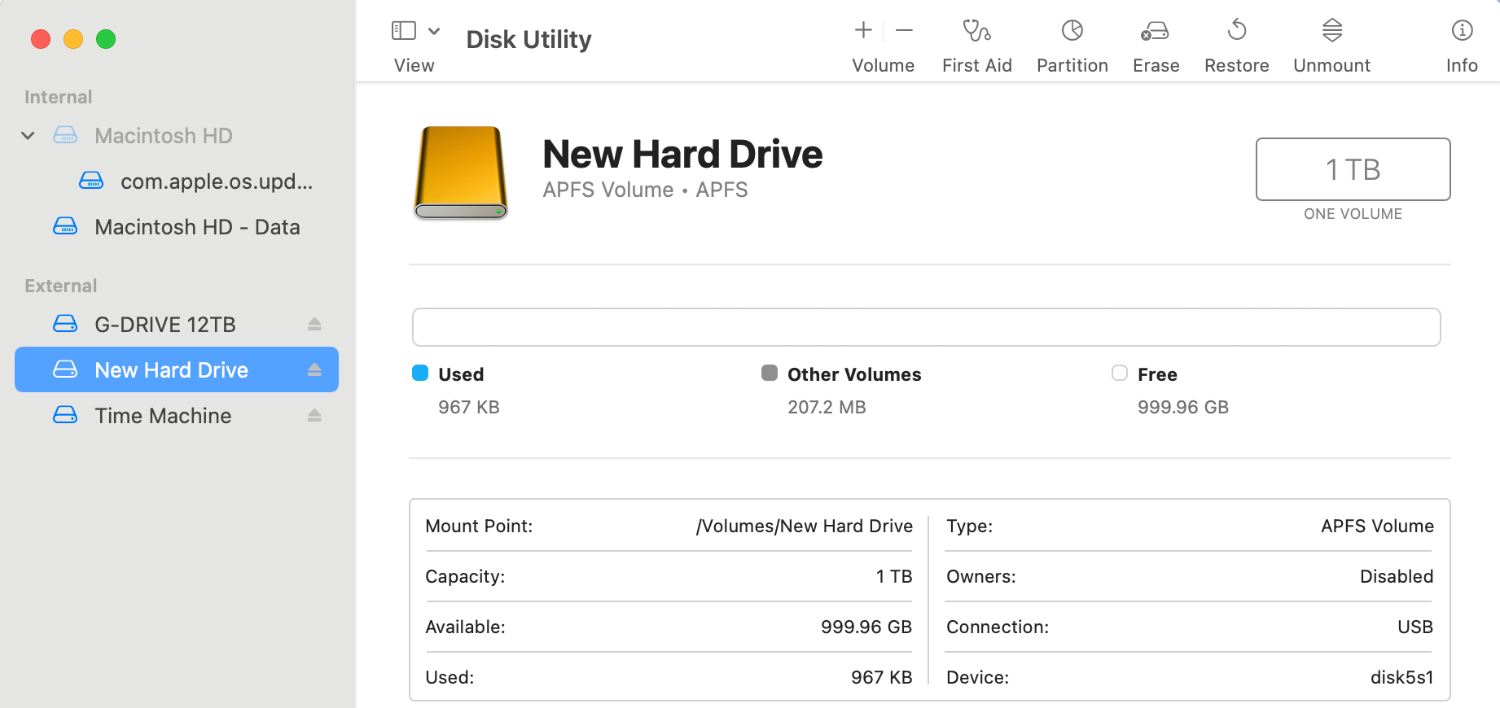
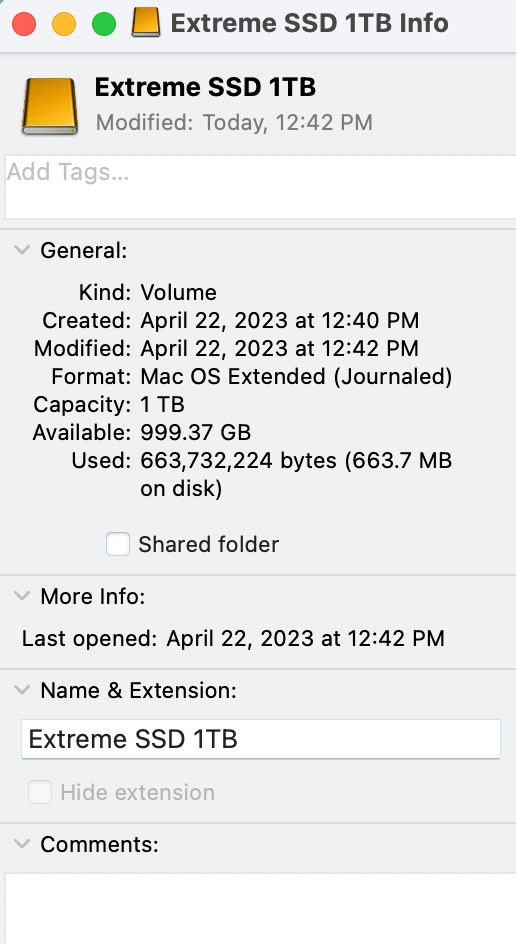
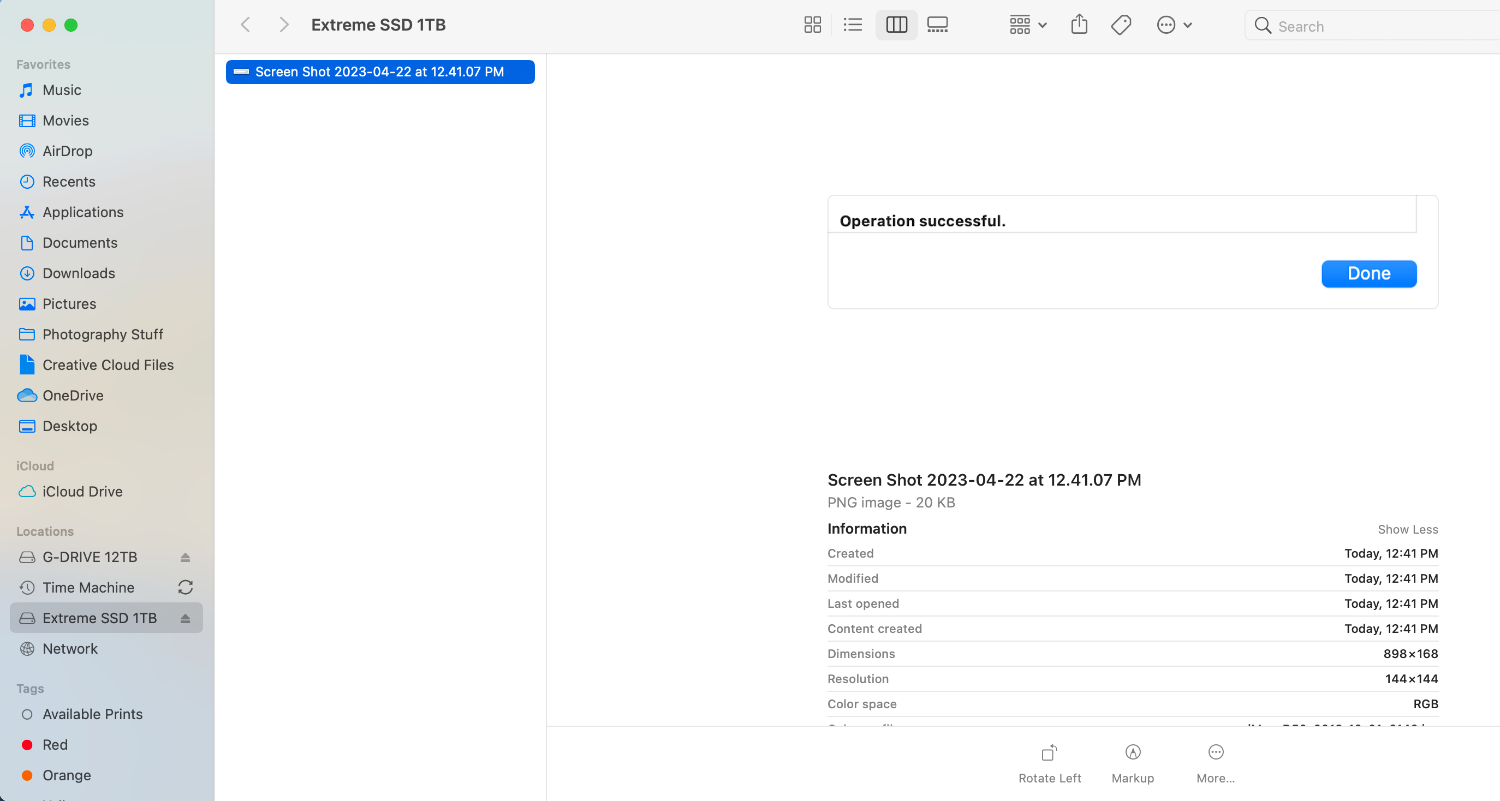
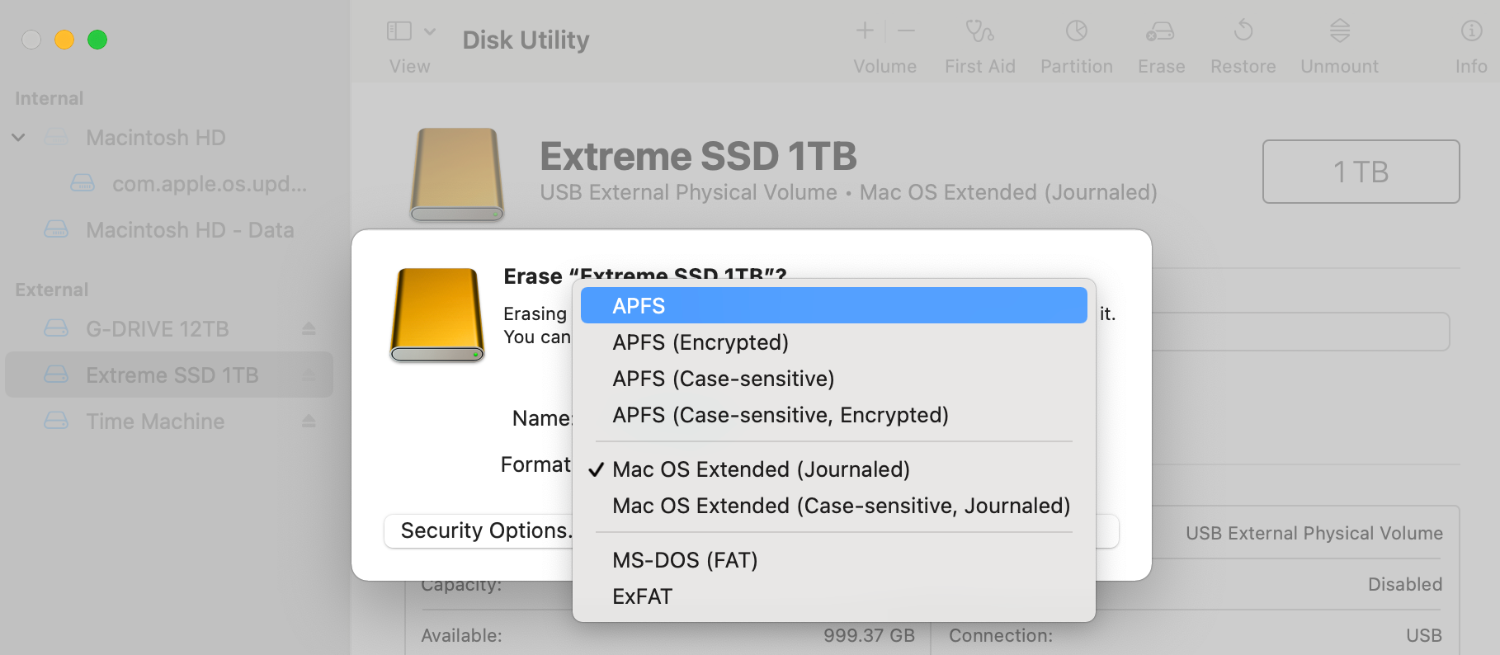
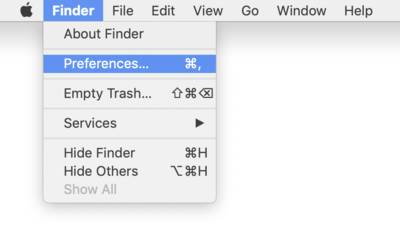
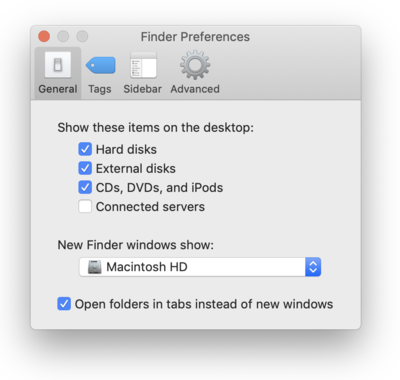
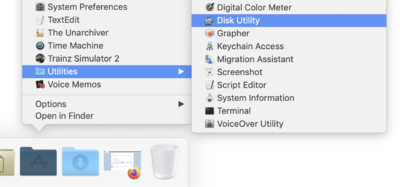
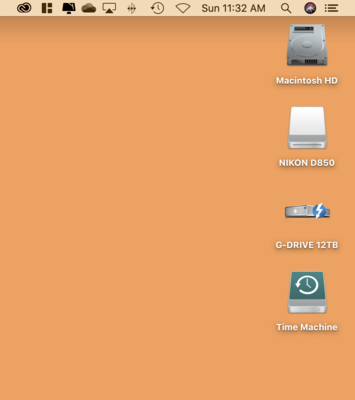
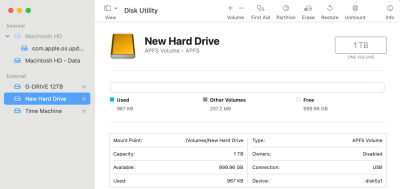
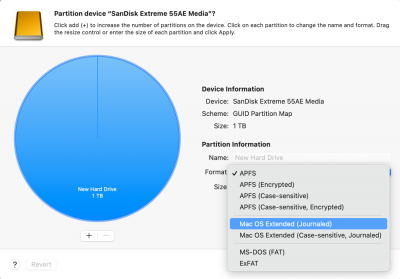
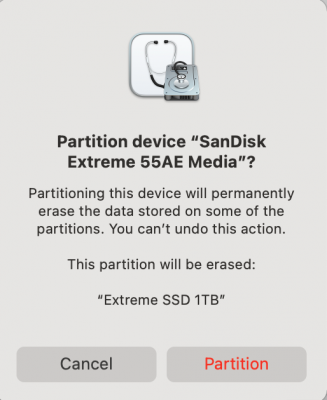
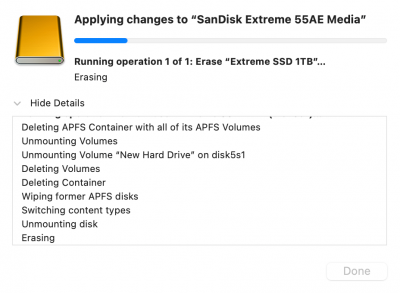
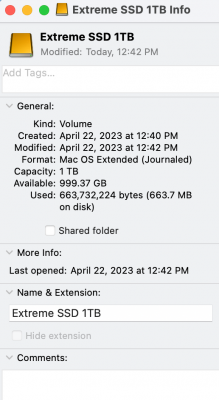
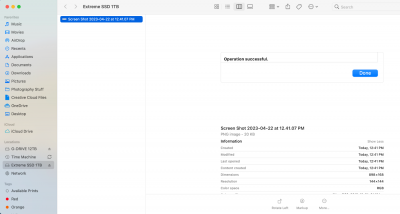
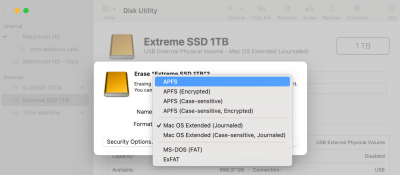
This is pretty straightforward, once you know how. The reason you can't just use Erase and select Mac OS Extended (Journaled) is because the Drive is APFS. You need to click the Partition Button instead and change things there. If your an existing HD is formatted as a Mac OS Extended (Journaled), you can covert it to APFS from the Erase Section; you just can't do it the other way around. Mac OS Extended (Journaled) is the most universal and easiest to work with, as that Partition Type has been around forever. For example: See how APFS is available on a Mac OS Extended (Journaled) HD? You can go Mac OS Extended --> APFS via the Erase Section, just not the other way around. OK, let's begin. I'm currently on Big Sur, but the steps should be same though the screens might look a bit different. Part 1 The first thing I want you to do, if you haven't already, is turn on the feature that allows you to see HDs and other "Mounted Devices" on your Mac Desktop. Open the Finder. The easiest way is to click the Smiley Face on your DockBar: Then head to the Finder Menu and select Preferences: Once there put checks next to these items and change the bottom to "Macintosh HD" if you want: From there, just click the Red Circle in the upper left corner to apply the changes. After you make this change, things like the Macintosh HD, any External Drives, Memory Cards from Cameras that are in a Card Reader and even portable DVD Disks will all appear on the Mac Desktop. This makes accessing them a breeze and is one of the things that has always puzzled me on why this feature isn't turned on by default. For example: Part 2 Now the fun begins! Let's get that new Hard Drive prepped for use on the Macintosh!! Click your Applications Folder, then open Disk Utilities. Head to Applications Menu >> Utilities >> Disk Utilities. This is where your Disk Utilities might look slightly different. Anyway, here is mine: While in your Disk Utilities Module, please make note of any additional Hard Drives listed in the left column. Pay special attention to the Hard Drives listed under the "External" Section. For this process, it is much safer to only have one EHD Mounted / Listed! Select your new HD that you want to change, make sure you pick the correct one: Then click "Partition" up at the top and click the two arrows on the right where it says "Format." Select Mac OS Extended (Journaled). Do NOT choose Case-sensitive, the normal one is perfectly fine: Give the new External HD a obvious name: Then click Apply. A Pop-Up Box will appear asking permission, click Partition or OK, or Apply. Let Disk Utilities do its thing... When completed, you should see "Operation successful" at the bottom. Click Done. Now the new External Hard Drive should appear on your desktop. If you want to verify things, Right-Click and select "Get Info." You should see the name of the HD and the Partition Type being Mac OS Extended (Journaled): Now you should be able to move a simple file to the new drive as a test and be able to read that file.


-
Yeah, to get the “Best” configuration, you need to customize it on Apple’s website and then ship it to the Apple Store. Let me know what you get and how well I configured things.
-
Canon .CR3 files do not show thumbnails in Windows 10
Brian replied to Kathy1's topic in The Windows & PC Hardware Forum
Thank You!! -
Bridge disconnects network drives
Brian replied to Ginger Wick's topic in The Windows & PC Hardware Forum
I'm wondering if your Video Card Drivers are out of date and/or got corrupted somehow. That's what gets hammered when generating 100% full-screen previews. The problem could also be with your Switch that is built into your Router (flaky port) or LAN Drivers isn't a bad idea. Try using a different port on the Switch. Oh, you are going to want to watch this video: Synology NAS UPS Setup Guide That video does a pretty good job walking you through the steps. Anyway, I'm wondering that since Wi-Fi is slower than hard-wired Ethernet, that the lag is somehow helping Bridge keep up? I also found this: https://kb.synology.com/en-my/DSM/tutorial/What_can_I_do_unresponsive_Synology_NAS Might want to go through the steps, as there doesn't seem to be any kind of true Diagnostic Scan with your NAS, but there are some things that allow you to verify things. One more thing... Do you have another computer or laptop that you could try? Just to see what happens. It could be a problem with your PC, that's why I have UPS units on ALL of my electronic equipment, from computers to my home theater system. Even my Wireless Access Point is on a 400VA UPS. My wife wasn't thrilled with her UPS being one of her Xmas Presents, but after the power glitched for a few seconds over the last few months, she was grateful to have them. -
Yeah...probably. Windows 11 still needs more time in the proverbial "Oven." I'm not touching it until I absolutely have to, and that's in 2025. Downgrade without losing data? Unless you JUST upgraded from Windows 10 to Windows 11, it's not very likely. Too risky. You would have to Nuke your main HD and install a fresh OS. What I would do is purchase a 1TB SSD Drive, like a Samsung 870 and swap out the current main drive. This way you can always go back in time if need be. I'm not sure how licensing will come into play, it is possible you can use the existing license key with Windows 10 that came from Windows 11, provided that it's the OEM Version. But you might have to contact MSFT on this one. Or you can install a copy of Windows 10 Pro and not activate it to see what happens with LR before you commit. I also highly recommend Windows 10 Pro, as it's easier to install things locally, (tell it you want to join a domain and then don't,) as the current "Home" editions FORCE you to add the license key to a Microsoft Account. I'd hate for you to spend $199 for Windows 10 Pro when you don't have to.