Brian
-
Posts
4,137 -
Joined
-
Last visited
-
Days Won
55
Everything posted by Brian
-

Canon .CR3 files do not show thumbnails in Windows 10
Brian replied to Kathy1's topic in The Windows & PC Hardware Forum
That's because the software that is built into Windows isn't updated to support the CR3 files. Keep in mind, that even though you shoot Raw, the Images that you see in Explorer are actually the JPEG Preview that is part of the Raw file, and not the Raw Image itself. From what I've found, is that there seems to be a Raw Images Extension Program that gives you the ability to view CR3 files. But with anything like this that comes from Microsoft, it takes time, usually years, to finally get it right and by that time, we will be onto CR4 files! Honestly? You are either going to have to find a free program put out by Canon to view the CR3 files or purchase one like File Viewer Plus or the program I use, Photo Mechanic 6. I know what you are after. Back in the day, you used to be able to download a piece of software called a "Codec" that gave you the ability to view files in the Windows Explorer as a Thumbnail and such. Well, it's not that simple anymore. The reason is the way the CR3 files are and how they are written. Here is a blurb from Photo Mechanic: So even a beefy program like Photo Mechanic will have trouble reading CR3 files, and this is something they specialize in. Microsoft and Windows on the other hand, have to cater to every developer on the planet and if Canon won't give the recipe on how to view CR3 files correctly, too-bad-so-sad, you are SOL. From the little bit of searching that I've done, it doesn't look like you can do it the way you want to. I'd try File Viewer Plus to see how that works for you, otherwise, you are looking at using Adobe Bridge or Lightroom to view the files and just skip trying to make Windows bend to your will. CR3 files aren't like CR2 files. Give it a shot and report back. This question does get asked on a normal basis. -
First read this: Buying a Mac in 2023 The current M1 and M2 Macs are different than the Intel-Based Macs. Gone are the days where you get computer A over Computer B because "A" has this CPU and comes with more RAM and a larger Hard Drive. That's thinking from last century. With today's Macs, Apple wants you to "Go Big or Go Home." With the current M1 and M2 chips, EVERYTHING IS BUILT INTO ONE CHIP!!! THAT'S THE "UNIFIED" YOU KEEP READING ABOUT. Think of current Macs like glorified iPads; there is no upgrading after the fact!! The CPU, RAM, Video GPU, Hard Drive Controller are all built into one chip. Want to upgrade your RAM in 3-4 years? You are buying a new computer to make that happen. Bigger HD? You will have to purchase a Thunderbolt 3 or TB 4 Larger External Drive. Can't upgrade the internal one down the line, as it's built into the M1 or M2 "Unified" Chip. (Well, truth-be-told, it's the HD Controller Chip that's built into the M1/M2 Chip. The actual Storage Chips are separate, but guess what? You can't install a larger memory chip...the controller chip won't recognize the "bigger" chips you just installed. Apple does this intentionally. Fun? Eh?) Doesn't matter if it's a Mac Laptop or Mac Desktop. So it's VERY important to budget for the "upgrades" that you would have done in say, 4-5 years...you NEED to purchase them at the time of purchase. It's only money, right? I will say this, the SD Slot on the new Macs just SUCK! Seriously, they are slower than ones that are in Macs from 2013. If you are looking for fast data transfers, I highly recommend Thunderbolt Based External Card Readers, don't worry about the built in ones, you aren't going to be happy. I know, you'd think spending $4600 on a stupid Mac Laptop would have a decent SD Slot. It doesn't work that way in 2023. That built in slot is meant for convenience, not speed. Each time you plug in a device that has a Lithium-Ion Battery, that is "One Charge Cycle." Plug in your iPhone for 20 Minutes, then pull it off the charger and call someone, and then plug it in 30 minutes later, that is 2 Charge Cycles within that hour. Lithium-Ion Batteries have a finite life, and I wouldn't put a whole lot of faith in what the OS says, if you aren't getting decent battery-life out of your laptop, the batteries are wearing out. Even if you leave the damn thing plugged in all the time! If you are the type of person that does that, you aren't helping things. In fact, you are killing your battery prematurely! That said, 2015 IS 8 YEARS AGO, approximately. Give or take a few months. Eight Years!!! That's a very good run for any piece of computer equipment, and when I purchase my computers, I have a 7-8 year lifespan in mind, and that's exactly where you are. So yes, it's time to be looking at a new computer of some kind. That's where Thunderbolt-based Hubs that have extra USB Ports come into play. Also, by purchasing the more expensive models, gives you more of a guarantee that you will have more Thunderbolt Ports. Keep in mind with Mac Laptops, one side will have faster Thunderbolt Ports vs the other. Like the Left Side will have "better" ports in terms of speed / power than the Right Side. Surprise!! The Liquid Displays are brighter and have Mini-LED Backlighting as opposed to OLED Panels. Both are IPS Based. Basically, the Liquid Retina is Apple Marketing doing its usual job convincing people that they NEED something. For work in Photoshop, working on still photographs...either screen is fine. Honestly, having a brighter screen isn't always a good thing. Especially when it comes to prints. I can't tell you how many questions and posts over the years that all say the same thing: My Prints are too dark. Why? The answer always is, "Your Screen is too bright!" Then followed by the response, "But if i lower the brightness, I can't see my screen!!" Then we usually ask, "Are you calibrated?" with the usual answer of, "I thought you didn't have to Calibrate Macs, they are supposed to be "good" or "better." Nope, all screens need to be calibrated, even Mac Displays. Give these a read, plenty of articles about Retina vs Liquid Retina: https://www.makeuseof.com/liquid-retina-xdr-display-explained/ https://en.tab-tv.com/apple-retina-vs-liquid-retina-vs-super-retina-the-differences/ In a nutshell, the higher-end MacBook Pros that cost more than $4000 after you configure things, will have the higher-end "Liquid Retina" Display. I wouldn't stress too much about the displays, either are fine, really.
-
Awesome. Yeah, that "2667" is the macOS being stupid. It's really 2666. Since you ordered two "kits" all 4 sticks of RAM will match, so you don't have to worry about any incompatibility or performance issues. That's the biggest thing with RAM; all of the sticks like being "matchy-matchy" for the best performance AND they need to be compatible with your motherboard. The kits I linked to are fine and what you should be using. One thing to keep in mind with programs like CleanMyMac X, they need to be current at all times. If you let them get out of date, bad things can happen. New OS + Outdated CMM = Big Problems. Fortunately, MacPaw has changed over to an Annual Subscription fee, which ensures you have the latest version. Trust me, forking out $40-ish per year is A LOT cheaper than dealing with the headaches that would come from a corrupted OS. Most of the people who have issues are using CleanMyMac 2 or 3 with a modern OS. You can't do that. Enjoy your purchase. Your Mac will run SO MUCH SMOOTHER with 64GB of RAM. It is a night-and-day difference between 16GB and 64GB.
-
Sorry that I've been MIA. I've been busy with my Day-Job and haven't had much time online. I'm glad you were able to get things worked out, I was about to suggest that either your HD had corruption or the Big Sur file you downloaded had corruption. Sometimes you just have to nuke the drive and start fresh. Photoshop should work fine, I'm on Big Sur and running the latest version of Photoshop, but my Video Card is a Radeon Pro 580 8 GB and Photoshop is getting a bit "Laggy." My plan is to have my iMac last until Early 2025 and then I will replace it. Depending on what video card you have or the "Graphics" listing under "About this Mac..." will determine your experience in Photoshop. If your video card isn't up to par, Photoshop will start bitching right away or you will experience weird things happening. Especially when using Tools like Liquify. Hopefully you have at least 4GB of Video Memory. If you only have 2GB or so, I'd install an older version of Photoshop, like Version 22.2. It seems that Photoshop CC 2020 is no longer available and you would have to contact Adobe to get a download link. Hopefully, your iMac is a little on the "Beefy" side and this will be a non-issue.
-
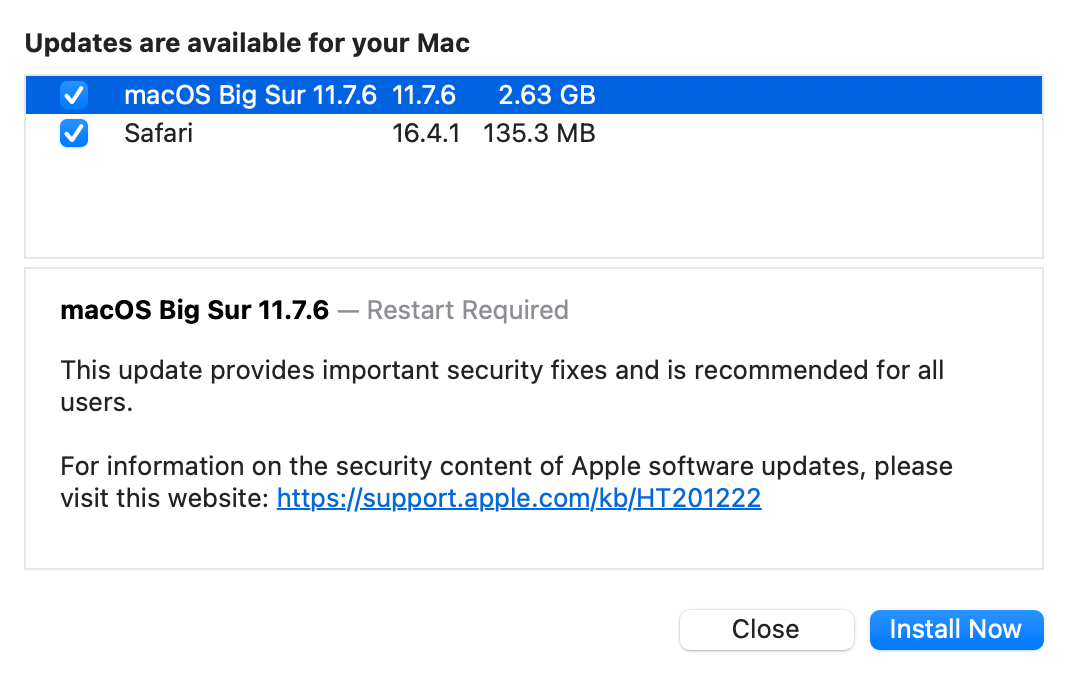
2017 & 2019 iMacs Max out at 64GB of RAM. 2020 iMacs go up to 128GB. You might, and I use the word "might" very loosely, be able to get your iMac up to 72GB, but there is no guarantees from me or Apple that it will be stable. Honestly, I wouldn't push things above 64GB. (There isn't a whole lot of difference between 72GB and 64GB; now going from 16GB to 64GB...BIG DIFFERENCE.) If you do decide to push your luck...you are on your own. No help from me. The trick with upgrading RAM is to have ALL of the Memory Sticks matching, so I'd recommend purchasing two 32GB kits, which is a quantity of four, 16GB RAM Sticks. So slots 1&3 have 32GB, and slots 2&4 also have 32GB (16GB in each slot) bringing your RAM total to 64GB. Here is the RAM Kit that you need. You will need TWO of these kits, and they are $71.99 each. Simply remove the existing Apple RAM, set it aside and then install all four 16GB Sticks. Then put the Apple RAM in the packaging that the 16GB sticks came in and store them. Here is a YouTube Video Demonstrating the process. The only thing I don't agree with is you want to touch something METALLIC, not Wood, to discharge ANY Static BEFORE handling the existing RAM or the replacement RAM. Simply touch the metal Mac case first and you should be fine. At this point in the game, I'd just pull the existing Apple RAM and install a set of 16GB Sticks. Do it once and be done with it. Yeah, I'm not going to recommend Ventura for Intel-based iMacs. Ventura is really meant for M1 & M2 Macs, which are the modern models. I'm happy with Big Sur and use Firefox myself. I never use the Safari web browser. Keep in mind that Big Sur has an update, and the most recent version is 11.7.6 AND there is a Safari Update as well: I will be installing both of these tonight. One of the gotchas with Ventura and Older Macs is the USB ports...Ventura kills speed. It's a known bug and there isn't much of a work-around. Some people are affected more than others. Especially if ANY HD isn't formatted to the Mac OS Extended (Journaled) Partition Type. If it's anything else, thing come to a Snail's Pace when you copy files to the drive. In my humble opinion, Ventura just isn't worth the hassle being installed on a older Mac. Now if you had a brand new Mac, sure...use Ventura.
-
Bridge disconnects network drives
Brian replied to Ginger Wick's topic in The Windows & PC Hardware Forum
One more thing, when is the last time you did a FULL Backup of your NAS to either another drive or Cloud Storage? Are you prepared for the whole thing to go ka-plooey and hoping a RAID 1 or RAID 5 Setup will cover your ass? Because it won't. RAID protects you from a single drive (hardware) failure, not data corruption or NAS OS corruption. -
More RAM certainly won't hurt. 64GB is the place to be in 2023, with 32GB at a Minimum or for non-photo-editing work. Especially if you have a high Mega-Pixel count (45MP or more, Hell...even 36MP is high.) I know my computer wasn't happy with my large D850 Files until I upgraded to 64GB. If you are able to run the NVIDIA Studio Drivers meant for your 3070, it should work fine. But you might want to call Adobe on this one. I'm kinda out of ideas.
-
Bridge disconnects network drives
Brian replied to Ginger Wick's topic in The Windows & PC Hardware Forum
No, I'm not Damien. I work from an External Drive. I don't think Bridge is the issue. I think there is something else going on, especially with your NAS. Possibly something is wrong with Permissions or Network Shares on your NAS. What really concerns me is the power outage, do you not have a UPS (Uninterruptible Power Supply) hooked up to your NAS? NAS units should be treated as "Little Servers" and not "Glorified External Hard Drives." (Even though you treat them as such.) Speaking of which, what type of NAS are you running (Make/Model?) Many support APC UPS Units, and can perform a graceful shutdown when the battery in the UPS gets low. Otherwise files on your NAS or the NAS OS can get screwed up if powered off abruptly. Like during power outage. Have you poked around your NAS OS and see if there are any repair tools? What happens when you access a network share through Windows' "Computer" or "Explorer." Do you have Network Shares setup? -
Yes. Because LR doesn't either like your Video Card or it's Drivers. So by turning it off and forcing the program to not use what it doesn't like, is a work-around.
-
Cloud storage (western digital maybe?)
Brian replied to Kim with the purple hair's topic in The Macintosh User Group
As soon as you start throwing "Mirroring" around, the price increases. I personally like my Hard Drives to be rock-solid, beefy and this usually results in them being "expensive." What do I have hooked up to my iMac? I like G-Drives. Here is one that is Thunderbolt 3 Based as well as USB 3.2.) I'd recommend just going for 12TB, which is two 6TB Drives Mirrored. You need to be careful when looking at HD brands, often they will give you the Raid 0 configuration, in this case that's two 6TB Drives combined that gets you 12TB. As soon as you start Mirroring, you need to cut the storage by half. SanDisk Professional G-RAID 2 12TB 2-Bay RAID Array This drive will only give you 6TB of Mirrored Space. There is a 12TB Mirrored and 24TB Raid 0 Model, but that's around $1100. Sheesh. Electronics and inflation (along with import Tariffs from items coming from China) are driving up prices. Not to mention today's $100 is yesterdays $20 bill. (Or so it seems.) Everything is just costing more. The other thing you can do is buy a single 12TB Drive now and then save up to invest in a NAS or a Mirrored EHD. Either way, if you want data redundancy, and want things to not fail, it's going to cost you money.- 1 reply
-
- 1
-

-
How about trying this program to see if the Metadata is completely intact. ExifTool Reader for Mac. As far as your Mac is concerned, 2014 is when the file was created and it's not picking up on anything from the camera. I have seen people complain about this issue for years, it seems Spotlight isn't reading the contents of the external drive. There really isn't a "fix." I'm hoping some sort of software can read the Exif Data, otherwise you are kinda SOL.
-
Can you perform a “Get Info” on one of the files and post a screenshot?
-
So what do you do if you find your camera is the culprit? Send your camera in for repair. The Complaint should be, "Does not hold date and time." Also have them clean it while it's in for service. (If you don't want to send it in for service.) Check the Date and Time each time you power it on. Set the Date & Time each and every time you swap batteries.
-
I’d check your camera first. How old is it? The reason I ask is that a lot of electronics have a little battery inside them that keep the time and date, and after 3-5 years, these batteries wear out. When that happens, the computer or camera or whatever will go back to a default date and time. I've seen 2000, or 1980 or 2007 as some default date examples How do you fix this? Send the body in for repair. Of course, I could be wrong, but I want you to check it. Check the date and time, set it correctly. Then pull the battery and let it sit, start with 30 min or so and check the date/time. Then do this process overnight. If the date goes back to 2014, after you set it to 2023, then you found your problem.
-
I just saw this video on Instagram. This is what I mean about learning to "see" the light. Watch how he sets up his shot: Jerry Ghionis
-
You have four slots. Each slot takes 8GB for a total of 32GB. If you want more than 32GB, you are buying a new Mac. You could have two 16GB, and max out at 32GB. So from a cost perspective, it's better to get two 8GB sticks and keep the RAM you already have and max out your Mac to 32GB.
-
Here you go. OWC is another brand I recommend with Macs. When COVID hit and the world shut-down, Crucial was affected by A LOT. I don't think they sell much memory from their website anymore, but you can still get it from retailers. Anyway, it's $40 for two additional 8GB sticks. B&H will re-open April 14th. OWC 16GB DDR3 1867 MHz SO-DIMM Memory Kit (2 x 8GB, Late 2015 iMac Retina 5K)
-
You are missing a lot. With Crop Cameras and that Angle of View change, it is WAY more forgiving when it comes to the Wider (or more open) Aperture Settings. You can practically "f/2.8 All the Things." without much thinking. You can't do that on a Full Frame camera and you will need to know your Aperture Values / Reciprocals. There isn't one rule for everything, it's something that you learn as you go. That said, I can give you some guidelines. Think of your DoF like two invisible walls. One in front of your subject and one behind. The closer you are to your subject and the wider / more open the Aperture, the shallower the Depth of Field, meaning the fuzzy Wall in Front and Behind your subject are closer together. You can really see this in person with a 50mm 1.8 or your 85 1.8. Set your Aperture to 1.8 and photograph something relatively close. Keep in mind that all lenses have a "Minimum Focus Distance" meaning the closer you get, the more the lens will fight you trying to lock on focus until you take a step or two backwards. You are on the right path, with subjects on different focal planes. The higher the number, f/4, f/5.6, f/8, f/11, f/16, f/22, the further the two "Fuzzy Walls" are apart. and the more that's in focus, with limitations. I can say this, f/8 is the "I Don't Care" Aperture setting. This is the Photojournalist's Setting; meaning it gets most of your subjects in focus, even if they are on two different focal planes, or could be a "walk-around" Aperture Setting. I've also seen the phrase, "Switch to f/8 and be there..." or something along those lines. f/8 works really well for landscapes, in addition to f/11. I used to use f/8 all the time, but I now use f/11 on my "Big and Wide" Landscapes. f/16...that's where lenses start to develop something called "Diffraction," meaning the Image Quality starts to decline. This issue is more pronounced at f/22, but it really depends on the lens. I have used f/22 on purpose to get those "Starburst" shots. Here is an example of mine: While the Tram-Car Sleeps While it's great that I got the "Starburst" from the lamps while using f/22, if you look closely, the image is a tad bit soft. That's the Diffraction messing with things. Some lenses are better, others are worse when it comes to this sort of thing. It goes back to the "Knowing your Gear" phrase that I kept going on-and-on about. You just can't half-ass it and click the button. I don't give a shit if it's a "...really nice camera." It doesn't work that way, as you are finding out. Granted, that photo was taken years ago, and I my technique has improved greatly; I also have better equipment and better lenses. With the exception of the Tripod. I still have the one that I used for that photo and when I took that photo it was a long-ish exposure and people were walking on the boardwalk, which shook a little. Plus it was a bit Windy. Excuses aside, I might take another crack at that photo and see if I can produce a better shot. OK, back to your original question. Let's review from FB Ask Damien. Depth of Field consists of 5 main things: Aperture Value Focal Length of the Lens Distance from the Camera Sensor / Film Cell to the Subject Distance between the Subject and Background Sensor Size. f/1.2 - f/1.8 - This is the Bokeh shots that are all the rage. You want the Mom with the preggo belly and the greenery behind her blurred out, these are your Apertures. They take practice and time to really nail down. You buy a f/1.2 lens to be "sharp" at f/1.8. f/1.8 lenses are MUCH better at f/2.2. Why? Because the DoF is so Shallow. These are single subject Aperture Settings for the most part, otherwise you need to stand farther away from your subject if you want to get multiple people in focus. For example, say there is a couple posing for Engagement Photos. You want a Fuzzy Background where the trees / plants are, but want the two people to be in focus. To accomplish this, you need to pay attention to #1, #3 AND #4. Hell, #2 shouldn't be discounted either as something called Compression makes people / faces look better. A person's Portrait will be much better at 85mm than at 35mm. To get that f/1.2, 1.8, etc. Setting, you need to be far enough away from your subject, AND the subject needs to be far enough away from the background. See how everything is interconnected? Lots of thinking is involved, this is the Theory that one must know; the other side of things is "Craft," that's where your instinct or "feel" comes into play. That comes from knowing your theory inside-and-out AND knowing your gear. Very similar to a Musician playing on a stage. They aren't thinking, "I'm about to play a A-Flat Minor Pentatonic Scale for this Solo," or "I wonder if I should play a Major Seventh add9 here?" No, they are live on stage, it's about "Feel" and what sounds "Cool." f/2.0 - f/2.2. Still in the area of f/1.8, but more forgiving. f/1.8 lenses will be a tad bit sharper at f/2.2. DoF is easier to manage. Still takes practice. f/2.8 - I typically use f/2.8 if I want shallow DoF, but if I'm standing a bit close, I might stop down to f/3.2 to give me a little more "wiggle room." The closer you are to your subject, the shallower the DoF and the more you will notice that's out-of focus. You could take a 50mm 1.8 lens, set it to 1.8 and get really close for a head-shot type of photo, but their head is turned ever so slightly. Which will make one eye in focus and the other one not. So unless you take a step or two backwards, or stop down your Aperture, you aren't going to get both eyes in focus. To further illustrate, one eye is in focus, one is not, BUT the Cheek in front of the eye that's in focus will be blurry. That's the Fuzzy Wall in front of your subject that I'm talking about. f/4 - I use this Aperture ALL THE TIME with my Weddings. Since I'm shooting with a Full Frame Camera, I don't have the "Forgiveness" with f/2.8 like you do. f/4 for me is like f/2.8 for you; it's about a stop difference. Getting Ready shots, really tight / zoomed in photos of the Groom with an ugly-cry face, I will be at f/4. BUT! At f/4, the Groom will be in focus, but the Best Man behind him will be blurry since they are on two different focal planes. So I will have to stop down to f/5.6 or maybe go to f/8 or EVEN F/11, depending on where I'm standing and what focal length that I'm at. It varies A LOT and it takes practice and experience. f/5.6 - This is the "Grab-and-Grin" Aperture Setting. Great for the table shots at receptions. Wedding Cake / Details Shots. The photos were you get a few people huddled together and get them to say cheese. f/5.6 is more forgiving for people that are front to back, and works well for the majority of these shots. Have someone looking to photo-bomb from the rear? Then you stop down to f/6.3, f/7.1 or even f/8. That moves the two DoF Field walls further apart, front-to-back, so you get more in focus. f/8 - I covered this above. The "I don't care..." Aperture Setting. Easiest Aperture to learn. Great for Landscapes and all sorts of things. Perfect for learning to use a Macro Lens (that's a whole other subject,) works for group photos as well. Swiss-Army Tool as far as Aperture Settings go. f/11 - An extension of f/8. I find that lenses are sharpest at f/8, but have the best contrast at f/11. Meaning the overall look of the photo is better, especially with Landscapes. More is included and I use f/11 a lot. f/11 also works really well for group shots 3-4 rows deep. I'm aware of a saying from a Mom-Tog Group, "Eleven sets of eyeballs, use f/11." While that won't work if they are standing in a single row, you could be at f/5.6 and get a great shot, I will admit it does get you thinking. "Hmmm....large group. Family Tree Type of Photo. Better stop down to f/11 to cover my ass. Might try a few at f/8 as well. f/16 - This is where I tend to stop with my photos. Deep DoF with my Landscapes, more-so than f/11. Image Quality starts to decline. If I'm using really high-powered lights / flash, I might use f/16, but that's even a little extreme if I have my lights that high. f/22 - This Aperture is used when I have a purpose to use it. Like if I want starburst lights. This Aperture setting is the easiest to use to get those type of shots. If I'm in a really-REALLY bright situation and have no choice, I will use f/22. Basically, this is the last Aperture Value you learn how to use. Master all the other ones first. THEN play with this one. Same thing with f/16, but that's easier to play around with. Again, f/22 is even worse Image Quality-Wise than using f/16. Now, if your eyes haven't glazed over by now, I have some additional reading for you. I want you to purchase this book from Amazon: Understanding Exposure by Bryan Peterson This book by far covers everything that I've written and goes into more detail. Not only with Aperture, but ISO and Shutter Speed. This book is the one that most Photographers own and where they start. I realize you are a Video Person, but there is something about a book, you can stop and re-read things to get it in your head. With a video, you are constantly pausing and going back trying to keep up. This shit takes time. You are not going to get this stuff in a Video or two. This is that part of "Learning to See the Light" that I was talking about. You aren't necessarily in "Cloudy" conditions, but depending on the light, you are inside a big "Softbox" and don't have a lot of contrast or shadows to work with. Cloudy Conditions mean very even light. With Digital Cameras, you need to be double what your focal length is. So if you are using your 85mm, you want to be around 1/160th or preferably faster, like 1/250th or 1/320th. This cuts down on camera shake which can result in blurry photos. That said, the higher the Mega-Pixels on your Camera's Sensor, the faster you need to be, usually 1:4 Ratio instead of the standard 1:2. Why? Because so much detail is recorded by high MP Cameras, you need to be faster Shutter Speed-wise to compensate. Or use lenses that have Vibration Reduction Technology to compensate. VR Tech is awesome. Here is a hand-held shot of mine I joking call, Not Bad for Hand-held. That shot was a single exposure, hand-held at 1/10th SS | f/11 | ISO 100 @ 32mm. Vibration Reduction Technology is amazing in certain situations. Why f/11? Because I wanted 1/10th to make the Waterfall "Silky" and I needed to cut the light hitting the sensor. If I was mounted to my tripod, I might have been at ISO 64 | 2 Second Exposure | f/16 or f/22. Now, you have to remember, the "Middle' Mark in your viewfinder is what your camera considers 18% Gray. It's the "Most Even" Exposure the camera's software thinks is correct. Often, middle can be the most boring and your exposure really depends on WHAT you are shooting and WHEN. (Along with the Lighting Conditions.) So don't always think your camera knows best. If you are looking for more dramatic and eye-catching shots, you need to be in all sorts of different places on your meter, combined with certain editing techniques in ACR / Photoshop to really put a shine on things. Same thing with Auto WB. That's what your camera thinks is correct, but often it is not. Unfortunately, I can't go much into this subject, because it's covered in the Raw Class. Same thing with the "Learning to Shoot in Manual" courses, where Kim goes way into more detail that I do. Hopefully this at least put you to a Starting Point. Get out there and fiddle and take notes. THINK before you click. Look at the entire scene, pay attention to what the shadows are doing, what the quality of light is. Meaning is it Hard or Soft? Is there a bit of Glow or is it just icky? Then take a photo. Do not shoot 200 photos and get frustrated. One at a time. Again, THINK BEFORE YOU CLICK. Then do it again. And again. And again. Take notes if you have to with a pad and paper. Remember, this is digital, you can afford to experiment. Back when I started, we didn't have a LCD, hell...we only had one focus point and only 36 tries to get it right. If you blew it, you didn't know right away.
-
How much RAM do you have now? 8GB? 16GB? Your Mac goes up to 32GB.
-
You didn't tell me you were in NZ. LOL!! Yeah. It's tough finding things in NZ and OZ. Damn near impossible and your budget needs to increase, by a lot. I'd have about NZ $4000 at the ready. $2500 is way too cheap in your area, that's like a $500 laptop here in the States, which isn't going to cut it for Photoshop work. The good news is, the specs for the Lenovo Laptop is what you are looking for. At least that gives you something to go on.
-
This display is more in line to what you should be looking at: DELL SE2723DS Quad HD 27" IPS LCD Monitor - Black Spending close to £ 720 for a Monitor intended for Photoshop work is a bit silly. For a 27" screen, you want a resolution of 2560 x 1440, not a 4K.
-
Either is fine. I'm not a fan of 4k resolution on a 27" screen, so the MSI Display @ 32" wins between the two. It's also way overkill for Photoshop, but I realize that choices are limited in other parts of the world.
-
Lenovo 16" Legion Pro 5i 16IRX8 Gaming Laptop (Onyx Gray) ASUS ROG Strix G16 Gaming Laptop (2023, Eclipse Gray) Personally, I've had really good luck with Lenovo Laptops. So between the two, I'd get the Lenovo.
-
Between the two, the Alienware has faster components (RAM / Video / Hard Drive / CPU,) but will Photoshop take advantage of the things that make it faster? Maybe. Probably not. If it does, it won't be as dramatic as one would think. Now if you were playing video games and such, then you would notice a difference. There is about a 7% performance gain with the 3090 vs a 3070. So if you are just using Photoshop, it's not that big of a difference and if you factor in the cost increase, I'd say it's overkill. But if you want to purchase a 3090, that's fine. Future-proof? I won't disagree that a 3090 would be "better" BUT, that all depends on what Adobe does in the future. It may buy you some time, or not. It's so hard to say. I can say this, either of those computers you linked to should get you about 7 years worth of software life. Of course, Adobe keeps adding shit and creating bloat with the software, so YMMV. Honestly, at the core, people do not "need" more than PS CS6, it's all those fancy tools like Content Aware, Auto Sky Replacement, and other new things that are making people buy new computers. I'd still recommend using the NVIDIA Studio Drivers which are drivers that are designed for programs like Photoshop and Lightroom. If you use the default "Gaming" Drivers, you'll notice a lag in certain situations. That being said, I'd check Dell's Website to see if they have the "Studio Drivers." More often than not, the Video Cards in Dells like Dell Drivers. If you do end up purchasing either one, call Dell first before you go messing with the drivers.
-
One question: Do you have at least $2500, in your hand, right now? Because Laptops are moving targets, if you don't have $2500-$3000 available, the first step is to obtain that money and then we will go shopping. . The ones that are "Good for Photo Editing" do not stick around. The models that I recommend will stick around for about 30-45 days at most, and then they are discontinued and/or replaced. That's why you need to have the cash on-hand. The days of lusting after one and slowly saving are gone, it needs to be a "Targeted Impulse Buy." Understand? Also, don't forget about this post, on more than one occasion I've had the same exact question, I answer it and then they forget about asking it for 2-3 months. Then the laptop I found is no longer available.