Brian
-
Posts
4,137 -
Joined
-
Last visited
-
Days Won
55
Everything posted by Brian
-
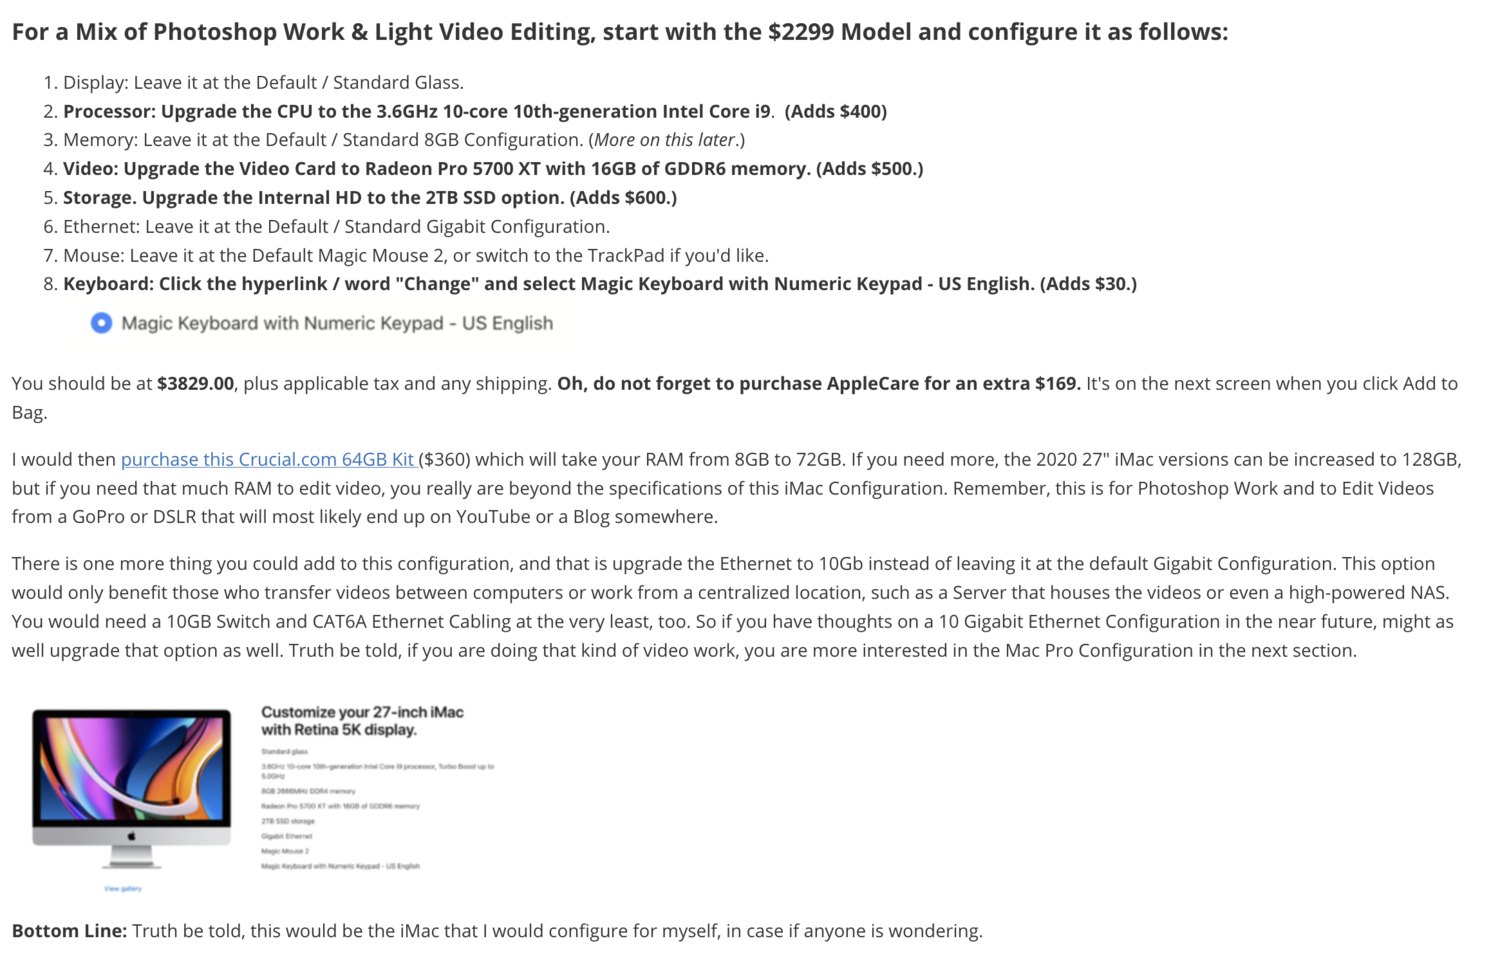
Apple is now releasing the M2 chip. Honestly? I'd hold off right now with the M1 or M2 Mac Chips. While interesting, we have enough issues with Photoshop as it is, and now you want to throw in new Architecture into the mix? If I had to buy a iMac right now, I'd start with the $2399 iMac and go configure things. Click on the "Quick and Dirty" configurations link in the above comment. Pay attention to this: If it was me, and my money, I'd stick with the Intel-based iMac in 2021/2022. If you configure the 27" iMac to my recommendations, it should last you about 7-8 years. You are just editing photos and playing with Photoshop. I'd recommend waiting until the Next computer, not this computer...the one AFTER this one to be the M-Whatever Macs. I'm sure they will be up to the M7 or M8 by that point. Also, with the M-whatever Macs, you need to purchase all of the expensive (and over-priced) items at the time of purchase. Everything is built onto the single chip, no upgrading ANYTHING after the fact.
-
-

Stephie
Brian replied to Stephie83's topic in Photoshop / Elements / Bridge / ACR questions or problems
Yes. They are backed up in iCloud, but the files themselves are still located on your Hard Drive. In a sense, you have three duplicates of the same files. One is where they are stored first. The second are the files that are located in your iCloud Account...and Third, those files that are in iCloud are then stored locally on your Hard Drive in the iCloud Folder. So what you will need to do is turn off Automatic Syncing and then clear the iCloud folders on the local Macintosh HD. Honestly? 500GB is just too small for a main HD these days. You are better off investing in a Thunderbolt G-Drive EHD and move all of your files there and work off that drive. That's what I do. Now, normally, if it was just a USB 2.0 or USB 3.0 drive, working off an External HD would not be the best option. Thunderbolt 3 however, IS FAST. It's so fast that honestly? It feels like I'm working off my internal HD. Here is the Hard Drive that I'm talking about, and this seems to be the BRAND NEW release. G-Drive 12TB - Thunderbolt 3 Now, I will warn you...G-Drives aren't cheap. They aren't the "$99.99 Special" from a Big Box Store. But they are made of high-quality components and are Enterprise Grade, which is really what you want when it comes to storing your data. They also come with all of the cables that you need and are already Macintosh Formatted. So just plug it in and go. -
It’s decent. If you are editing photos, then the 512 GB HD concerns me a little. Also, the light up keyboard, while a neat feature to have, might throw a color cast on the screen. So turn that off if you are editing. I’d also get a large external USB 3.1 or 3.2 drive to go with it if you are editing photos.
- 1 reply
-
- 1
-

-
45MB Files - how much RAM is required
Brian replied to Cathy Price's topic in Photo Gear & Equipment
Actually, your current computer will choke on files from either camera. Keep saving. You will also need to plan for storage, a video card with its own GPU and dedicated Video RAM. See where I’m going with this? Case in point: My stupid Nikon D850 costed me so much friggin’ money. That camera body required new lenses, a new computer, upgrade the new computer to 64GB, plus a 12TB external HD to store my 100MB Raw Files. Keep saving. -
45MB Files - how much RAM is required
Brian replied to Cathy Price's topic in Photo Gear & Equipment
I had to upgrade my iMac to 64GB of RAM to handle Raw files from my Nikon D850 which has a 45.1MP sensor. Honestly? The more RAM the better. For either the R5 or R6, 32GB would be the minimum, IMHO. -
Oh, here is the Rocket Blower (Medium) that I’m referring to.
-
Purchase iMac 27" or laptop and screen?
Brian replied to Footsie's topic in The Macintosh User Group
Check some of the latest threads. I’ve answered similar questions. Personally, I would still buy a Intel iMac as of right now. Let the other people be Guinea Pigs for the new Architecture. If you purchase a 27” based on my recommendations, it should last you about 7-8 years. If you are worried about getting a M1, there is already talk about the M2 Chip this Fall. You will NEVER win the “ahead” game. Unless you buy a new computer every 18-24 months. In case you are wondering, Mac Laptops are a complete waste of money, in my honest opinion. Check out the “Quick and Dirty Mac Configurations” in this group. It’s a Pinned Topic. -
I’m out exploring the US at the moment, and cell coverage is spotty. So I can really reply this Saturday. Anyway, most dust / hair / dirt appears at f/11 or f/16. Does your camera have a cleaning mode? What make/model is it and do you have something like a Rocket Blower to blast some shots of air at your camera’s sensor. Let’s see some images in question first.
-
I’m not digging that laptop’s screen. Here is why: The Asus ROG of today is not the same as ones years ago. I find that this screen is “Meh,” meaning better than a TN Type, but not as good as a true IPS screen. To clarify, if you not only want accuracy and consistency, and are charging people good money for your services, you’d better invest in an external IPS display and calibration device if you go with this model. Plus, a 500GB HD doesn’t give me any warm-fuzzies either. 16GB is the bare minimum, too. I’n reality, you will only have 320GB or so to play with, after formatting , Windows, and whatever bloatware that is installed on it. New Laptops usually will have a 45 Day Lifespan, and then new models will hit the shelves. My advice: Wait. The chip shortage is forcing manufacturers to cut corners and features. Not to mention this whole Windows 11 TPM 2.0 thing, which adds to the hassle of buying a laptop/ desktop in 2021. I suspect and expect a new laptop for in 2025 for a lot of people, including ones just bought in 2021.

-
Ah ha!! So a full EHD, even a Time Machine Drive, can slow down a Mac’s performance! Good to know! Honestly? If everything is “fine” on your computer, there is no shame in formatting that TM drive and starting things all over again. Of course, if you are looking to restore things from a few years ago, this will cause an issue. This is just a thought.
-
Never mind!! That will teach me to look at stuff on my phone. You are talking about that horizontal dark line! That's sensor banding. This happens a lot with Canon bodies. Especially for sensors that are overheating with continuous long exposures, like for a Time-lapse sequence. See this thread, scroll down some...you will see some photos look almost identical to yours! How do you fix it? You don't. You send your camera to Canon and it will be repaired at around $500 or so to fix. Maybe more in 2021. That being said, I've seen this software package being recommended a lot, PixInsight, and you will need to run the Canon Banding Reduction Script. The program isn't free, though there is a free 45-Day Trial. So you will have time to fiddle and make sure that it's worth the money. If you are going to do more shots like this one, it seems to be way cheaper than spending $500+ with Canon Repair. (IF Canon actually fixes it.) I found this thread with a little bit of instructions on what I'm talking about: https://stargazerslounge.com/topic/322183-north-america-nebula-canon-banding/
-
Here's one of my shots of the Comet from last year. I also caught one of Elon's Satellites:

-
You also have high clouds and it seems your camera is stationary on a tripod. If you want tack-sharp stars, you are going to need a star tracker and a special filter known as a Bahtinov Mask. The SharpStar2 by Lonely Speck is one of these filters. But with a Time-Lapse, you won't need a Star Tracker since you want the Milky Way to move along the Sky, but a sturdy tripod or Platypod with a solid tripod head is mandatory.
-
This isn’t a Canon / Camera / Lens problem. You can thank Elon Musk for this shit. You know that Starlink Internet that’s supposed to give internet access to remote parts of the globe? That’s one of those satellites. It’s only going to get worse the more satellites that he launches into space. You are just going to have to clone it out. Content Aware or the Patch Tool might be your friend on this one…or all 411 images.
-
It couldn't hurt. Especially if they are from YEARS ago. As for the speed, disconnect the Time Machine Drive and see if your performance improves. If it does, let me know and I will add it to my brain to help others. :)
-
This isn't a add more RAM or free up hard drive space or update to the latest OS, you have a physical hardware bottleneck that you can't get around. Sorry.
-
That's your problem. A traditional spinning HD is not as fast as today's modern SSD Drives. A "Fusion Drive" is the combination of a small SSD Drive, usually 32GB and a much larger traditional spinning HD, in your case around 2-3GB or so. The problem is, the MacOS decides what is installed on the SSD side of the HD, not you. The only thing you have access to is the slower portion of the drive. How much faster is a SSD Drive? It takes approximately 15 seconds for my iMac to completely boot up to a login screen from it being in a powered off state. SSD Drives are way faster. In reality, it's time for a new iMac if you want more speed. Here are my "Quick and Dirty" iMac Configurations. Now, I'm sure you will be asking, "Can I just upgrade the HD?" The short answer is Yes...but the long and more honest answer is, you will need to have it done by an authorized Apple Service Center, or a Computer Shop that has experience in doing this sort of thing. I wouldn't try it yourself.
-
How old is this Mac. What size screen is it? I've never seen a Mac come with a 3TB Main Hard Drive, though if it has a few years on it, 3TB is possible. As per our original conversation on FB, upgrading to Big Sur isn't going to improve performance. The MacOS isn't Windows; formatting and re-installing or upgrading has a negligible affect on increasing speeds. If your Mac is from 2013 or earlier, honestly? It's time for a new computer. Heck, ones from 2015 are also getting a bit "long in the tooth" at this point. So lay on more details, an inquiring mind wants to know.
-
Would this screen be comparable to a MBP screen?
Brian replied to touyen's topic in The Windows & PC Hardware Forum
I also think IPS-Like is just LG’s attempt at creating an IPS display, without having to pay royalties. So, when it’s all said-and-done, it should be fine. -
"Save" function takes longer than normal.
Brian replied to Gera's topic in The Windows & PC Hardware Forum
Also, manufacturers have been doing a lot of bait-and-switch, due to the Chip shortage. So while you might think you bought a new PC with all the latest and fastest technology/chips, that might not be the case. In fact, some m.2 drives that are brand new perform as fast as one that is 94% full that’s been running for 3+ years, and it’s a brand new drive! The reason is, the manufacturers install slower components/ chip controllers / flash memory. The problem can’t be identified via a website and it affects things being advertised on reputable sites. So you might have to exchange that new rig or the HD that was installed. 2021 is such a mess when it comes to technology and you might not have done anything wrong; it’s just they way it is. Very much like you “almost” get a gallon of ice cream in the US now. -
"Save" function takes longer than normal.
Brian replied to Gera's topic in The Windows & PC Hardware Forum
What are you trying to save and where? What type of storage medium are you using and is it internal or external? Also, how large is the document / image? Are you duplicating and flattening the image a lot? Is your image created with a High MP camera? How much RAM do you have. Need more info. -
Would this screen be comparable to a MBP screen?
Brian replied to touyen's topic in The Windows & PC Hardware Forum
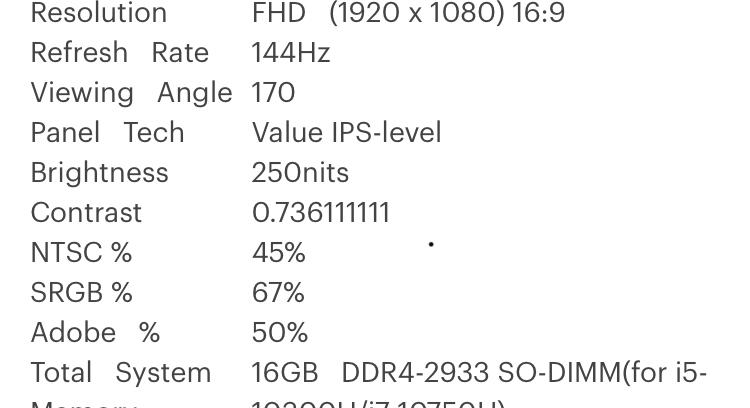
“IPS Level” bugs me a little bit. This display panel type has a wider viewing angle, is brighter (which may or may not cause problems with matching your prints,) and has better colors, due to the DCI-P3. But it’s not a true IPS Screen. Think of it like “Artificial Flavors,” it may taste like an Orange, and be the color Orange, but it’s not truly an Orange. That said, it is better than the TN Display Panels that you get with your typical laptop. -
Purchase iMac 27" or laptop and screen?
Brian replied to Footsie's topic in The Macintosh User Group
Yep. That should work. A$239 is way better than paying Apple's insane prices. Here is the real benefit, you can keep using the Apple RAM and get 40GB! Yes, you can install it yourself, it takes about 5 or so. So you spend A$239 for 40GB of RAM vs A$600+ for 32GB. That is the question that only you can answer. If you want to stick with the Windows Platform, then yes, that would be one way to go. The tough part with a laptop is honestly getting one that has enough horsepower. The requirements are still the same, enough RAM (16GB or more,) a beefy video card that has its own dedicated Video Memory, 1TB Hard Drive, etc. In reality, you are looking at a Gaming Laptop which really isn't cheap. No, the "$999 Special" that used to be "Good Enough" in years past doesn't exist in 2021. The chip shortage has made sure of that; what I mean about the chip shortage is not only the actual parts that make up a computer, i.e., hard drives, motherboards, etc. but the actual components that make up those parts are in short supply. It's the same reason you can't buy the latest Xbox or Sony Playstation off the shelf. There is a shortage of a whole slew of components. We have fields full of cars that can't be sold in the US. Why? No computers to install in them. Now for the answer I think you are looking for: Macintosh computers are NOT better, they are just different. I'm a Mac owner and I'm typing this on my fancy 27" iMac. So I put my money where my mouth is. That said, I deal with Windows Computers and Servers all day long when it comes to my day-job. When I come home, I don't want to F*ck with my computer, and if I do, it's just routine maintenance. That's why I have a Mac. When you switch to a Macintosh, it's in your best interest to switch to the Mac Format and not live between worlds. Mac --> OR <-- Windows. If you are going back-and-forth between the two worlds or have to, it's better to stick with a Windows Computer. Speaking of a Windows computer and the chip shortage, the price between the two worlds has never been closer that it is currently, and I've been messing around with computers since 1981. It's insane. Even a Dell XPS Computer is around the same price as a 27" iMac, and that's before you purchase a Display. Video Cards are going for $1500 all by themselves. Yep, and there is no way to "upgrade" to a 64-bit Operating System to take advantage of that extra RAM. You will need to format (aka Nuke) your Hard Drive and install a 64-bit OS, like Windows 10. You can't go from 32bit to 64bit, so says Microsoft. Turning off the WiFi is also smart and it sounds like it's running Windows 7 or Windows Vista. Neither are supported in this day-and-age. Hell, even Windows 10 is due to be replaced / not supported in 2025. So buying a little more now in terms of horsepower, might save you from having to buy another computer in a few years. But Windows 11 is still a bit down the line and I'm in no rush. A lot can happen within the next 4 years or so. You are at a crossroads. Damien will tell you that Macs are a complete waste of money and you should buy a Windows Computer. I own a Mac for the above stated reason. In either case, you really need a better screen and a computer upgrade. Macs come with a IPS screen and traditionally, we have had decent luck with the Dell IPS Displays if you went the Windows Computer route. Oh, besides a new computer, you need a calibration device of some kind. I don't care what Kool-Aid Mac User's drink, ALL DISPLAYS NEED TO BE CALIBRATED, even Macs, if you are editing photos. Especially if you are looking to charge people good money for your services. The reason that the Art / Music world is Pro-Mac has nothing to do with being "better," it's just that Software back in the late 1980's and 1990's that catered to the Creative Types was only taken seriously by Apple. Windows went after Video Games and Business Related Users, so there is this encampment. That's why there is a divide that still exists to this day, and again...Macs are just different, they aren't "Better." Photoshop works the same on both, with very minor differences. (Command Key is used instead of the Ctrl Key and the Option Key on the Mac is used instead of the Alt Key on a Windows Computer. That's the difference when it comes to Photoshop, everything else is the same.) From a convenience standpoint, a 27" iMac makes things really easy. Just buy the 27" iMac Computer based on my recommendations and get the RAM upgrade; you don't have to think. Then purchase the latest version of Photoshop Elements or sign up for the Photographer's Plan for Adobe Photoshop CC. That's it. It should be $9.99, plus tax. If you do go the PS CC Route, check with me 1st, there are many different and more expensive Adobe plans that are simply not worth it, and you can get suckered into spending more money than you have to. Macs also make things very easy to switch and it will read your Windows External Hard Drives with no problems. So migrating won't be an issue; in fact, after we get your images moved over to the new Mac, we can Partition and Format your existing HDs and use them on your iMac. The issue is when you want to go back to a Windows Computer or go back-and-forth. That's when things get a little messy. -
Purchase iMac 27" or laptop and screen?
Brian replied to Footsie's topic in The Macintosh User Group
Mac Laptops are a complete waste of money. In order to get one that "Is good for photo editing," you are spending at least $3499 (US Dollars) which as I type this, works out to be A$4645.14. That's before you buy AppleCare and pay your local taxes. So call it around $5000+ Australian!! Which is an insane amount of money to spend on something that you will get 3-4 years of life out of. The reason is, everything is integrated when it comes to Apple's current products. You can't upgrade things after the fact. Not only laptops, but the new M1 line of Apple's products. So you need to spend Apple's way over-priced upgrades in order to be set for the future. Yes, you read that correctly, the "average" laptop only lasts about 4 years or so. Why? Because it's the Lithium Ion Battery, that hasn't changed much over the years. Sure they have gotten them to last a bit longer, but the battery itself wears out over time, even if you leave it plugged in all the time. Lithium Ion Batteries have a certain shelf life, then they either die on you unexpectedly or start to swell up and possibly can catch on fire. (Rare, but it happens.) As you can see, I don't recommend laptops for photo-editing. I never have, but people keep asking and I finally gave up arguing. Anyway, to answer your question, you'd need at least a IPS 4K display with a Mac Laptop but truth-be-told, it probably won't look the "best," at least what you are used to. Apple currently does not have an affordable 5K external screen on the market the only models are around the $6000 mark (US Dollars) which are really meant for the $20,000 Mac Pros. Apple used to have an affordable display, but stopped making them years ago. So what's so bad about a 4K display? Apple really doesn't support any other hardware other than their own. So things like text may not look as crisp among other things. It's the same reason I don't recommend the current Mac Mini computers, it's the lack of a good display to use. Personally, I'd purchase an Intel Based 27" iMac right now if I had to. The M1 chip is still kinda new, and to be honest, all of those features that Apple is advertising that requires the M1 CPU, I'm not using. So it really isn't a loss for me. I'm just wasting time on Facebook, editing photos, paying bills, etc. Besides, Photoshop needs to be programmed to take advantage of what makes those M1 chips so fast, and that's going to take a few years to accomplish. By then, we will be on the M2 Chip, maybe M3. Have you read some of the pinned articles in this forum? Give this one a read and especially this one. You really aren't going to get the "Best" configuration when it comes to a Mac, unless you buy directly from Apple's website. Currently, with the world-wide chip shortage, prices across-the-board are about $1000 more than their 2018/2019 counterparts. So if you are in the market for a new computer, I'd either save up more money or stick with what you have and deal with it.