Brian
-
Posts
4,137 -
Joined
-
Last visited
-
Days Won
55
Everything posted by Brian
-
As with most things, the first question I will ask is: "Budget?" The next few questions that I will ask in regards to this topic is: What do you plan on shooting with said flash/strobe? Newborn? Groups / Families? Macro work? Where will most of your work take place? Will this be on location or in a studio of some sort? Are you planning on 'running and gunning' while using flash, like at a sports event or wedding?
-
Don’t fall for marketing. Apple Photos can edit Raw files, but it’s NOTHING like ACR sliders. It’s more like the built in Camera App on a iPhone or iPad that allows you to tweak some parts of the photos. It’s not a real editing program as far as I’m concerned. Now, if you want to shoot Raw / import then throw on a bunch of IG-Like filters, be my guest. if you are looking for the same power and level of control that a program like Adobe ACR, it’s not Photos. Basically your iPad would be a great viewer to cull, but I feel a laptop still would be a better fit for true editing. PS for the iPad. I’ve never installed it, I also don’t own a iPad. It is highly recommended by Adobe to use an iPad Pro instead of just a regular iPad, though a modern one that can use an Apple Pencil will work. I did find a FAQ Page and it seems you just need to sign into the Adobe Cloud Manager Software on your iPad and download the App. If that’s what you are trying to already do, I suggest contacting Adobe. I’m thinking there is an issue with your PS CC Cloud Subscription. https://helpx.adobe.com/photoshop/using/photoshop-ipad-faq.html#use-photoshop-ipad
-
If there is anything super important on that drive: stop. Step away from the drive and send it to these guys: https://www.gillware.com You could be right, it could be a bad USB port or the controller board on the HD migh have went out on you. If you aren’t hearing the “Click....Click...Ka-Thunk....Click” coming from the HD, you have a decent shot of recovery. If you keep messing with it in a panic trying to “fix it,” chances are you will just make it worse. I will warn you, Extreme Data Recovery isn’t cheap, depending on what needs to be done. That being said, if you shoot professionally, it’s cheaper than legal fees if you get sued.
-
Power strips do wear out over time, so keep that in mind. They won’t let you know when they wear out, they just turn into glorified extension cords on their own. Fun Times!! At the very least you should have one and not hook the Mac directly into the wall, but if the power strip is from the 1980’s, compete with Faux-Wood Panel stickers on the side and it’s yellow instead of white, due to age...you probably should avoid using it on your brand new computer. It boggles my mind! I have PERSONALLY seen a person buy a $2000+ brand new fancy computer and not spend the extra $20-$30 on a new surge protector to go with it, because they don’t want to “waste money” since they already have one. SMDH. Waste $2000 and cheap out on the $30 power strip LOL! Personally, I use something called a UPS, which is a surge protector on steroids and has a battery built in. A UPS allows for a graceful shutdown which if you suddenly lose power. Please do not misunderstand me, people automatically thinK, “...must have gotten a surge and that’s what broke my computer!” Not in every case. Now, if you have lots and lots of brownouts / spikes over the years, then I can say yeah, it’s possible. In reality, I think you just got a “Lemon.” The Asus Republic of Gamers line is usually decent. For that question, post a new thread in the Windows Hardware Forum.
-
Hello Rebecca! I'm so glad you posted here as I just saw your post on FB Ask Damien. *SIGH* I'm going to address each question one-by-one. This isn't good... This indicates a problem with the power supply or a certain component's power randomly being interrupted, specifically the 5 volts that comes from the power supply. It could also be a motherboard problem as well. When you press a reset button on a computer, the +5 Volts is interrupted, which freaks the computer out and it resets. It could also have a bad ground somewhere. Still indicates a problem with the motherboard, or some sort of controller chip isn't getting enough power or something is happening on the power rail to the component / capacitor. (Component level repair on a motherboard, etc.) Bad video card is also on the table. Photoshop CC 2020 does not seem to play well with the 2015-era iMac's Video Card. Older versions, like PS 2019 seem to work better, and this information I got from other members in your situation (owing 2015 iMacs.) Realistically PS 2017 is the best choice for your 2015-era computer. Unfortunately, you are on Catalina and only PS CC 2019 and PS CC 2020 are Catalina Compatible. How do you go back to Mojave? Format the HD and install from a Mojave Thumbdrive. There is absolutely no-way to downgrade and it's a complete wipe / re-install. Unfortunately, you as the consumer / owner, there is nothing you can do. I'm so sorry. This isn't a software patch or turn off a setting kind-of-fix. I think you just got a bad Mac (aka Lemon) to begin with. Mojave crashing your HD...that could be the culprit, though I can not officially say. During the update, sometimes Apple updates your computer's firmware in addition to the OS being updated. Other components, like the video card's Firmware could also be updated at this time. It is plausible that upgrading to Mojave irritated an existing issue and not only do you have a motherboard / power-supply physical problem, but a possible corrupted firmware somewhere in your computer. As to why this only happens in PS, it is possible that this affected area is ONLY accessed when PS CC 2020 is in use. Using your Mac for general computing doesn't trigger the problem; watching Netflix, wasting time on FB, checking e-mail...your computer will work "fine." Kinda figured. I would not bother trying to fix this, as it's a 21.5" iMac. You are looking at least $800-$1000 repair bill between parts & labor. In my humble opinion, 21.5" iMac models are a complete waste of money as they usually have slower and less powerful components installed as compared to their 27" counterparts. This is coming from a Mac owner who loves his Mac and iPhone. The 21.5" models used to not be this way, and I even owned a 21.5" 2009 iMac. With the models today, Apple really wants you to "Go Big or Go Home." As to what Mac do I recommend, especially for Photo-Editing work, please give this article a read.
-
I'm saying pull the Ethernet Connection / disable the WiFi. But that's a little extreme for now.
-
Interesting. Going forward, it’s a good idea to not have that computer hooked up to the internet. No telling what could be lurking in the shadows. Especially if it’s one that has old software that won’t / can’t be upgraded to Windows 10.
-
No idea on this one. You might have to call Adobe, update to the latest PS CC 21.0.3, which was released a short time ago or possibly do a reset of some sort on your tools.
-

Backing up & Hard drive options
Brian replied to SophieBowden-Caldwell's topic in The Macintosh User Group
I will be away from my computer next week as well. I still will have access, just not able to post screenshots, so we will pick this up after next week. -
Backing up & Hard drive options
Brian replied to SophieBowden-Caldwell's topic in The Macintosh User Group
One more thing... When you get those Western Digital EHDs, LET ME KNOW. We will need to prep them for use on your Mac. DO NOT USE ANY BUILT-IN WESTERN DIGITAL SOFTWARE to do this, no matter how much it bugs you. Everything that you require is built into the Operating System. -
Backing up & Hard drive options
Brian replied to SophieBowden-Caldwell's topic in The Macintosh User Group
This is totally your choice. It boils down to what you are comfortable with. If you do a lot of sessions, 18 Months seems reasonable. I know other Photographers who keep stuff for decades. You'd be surprised on how many requests are generated for photos when someone dies. But if you are a newborn photographer, your situation might be different. It really depends on WHAT type of Photographer you are. If you are into Commercial Work, and need to have proof of negatives just in case you need to go to court, your needs might be different than one who sets up hay-bails and corn-stalks for "Fall Mini Sessions." Personally, I keep all of my stuff and will gradually move old Weddings that I've shot over to a EHD that's put into a storage unit. So I tend to keep stuff for years. If 18 Months works for you, keep doing what you are doing. -
Backing up & Hard drive options
Brian replied to SophieBowden-Caldwell's topic in The Macintosh User Group
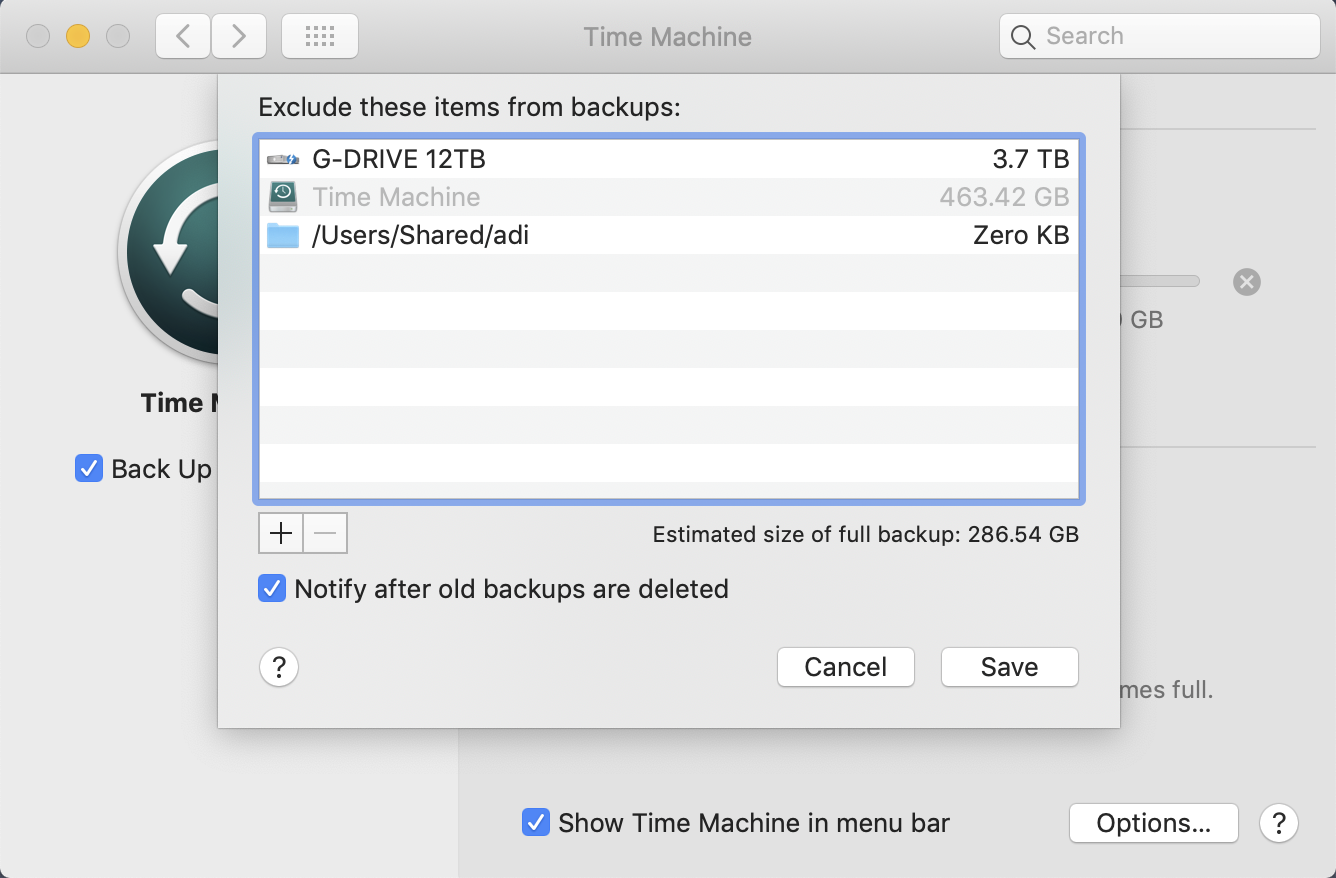
If you store a lot of data on your main hard drive and work off of it exclusively, which is probably the case at this point, you can leave it on and it will automatically backup every hour or so. The first Time Machine Backup usually takes awhile during the first-go-round. Technically, if you have a large enough HD (like a 4TB Drive,) Apple wants you to have the TM EHD hooked up at all times and let it run in the background. I will say, it works REALLY WELL. I once had a catastrophic failure, had the HD replaced and restored from a TM Backup. I was operational at about 99% with having do tweak a few things here and there, like 3rd-party license keys and such, after about 20-30 minutes. Steve Jobs wanted doing data backups to be "Fun" and to have little input as possible for the end-user, so they couldn't screw up things. Time Machine is a "Set It and Forget It" type of thing, and in reality, it's designed just to work in the background; it doesn't take that much system resources either. I personally use my TM Drive about once a week, basically it's what you are comfortable with losing. If you can afford having a week's worth of possible data going "poof," just doing it once a week is fine. If you can't, or if you like adding / deleting files on a normal basis, then more often or at the very least, daily. Simply power-off the EHD or eject & disconnect the TM Drive so Time Machine won't kick in if you want to hold off on backups. You could also flip the switch in the System Preferences / Settings but this is a little dangerous, as you could forget to turn TM back on each time. When you configure Time Machine, make sure you EXCLUDE any other external hard drives. You just want to backup the Internal Mac HD. Open the Time Machine Preferences and click on the "Options" button. You should see your other EHD (if it's hooked up) in the Exclude List. I'm currently running a TM Backup as I type this and my Exclude List looks like this:
-
Backing up & Hard drive options
Brian replied to SophieBowden-Caldwell's topic in The Macintosh User Group
First, backing up via Time Machine is perfect for backing up your internal Macintosh HD on your 2013 iMac. I would not use Time Machine that is backing up on an external to backup another external as this causes issues. Ultimately, you want an external HD that is just used for Time Machine Backups only. When people try to "Kill Two Birds With One Stone" they end up having issues and failed backups. Do not cheap out when it comes to backing up, especially if you are truly running a business. This is just one of those costs of doing business. My recommendation for a Time Machine Drive is to purchase a size is at least double of what your internal hard drive capacity is now (or larger, since 2TB Drives are getting harder to find these days and have been replaced by 4TB models.) So if you have a 500GB HD, that would be a 1TB External used for Time Machine, if you have a 1TB Macintosh HD, a 2TB HD, etc. etc. Again, You do not want to use an external HD for Time Machine AND as a regular EHD. Even if you partition it to two separate partitions, you are really playing with fire. In reality, you are looking at two External Hard Drive Devices. Since you have a studio, and your 2013 iMac contains customer images that is located in said-studio, I really think you need two different types of External HDs. One, is just for the Time Machine Backup. The other, will be either another external HD which will follow you home each night (It's important to have an off-site backup) or something called a RDX Unit. A RDX unit is usually made by Tandberg. It's the combination of a External Hard Drive and a Tape Drive. Instead of Magnetic Tape in a Cartridge, there is a little hard drive. These cartridges come in different sizes, from 500GB to it seems around 5TB these days. Here is a 2TB RDX Cartridge. These cartridges go into a RDX Dock, which attaches to a USB Port. Tandberg is the main manufacturer of these devices, and HP also makes them. When you insert the cartridge into the Dock, it acts just like a EHD. Simply copy and paste your customer files to the RDX Cartridge, then "Eject" the Cartridge and put in in it's transport case and take it home. You could have two RDX Cartridges, a Week A and a Week B or something that is even monthly based. Totally up to you. Plus, if you ever wanted to upgrade the capacity, all you would need to do is purchase a larger RDX Cartridge, the Docking Station stays the same. The only thing you want to avoid with RDX units is to not drop them. Even though they are rugged and have plastic transport cases that can take a beating, they still have little hard drives inside of them. That being said, they are a lot more durable than a typical EHD that you would move around. As far as an external hard drive, the brand that I recommend and use is G-Technology. They come Mac-Formatted and there are cables in the box. You could go with a simple 4TB for Time Machine and a much larger one, say a 10TB model that is just meant for your data files. I will warn you, these are Enterprise-Grade Hard Drives and are NOT CHEAP. If you really wanted to save some cash, you could go with a lower end EHD, such as this Western Digital 2TB EHD. This EHD would be just used for Time Machine. So if it dies, it's not a big deal...just as long as your internal Macintosh HD doesn't die at the same time. (Plausible, but HIGHLY UNLIKELY.) Better yet, I'd opt for this 3TB Gaming EHD from Western Digital. I am a big fan of the WD Black Line of drives (Class of Drives, not actual color.) WD Black Hard Drives are an advanced model, and just below a server-class / Enterprise-Grade Hard Drive. I have owned several WD Black Models over the last 30 years and have never had a problem with them. They run fast, run quiet and run cool. Even though it's a "Gaming" EHD that I linked to, it will work just fine on your Mac. All we would have to do is repartition and reformat the Drive. That takes like 5-10 minutes to accomplish. No software needed as it's built into the OS and I can help you with this. If you are in the market for a new iMac, I would HIGHLY RECOMMEND just purchasing that 10TB Thunderbolt G-Drive now. The new Thunderbolt Ports on the new iMacs are FAST and believe it or not, you can actually work off this drive without any lag. Of course, this makes Damien's head spin, but I do it all the time. That being said, I would never do this with a USB 3.0 EHD, that interface is just too slow. -
Yeah, that PC is probably not a candidate for Win 10 either. For your view files problem, check how you are “viewing” your files and make sure they just aren’t with a certain file extension. Other thoughts, that HD could be developing bad sectors or there is even more Windows 7 issues that are only going to get worse as time goes on. Those programs need to be updated or replacements must be found. I get it, I work in IT, and this type of thing with DOS Software working in XP compatible mode is just not going to work that well long term. Remember...as of right now, the 1990’s started 30 years ago. Software from that era is 30 years out of date.
-
Bugs and error messages are only going to get worse going forward. This time it's just a Shutdown thing. Next time is could be a back-door security thing rendering your computer to a boat-anchor status. Seriously, please start saving for a new computer and have Windows 10 in your plans for 2020.
-
Sounds like your rights and privileges associated with your login account are corrupted. This seems to be a Windows 7 bug and I say it kinda sounds really fishy. Why? On January 14th 2020, Windows 7 in all versions and Server 2008 have been taken behind the proverbial barn and shot dead. This "bug" will not be fixed and has been reported by many people. Well, the author of this article is hopeful, but the wallpaper bug was fixed back in December. Here is an article that I'm referring to with a work-around: https://www.zdnet.com/article/windows-7-bug-prevents-users-from-shutting-down-or-rebooting-computers/ So what's the solution? Upgrade to Windows 10, aka...buy a new computer.
-
If your budget is really tight, and you can't wait, re-read the "I can't afford $3000+ on a Mac" section. I can't link to Apple Canada, but just select the most expensive 27" iMac, (usually the column/model on the right) and just upgrade the HD to a 1TB SSD and leave everything else at the base configuration. I'd rather have a member get a better video card than put extra money towards a CPU when it comes to Photoshop.
-
Why I just finished a massive article on this very subject. It will be a part of my new (yet-to-be-released) FAQ section. Please give it a read and let me know your thoughts: What Macintosh Desktop Computer Do You Recommend?
-
HP monitor - to Dell CPU with converter plug
Brian replied to MJD's topic in The Windows & PC Hardware Forum
SMH. You have two video cables hooked up from the same computer and using both ports on the monitor. This is just as bad as having the CAPS Lock on in PS. ? ? ? You need to use ONE display cable. In your case, only use the DVI Cable, the one with the White Connector. Pull the Blue Cable with the Adapter off the PC. I realize you probably hook up the old computer from time to time, and that old computer has a VGA port. When you do use the old computer, make sure the main one is powered off. -
HP monitor - to Dell CPU with converter plug
Brian replied to MJD's topic in The Windows & PC Hardware Forum
Do you have one or two monitors? -
HP monitor - to Dell CPU with converter plug
Brian replied to MJD's topic in The Windows & PC Hardware Forum
The blue VGA 15-pin cables, also known as D-Sub cables are notoriously known to cause issues like this. In reality, those cables were only meant to go up to 20” Tube Monitors, not today’s fancy flat-screen displays. Can you snap a photo of the back of your computer? I’m looking to see what monitor ports you have to work with. Post the photo here in this thread. -
Yes. Damien has instructions and it's very important to download the current calibration software from Spyder's website.
-
Yep. Just create a file folder structure. Get things organized now or at the very least tweak things. It will make it easier in the long run. You can delete both of those programs if you wish.
-
NO.
-
2-in-1 are a pain to calibrate. You really don't want a touch screen. I'd get the Dell and upgrade the RAM at a later time. Intel CPUs are still better when it comes to laptops, not if this were a desktop, that changes.