Brian
-
Posts
4,137 -
Joined
-
Last visited
-
Days Won
55
Everything posted by Brian
-
Can you unplug it and then remove the battery?
-
HP Laptop Drivers are such a Pain in the Ass to deal with. The more I mess with them for my clients, especially the newer ones, the less I like them. You MUST PURCHASE A IPS BASED DISPLAY if you are editing photos. I don't care how big or small it is, IPS is the key. What IPS does is ensure that the colors, contrast, brightness is consistent from edge to edge...which is kinda important if you are editing photos. I'd still mess around with that external display's settings and re-calibrate. You can always set things back.
-
32" inches is quite large, don't compare it to a Flat-screen TV size. You aren't going to be sitting 6-8 away like you would with a TV. In fact, most folks can get away with a 27" model just fine. Heck a Dual 24" setup is also one to consider, but not with a laptop...unless it has a high-powered video card. Also, 32" sounds great, until you fork out $1300 to get one. What I would do is purchase a Dell 27" IPS Monitor for editing, such as this one and a SpyderX Elite, which has the best chance of calibrating two displays, especially when it comes to laptops. You could *Try* and keep using your ColorMunki, but I think you will have much better results with a SpyderX Elite. (I also own a ColorMunki and will get a SpyderX Pro for myself next.) In addition, there might be some sort of mode you can change within the External Monitor's Settings, it might be something called "Picture Mode" or something along those lines. I'd try something like "Movie," which really warms up the picture, or just anything different really and then re-calibrate. Oh, you definitely want to keep using the HDMI cable for your external for the best results.
-

Old Photoshop cs5 won't open due to upgrade to Catalina
Brian replied to SueP's topic in The Macintosh User Group
Welp, full disclosure... I had to upgrade to Catalina yesterday to fix my iPhone 6s, which got corrupted during the latest update. So now I'm stuck with Catalina as well. The good news is, the world did not end. The latest version of PS CC seems to have the majority of bugs worked out, so if you do take the plunge and get PS CC, things should work out for you. -
Here is a 14TB Thunderbolt G-Drive: https://www.bhphotovideo.com/c/product/1480233-REG The cool part with G-Drives, is they include cables...which they should for that amount of money.
-
Yep! You are good! You did purchase a good drive! I did the same thing! When I got my new fancy iMac, I just used my older 4TB USB G-Drive for a “TM Only Drive” and bought a larger 12TB Thunderbolt 3 Drive for use as a Data EHD for my new Mac. Keep in mind, some of the larger TB3 G-Drives are quite expensive, like around $600-$700, so budget for that. Yes, it is worth it.
-
As for the Thunderbolt 3, you don't have that option for your EHD, so please disregard what I mentioned above. You will know when you have a Thunderbolt Version because you will have a Thunderbolt Logo on the front of the Drive: In the future, if you do purchase another G-Drive, be sure to get a Thunderbolt 3 version. Once you experience the speed of TB3, it will be tough to go back to USB3.0.

-
If you are using this drive as a Data Drive, TELL IT NO...AS IN NO I DO NOT WANT TO USE THIS DRIVE FOR TIME MACHINE. Keep your Time Machine separate from your Data Drive. What happens is if you do use the drive for Time Machine, it will attempt to backup to itself, and that is very bad. We want this drive excluded from Time Machine. For that, head into Time Machine's preferences and put the new G-Drive on the exclude list. Time Machine's Preferences are pretty straightforward, and I'm sur you can find the exclude list if you poke around.
-
Can't adjust laptop brightness
Brian replied to JoJo momo's topic in The Windows & PC Hardware Forum
-
One more important thing! If your Mac has a Thunderbolt 2 or Thunderbolt 3 port, make sure you use that cable and not the USB Cable. I know everyone is so used to using a USB Cable, but if you have a newer Mac, and a Thunderbolt 3 port, plus a G-Drive that contains a Thunderbolt 3 connector, it is so much faster than using a USB Cable. So much that I work directly off my EHD, which Damien disagrees with. My reasoning, is that Thunderbolt 3 is so fast, that it's almost the same speeds as working with my internal HD. Now if all I had was a USB drive to work with, I would be importing my current gigs to the Main HD, while keeping a similar file / folder tree. This way I can drag and drop each file / folder from the Main HD to the EHD, the only difference is physically they are stored. I can find them using the same searching methods, regardless of drive. Most importantly, when it's all said and done, create a File Hierarchy AND STICK WITH IT. It is so easy to get sloppy and I'm guilty as charged. I have a bunch of crap in my personal folder that is all over the place. The business & client stuff though, is where its supposed to be.
-
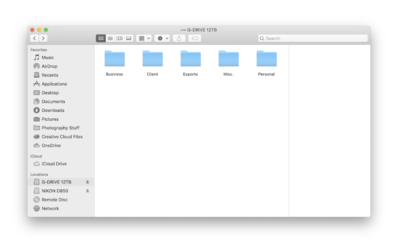
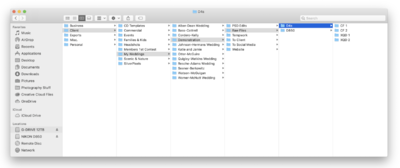
You have to treat your new EHD as a File Cabinet. Some File Cabinets have 4 drawers, some have 2 and others are bigger, like 6 or even 8. Most people have 2 - 4 drawers. Each one of these "drawers" is a main folder that is at the top level. For example, here is how my 12TB G-Drive looks: Here is another shot, with a few levels down: As you can see, the more detailed you are, the easier it is to keep things organized. If you have multiple camera bodies, it might be a good idea to have your bodies listed separately, each with their own folder system, that are duplicated in terms of hierarchy. So my D4s has a Raw folder, under that is the type of Cards that were used, and are numbered separately. So if I use several XQD cards during a Wedding, When I download them, I put them in chronological order. D4s >> Raw Files >> XQD1...XQD2...XQD3, etc. If I use my D850 during the gig, those images are put in the D850 >> Raw Files >> XQD1 >> SD1 folders. This way if I ever had two files that were named the same, at least I would know that DSC_0425.nef in the D4s folder came from that camera body. Of course, you usually can change the way your file names are created, it's just a setting in your camera body that you need to tweak. For example, I have 4 "Banks" in each of my camera bodies. Each "Bank" has its own unique three letter code. "WED" is for Weddings, "LND" is for Landscapes, "TVL" is for "Travel & PS," and so forth. I could also change this ID to "D4S" or "850" If I wanted to. Again, this is a personal thing. There is no "correct" way, just a way that makes sense to you.That being said, create a folder structure that would make sense to others. In the event is something terrible happens to you, someone could figure out where those Life Insurance Forms are stored, as well as other important files. KWIM? Really think things out, even if you have to write them down on paper first, THEN go diving into your files.
-
Old Photoshop cs5 won't open due to upgrade to Catalina
Brian replied to SueP's topic in The Macintosh User Group
I’m not going to sugar-coat this... You are fucked. Upgrading to Catalina is a one-way proposition. The only way to downgrade is if you either have a Time Machine Backup with the older OS and format your HD / perform a restore or have created a Thumbdrive with a older OS and then format the HD and reinstall everything. Either way, you will need to format your HD and then deal with the issues that process creates. Other option: Photoshop CC is in your immediate future. There are absolutely no work-arounds to get CS5/CS6 working with Catalina. The programming language that was used to code CS5 flat out will not work with Catalina. Heck, even PS CC 2015 & 2017 don’t work. Only PS CC 2019 and 2020 work with Catalina. -
I’m going to have to completely redo the above comment. Talk about messy. There is only so much I can do from my phone. Before jumping in, why not get a piece of paper and plan out your directory tree? Then create folders on the G-Drive? LR is going to BITCH about you moving stuff, so the better your folder structure and easier it is to find things, the easier everything will be for you.
-
When you put a card into the reader, it will appear on the desktop just like your G-Drive. Then all you have to do is double click on the reader and navigate to where your Raw files are. Do a select all and then right click copy. Then navigate to where they are to be located on the G-Drive EHD and then create a folder with the project name and then you right click and then paste. You simply treat the card reader as another “Hard Drive,” for lack of a better term. For how to organize, I answered that above. That is a very personal thing. You tell me how you want it organized. Here is a sample, and I will tweak this on my computer later. Doing this from my phone is tough: — G-Drive EHD — Client –Weddings —2020 —May —-> 5-23 ———> Smith-Jones Wedding (Bride’s Last name first) ————-> Raw Files ——————> CF1 ——————> CF2 ——————> CF3 ——————> SD1 ————-> Raw Edits ————-> To the Client ————-> To Social Media ——————-> Facebook ——————> IG ——————-> Pinterest -June -Headshots -Commercial -Family Portraits -Headshots -2019 Personal Business iPhone Website
-
Can't adjust laptop brightness
Brian replied to JoJo momo's topic in The Windows & PC Hardware Forum
Alright, so that was successful, but the problem still remains. Bummer. Unfortunately, this problem is a Pain in the Ass to solve. There is no one particular method that fixes it. Try downloading a fresh set of drivers from the manufacturer and see if that works. -
Since you have a Mac and G-Drives come Mac formatted AND it’s appearing on your desktop... Guess what? You are done. No need to do anything hardware-wise. At this point, double-click I’m the new G-Drive and start creating a file / folder hierarchy. Create main folders, e.g., “Personal” “Business” “Website” “Uploads” (whatever you choose.) Then under the main folders create years, then months, then project names. Find a way to make things logical and methodical so that things are easy to find down the road. Take a hard look at your naming structure. Where are your photos stored now? What kind of folder? If it’s just a “Photos” folder, which is a dumping ground, that’s a issue. If you are a LR user and leave it up to LR to organize stuff, that is also very bad. Most people find out just how badly they are disorganized and have shit all over the place. Time to change habits. One more thing, are you using a card reader or your stupid camera to transfer images to your computer?
-
Can't adjust laptop brightness
Brian replied to JoJo momo's topic in The Windows & PC Hardware Forum
Did you run CMD.exe as an Administrator? You MUST right click on CMD and Run as Administrator, or else it won't work. Error 87 is most caused by not opening an Elevated Command Prompt. There are few things we could do, but honestly, it's way more involved. You might want to try and see if the manufacturer has a driver download available and all we have to do is re-install the video drivers. The other more involved way is to download a new version of Windows, create a .iso file and then tell Windows to use contents of that file to help fix Windows. Unfortunately, it isn't bullet-proof and doesn't always work. We might have to boot your laptop in Safe Mode and do a restore (keeping your files and data.) If that doesn't work, it might need a complete wipe and restore. Unfortunately, that is really beyond the scope of this Forum. I could log-in and do these things, but it would require a fast Internet Connection, and I wouldn't be doing it for free. I charge a flat $150 to do service work over the Internet, whether it works or not. With this Corona-19 going around, your local computer shop might be closed, but I'd try calling around. You might get lucky. Oh, stupid video driver problems like the one you are having are common with Windows 10. Often as the result from a Windows Update screwing things up. I've run into this type of thing more than once, and I'm sorry to say, there is no "one" fix; basically...you dork around with it until it works. Sometimes I'm at it for 3 hours or more because Windows is just being stupid and stubborn.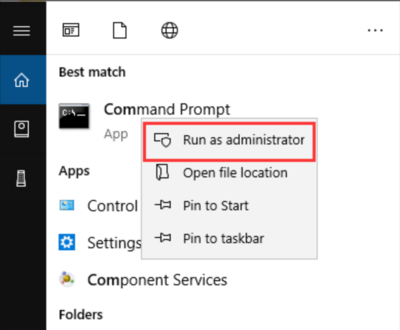
-
Can't adjust laptop brightness
Brian replied to JoJo momo's topic in The Windows & PC Hardware Forum
After the DISM commands complete, reboot your laptop. Then run the SFC /Scannow command again. You might have to run this multiple times for it to get everything. -
Can't adjust laptop brightness
Brian replied to JoJo momo's topic in The Windows & PC Hardware Forum
OK, it's what I suspected. You Windows is botched up. It seems to have repaired some files, no telling which ones. What we are going to need to do is open up another Command Prompt box with it in an "elevated" status, which you right click and "Run as Administrator." This is very important as the following commands won't work unless you run CMD.exe as an Administrator, even though you might be logged in as one. Once you get the elevated command prompt box open, type the following: DISM /Online /Cleanup-Image /ScanHealth {press enter & let it do its thing.) Hopefully it will come back with saying there is a problem and it can repair it. Then type the next command: DISM /Online /Cleanup-Image /RestoreHealth {press enter & let it do its thing.) This will take awhile, so be sure to have your laptop plugged in. -
Can't adjust laptop brightness
Brian replied to JoJo momo's topic in The Windows & PC Hardware Forum
Sorry, I can't read that screen shot. Can you use the Snip-It tool so I can get a closer look at what it says? Have you rebooted since running SFC? -
Can't adjust laptop brightness
Brian replied to JoJo momo's topic in The Windows & PC Hardware Forum
Windows Update LIES. Unless you click on "Check for Updates" and it comes back with saying "You are up to date..." (or something similar) do not trust it. So after checking for Windows updates, I want you to click on the Start Button and just start typing the letters CMD. Command Prompt should appear in the Start Menu at the top and I want you to RIGHT-CLICK IT AND SELECT "RUN AS ADMINISTRATOR." When the Command Box pops up, type the following: sfc /scannow Let Windows do its "System File Check." This will take awhile. Hopefully it will fix things, if not I have a few more commands to run. -
Can't adjust laptop brightness
Brian replied to JoJo momo's topic in The Windows & PC Hardware Forum
Yeah, your video driver is really screwed up. Can you right click on the very top item in the device manager list, where it says laptop-blah blah blah and do a “Scan for new devices.” We will start there. Also, have you rebooted? What is the status of Windows Updates? Have you done a Windows Update recently? -
Hard drive, D drive and all things inbetween
Brian replied to LCC's topic in The Windows & PC Hardware Forum
Yeesh!! Yeah, that's a problem. Even if we moved everything over to your D Drive, PS would still complain and you really wouldn't get much of a performance boost, since more than likely you'll be working off a USB port of some kind. Hopefully a 3.0 or 3.1 Port. I'm thinking you have a 128GB SSD Drive in your laptop and by today's standards, you want 16GB of RAM at a minimum and a much larger HD. So yeah...right now your laptop is way under-powered for PS CC 21.1.1. Even if we had a 256GB HD to work with, we could make things work...but not with a 128GB Drive. That laptop is only meant for general computing, not Photoshop. Let's start with the Make/Model and let's see if we can get it upgraded. In reality, we want a 1TB SSD HD and as much RAM as your laptop can handle. Hopefully that's at least 16GB. If it isn't able to be upgraded, unfortunately, you are in the market for a new computer. -
-
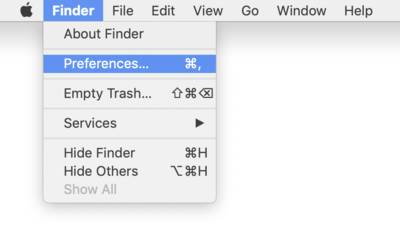
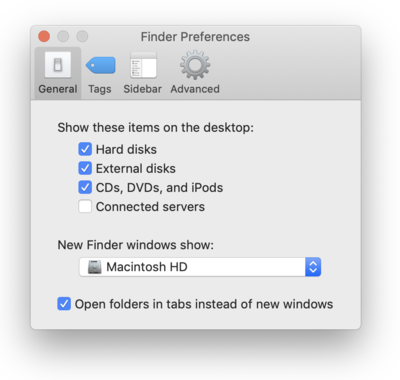
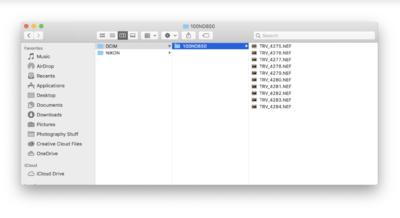
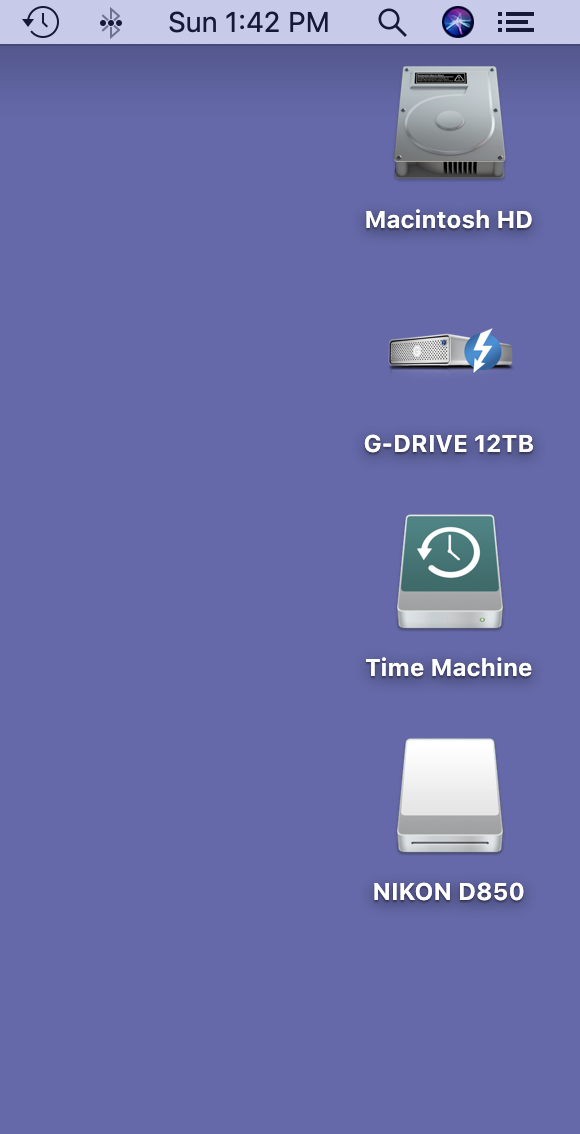
Now for Part 2.... OK, first, purchase one of the card readers that I linked to above. For the majority of today's modern computers, it will be the Sandisk Reader or the Sony XQD Reader. One of those two readers should cover just about everyone reading this article. If a computer needs a Traditional Card Reader with a USB 3.0 port, the Lexar model should work fine. Second, there are a few simple steps that need to be enabled so that the Card Reader appears on the Mac Desktop when Flash Media is installed. The added benefit is that this will also turn on the ability to see External Hard Drives as well as DVDs on the Mac Desktop. This process should take no more than a few Minutes and I'm surprised it isn't on by default already. Well, I know the reason why, I just won't bore you with the details and Apple's (Steve Jobs') way of thinking. Without further ado... Open the Finder. The easiest way is to click the Smiley Face on your DockBar: Then head to the Finder Menu (Next to the Apple Menu) and select Preferences: Once there put check-marks next to these items and change the bottom to "Macintosh HD" if you want: Finally, Click the Red Circle in the Upper Left Corner to save the new changes and close the Preferences box. Now when you insert an External HD or Camera Memory Card into a Card Reader, they will appear on the Mac Desktop. For example: To access my images, I simply double-click on the Nikon D850 Icon and navigate to where the camera stores the images: Then it's a simple matter of creating a folder on my Hard Drive of choice and then performing a COPY AND PASTE on my image files. It is IMPERATIVE THAT YOU ALWAYS Copy-and-Paste and never-ever perform a Move / Cut-and-Paste. Why? If something were to go wrong during the Data Transfer, with a Copy-and-Paste Method, you can simply either click Cancel or try Copying again. Unfortunately, you will not have that option with a Move or Cut-and-Paste! Your images could go "Poof!" Without you realizing and then we are thinking about performing data-recovery to get those images back; with a Cut-and-Paste Method, you are not only copying but deleting the source-file as it does the Data Transfer. Save yourself the potential stress and frustration and always "Copy & Paste." Life is too short as it is.