

Damien Symonds
-
Posts
211,935 -
Joined
-
Last visited
-
Days Won
3,480
Everything posted by Damien Symonds
-
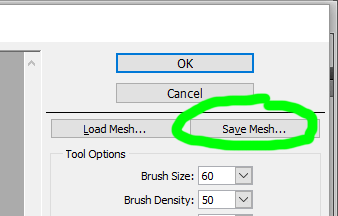
In this case I would do a new merged layer above all your other layers (Cmd Opt Shift E). Then do the Liquifying on that layer. BUT, here's the important trick. After you've done the liquifying, but BEFORE pressing OK to exit the Liquify window, hit "Save Mesh": Save the mesh file with the same filename as your photo, so you don't lose it. After saving the mesh, press OK to commit the Liquifying. The reason we do this is in case you find you need to do other editing with your Levels layers or whatever. In that case, you'd need to delete your Liquify layer, you see? But that's ok, because you can re-do whatever Levels work needs doing, then make a new Liquify layer on top (Cmd Opt Shift E again) then go into Liquify filter, hit "Load Mesh" and restore the liquifying you did before. No need to do it over again. Is this making sense?
-
The trick to this is so easy you'll fall of your chair First, mask the entire sky with your brush. Ignore the gradient for now. Use the brush to fill in the entire sky, in the windows of the truck, along the horizon as accurately as possible. THEN, put the layer in a layer group by hitting Ctrl G. Add a mask to the group, and put the gradient on THAT mask.
-
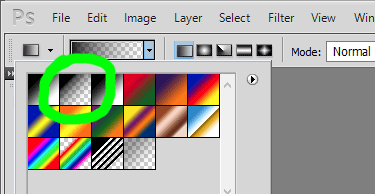
Always make sure your tool is set to "Foreground to Transparent" not "Foreground to Background".
-
Then something is badly wrong. Can you select your gradient tool and take another screenshot to show me, so I can check your settings?
-
This is not a class question, so I've moved the thread into AD. Can you include a screenshot showing your Layers panel?
-

Multiple Door Collage
Damien Symonds replied to Sara_B's topic in How to achieve a certain look or effect
Oh yeah, don't worry, you can still sharpen like any other collage. You might need to mask it partially off any images that were terribly over-sharpened in camera, though. Alas, I'm not sure either The angles of the doors. The first thing I noticed about the one you showed me on Pinterest is that the designer didn't correct the perspective, and it hurts my eyes. I think it will be well worth the time to do this for each one: https://www.damiensymonds.net/2014/03/distortion-or-perspective-correction.html I don't think your spacing of the red blocks is very even. Make sure you use grids so you can get them exactly even. -
Hi Tracy, I've moved this thread to the correct area. You're not imagining it, this is no good, I'm afraid. It's motion blur. What was your shutter speed?
-
File Size?
Damien Symonds replied to Summer Michelle's topic in Output - print, websites, Facebook, email, client disk, etc
@Summer Michelle? -
Your masking is a bit dodgy here and there. That'll need to be fixed. But on the whole, good job.
-
I'm so sorry, I don't understand the question. (By the way, make sure you pay attention to the blend mode of my layers.)
-
Soft Proofing/Monitor Profile
Damien Symonds replied to JenniferSuggs's topic in Monitor calibration questions or problems
It doesn't say anything. It only proves that Chrome is shit, as you now know. Safari is also a tiny bit shit, but better. Firefox is the only browser to use, really. CMYK is a complicated world. I'm happy to discuss it with you at length if needed ... IS it needed? How often do you print in CMYK? CMYK soft-proofing shouldn't look awful. Again, I'm happy to discuss this with you, but only if needed. Soft-proofing is very important when you're getting ready to print a photo with vivid colours in it. But you HAVE to make sure you're using the correct profile, and using it properly. Have you read this? https://www.damiensymonds.net/2010/03/bit-about-soft-proofing.html What you must NEVER do is what you did. You must never use it for web images. This brings me to the MOST important question. Have you done this? https://www.damiensymonds.net/art_tscs000.html Oh yeah, you must NEVER do that. Were you following my calibration instructions here? https://www.damiensymonds.net/calibration.html Once a month is normal. Nerds do it once a week, and raging nerds do it every morning. But once a month is fine for the rest of us. I also have a ROG laptop, and it's excellent. Soft-proofing (although important from time to time) has absolutely no role in calibration or the checking of calibration. Your problem must be the calibration itself. Again I ask, did you follow my directions here? https://www.damiensymonds.net/calibration.html https://www.damiensymonds.net/2010/03/calibration-before-and-after-confusion.html -
Soft Proofing/Monitor Profile
Damien Symonds replied to JenniferSuggs's topic in Monitor calibration questions or problems
First of all, have you done this? https://www.damiensymonds.net/art_tsfb000.html -
Glad to be of assistance.
-
I did it on the first one you posted, but of course you'd do it on the finger-fix version. Download the PSD
-
I don't understand, but ok. I'm sure it won't be a problem. No, that's completely pointless. The whole purpose of this thread is to replace the flooring. How does this look?

-
Why are there two Thumb layers? What's on the "Fix Black Floor" layer?
-
Again, looks good at this size. May I see a screenshot of your layers panel now?
-
It looks fine at this distance. Now you need to do the thumb. Turn off all the layers you've used to replace the backdrop. I can help you with that part, once the fingers are fixed.
-
Gee, I was going to help you with this! I just needed you to fix the fingers first.
-
Odd Color
Damien Symonds replied to DonnaJames's topic in Photoshop / Elements / Bridge / ACR questions or problems
With Bridge you can batch edit much more powerfully, it will speed up your workflow so much. Not to mention that you can, of course, modify Bridge's layout to look however you like. Your protestations are invalid. Delete Faststone NOW. -
Odd Color
Damien Symonds replied to DonnaJames's topic in Photoshop / Elements / Bridge / ACR questions or problems
You are insane. -
Well, after doing the main masking with a 100% brush, I dropped to 10% and gently blended it into the rest of her face.
-
No, I told you, look at my numbers again. You're not getting them in the right order. See, on each channel, how I have the largest number first? You have zero first on some of the channels.
-
I mean, the order of the zeros and the other numbers. The order is very important.
-
Please continue the discussion here. You need to look at my numbers again.


