Damien Symonds
-
Posts
212,212 -
Joined
-
Last visited
-
Days Won
3,497
Everything posted by Damien Symonds
-
 Also, to begin, can you do this for me?
 -
Hi Olivia, The photo you've showed me there is a raw file. Can we put that aside for a moment. How about jpeg files? Are they different too? Between the viewer and Photoshop, I mean.
-
Glad you like it. I used a 5% brush because I was in a bit of a hurry. Hopefully you'll find that 5% works for you too, but you may need to drop to 3% to make it look really smooth.
-
Oh Wendy, I wish I had some magic quick fix for you. Sometimes there is, but not this time It'll have to be handyman method. It's very very good, but it does take a bit of time.
-
ACR 9.12 - Noise reduction
Damien Symonds replied to Rae's topic in Photoshop / Elements / Bridge / ACR questions or problems
*thumbs up* -
Internet Colors
Damien Symonds replied to nikkinisly's topic in Output - print, websites, Facebook, email, client disk, etc
Check for yourself. Download the file. -
Internet Colors
Damien Symonds replied to nikkinisly's topic in Output - print, websites, Facebook, email, client disk, etc
No, the file you posted here is definitely untagged. Its master file is sRGB, yes, but it wasn't saved with its profile for web. -
Internet Colors
Damien Symonds replied to nikkinisly's topic in Output - print, websites, Facebook, email, client disk, etc
Washing out when you view it where? It's untagged, for starters. That's likely part of the problem. -
graphics tablet and banding
Damien Symonds replied to meris's topic in Miscellaneous questions or problems
Yes, this is very normal, I promise. Your mouse would do the same, I'm sure. -
Multiple Door Collage
Damien Symonds replied to Sara_B's topic in How to achieve a certain look or effect
Hooray! -
Multiple Door Collage
Damien Symonds replied to Sara_B's topic in How to achieve a certain look or effect
And when you're Alt-dragging the new shape, you really should see it snap to the grids. -
Sorry this is biggish: Download PSD
-
Web output
Damien Symonds replied to margaretbonson's topic in Output - print, websites, Facebook, email, client disk, etc
No problem at all. Let me know how you go. If you've got a lot of them to do, consider making this: https://www.damiensymonds.net/act_web.html -
Multiple Door Collage
Damien Symonds replied to Sara_B's topic in How to achieve a certain look or effect
Your preferences are set up correctly. I don't understand why the the snapping wouldn't be working, sorry. Yes, with the Path Selection Tool (A). It's about 4/5ths of the way down the toolbar, two places below the Text Tool. Choose it, click on a shape, then Alt-drag to create a copy of the shape. -
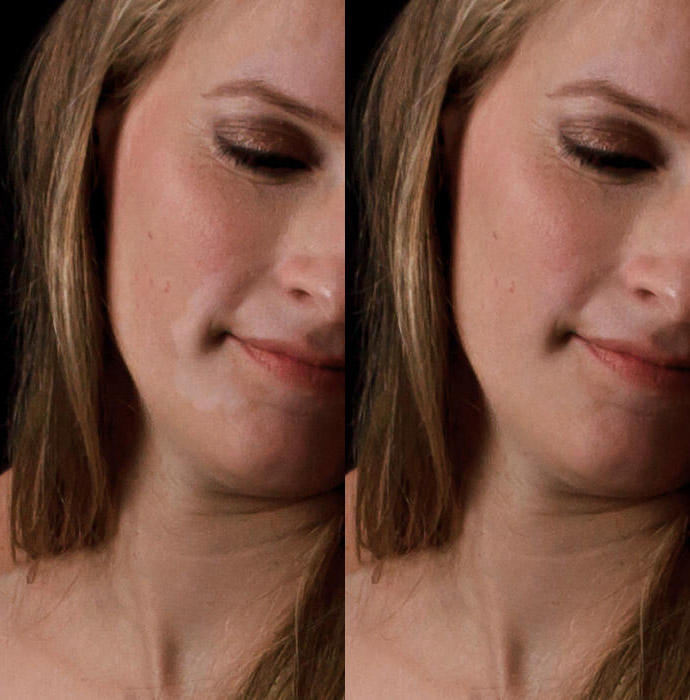
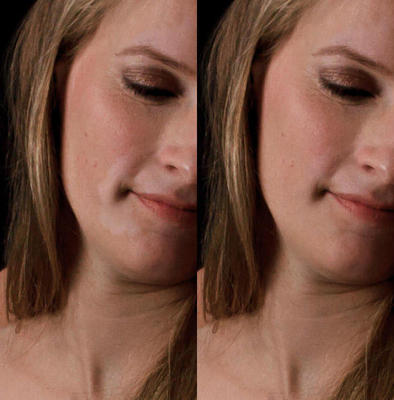
I would just rebuild the area. Easier than D&B. Can you post the 100% crop again, after you've done your noise removal? *frowns*
-
Gee, I reckon that's enough. It's perfectly plausible to leave some glow there.
-
Web output
Damien Symonds replied to margaretbonson's topic in Output - print, websites, Facebook, email, client disk, etc
That's entirely up to you. Web sharpening is WYSIWYG. Just make sure you only view it at 100%. By the way, make sure you position your watermark on an area that can't be easily cropped or edited out. -
Web output
Damien Symonds replied to margaretbonson's topic in Output - print, websites, Facebook, email, client disk, etc
It's what happens when your website advises a specific size, yes. -
Web output
Damien Symonds replied to margaretbonson's topic in Output - print, websites, Facebook, email, client disk, etc
Perfect. Now move the area around, or grab the corners and drag them inwards to reduce the size of the crop if you wish. Then press Enter when done, and you'll see the photo shrink to web size. Easy! Then zoom in to 100%, and sharpen for web. -
Web output
Damien Symonds replied to margaretbonson's topic in Output - print, websites, Facebook, email, client disk, etc
Yep, that's the one, great. Choose it, then you'll be given those three fields in the options bar. Following the exact instructions of your site, you'll enter "850px" in the width field, and "1100px" in the height field. Make sure you include the "px" part, this is very important. Leave the resolution field blank. Once you've entered those values, show me another screenshot. Layers & Masks. Sharpening won't make a lick of sense if you don't have the basic knowledge that L&M gives you. Well, that varies for everyone. For some people it's only a week before they're ready for the Levels Class. Other people take several weeks, or even months. It all depends on how much you flood me with photos. -
Web output
Damien Symonds replied to margaretbonson's topic in Output - print, websites, Facebook, email, client disk, etc
I beg you, please don't wait any longer to take the Layers & Masks Class. -
Web output
Damien Symonds replied to margaretbonson's topic in Output - print, websites, Facebook, email, client disk, etc
Exactly. See where it says "Ratio" in the options bar? Click on that little menu. In there, is there something that says either "Size and Resolution" or "W x H x Resolution"? -
Web output
Damien Symonds replied to margaretbonson's topic in Output - print, websites, Facebook, email, client disk, etc
Not stupid at all. I'm going to help you, that's why I need the screenshot. -
Web output
Damien Symonds replied to margaretbonson's topic in Output - print, websites, Facebook, email, client disk, etc
Oh, well done you for your research! This is very very helpful. Since they say this: we should definitely follow those instructions to the letter. That means, DON'T use the Image Size feature. Only use the Crop Tool. Can you choose your Crop Tool, then show me a screenshot? -
ACR 9.12 - Noise reduction
Damien Symonds replied to Rae's topic in Photoshop / Elements / Bridge / ACR questions or problems
If you think they're behaving differently, it's probably because you're not used to the noise of your new camera, I figure. Have you opened an old raw file to check?