-
Posts
210,681 -
Joined
-
Last visited
-
Days Won
3,424
Everything posted by Damien Symonds
-

Web output
Damien Symonds replied to margaretbonson's topic in Output - print, websites, Facebook, email, client disk, etc
I'd prefer to see a few more raw images first. -
By the way, I used a 3% brush for that. I wouldn't advise going any higher. It'll get really blotchy really fast.
-
That's right, if it was really smooth, you can use the clone or healing tools. Or heck, even just blur it.
-
(You forgot the colour noise removal.) Ok, that's pretty pronounced texture, so you'll have to do it the hard way. Very slow and patient dodge and burn. Download PSD
-
Well, it might depend on how textured the fabric is. May I see a 100% crop from the area?
-

Web output
Damien Symonds replied to margaretbonson's topic in Output - print, websites, Facebook, email, client disk, etc
Yes, exactly as I expected. The raw processing is good for the most part, but they have that half-done look to them, because you literally have only half-edited them. The Levels Class is going to blow your mind. -

Web output
Damien Symonds replied to margaretbonson's topic in Output - print, websites, Facebook, email, client disk, etc
Oh no! You didn't need to do that! I wish you'd asked me. All calibrator software is available for download from the manufacturer's website. Even if you DID have a CD drive, you still wouldn't have used the disk, because the software on it is always out of date by the time it reaches you. Of course. -

Web output
Damien Symonds replied to margaretbonson's topic in Output - print, websites, Facebook, email, client disk, etc
I'd rather see your broader portfolio. -

Web output
Damien Symonds replied to margaretbonson's topic in Output - print, websites, Facebook, email, client disk, etc
One year from now you'll look back and cry at the rubbish you were giving clients. It's painful, but it's part of the journey. You're going to love stepping above the level of those Lightroom "professionals" and producing images to be proud of. -

Web output
Damien Symonds replied to margaretbonson's topic in Output - print, websites, Facebook, email, client disk, etc
I'm so pleased you have taken the first step out of that mire. Bridge now. Photoshop next. -

Web output
Damien Symonds replied to margaretbonson's topic in Output - print, websites, Facebook, email, client disk, etc
No. There is no photo in the world that is perfect with only raw editing. Yes, and their work is shit. -

How to make a lantern glow/sparkle?
Damien Symonds replied to MEP's topic in How to achieve a certain look or effect
255/220/0 -

Web output
Damien Symonds replied to margaretbonson's topic in Output - print, websites, Facebook, email, client disk, etc
Because the video is made for people who do things PROPERLY. You're not supposed to give clients photos you've only edited in raw, Margaret. It's terrible. After you've finished this job you're working on, PLEASE don't take any more clients until you've actually learned how to edit. The editing workflow is this: Raw editing Photoshop editing with Levels etc Save your PSD master file THEN output. -

Web output
Damien Symonds replied to margaretbonson's topic in Output - print, websites, Facebook, email, client disk, etc
No, not DONE. Edit them in ACR and press OPEN. Once they're all open in Photoshop, do the cropping and run Image Processor, per the video. -

Web output
Damien Symonds replied to margaretbonson's topic in Output - print, websites, Facebook, email, client disk, etc
No no no no no no no no no. DO NOT SAVE THOSE JPEG FILES! Just use the "Open" button in ACR to open all of the files into Photoshop. -

How to make a lantern glow/sparkle?
Damien Symonds replied to MEP's topic in How to achieve a certain look or effect
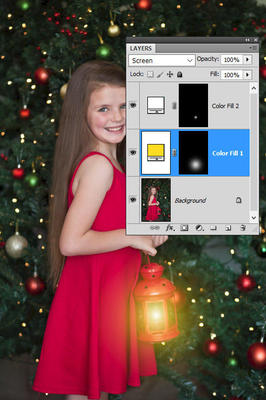
Well, there are several ways it could be done, but we might as well go for the easiest. A "Solid Color" adjustment layer of yellow colour, then another one above it of white. Both on "Screen" blend mode, and both start completely hidden with black masks. Then with a low-opacity brush (I used 20% and it seemed to work well) gradually dab on the yellow layer first to create that glow. I kept the brush in the same place, and just varied the size of it - started big then got smaller, so it got more intensely yellow towards the centre, if you know what I mean. Then the same, but smaller of course, on the white layer. It'll probably take you a few tries to get it just how you like it. Don't be ashamed of that, I had to do it too. Several times I returned the mask to black and started again. -
Try Channel Mixer: R 0, 0, +100, +55 G 0, 0, +100, -5 B 0, 0, +100, 0 Then tidy up a bit with Handyman.
-

Web output
Damien Symonds replied to margaretbonson's topic in Output - print, websites, Facebook, email, client disk, etc
Have you read this? It's REALLY important. Then this. -

Web output
Damien Symonds replied to margaretbonson's topic in Output - print, websites, Facebook, email, client disk, etc
You can do it that way, but it's less than ideal for a number of reasons. To clarify ... ... are you talking about low-res web proofs for your clients to browse, then order their favourites? Or are you talking about high-res files for the clients to keep and print their own? -

How to make a lantern glow/sparkle?
Damien Symonds replied to MEP's topic in How to achieve a certain look or effect
Lovely photo. Generally this is my go-to method. A broad yellow glow, and a small white glow at the centre: Of course, the yellow glow doesn't need to be so strongly yellow, nor so broad. What do you think of it? I suppose what I should have asked at the beginning was, can you provide me with any links to lantern photos that you admire? -

How to make a lantern glow/sparkle?
Damien Symonds replied to MEP's topic in How to achieve a certain look or effect
Hi Melissa, yes, this comes up from time to time (usually at this time of year) The challenge isn't usually the lantern itself, but making whatever is near it look plausible. May I see the photo you're working on?


