

Damien Symonds
-
Posts
212,212 -
Joined
-
Last visited
-
Days Won
3,497
Everything posted by Damien Symonds
-
Oh, interesting choice. Ok, I guess it can work ... For the fountain, you'll need to work patiently with a low-opacity brush for the masking, to make it blend plausibly.
-
May I see the whole photo?
-

Calibration Colour Issues
Damien Symonds replied to sherriphotos's topic in Monitor calibration questions or problems
Well, no, your prints are what they are. Then never change. Maybe your light is too dim and too warm? -
Now, hang on. That sky looks MUCH too strong. Let's keep things plausible.
-
Yes, this is really important. If you don't see the issue in jpegs, then we can narrow it down to a raw problem, not a problem with your screen.
-
Hi Nilda, are you seeing this behaviour with raw files only?
-
Oh yes, it'll have to be another orange sky.
-
It's completely white!!!!!!!!!!!!!!!!!!! You can't get any more blown out than that.
-
Hi Cindy, have you read this?
-
Sorry, that's as good as it's going to get. But please be aware you're not out of danger yet. Not by a long way. When you resize for print or web, the problem might reappear. So make sure you've read this thoroughly.
-
I agree. But what else are we to do? The only alternative would be to mock up a personalised plate.
-
What??? I gave you the PSD!!!!
-
Well, for out-of-focus ones like that, you might be able to clone it out entirely. But where the grill is in focus, cloning would be prohibitively time-consuming, I'd say. But I guess it depends on how much time you can afford on this job.
-
Um, that's a different photo.
-
Gee, you'd just paint right over it, I reckon. Download PSD file

-
Calibration Colour Issues
Damien Symonds replied to sherriphotos's topic in Monitor calibration questions or problems
Ok, great. Are these the exact instructions you followed? -
Error in ACR
Damien Symonds replied to Lisa Schwerin's topic in Photoshop / Elements / Bridge / ACR questions or problems
That message really doesn't matter. Keeping the graphics processor turned off is generally a good idea anyway. Do you have this button visible?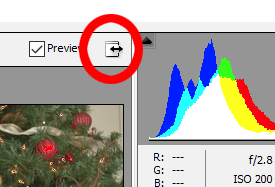
-
Calibration Colour Issues
Damien Symonds replied to sherriphotos's topic in Monitor calibration questions or problems
Opinions are completely irrelevant here. The only relevance is the print match. Which calibrator do you have, and what screen? And which pro lab do you print with? -
Terrific. Have you see this page? It's my go-to.
-
Ok, let's take it step by step. First, can you tell me which version of Elements you have?
-
I'll be able to help with this to a degree. Go ahead and do your raw processing as normal, then post the 100% crop again for me.
-
Very small text/icons in Bridge
Damien Symonds replied to Kathy1's topic in Miscellaneous questions or problems
Oh crap, no wonder. This is similar to this question. I'm not aware if CC would solve your problem, sorry. -
It'll sharpen ok.
-
Do you think his eyes need to change size? Or would it be enough just to fix the bit at the left-hand edge?
-
Just go to my website and search for "glasses". It should be the first hit.
