Damien Symonds
-
Posts
212,143 -
Joined
-
Last visited
-
Days Won
3,490
Everything posted by Damien Symonds
-
Of course! You do it under this username, no matter which computer you're on.
-
I'm so sorry, I don't know. Other people have been signing up fine. Try a different browser.
-
Force refresh? Normal refresh won't work.
-
The ColorMunki is an X-Rite device. Force-refresh the page (I think it's Cmd R on a Mac) and start over.
-
May I see a screenshot of what you're seeing?
-

Wacom Intuos Pro
Damien Symonds replied to Shar Bigham's topic in Photoshop / Elements / Bridge / ACR questions or problems
Same question as before - is that happening with both mouse and tablet? -
There's no wait - you can sign up immediately.
-
What is "piccollage"?
-
No, it's really not. I tried personal classes for a few years, but they are woefully inferior.
-
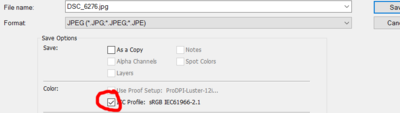
Ah, it's called "Embed Color Profile" on your version. Sadly I don't know which are the good labs in Sydney. There must be plenty, though. The classes are right here on the website.
-
Yes, it's perfect, great. It should be right there, in the save dialog. Do you mean in Photoshop? No, definitely not Custom. It must stay on "North America General Purpose 2". Yes, Raw Class first. Which part of Australia do you live?
-
Ok, can you choose the one with the least "busy" detail in it - eg clear sky and smooth water - and see if you get the same poor quality when you save? http://www.damiensymonds.net/2015/08/about-jpeg-file-size.html
-
Hi mate, are all your photos landscape/scenery like this one? Do you have any people photos?
-
Your ipad is irrelevant.
-
May we see?
-
I know it is, that's exactly the point. You must NEVER sharpen in Lightroom. It's just a plain blank layer. What's important is that you have your clone tool set to "Sample: Current and below" in the options bar.
-
No, they're identical. Which web browser do you use?
-
There are two problems here. Both are very bad, but both are fixable. The problem with them looking different is that in your Save As dialog, you don't have the "ICC profile" checkbox checked. It's really important to keep that checked at all times. Never uncheck it, under any circumstance. The second problem is that you're in Adobe RGB. Follow this troubleshooter all the way to the end to fix this very very bad problem.
-
In case you like it, here's the PSD file. Hopefully you'll be able to see the steps I took, and copy them on your photo.
-
I beg you, don't wait too long to take the Sharpening class. Your edit makes me cry a little. This is the best I can do: It's not great, but I'm hoping it would pass casual scrutiny. What do you think?

-
i1 Display Pro calibration
Damien Symonds replied to TAMD's topic in Monitor calibration questions or problems
Let me know how the comparison goes. -
Again, though, ppi is one of the things that the poorly-endowed men and control-freak women will wig out about. So stick to 300.
-
The ppi is completely irrelevant. Generally we leave it at 300, but it honestly could be 10000, or 72, or 13. It's meaningless. Only the pixel dimensions matter. PPI only matters when you're doing the printing yourself.
-
i1 Display Pro calibration
Damien Symonds replied to TAMD's topic in Monitor calibration questions or problems
No, you didn't. You chose the instructions from the "Desktop computers and external monitors" column, but you have a Mac, so of course you were supposed to choose it from the "Macs and Laptops" column. -
Calibration not red enough
Damien Symonds replied to Amy Claire's topic in Monitor calibration questions or problems
Well, my understanding was that it was just the software. But I've never actually done it.