

Damien Symonds
-
Posts
212,209 -
Joined
-
Last visited
-
Days Won
3,496
Everything posted by Damien Symonds
-
 Can you do this for me?
 -
Not white to me. Looks fine. You've restarted your computer, I trust?
-
When you save them, then check their file size on your hard drive, does it seem ok? As big as they should be? Can you send me one?
-
All other files are ok? It's just these two?
-
How do I size a photo to fit a 2 inch circle?
Damien Symonds replied to YvetteA's topic in Help with editing
You're right, it will be very easy. But first, I need a bit more information. Are you designing the whole wedding invitation in Photoshop? If so, what size will they be? -
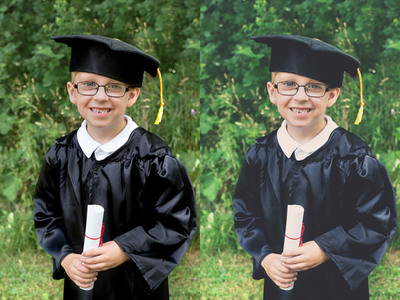
Oh, gee. Make sure you always do your raw processing completely and properly before beginning any Photoshop work. I'm afraid I see no alternative than careful masking with your brush tool around her hair. The result will be a slight "haircut", but there's nothing we can do about that.
-
Is there another computer in the house you can try calibrating with the Spyder? To see if it is, in fact, faulty?
-
Gosh! I can't think why it would do that :\
-
Wherever it's straightish edges (eg shoulders and sleeves) extending past the backdrop, the masking is reasonably simple, using the Shift key. But that girl's hair might be a problem, especially since it's against a busy bit of background. May I see it close up?
-
Try this.
-
Matte Effect plus?
Damien Symonds replied to JudyM's topic in How to achieve a certain look or effect
-
Matte Effect plus?
Damien Symonds replied to JudyM's topic in How to achieve a certain look or effect
I'm going to go with this one, since it's most similar in lighting: -
Yeah, I definitely don't encourage that. Because it crops, you see. Do it in Photoshop instead.
-
I'm so sorry, this is out of my league. I'll move this question to the GenDisc area, in hopes that there are some members with 3D experience.
-
That is a decision you have to make on a photo-by-photo basis. Every situation is different. Please feel free to post your photos any time you need my help. Noise is only necessary for gradients, not for Solid Color layers.
-
how to add shine to the face
Damien Symonds replied to @jeanninedippenaar's topic in Help with editing
Oh gosh, I'm not surprised! She looks so awful! I hope you don't have to work with that MUA again. The only way I know is to work patiently and artistically with a dodge and burn layer. But even with the best dodging, it's still going to look weird, because she has no texture -
May I see another screenshot, showing your whole screen?
-
image size window
Damien Symonds replied to Samryer's topic in Photoshop / Elements / Bridge / ACR questions or problems
Great! Then you're safe. But yeah, stop reading whatever you were reading. -
What did you do, exactly? How did you "fix" it?
-
Matte Effect plus?
Damien Symonds replied to JudyM's topic in How to achieve a certain look or effect
No, that won't work. Your photo is beautifully lit. Whereas the example photos you've linked are all very shadowy. I need you to find me a more suitable photo of your own; or link to different examples of photo with lighting like yours. -
Excellent. Then you should be able to simply go to Image>Duplicate, to make a second copy of the file in Photoshop. Then on each one, go to Canvas Size, and set the width to 50%. On one of them, click on a right-hand square of the 3x3 grid; on the other one, click on a left-hand square.
-
Does it have bleed?
-
Oh, well ... maybe. I'd need to see 'em.
-
Allowing for the shortcomings of PDF, yes, it's excellent. Are you new to the internet? Here's a tip for beginners - blue underlined words are generally links

