-
Posts
211,279 -
Joined
-
Last visited
-
Days Won
3,459
Everything posted by Damien Symonds
-
Having trouble calibrating correctly
Damien Symonds replied to Danelle's topic in Monitor calibration questions or problems
Ok, now tell me about the print comparison. -

Having trouble calibrating correctly
Damien Symonds replied to Danelle's topic in Monitor calibration questions or problems
They will be, somehow. Your job is to figure out how. Try turning Gamma off, for starters. Then look for other settings that might free them up. -

Having trouble calibrating correctly
Damien Symonds replied to Danelle's topic in Monitor calibration questions or problems
http://www.damiensymonds.net/desktop-monitor-brightness -

Having trouble calibrating correctly
Damien Symonds replied to Danelle's topic in Monitor calibration questions or problems
No, I'd stick with 6500 for now. -

Having trouble calibrating correctly
Damien Symonds replied to Danelle's topic in Monitor calibration questions or problems
I would leave it on. -

Having trouble calibrating correctly
Damien Symonds replied to Danelle's topic in Monitor calibration questions or problems
Gee ... could you show me a photo of that setting? -

Is it possible to merge these two images?
Damien Symonds replied to JenniferK's topic in Help with editing
No, not necessarily. I was just curious. -

Is it possible to merge these two images?
Damien Symonds replied to JenniferK's topic in Help with editing
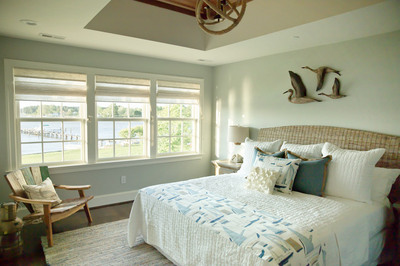
As I mentioned earlier, if you'd shot on a tripod, you might have had other options (ie HDR). But in this situation, just choose one of the files and process it in the usual way. Choosing which file to use is a balancing act. Brighter files are better quality (not so noisy) but darker files have more outdoors detail visible through the window, as you know. As it happens, in this case, the darker file has noticeably better focus than the brighter one, so that decision is more or less made for us. I processed the darker file in ACR, then did some Levels work, to get this: With more time, it would be possible to enhance the outdoor detail a little more, of course, but even as you see here, it's fairly visible. -

Is it possible to merge these two images?
Damien Symonds replied to JenniferK's topic in Help with editing
Out of interest, why do you work with DNG files? -
Now, add a Hue/Saturation layer, and clip it to that new forehead layer. Move the "Lightness" slider to about -50, then invert the mask to hide the adjustment. Then very patiently (with a very low opacity brush) paint to darken the new forehead, until it looks plausible. Particularly the right-hand side above the eyebrow, where it should be more shadowed.
-
Yeah!!!! I think that has great potential, as long as the focus is equivalent.
-
This will probably require a "skin graft" from her arm, but before we explore that, are you sure you don't have any other photos of her forehead without the hair, that could be used for a forehead swap?
-
Yes, but not until you show me a clean edit. I don't teach my gymnasts to somersault before they can roll; nor would you expect your own children's teachers to teach them multiplication before they can add and subtract. The basics are vital, in any endeavour. PLEASE consider the Raw Class. It will change your life.
-

Choosing the right type of Canvas
Damien Symonds replied to tracig24's topic in Miscellaneous questions or problems
Hi Traci, can you give me a link to your lab's website, where they list these options? -

Is it possible to merge these two images?
Damien Symonds replied to JenniferK's topic in Help with editing
Because you didn't use a tripod, no, it would be damn near impossible. Could you send me the raw files? -
No, this is REALLY bad. You cannot possibly guarantee how other devices (your clients' screens, or more importantly, your lab) will handle that non-standard colour profile. Even if you insist on converting to BW in raw (and I strongly advise against it, BW conversion should be done in Photoshop where the control is so much more exquisite) you should convert to sRGB afterwards if necessary.


