Damien Symonds
-
Posts
211,794 -
Joined
-
Last visited
-
Days Won
3,474
Everything posted by Damien Symonds
-

Calibrating New Dell Laptop
Damien Symonds replied to Kim C.'s topic in Monitor calibration questions or problems
That's correct. Support for it stopped a very long time ago. -
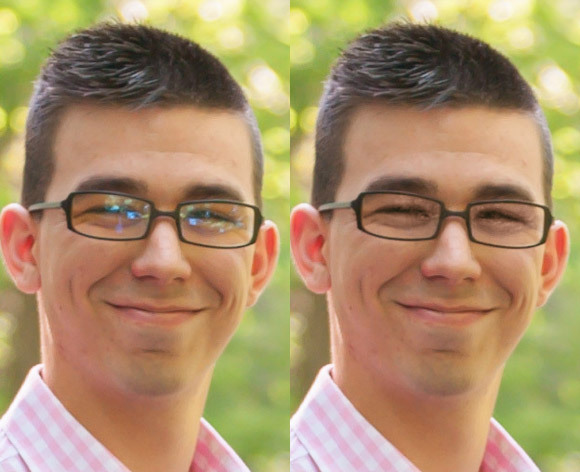
Glasses glare with lots of color
Damien Symonds replied to Lisa Manchester's topic in Help with editing
That noise reduction is good. This is the best I can manage. Would it be sufficient?
-
Feasible editing like Julia?
Damien Symonds replied to Stacey Sedgman's topic in How to achieve a certain look or effect
Hi Stacey, I've moved this post into the correct section. This style only works on photos with backgrounds that are completely dark (or medium dark, anyway). Can you find a photo among yours that suits? Before that, though, please read through the pinned post in this section. -
Add a Channel Mixer layer, check the "Monochrome" box, and enter +50/0/+50. That should do most of the heavy lifting.
-
Adding contrast to sky, masking around trees
Damien Symonds replied to Kim Howells's topic in Help with editing
Have you processed the raw file twice? If so, may I see the sky one? -
Now that they're close, you can go to View>Sort>Manually, and re-jig them a bit more as needed. Then select them all and go Tools>Batch Rename.
-
Downloading to bridge
Damien Symonds replied to Kathybb's topic in Questions about tutorials and articles
This one? http://www.damiensymonds.net/importing-video -
Ok, that's oodles of RAM, so you should have no trouble there. I expect Brian will tell you that the problem is your hard drive. He generally recommends always having at least one-third free space, and you've only got one-ninth free space. I'd get some stuff of there, pronto.
-
No it doesn't. Check again.
-
Are you saying that when you go to View>Sort>Date they don't fall into the right order? If so, it means that your cameras' clocks aren't synced properly.
-
Hi Christy, just so we have all the necessary info, can you fill this out for me? I've also moved your question to Brian's section, because he's the expert with this stuff.
-
Yep, exactly.
-
Glasses glare with lots of color
Damien Symonds replied to Lisa Manchester's topic in Help with editing
You must never start to do any Photoshop work until your raw processing is completely done. -
Hi Dannielle, I've just moved this to the general discussion area, where I hope you'll get some feedback from other GTA users.
-
image size window
Damien Symonds replied to Samryer's topic in Photoshop / Elements / Bridge / ACR questions or problems
5877x3918 is 23 megapixels. Is that correct for your camera? -
What's up?
-
May I see a screenshot, when you have one of the files open in ACR?
-
It'll be a setting in your raw program.
-
Yes. But seriously, you don't need to be in 16-bit at all.
-
It refers to the colour profile of your photos. You can check it by following this.
-
Oh, yay! I think that will work! Put his leg in there (using a mask, of course) then borrow green foliage from the other side of the photo to fill in the rest of the space where the chair is.
-
Then it's not a raw file. What is its file name?
-
What? Just double-click it in Bridge, and it will open in ACR. Do your adjustments as usual, then press the "Open Image" button.
-
NO! Do you have Bridge open right now?