Damien Symonds
-
Posts
212,203 -
Joined
-
Last visited
-
Days Won
3,495
Everything posted by Damien Symonds
-
 Yes, that's much too big. You'll need to find out what size Squarespace resizes it too, and do so yourself, plus sharpening appropriately.
 -
Now you clean up the photos. Yours will need Dust & Scratches filter, and your dad's will need noise removal, at least.
-
Gee, that doesn't look any different. May I see the whole photo?
-
You're welcome. Glad you like it. Alas, no, it's very much a photo-by-photo approach.
-
Ok, try this ... add a Channel Mixer adjustment layer, and enter these values: Red 0, +90, 0, 0 Green 0, +100, 0, 0 Blue 0, +125, 0, 0 Then mask on to the shirt, and show me how it looks.
-
I think you could make a passable (though not spectacular) black-and-white out of the second one. The first one is just too far gone, I'm afraid.
-
I'm afraid of that too, but can you send me the raw files?
-
Replacing bkgrd behind Ryan and Jake
Damien Symonds replied to Cindy Young's topic in Help with editing
Download the PSD First, a chunk of hair from a bit further along, to cover that tricky black bar. Then a Solid Color layer on Multiply mode. Then a gradient layer for the whole background (I forgot the noise layer). -
Replacing bkgrd behind Ryan and Jake
Damien Symonds replied to Cindy Young's topic in Help with editing
So sorry about the delay. I'm taking a look at this now, I'll get back to you shortly. -
Oh gosh! How awful! I'm sure we can improve this to a degree, at least. Go ahead and do your raw processing, then post a 100% crop like this for me.
-
And did you lower the exposure before posting these for us? Is there any more detail to be found?
-
calibration - warmth
Damien Symonds replied to Historyteach's topic in Monitor calibration questions or problems
First, can you tell me about your light? -
Replacing bkgrd behind Ryan and Jake
Damien Symonds replied to Cindy Young's topic in Help with editing
Gosh, you must have a heck of a camera. Sorry, my bad. 700px won't be enough. Could you take a 1500x1500 piece for me? -
Does this fake rainbow look realistic?
Damien Symonds replied to Seahawk's topic in Help with editing
It's excellent, well done. It's implausible because of the absence of sun in the photo, not because of your Photoshop work. -
It's fabulous. All that remains is a very slight gradient mask from the bottom up.
-
Replacing bkgrd behind Ryan and Jake
Damien Symonds replied to Cindy Young's topic in Help with editing
May I have a 100% crop of Dad's hair where the dark section meets the light section of background? -
Replacing bkgrd behind Ryan and Jake
Damien Symonds replied to Cindy Young's topic in Help with editing
Sorry, it can't be done. You'd have to replace it all with the dark colour from the middle section of the background. Even that would be a bit dodgy, but should be passable. -
That looks fabulous! But you shouldn't have blurred the sky. Can you turn off the blur and show me?
-
Terrific.
-
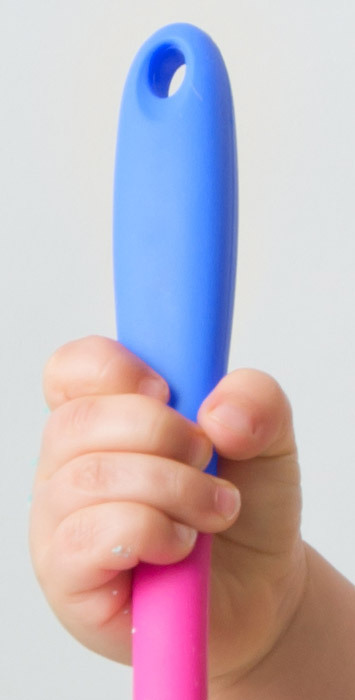
Excellent. Add a Channel Mixer layer, and enter these values: Red channel: 0, +100, 0 Green channel: 0, +35, +65 Blue channel: +100, 0, 0 Then mask on. Around the bulk of the handle, you shouldn't need to be precise - the CM layer shouldn't affect the wall colour. But around the fingers, you'll need to be VERY precise, of course. IMPORTANT: After masking around the fingers very carefully, then lower the brush opacity a lot, eg 5%, and paint gently onto the skin to replace the pink cast with blue cast. This step is really important. Here, I've done the top half to show you:

-
Sure, try this: Add a Channel Mixer layer, and go to the Blue Output Channel. Change the sliders from 0, 0, +100, 0 to 0, +100, 0, -10. Then mask to the foot.
-
Sure, I reckon we can manage that. Could you show me a 100% crop of the spoon, including the hand?
-
Look at the smaller thumbnail version, you should be able to see it.
-
I just noticed the top left-hand corner - there are some repeated patterns there.
-
It's great! I would never have known.